The junction box and outlet box are wired under the kitchen sink in this installment.
This project is continued from How to Wire an Electrical Outlet Under the Kitchen Sink – Part 5.
How to Wire an Electrical Outlet Under the Kitchen Sink
Under Kitchen Sink Outlet Wiring Materials
Having fished a new run NM-B 12/2 cable from the circuit breaker panel to the kitchen sink cabinet, I’m ready to wire the junction box and electrical receptacle. The materials used are illustrated in this photo:
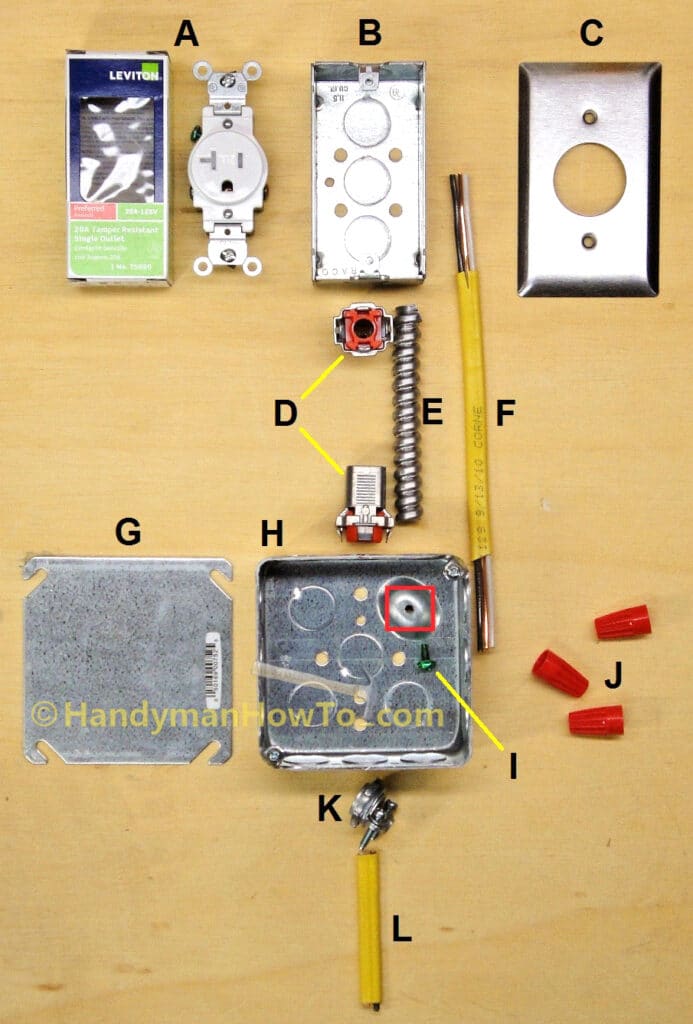
Referring to the letters in the above photo, the electrical parts needed for this job are:
- A) Leviton T5020-W 20-Amp White Tamper-Resistant Single Outlet.
- B) Single gang metal outlet box
- C) Single gang metal outlet box cover with a single 20 AMP receptacle hole (1.594 inch diameter).
Note: The photo shows a finish wall plate cover for fitting a recessed box in the drywall – which will work fine, however I actually used a simple box cover in the project. - D) Double Snap Lock Connector by Sigma Electric. Available at Lowes under as the Gampak 3/8″ BX-MC-Flex Connector, Item #: 111896, Model #: 45505 for about $2 for a bag of two connectors.
- E) 3/8 inch aluminum flexible conduit.
- F and L) NM-B 12/2 electrical cable
I bought a 50 foot roll for about $32.50. The cost varies with the price of copper and has been going up in recent years. - G) 4 inch metal box cover.
- H) 4×4 inch square by metal junction box.
- I) #10-32 green ground screw, sold in bags of 10 screws.
- J) Red twist on Wire Nuts for minimum of two (2) #14 and maximum of four (4) #12 gauge wires.
- K) 3/8 in. Twin Screw Non-Metallic Cable Clamp Connector.
- 3/8 inch by 25 foot roll of aluminum flexible conduit (See below)
Under Kitchen Sink Junction Box Wiring Options
There are two ways to wire the branch circuit for the under kitchen sink electrical outlet:
A) With a 4 inch square junction box in the sink cabinet, or
B) Without a junction box.
These wiring options are illustrated in the following wiring diagrams.
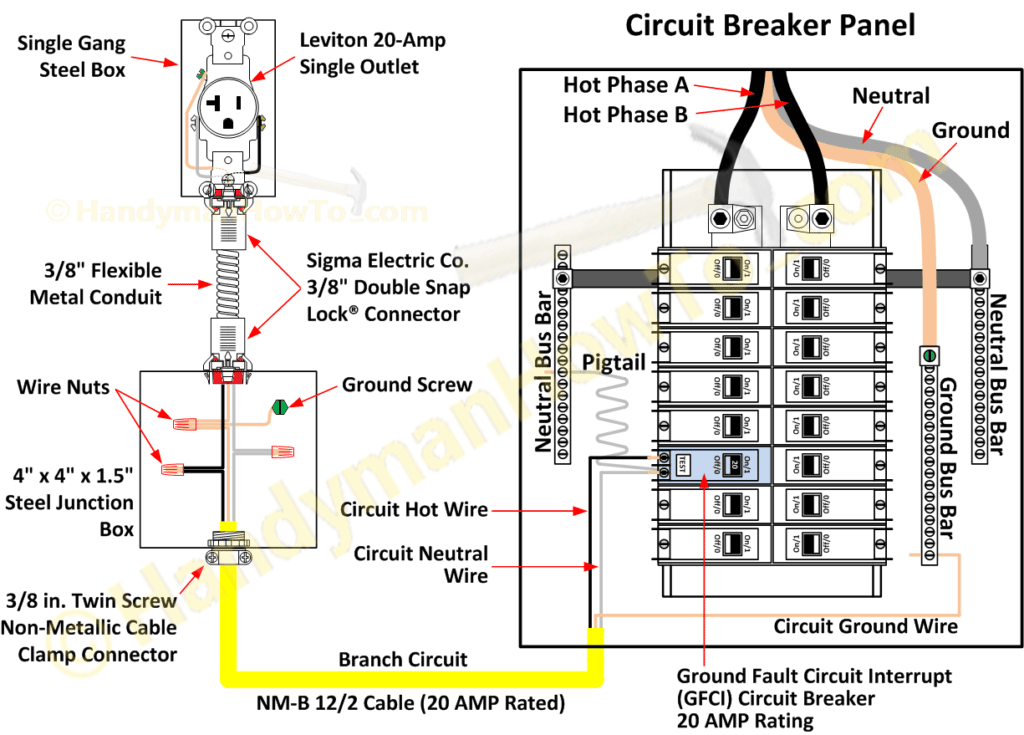
Option A: 4 inch square junction box:
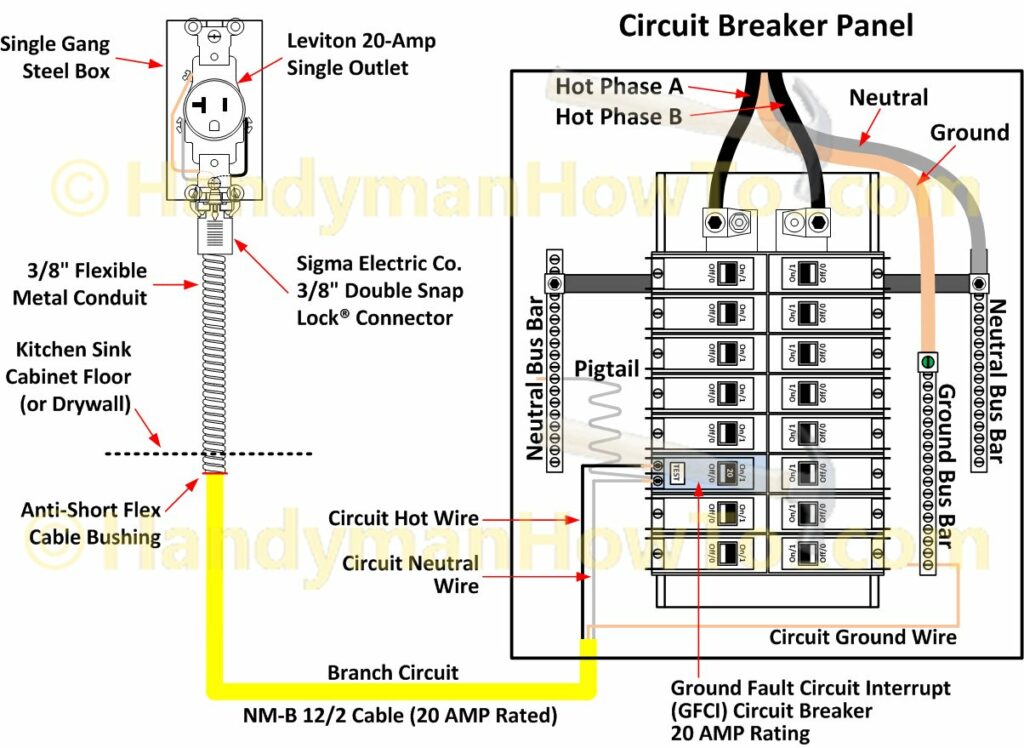
Option B: No junction box – straight run of flex cable conduit from the kitchen cabinet bottom to the receptacle box:
Comparing the two wiring options:
- Both methods are allowed by the National Electrical Code.
- Option A is a bit more work and a few dollars more in materials.
- Option B is simpler, less effort and materials. An electrician will most always use this technique.
I chose Option A. Why?
- I preferred the aluminum flex cable termination in the 4×4 inch junction box via the Double Snap Lock Connector instead of just poking the flex cable down a hole in the bottom of the kitchen cabinet.
- Junction boxes provide flexibility for future wiring additions.
NM-B Exposed Cable Protection with Flexible Metal Conduit
NM electrical cable may not be exposed and must be protected per the National Electrical Code (NEC) 334.15(B) Protection from Physical Damage. 3/8 inch diameter Flexible Metal Conduit (FMC) is perfect for this job. The conduit is hollow and the NM-B 12/2 cable is pushed into the conduit. A 25 foot roll cost about $11.00 at the home improvement store.
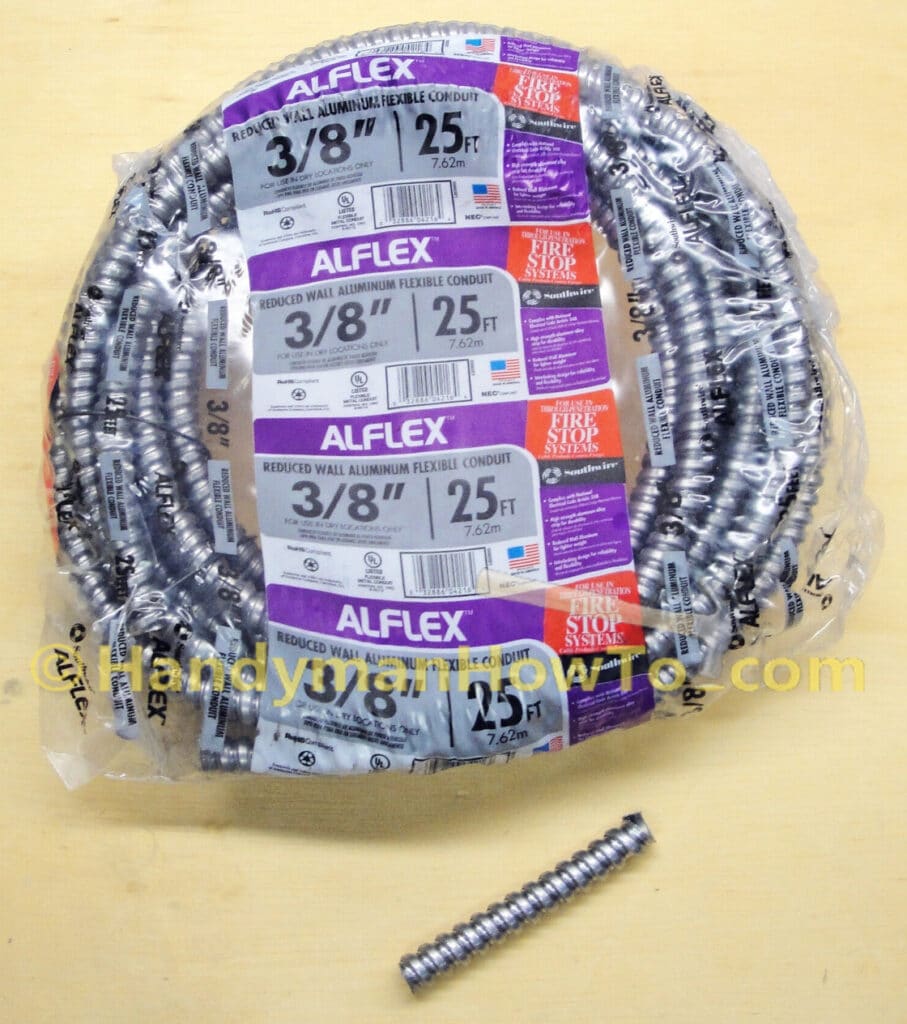
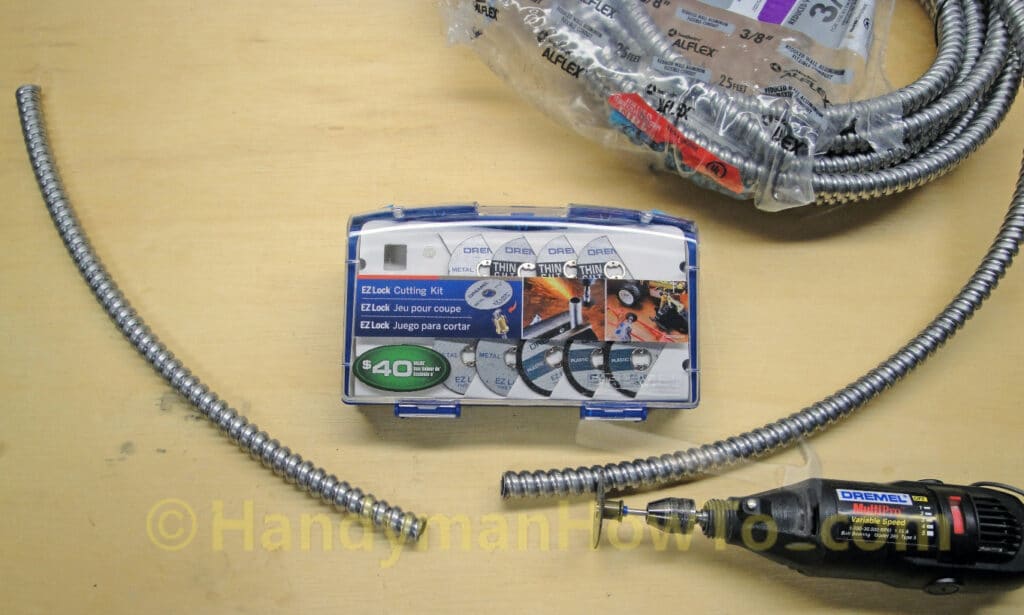
There are two ways of cutting flex conduit:
- Untwist a section and cut it with metal snips.
- Cut a hacksaw or power tool
I found it convenient to saw a ~2 foot length of flex conduit with my Dremel tool and cutoff wheel, which makes a clean even cut:
Wiring the Under Kitchen Sink Junction Box
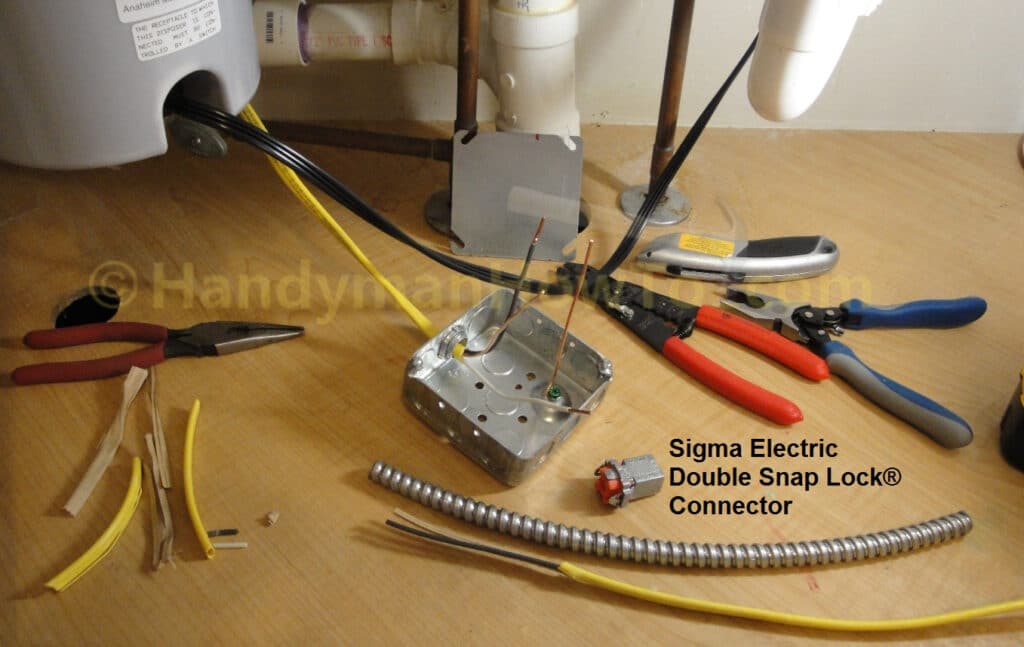
The yellow NM-B 12/2 cable is not yet connected to the electrical panel (never work on a live cable!) and hanging loose in the basement.I pulled up some extra cable to wire the junction box and electrical receptacle in a more comfortable location in the kitchen sink cabinet (see the following photo).
The kitchen sink junction box wiring steps are:
- Strip 6 inches of the yellow outer insulation jacket from the NM-B 12/2 cable being careful not to cut the insulation on the black and white wires.
- Remove a 1/2 inch knockout and screw on the 3/8″ NM cable clamp in the side of the 4×4 metal junction box.
- Insert NM-B 12/2 cable through the clamp into the junction box.
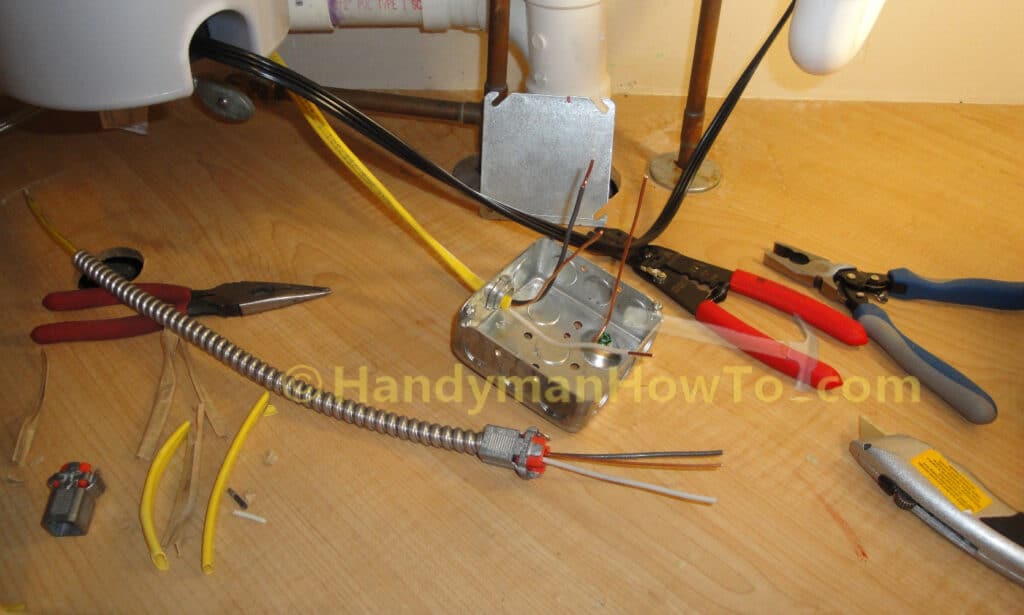
Per NEC 300.14 all conductors must extend at least 6 inches in the box and at least 3 inches beyond the box. I prefer about 8 inches of wire length because it’s easier to work with. Also, the NM-B 12/2 yellow insulation jacket must extend 1/4 inch into the box per NEC 314.17 (see the previous link). - Strip 5/8 inch of insulation from the black (hot) and white (neutral) wires.
The red handle wire strippers to the right of the junction box in the photo below do a great job of stripping the insulation without cutting the copper conductors. - Attach a 8 inch length of bare copper wire to the green ground screw. The ground wire is looped clockwise around the ground screw and the screw tightened. Trim the ground wire so it’s extends an equal length out of the junction box as NM-B cable wires.
I’ve also measured, cut and prepped the ends of a new section of NM-B 12/2 cable that is 1 foot longer than the metal flex conduit as shown in the foreground to connect the junction box to the wall outlet:
The NM-B 12/2 cable is pushed through the 3/8 inch metal flex conduit as shown below – it was a snug fit. Do not remove the NM-B 12/2 yellow insulation jacket because it would be a code violation for unmarked wiring. The Sigma Electric Double Snap Lock connector is pressed onto the end of the flex conduit and snaps in place with metal tangs that won’t pull out. It’s a foolproof and professional system. The Sigma Double Snap Lock connector has a built-in red plastic anti-short bushing to protect the wires from the sharp ends of the flex conduit.
The Sigma Double Snap Lock connector is snapped into a 1/2 inch knockout hole on the opposite of the 4×4 junction box. The insulation is stripped 5/8 inch from the ends of the black and white wires as shown. Take care that all wires are equal length and extend at least 6 inches into the junction box. My wires probably extend 6 inches past the face of the junction box, which is fine. Wires never grow longer.
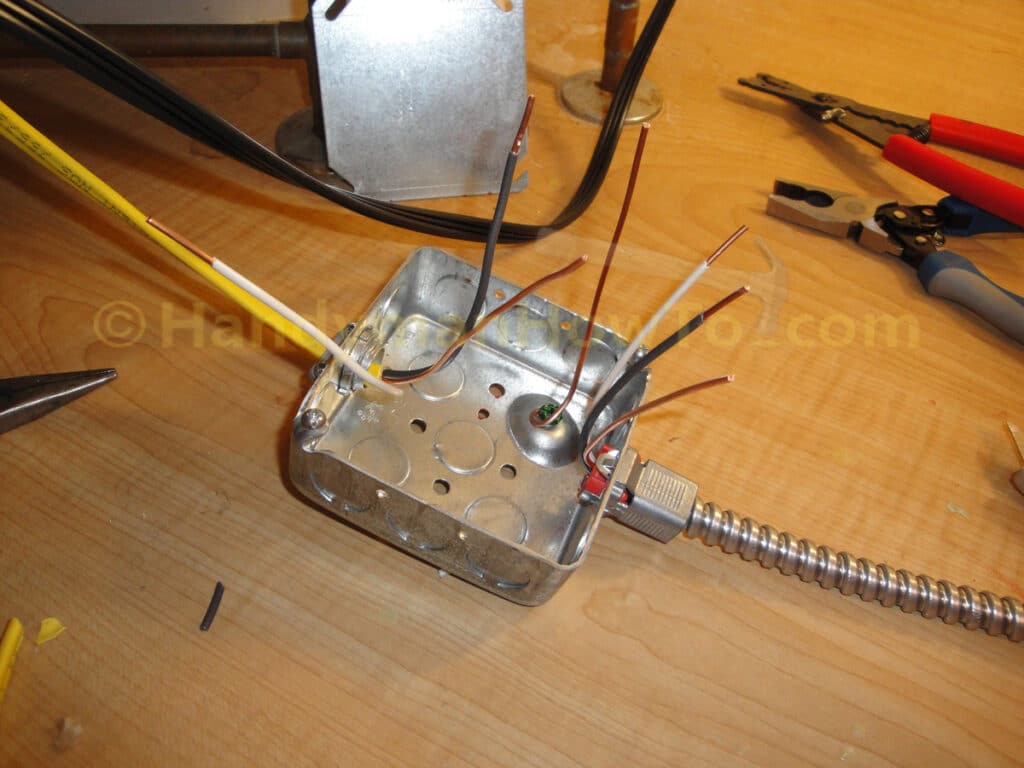
Connect the wires in the junction box per the following steps:
- Twist the bare copper ground wires clockwise together with Linesman pliers.
– It’s important the wires are twisted together clockwise to match the threads of the wire nut (righty-tighty, lefty-loosey).
– Linesman pliers have wide short jaws for gripping several wires by the tip of the jaws. The side-cutters are a nice convenience, too. - Twist on a wire nut to secure the wires.
- Twist and nut the white (neutral) wires together.
- Twist and nut the black (hot) wires together.
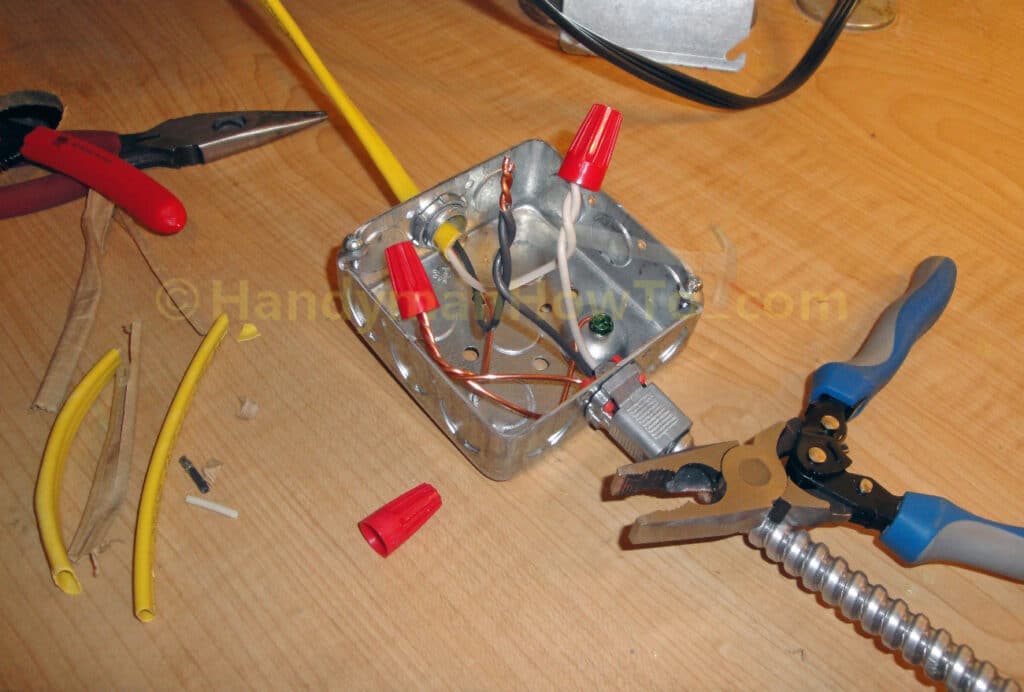
Do not attach the junction box cover at this time because there is more preparation work to be done.
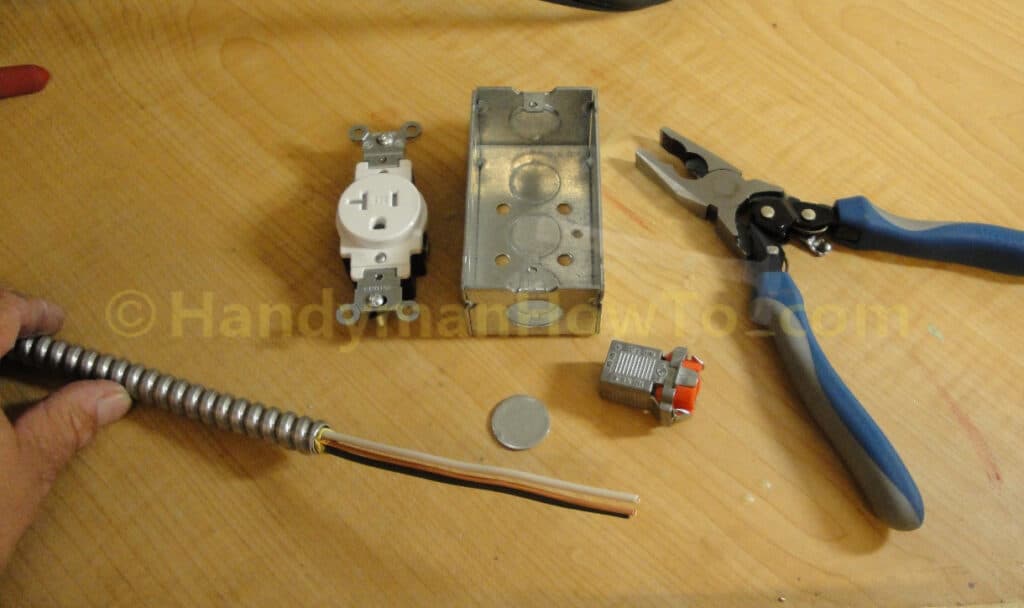
Wiring the Under Kitchen Sink Outlet
The Leviton 20 AMP receptacle, single gang metal outlet box, Sigma Electric Double Snap Lock connector and other end of the flexible metal conduit are arranged to wire the kitchen sink outlet in the next photo. I’ve removed a 1/2 inch knockout on the bottom of the outlet box to install the Double Snap Lock connector.
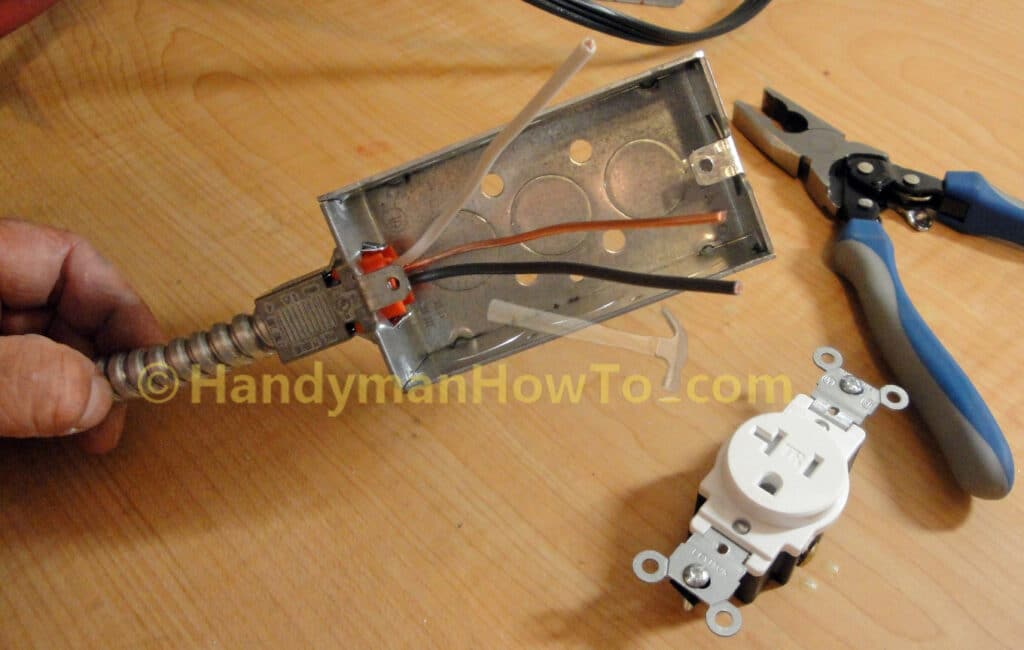
The NM-B 12/2 cable is fed through the Double Snap Lock Connector, then the snap lock is then pressed on the end of the flex conduit until it’s fully seated. The wires and snap lock connector are inserted in the outlet box 1/2 inch knockout and the connector snapped in place. The Sigma Double Snap Lock connector is a really neat system.
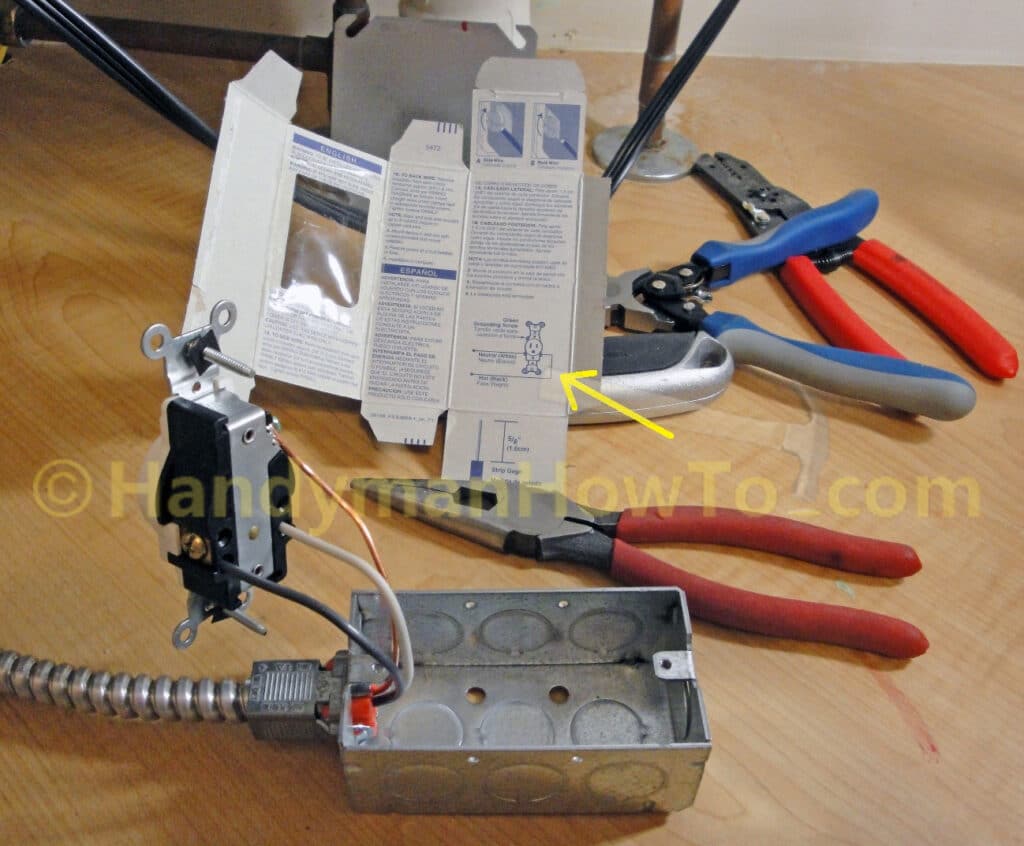
Use the strip gauge on the back of the electrical outlet to strip the insulation from the black and white wires:
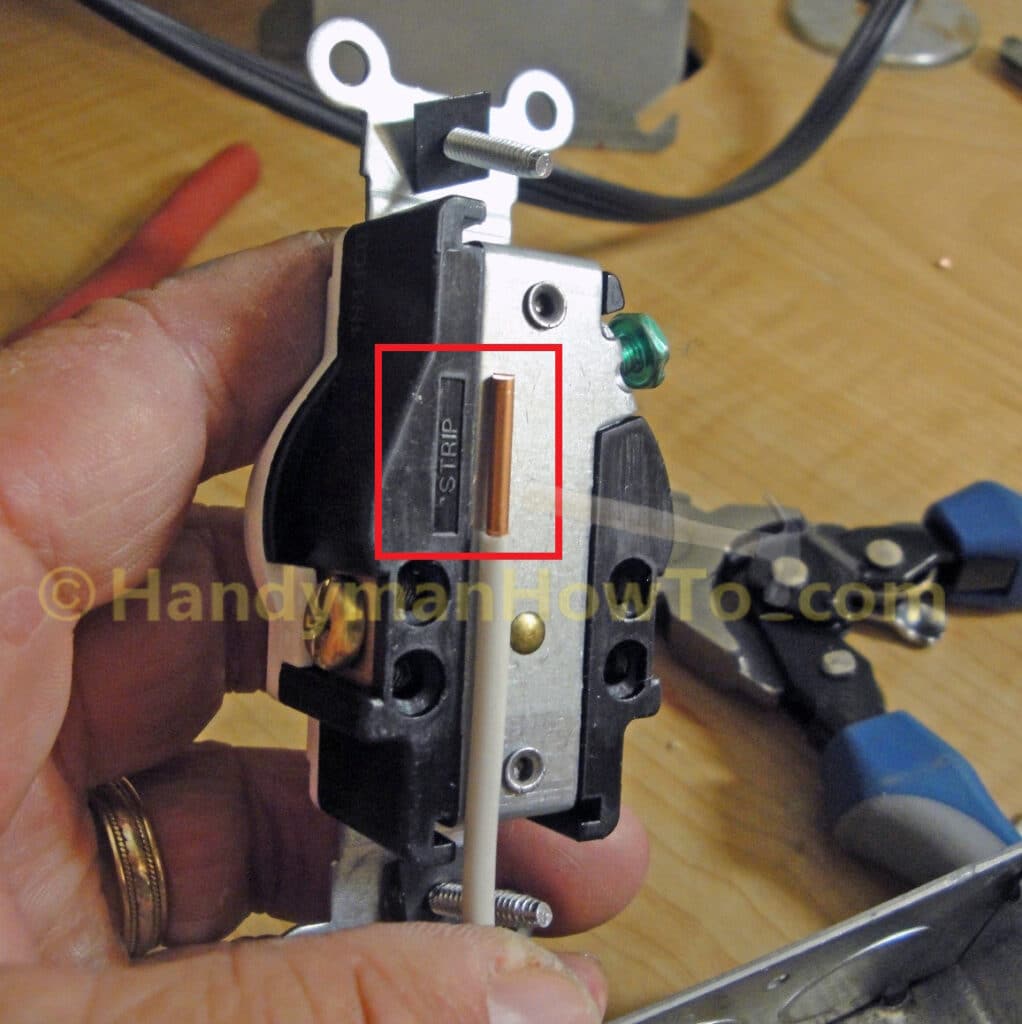
The Leviton 20 AMP receptacle is back wired per the connection diagram inside the box (yellow arrow). I prefer back wiring an outlet because it’s simpler and the internal clamping mechanism is a more robust connection. The ground wire is side wired by looping clockwise around the green ground screw:
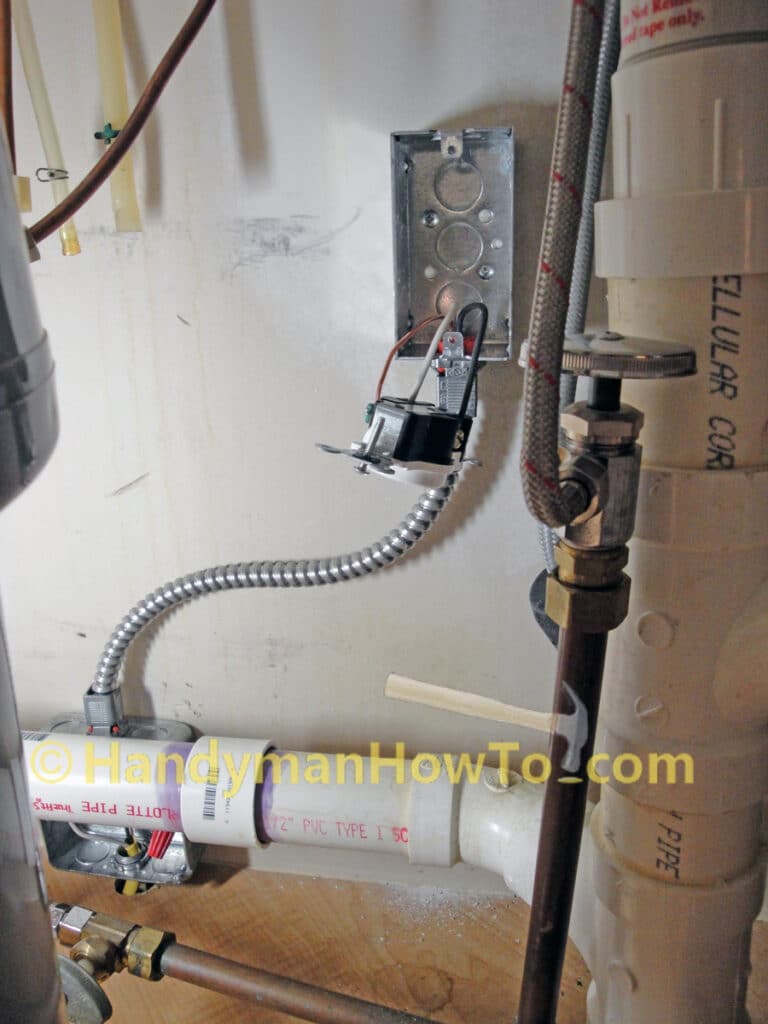
I marked and set two drywall anchors in the drywall at the back of the kitchen cabinet to mount the junction box. Here’s a complete view of the under kitchen sink junction box and outlet:
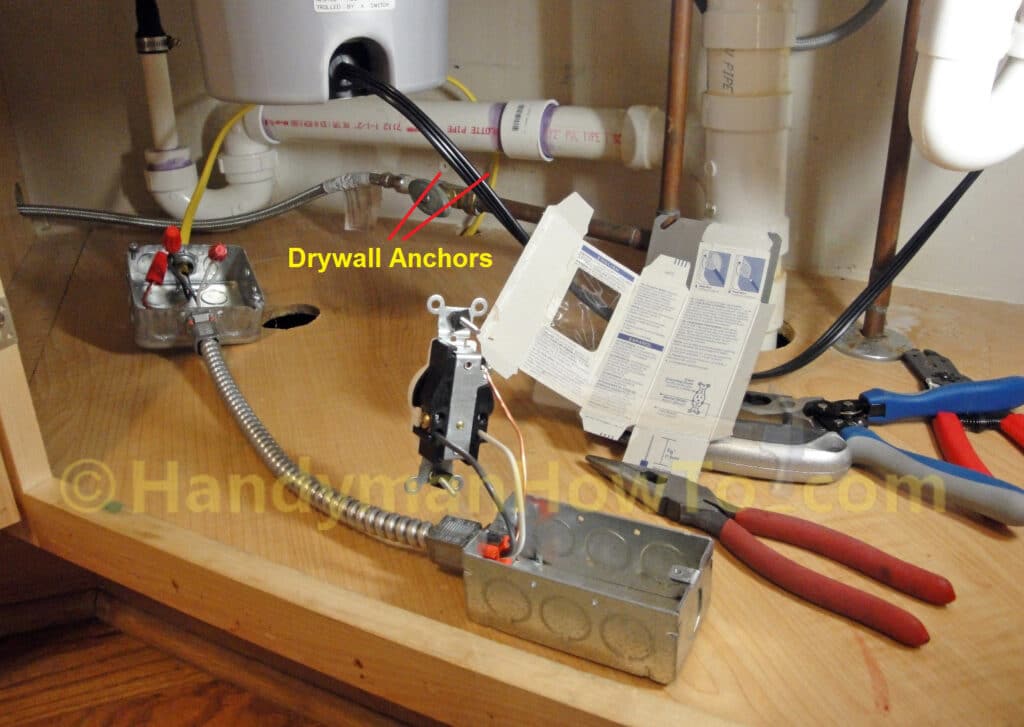
I pushed the yellow NM-B 12/2 cable back down into the cabinet bottom to the basement crawlspace to mount the junction box to the drywall anchors with two screws. It was awkward effort because the dishwasher copper water pipe and PVC drain pipe were in the way.
Note that it is in violation of the National Electrical Code (NEC) to place a junction box or outlet on the bottom of the kitchen cabinet, these boxes must be mounted on the wall.
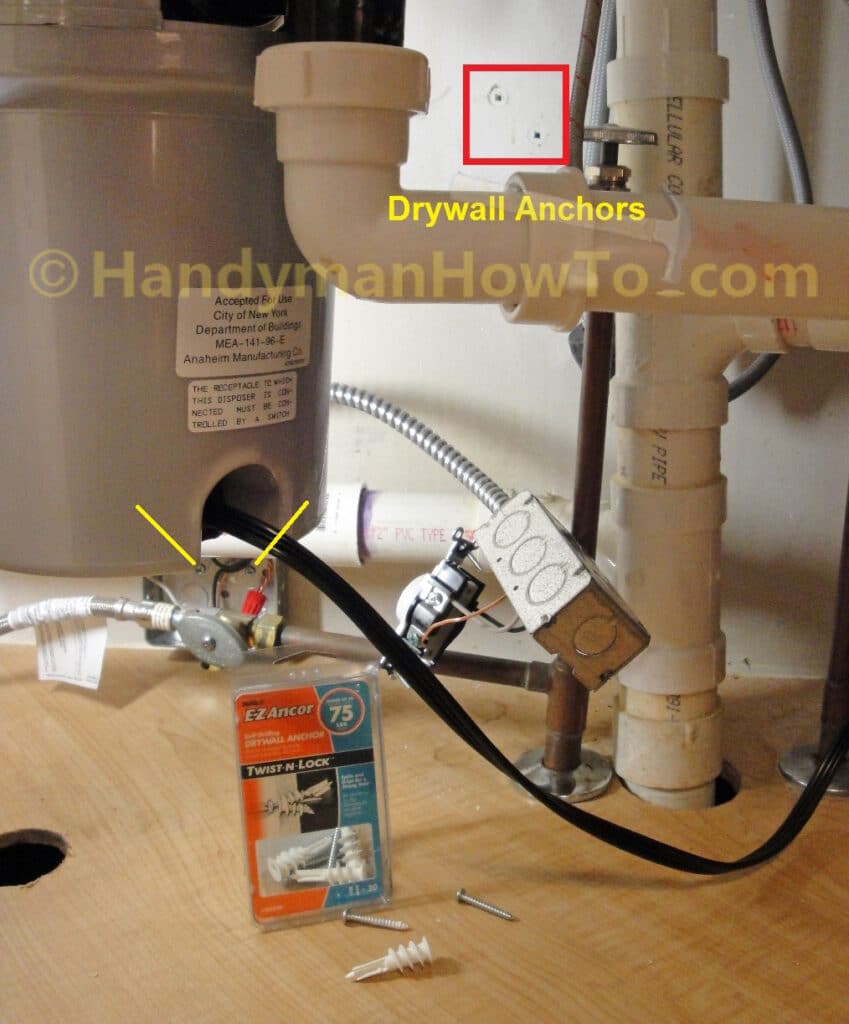
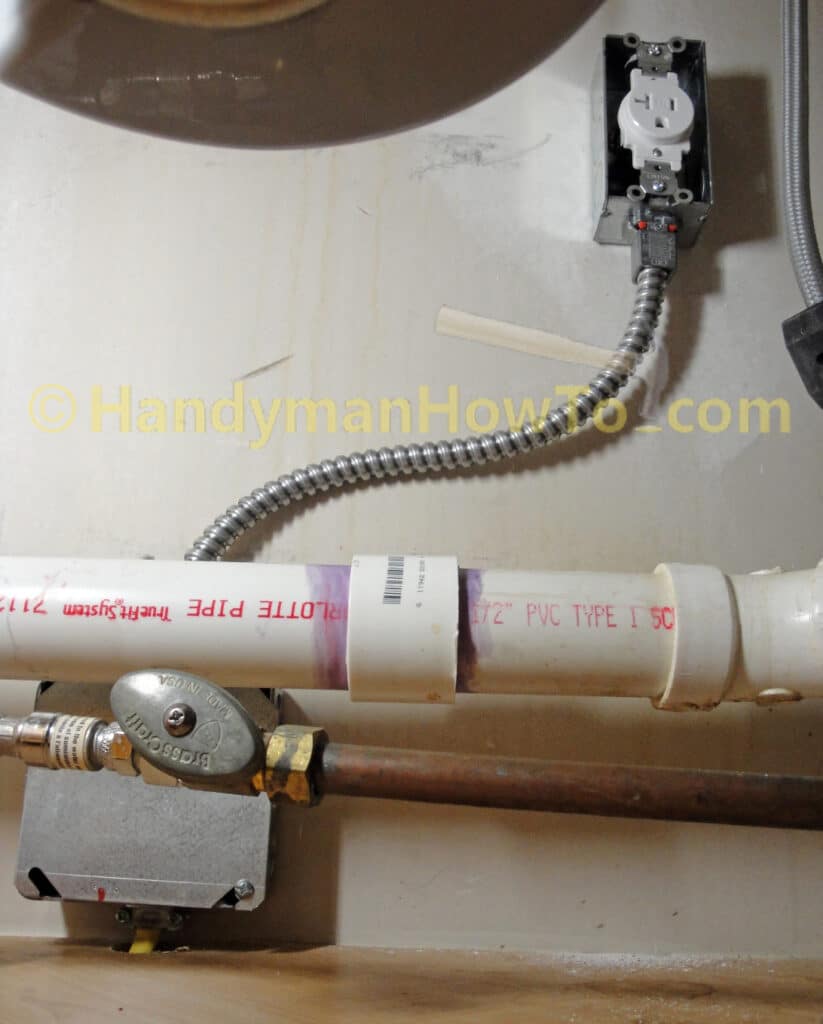
I mounted the metal junction box to the drywall anchors with two screws (see yellow lines), then held the outlet box against the drywall in a convenient location where it could be reached to plug in the hot water dispenser cord, checked it with a bubble level, marked and set two drywall anchors (see red square). What a pain doing this in such cramped quarters!
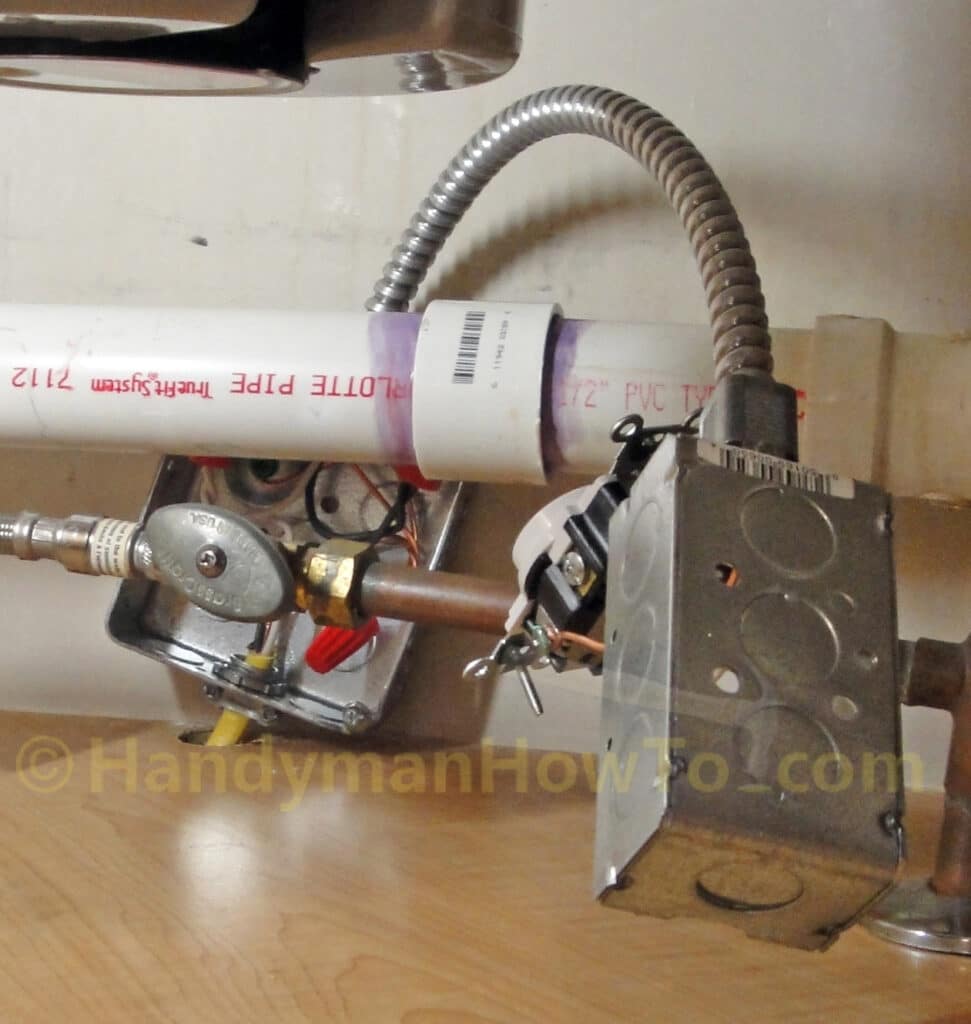
The under kitchen sink outlet box is mounted with two screws provided with the drywall anchors:
I folded the outlet wires into the box and mounted the receptacle with the two captive screws. The 4×4 inch metal junction box cover is also installed. Note that mounted the 4 inch steel junction box slightly above the bottom of the cabinet so it wouldn’t get wet in case of a plumbing leak:
This project is continued in How to Wire an Electrical Outlet Under the Kitchen Sink – Part 7 where the branch circuit is wired into the ground fault circuit breaker in the main panel.
Take care,
Bob Jackson