This project is continued from Part 1.
Mobotix IP Notify Profiles
IP Notify Profiles are used to configure network messages which the camera can send to itself or other computers running locally or over the Internet. In this tutorial, the camera will send IP Notify events to itself to change recording modes for Open and Closed business hours.
The HTTP API commands are configured in IP Notify Profiles to change the camera recording mode an associated with Time Tasks to trigger the IP Notify events. The configuration steps and web configuration menu navigation are summarized in the following diagram:
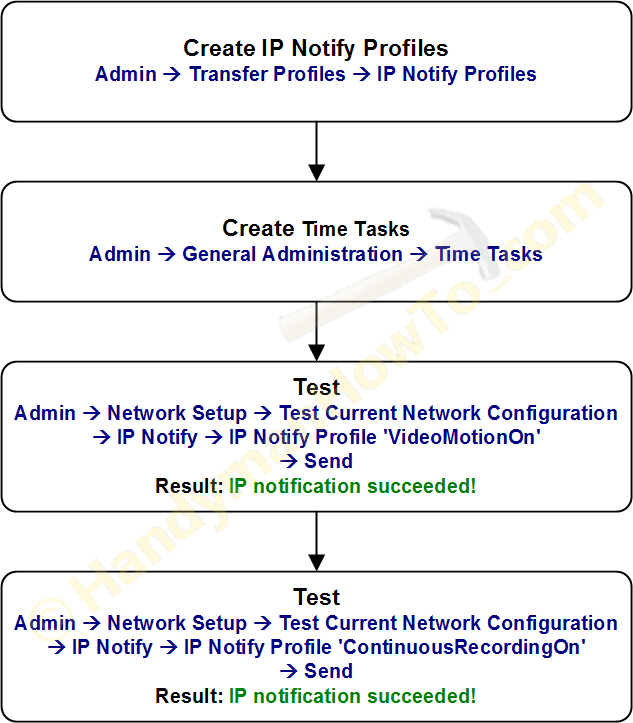
Create IP Notify Profiles
From your web browser, log in to the Mobotix camera as “admin” and navigate the web menus to:
Admin → Transfer Profiles → IP Notify Profiles
Click the “Add new profile” button at the bottom of dialog box. Input the new IP Notify Profile parameters to configure video motion event recording for after-hours recording:
- IP Notify Profile 6: VideoMotionOn
- IP Notify Type: Custom Configuration
- Destination Address: localhost: 5001
- Send Order: Parallel send to all
- Transfer Protocol: HTTP/1.0 Request
- CGI-Path: /control/control/
- HTTP Authentication: username:password
- Notification Data: Plain Text
- Message: set§ion=recording&recording=streaming_event
- Port Number: 0 (0 for automatic)

Click the Set button to save the new profile.
Click the “Add new profile” button again to create another IP Notify Profile parameters to configure continuous recording for use during normal business hours:
- IP Notify Profile 6: ContinuousRecordingOn
- IP Notify Type: Custom Configuration
- Destination Address: localhost: 5001
- Send Order: Parallel send to all
- Transfer Protocol: HTTP/1.0 Request
- CGI-Path: /control/control/
- HTTP Authentication: username:password
- Notification Data: Plain Text
- Message: set§ion=recording&recording=streaming
- Port Number: 0 (0 for automatic)
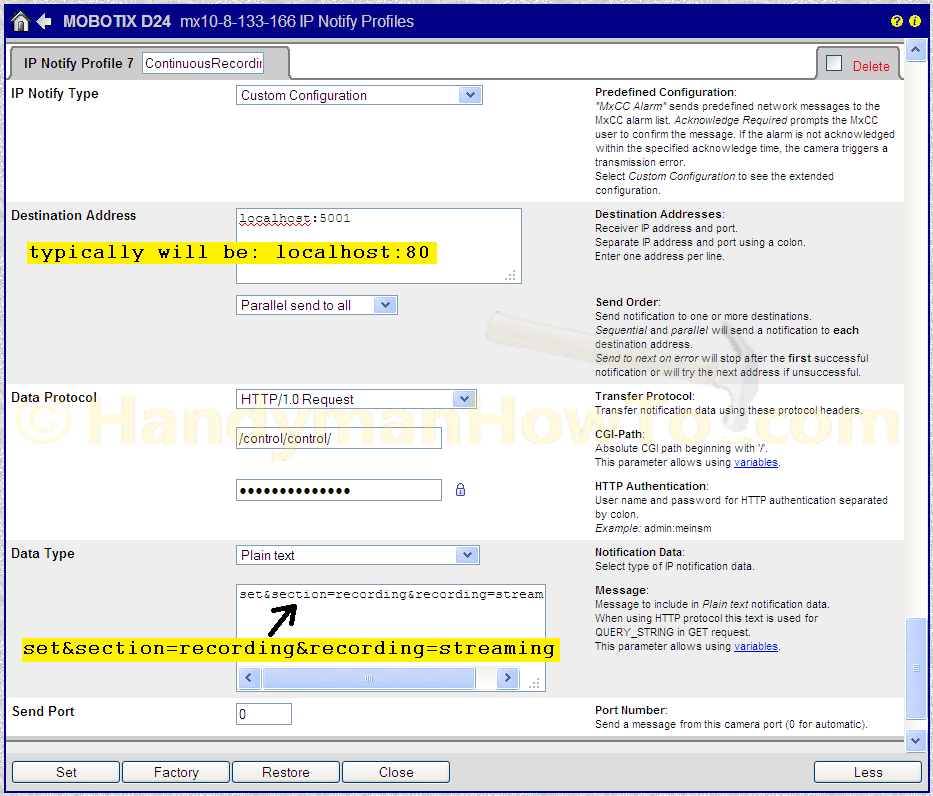
Click the Set and Close buttons to save new profile changes.
Test the IP Notify Profiles
Test the new IP Notification profiles by navigating to:
Admin → Network Setup → Test Current Network Configuration → IP Notify → IP Notify Profile ‘VideoMotionOn’ → Send
The confirmation message should be: Result: IP notification succeeded!
A successful network test log will look like this:
Network Test Log
Note: There is no output in the main window while the test is running!
Sending IP message using profile "ContinuousRecordingOn" (this may take up to one minute!): INF: loading notify profile ContinuousRecordingOn ... INF: set profile send order "parallel" INF: set profile address "localhost:5001" INF: set profile data type "msg" INF: set profile message "set§ion=recording&recording=streaming" INF: set profile http version: "HTTP/1.0" INF: set profile http cgi path: "/control/control/" INF: set profile http authorize: "username:password" INF: try to resolve IP address of host "localhost" ... INF: resolved "localhost" ip-address as 127.0.0.1 INF: force generation of current JPEG ... INF: [hdl#1] connection established (ip=127.0.0.1, port=5001, fd=2) ... INF: [hdl#1] HTTP-Headers: HTTP/1.0 200 OK INF: [hdl#1] HTTP-Headers: Content-type: text/plain INF: [hdl#1] HTTP-Headers: Cache-Control: no-cache INF: notification to 127.0.0.1:5001 has been sent [msg okay=1]. INF: Server 127.0.0.1:5001 responsed HTTP code 200. Result: INF: sending message succeed. 1x222 bytes in 3.011s.
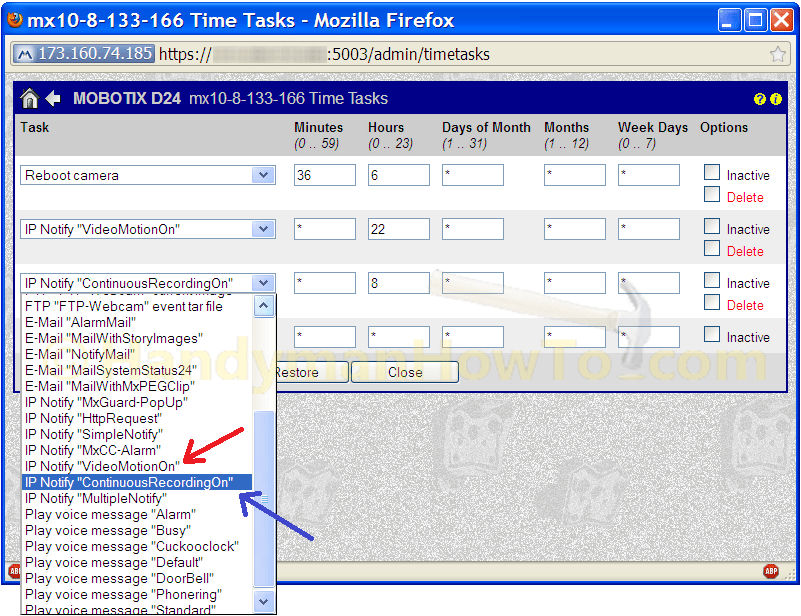
Create Time Tasks
Time Tasks are used to trigger the IP Notification Profiles to change the camera recording mode between Open and Closed business hours.
- Navigate to: Admin → General Administration → Time Tasks
- Choose and empty task and select the VideoMotionOn IP Notification profile from the drop down list.
- Set the time values to your requirements. I’ve entered 22 in the Hours field so the camera will switch to video motion event recording every day at 10pm, which equals 22 on a 24 hour clock. An asterisk ‘*’ means “for every” in the time and date fields.
- In the next empty Task slot, select the ContinousRecordingOn IP Notification profile.
- Continuous recording will start every day when the business opens at 8am, so I entered 8 in the Hours field.
- Click Set and Close to save your changes.
Create E-Mail Profiles and Time Tables
An e-mail profile defines the e-mail account credentials, who will receive the e-mail and the message content (e.g. camera image) to be sent when a video motion event is triggered. A Time Table will be created later so that e-mails are only sent when the business is closed between 10pm and 8am.
The process steps are:
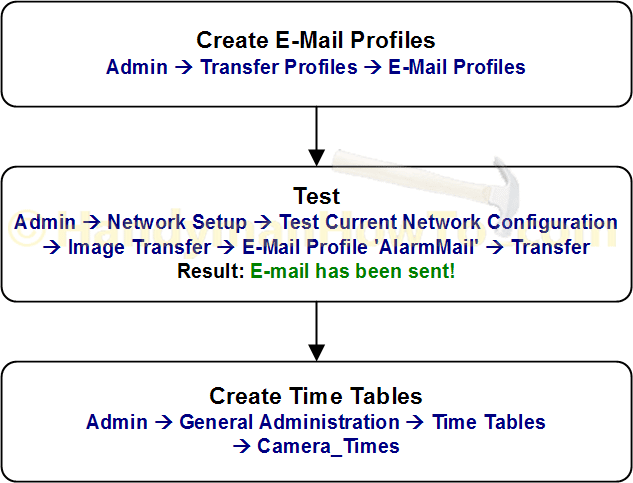
E-Mail Profile
Navigate to: Admin → Transfer Profiles → E-Mail Profiles
A new e-mail profile named “AlarmMail” will be created. Enter the mail account parameters that correspond to your mail credentials. Click the Set and Close buttons to save your changes.
Test the new e-mail profile by navigating to:
Admin → Network Setup → Test Current Network Configuration → Image Transfer → E-Mail Profile ‘AlarmMail’ → Transfer
You should see the message Result: E-mail has been sent!
If you have any problems sending e-mail from the new profile, examine the e-mail log in the popup window. I discovered that my DSL ISP was rejecting the automated login with a “550 Sender is restricted” error message as some sort of anti-abuse policy. When I reconfigured the e-mail profile for a Google Gmail account, the camera was able to send e-mails just fine.
Create Time Tables
A Time Table is created for the Open (8am to 9:59pm) and Closed (10pm to 7:59am) business hours to only send video motion e-mail alarms when the business is closed.
Navigate to: Admin → General Administration → Time Tables → Camera_Times
Create a Time Table Profile named “Camera_Times” (or any name you prefer) to defined the Open and Closed business hours. This time table is fairly simple with no exceptions for weekends and holidays. See the Mobotix camera software manual and online camera help pages for more information on Time Tables. A single time entry cannot span different days, therefore the 10pm to 7:59am time range is split at midnight (23:59 and 00:00) across two entries.

Click Set and Close to save the Time Table Profile.
Developer Tip: During the initial camera setup, create a time table that changes camera modes every 5 minutes so you can verify the Time Table is working without waiting for the 10pm and 8pm Time Task and Table Table events. Once you’re satisfied the video motion e-mails and IP Notify API commands are all setup to your liking, go back and input the desired business hours.
Take care,
Bob Jackson