This project shows how to install a basement dehumidifier and drain the condensate water to the outdoors for continuous operation.
A dehumidifier extracts moisture from the air and is a great way to lower the humidity in a basement. This makes the air fresher and reduces the chance for mold. I wanted a dehumidifier to eliminate any chance of rust on the tools in my basement workshop. The humidity in the basement ranged from around 40% in dry weather up to 70% in damp weather. I wanted to limit the humidity to around 50%, which is on the dry side.
The question I faced is “What to do with the water?”.
How to Install a Basement Dehumidifier
Room size humidifiers have a condensate bucket that must be emptied by hand. A float switch turns off the humidifier when the bucket is full to prevent overflows. Many humidifiers also provide a threaded spigot to connect a water hose for drainage, assuming you have a floor drain or sump pump to take away the water. A daily routine of checking and emptying the condensate bucket wasn’t going to happen. I’ve got better things to do. My basement doesn’t have a floor drain or sump pump, so draining the unit with a water hose wasn’t an option… then I had an idea.
The solution was to elevate the dehumidifier above grade level and use PVC plastic pipe to drain away the water. This is possible because my house sits on a hillside and the basement is above ground on three sides.
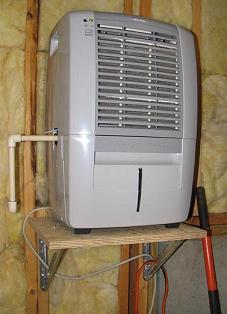
Dehumidifier Installation Materials List
- Velgoo 52 pint Dehumidifier
Rated for a 1000 square foot room, low temperature operation down to 41 deg. F, continuous drain option, automatic 50% – 70% humidity control, side air discharge - 5/8 inch plywood shelf
- Two (2) shelf brackets – Simpson Strong Tie “SBV” 9 inches by 11 inches. Available at Amazon.
- One (1) box of Simpson Strong Tie SD8x1.25 wood screws. Available at Amazon
- Four (4) PVC, 1/2 inch, 90 degree elbows.
- Ten (10) feet of 1/2 inch PVC pipe
- One (1) can of PVC purple primer
- One (1) can of PVC cement
- One (1) 1/2 inch PVC to garden hose bibcock adapter
Basement Dehumidifier Installation
- Pick a location several feet above the exterior ground level that is free of electrical, plumbing and natural gas lines. I used the natural gas pipe entrance to locate and mark a position on the exterior and interior walls for the 1/2 inch PVC drain pipe.
- Cut the 14 x 17 inch plywood shelf to rest the humidifier upon from a scrap sheet of plywood. I used 5/8 inch plywood as it is strong with enough thickness for the wood screws to hold fast.
- Using a carpenters level, mark the level line on the 2×4 wall studs for the top of the shelf, at or slightly above the height where the drain line will penetrate the wall. Attach the shelf brackets to the 2×4 wall studs with the wood screws, the top of the brackets even with the level line.
- Attach the plywood shelf to the brackets with wood screws driven from the bottom of the shelf (screws are pointing upward).
- Drill a 1/4 inch pilot hole in the basement wall at the location marked for the drain line.
- With a 1/2 inch drill bit, enlarge the pilot hole to 1/2 inch. You may need a masonry drill bit if the wall is construction is stucco, brick, cinder block or poured concrete.
- Remove all wheels or casters from the humidifier.
- Center the humidifier on the plywood shelf.
- Using a tape measure, cut and dry fit (no glue) the PVC to garden hose adapter, pipe sections and 90 degree elbows. Trim and adjust the plumbing as needed.
- When your satisfied with the PVC plumbing connections, glue the sections together. PVC is very easy and fast to glue. Swab the mating ends with purple cleaner, swab on some glue and press together. The bond is permanent in a minute.
- Caulk the the PVC pipe where it exits the wall to provide a water tight seal.
The following photos will clarify the layout and fittings.
The PVC to brass garden hose adapter and other pipe fittings are shown in the photo below. The humidifier drain bucket has been removed to view the interior.
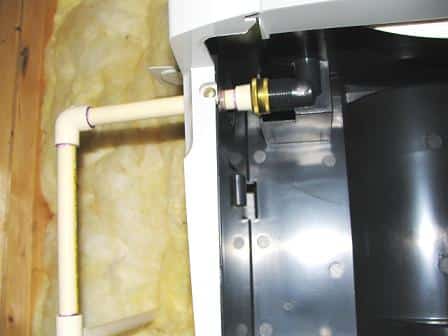
The finished PVC drain pipe connections.
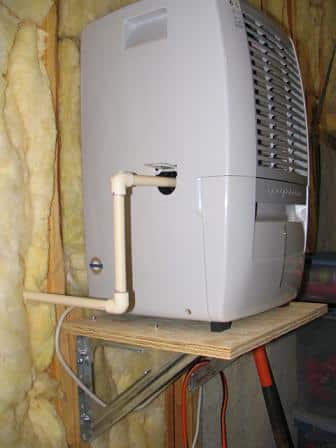
The PVC drain pipe exit through the exterior wall. The natural gas pipe was used to locate and mark the PVC exit at a suitable location above ground level.
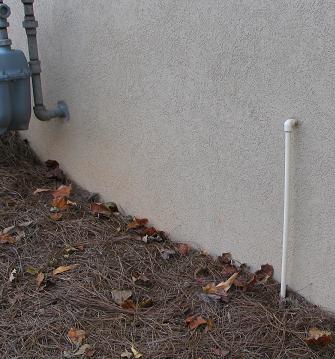
The PVC pipe just lays on top of the ground, covered with pine straw as shown in this photo. It’s important to run the line away from the foundation because a persistent wet spot can invite termites.
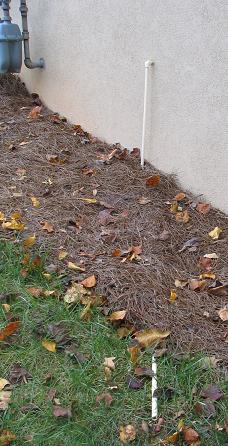
Tip: Do not glue the vertical PVC pipe run into the 90 degree elbow at the wall exit. The dry fit connection is water tight (because there is no pressure in the line) and allows freedom of movement for the drain end to avoid saturating the ground. When I mow the yard, I swing the drain end of the pipe 3 feet or so to a new spot. Take care to keep the pipe drain at least 6 feet or more from the foundation wall to discourage termites.
An improvement would be to extend and bury the PVC pipe several inches under the sod to a permanent drainage position 20 feet or so from the foundation. I didn’t bury the line due to phone, electrical and CATV lines in the immediate area.
Take care,
Bob Jackson
I have 2 of these pipes in my backyard, about 2” from my foundation. They appear to have a vented cap on top.
I have a humidifier built into my furnace. Would you have any idea what these are?
Thank you for you thoughts.
Would you be able to share a picture?