This tutorial explains how to configure DNS settings for Google Apps Gmail when hosting your own domain.
Managed DNS Service
I moved www.HandymanHowTo.com from shared hosting to WP Engine for managed WordPress hosting, speed and security. Because WP Engine doesn’t provide DNS or email services, it was necessary to subscribe to 3rd party DNS and email providers. I chose Dyn Managed DNS because Dyn is very fast, runs an Anycast global network, has excellent support and is reasonably priced. I’ve used Gmail for years and like Google Apps for Business for the security and features. The following diagram illustrates the changes when migrating from shared hosting to WP Engine:
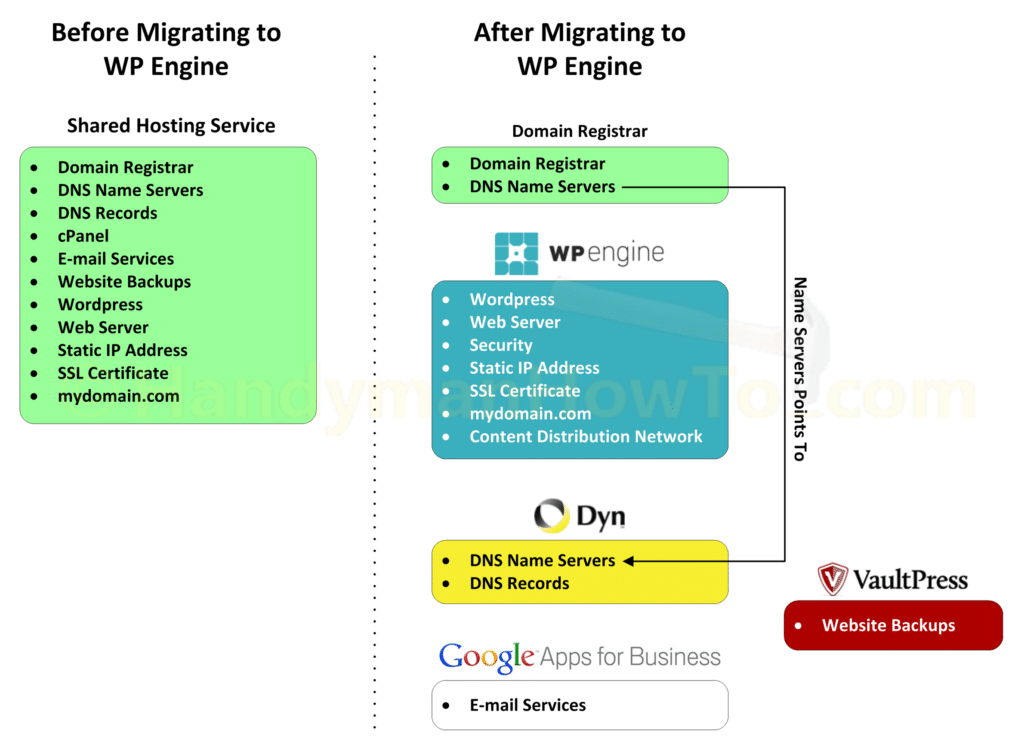
Making the change from shared hosting where the DNS records are configured for you to self-managed DNS may seem complex and perhaps worrisome (What if I knock my website offline!), but the concepts are easy to understand and it doesn’t take long to setup.
Google Apps Gmail DNS Zone Records
My complete DNS Zone records for handymanhowto.com are shown below (the A Record IP address is fictitious). Once you’ve configured DNS records for Google Apps Gmail, yours will be very similar:
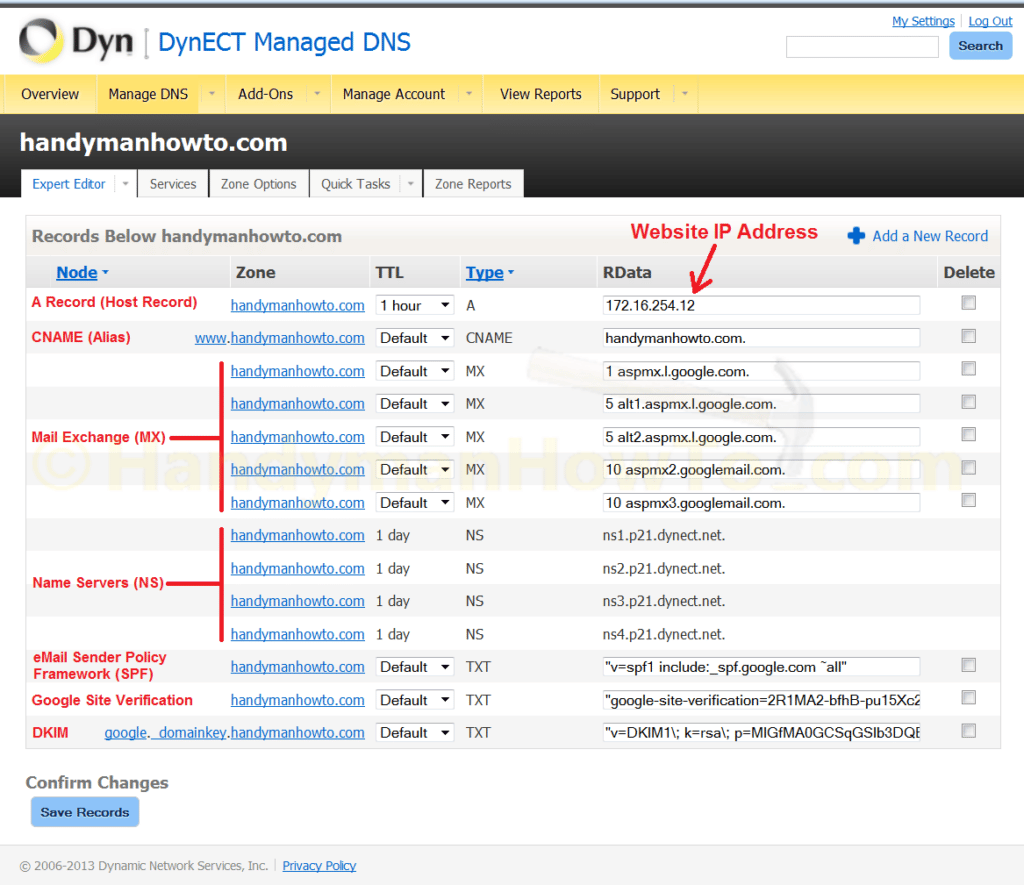
An explanation of each DNS record and its configuration is given in the following steps.
DNS Zone
Notice the Zone heading for the 2nd column in the image above. A DNS Zone in this context is your naked domain, e.g. mydomain.com or in my case handymanhowto.com. The Zone defines the records for your own domain.
If you have two or more websites each with a dedicated domain, e.g. mydomain.net or example.com, each will have a unique Zone and set of DNS records. Dyn Managed DNS (formerly branded DynECT DNS) displays the Zones in the dashboard:
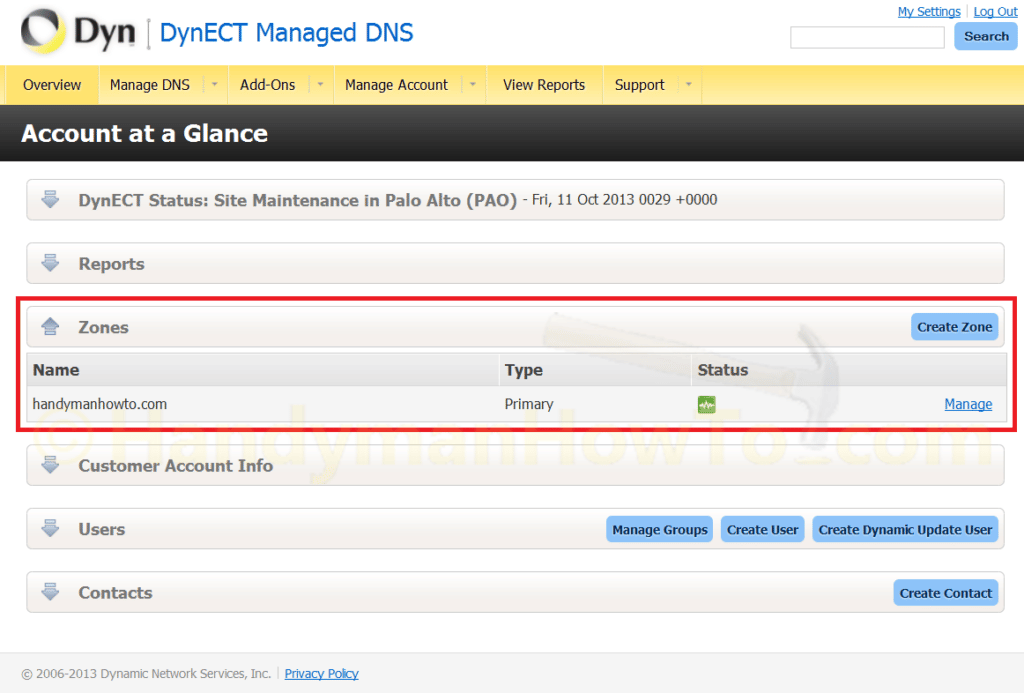
I created a new Zone on Dyn DNS, so there were no old DNS records to be modified or deleted.
DNS A Record Setup
The DNS A Record is an important record because it maps your domain name to the IP address of the host (web server). The IP address will be specified by your hosting provider, if your using WP Engine your website IP address is displayed in the WordPress dashboard.
-
Node: <blank>
Some DNS record editors may require an @ symbol, which just means “this domain”. Dyn requires a blank entry. -
Zone: <naked_domain>
This entry is pre-populated and cannot be changed. e.g. mydomain.com - TTL: 1 hour or Default
1 hour Time To Live (TTL) can be useful when migrating to a new host for faster updates to cached DNS records. - Type: A
-
RData: <IP address of your website host>
RData is the DNS Record Data, which is dependent upon the type of DNS Record. A Records always have an IPv4 address.
There will normally be a single A Record for most websites. Multiple A Records are sometimes configured if you’re an expert and know what you’re doing.
Migrating a Website to a new Host
If you’re migrating your website to a new host, it’s best to:
- Migrate DNS first from shared hosting to a managed DNS service.
- Set your A Record to the IP address of the existing shared host.
- Migrate and test the new website on the new hosting service.
- When ready to go live on the new website, update the DNS A Record with the IP address of the new host.
DNS CNAME Record Setup
A Canonical Name (CNAME) is used to identify different services such as ftp, www, mail, direct, etc. I chose www.handymanhowto.com as my preferred domain name (visitors are redirected to the www site) and created a CNAME record; your requirements may be be different.
-
Node: www
Aside: www is a subdomain of the primary, or naked domain. -
Zone: <naked_domain>
This field is pre-populated and cannot be changed. - TTL: Default
- Type: CNAME
-
RData: <naked domain>
Dyn DNS automatically appends the ‘.‘ to the node as in www.
Create additional CNAME records as required for ftp, mail, etc. I don’t have such records because it wasn’t necessary for these services.
DNS Name Server (NS) Records
Dyn DNS will automatically create the Name Server records. Other DNS services might not show NS Records and because they can’t be changed and are create these behind the scenes for you.
The new Name Servers must be updated at your domain registrar to be the Authoritative Name Servers, meaning the Managed DNS provider is responding to DNS queries (DNS lookups) for your domain using these records.
The DNS records must be configured, saved and published (pushed to the provider’s Name Servers) before updating the domain registrar Name Server entries. I’ll cover this step later in this tutorial.
Configure DNS settings for Google Apps Gmail
Google Apps Gmail MX Records Setup
When you sign-up for Google Apps for Business with your domain, the Gmail setup process specify the MX Records, which are also listed in the Google Apps Documentation & Support.
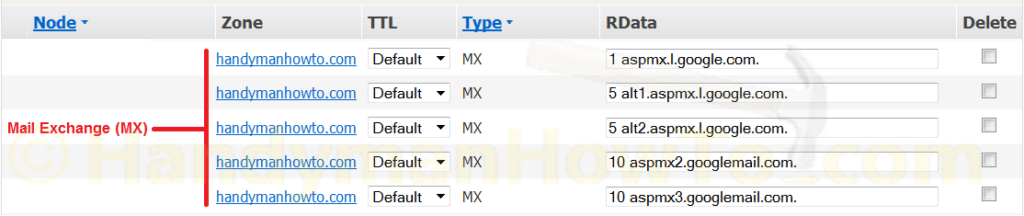
The five MX Records point to mail servers with various priorities:
-
Node: <blank>
Some DNS record editors may require an @ symbol, which just means “this domain”. -
Zone: <naked_domain>
This field is pre-populated and cannot be changed. - TTL: Default
- Type: MX
- RData: <copy and paste the MX record value>
The current list of Google Apps Gmail MX Records are:- 1 ASPMX.L.GOOGLE.COM
- 5 ALT1.ASPMX.L.GOOGLE.COM
- 5 ALT2.ASPMX.L.GOOGLE.COM
- 10 ASPMX2.GOOGLEMAIL.COM
- 10 ASPMX3.GOOGLEMAIL.COM
Remember, a separate MX Record is required for each mail server and priority.
Google Apps Gmail SPF TXT Record
A DNS TXT (text) record is required for the Sender Policy Framework (SFP). The SPF record allows Google’s mail servers to send email on behalf of your domain.
Enter the following to create the SPF TXT record:
-
Node: <blank>
Some DNS record editors may require an @ symbol, which just means “this domain”. -
Zone: <naked_domain>
This field is pre-populated and cannot be changed. - TTL: Default
- Type: TXT
-
RData: v=spf1 include:_spf.google.com ~all
After pasting the SPF string into the Dyn DNS record editor, it automatically wrapped it with double quotes.
Google Apps Gmail DKIM DNS TXT Record
DomainKeys Identified Mail (DKIM) is a means to include a digital signature to outgoing email. I enabled DKIM authentication to avoid potential issues.
First, generate the domain key, my domain key is shown here and yours will be different:
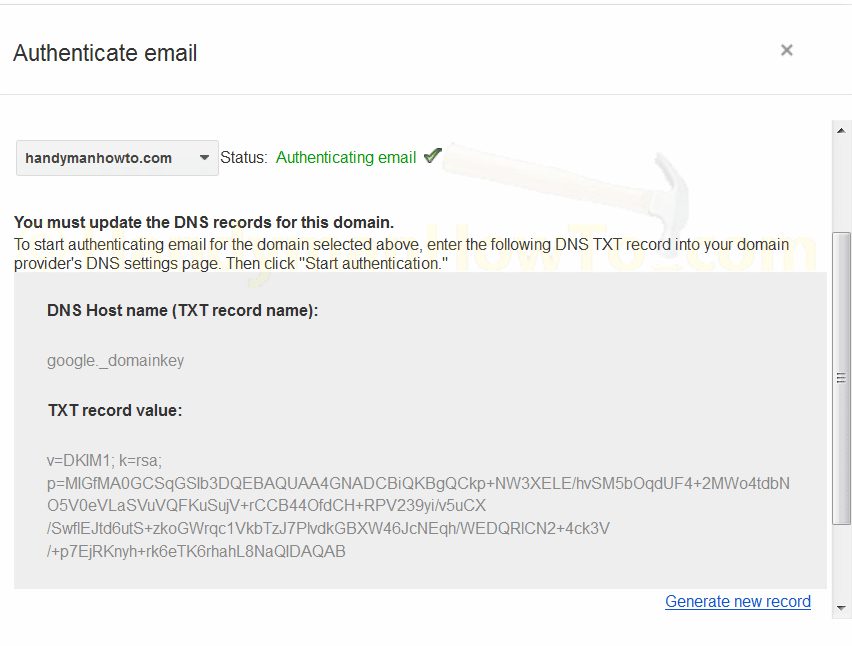
Create the DKIM DNS TXT record:
- Node: google.domainkey
-
Zone: <naked_domain>
This field is pre-populated and cannot be changed. - TTL: Default
- Type: TXT
- RData: <copy and paste TXT record value from the Google Admin Console>For example, my DKIM TXT record value is:
v=DKIM1; k=rsa; p=MIGfMA0GCSqGSIb3DQEBAQUAA4GNADCBiQKBgQCkp+NW3XELE/hvSM5bOqdUF4+2MWo4tdbNO5V0eVLaSVuVQFKuSujV+rCCB44OfdCH+RPV239yi/v5uCX/SwflEJtd6utS+zkoGWrqc1VkbTzJ7PlvdkGBXW46JcNEqh/WEDQRlCN2+4ck3V/+p7EjRKnyh+rk6eTK6rhahL8NaQIDAQAB
Each DKIM key is unique and it’s important to use your DKIM key. This is a public key (it’s not secret!) that will be reported in the DNS records.
Google Site Verification DNS TXT Record
The Google Site Verification TXT record is one of several methods to prove you own a website. DNS Site Verification is one of several verification methods and the key is obtained from your Google Webmaster Tools account:
- Log into your Webmaster Tools account
- Click on the website, e.g. mydomain.com
- Click the gear icon in the top right corner of the page, then click Verification Details.
- Choose the DNS Verification Method.
- Pick a Domain name provider.
For Dyn DNS pick “Other“. - The TXT Record value is displayed: google-site-verification=long_random_string
Create the Google Site Verification DNS TXT record:
-
Node: <blank>
Some DNS record editors may require an @ symbol, which just means “this domain”. -
Zone: <naked_domain>
This field is pre-populated and cannot be changed. - TTL: Default
- Type: TXT
- RData: <copy & paste the google-site-verification=long_random_string here>
Dyn DNS will wrap the string in double quotes.
Save and Publish the Zone DNS Records
The Dyn DNS record changes can be saved after each update. Saving Zone changes (DNS records) simply updates the Zone in Dyn DNS but does not make the changes public. The Zone must be Published to push the changes to the Name Servers so it’s accessible by the Internet.
Once you’re done entering all the records, publish the Zone. Allow up to 48 hours for DNS changes to propagate, but changes can take effect in near real-time to several hours.
Verify the DNS Zone Records
Verify your DNS Zone Records after saving and publishing using an online Dig tool such as Kloth.net. Be sure to query your new Name Server(s) explicitly because these haven’t been updated with your domain registrar at this step in the process. The new Dyn DNS Name Server in this example is ns1.p21.dynect.net. A Dig on my website for ANY type of DNS record reports:
; <<>> DiG 9.7.3 <<>> @ns1.p21.dynect.net handymanhowto.com ANY
; (2 servers found)
;; global options: +cmd
;; Got answer:
;; ->>HEADER<<- opcode: QUERY, status: NOERROR, id: 57223
;; flags: qr aa rd; QUERY: 1, ANSWER: 13, AUTHORITY: 0, ADDITIONAL: 0
;; WARNING: recursion requested but not available
;; QUESTION SECTION:
;handymanhowto.com. IN ANY
;; ANSWER SECTION:
handymanhowto.com. 3600 IN SOA ns1.p21.dynect.net. admin.handymanhowto.com. 15 3600 600 604800 60
handymanhowto.com. 86400 IN NS ns3.p21.dynect.net.
handymanhowto.com. 86400 IN NS ns1.p21.dynect.net.
handymanhowto.com. 86400 IN NS ns4.p21.dynect.net.
handymanhowto.com. 86400 IN NS ns2.p21.dynect.net.
handymanhowto.com. 3600 IN A 172.16.254.12
handymanhowto.com. 3600 IN TXT "v=spf1 include:_spf.google.com ~all"
handymanhowto.com. 3600 IN TXT "google-site-verification=2R1MA2-bfhB-pu15Xc2PBbD-gPaxiXiOVVupif9XWOA"
handymanhowto.com. 3600 IN MX 5 alt2.aspmx.l.google.com.
handymanhowto.com. 3600 IN MX 1 aspmx.l.google.com.
handymanhowto.com. 3600 IN MX 10 aspmx3.googlemail.com.
handymanhowto.com. 3600 IN MX 10 aspmx2.googlemail.com.
handymanhowto.com. 3600 IN MX 5 alt1.aspmx.l.google.com.
DKIM DNS TXT Record Verification
This step is included here for completeness, however your DNS Zone must be published and registrar Name Servers updated for the following tools to work.
Note the DKIM TXT record is not shown in the above Dig report. DKIMcore can verify a published DKIM key:
- Selector: google._domainkey
- Domain Name: <your naked domain, e.g. mydomain.com>
Port25 Solutions, Inc. will analyze and report SPF, SenderID, DomainKeys, DKIM and Spamassassin for email from your domain. It’s very fast and extremely detailed.
Domain Registrar Name Server Update
After saving and publishing the DNS Zone records, log into to your domain registrar account and change the Name Servers to point to the new Managed DNS service Name Servers. Check your registrar’s instructions for changing the Name Servers. For Bluehost.com, I selected “Use Custom Nameservers” and entered the Dyn Managed DNS Name Servers:
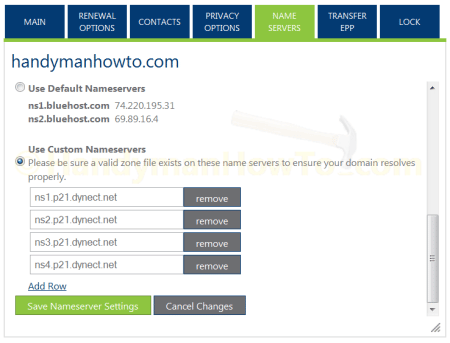
Save the Nameserver Settings when finished. DYN DNS is the Authoritative Name Servers for my Zone/domain records.
DNS Records Testing
Website Monitoring Tools
Subscribe to a Website Monitoring Tool like Pingdom or Uptrends to run checks against your old new sites to verify which is site is active and monitor for possible outages from locations around the world.
Web Browser Check
Open a new web browser, clear the cache and surf over to your website to verify the DNS Records are working correctly. Check your site from different networks (cable, DSL) using your PC and smartphone (3G/LTE networks by turning off WiFi).
Gmail MX Record Check
Run Google Apps Toolbox Check MX, Dig and MXToolBox to find problems.
I had odd email problems during the website migration due to mail server conflicts between my shared hosting account e-mail and Google Apps Gmail despite removing all Bluehost MX records and enabling the “Remote Mail Exchanger” setting. It was finally solved when I completed the site migration to the new hosting server and closed the shared hosting account; remember to keep your domain registration account active!
WordPress Send email with Gmail
The Easy WordPress SMTP plugin is required for WordPress to send email notifications (comments, user registrations, etc.) using the Google Apps Gmail account. I created an email alias for wordpress@mydomain.com under the admin@mydomain.com user account because WordPress only needs to send, but never receive e-mails. Take care if you’re using 2-step authentication (strongly recommended!) to create an Application Specific Password for the Easy WordPress SMTP plugin.
Hope you found this helpful,
Bob Jackson