This project shows how to build a rope tree swing with details for selecting the proper type of rope, tying the specialized knots required for safety and to prevent damage to the tree limb.
This swing can be tied to a high tree limb while keeping your feet on the ground, there’s no need for a ladder. My daughter really enjoys it, however I made it large and strong enough to seat two adults.
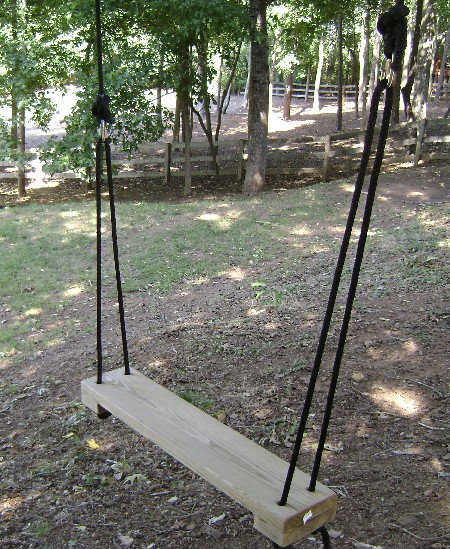
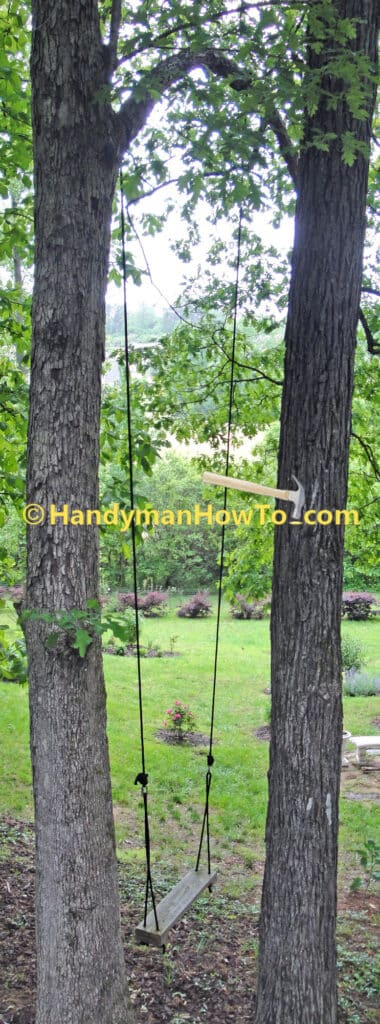
Here’s the finished swing hanging from a high branch on the oak tree:
Rope Tree Swing Materials:
- Pressure treated 2in x 8in board, 4 feet in length
- 5/8in diameter hollow-core braided polypropylene rope, ~100 feet length.
- 3″ corrosion resistant deck screws, Qty: 10
- Sanding block
- Course and fine grit sandpaper
- 5/16in stainless steel quick link (working load 1760 lbs), Qty: 2
- Gorilla Wood Glue
- Roll of kite string
- Oak tree
How to Choose the Correct Rope for a Tree Swing
The 5/8 inch braided hollow-core polypropylene rope I used in this project has a safe working load of 294 lbs. The “working load” of a rope is about 1/5 of it’s total tensile (or breaking) strength, and the tensile strength of this rope is 1400 lbs. In the next photo, the rope appears to be 3/4 inch diameter; under load it thins to 5/8 inch diameter. The only difference between the two ropes here is the color.
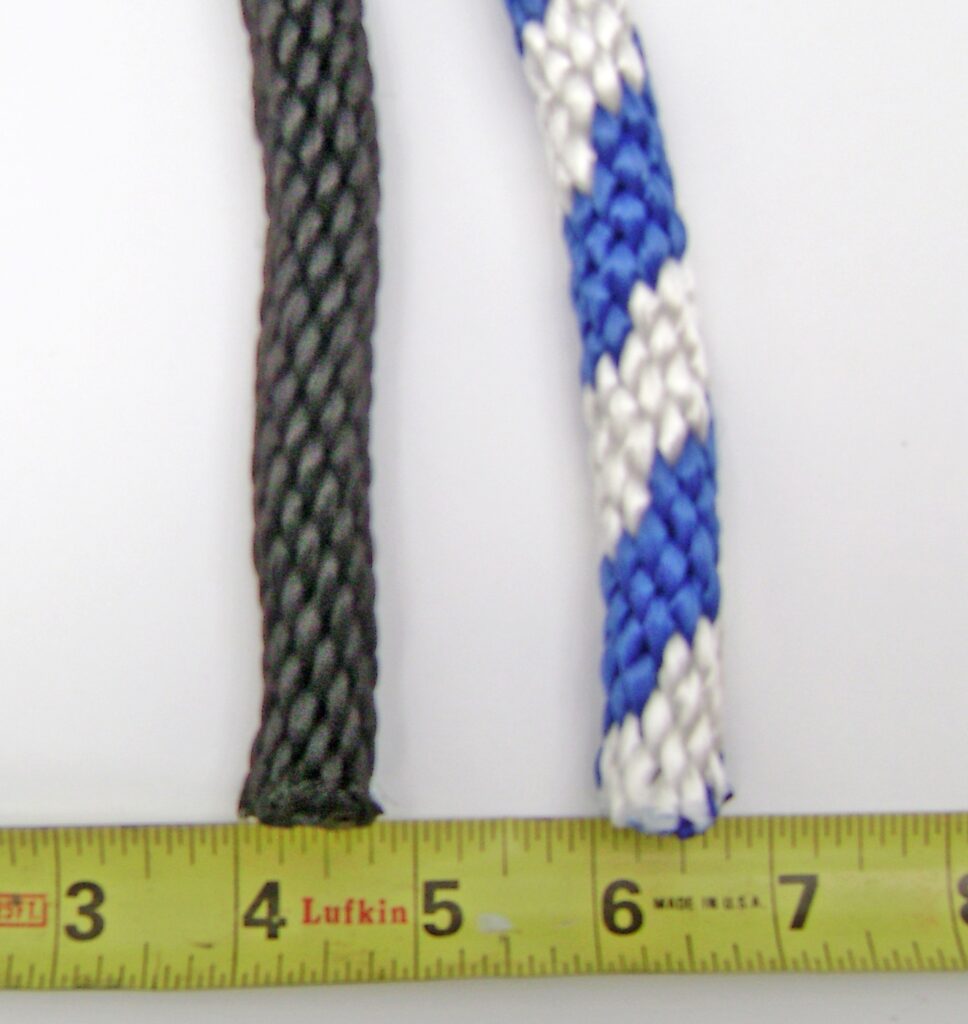
It’s important to use a large diameter braided rope for the swing. The use of a smaller diameter and/or twisted rope will be too slippery on the chain link and may cause the seat to tip over.
Nylon rope would be an upgrade over the hollow-core braided polypropylene rope used here because it’s a stronger (and more expensive) material.
A nice overview is of twisted and braided ropes is at Rocky Mount Cord Company, Inc.
Tools
- Cordless Drill/Driver
- Saw
- Carpenter’s square
- Pencil
- Tape measure
- Carpenter’s level
- Butane Lighter
Hanging the Tree Swing from a High Tree Branch
Building the tree swing presented a bit of challenge because my 24 foot extension ladder wasn’t tall enough to reach the high and strong branch on the oak tree. Normally, I’d tie the rope to the tree branch using a Swing Hitch knot, but it requires putting your arms around the branch to tie the knot. The Swing Hitch must also be loosened and retied at least once a year so it doesn’t strangle and kill the branch as the tree grows.
Since I couldn’t reach the branch, I had to figure out a way to tie off the lines from the ground. I solved this problem with kite string and a Running Bowline knot.
Build the Rope Swing Seat
- The seat is a 36 inch length of 2in by 8in pressure treated lumber.
- The seat reinforcements are a 4in length of 2×8.
- Mark and saw the 36 inch long bench seat and the two 4 inch reinforcing blocks.
- Bevel (i.e. round off) front and rear edges of the bench seat with sandpaper. This is so the edges of the board won’t cut into your thighs when sitting.
- Attach the reinforcing blocks to the bottom ends of seat with Gorilla Glue and the five 3 inch wood screws. Notice the screw pattern is laid out to avoid the drill holes for the rope.
- Locate and drill the 3/4 in holes for the rope 2 inches from the outside end of the seat and 1-1/2 inches from the front and back sides. Here’s a closeup of the reinforcing block attachment and holes.
Tie the Rope to the Tree Limb
As described in The Challenge section, the tree limb was too high for my ladder and climbing the tree was possible. The solution for attaching ropes to the tree limb is a Running Bowline knot, a type of slipknot. A key benefit of a slipknot is it expands as the tree grows and won’t strangle the limb.
Not any knot will do when personal safety is at stake. The knots I used in this project are:
- Very strong
- Secure
- Won’t significantly weaken the rope
To reach the limb, I tied a small rock to a spool of kite string and threw the rock over the tree limb, letting the string run off the spool. This took a couple of tries to get it where I wanted.
With the kite string looped over the branch, I tied the free end of the kite string to the 5/8 rope and pulled it back up and over the limb. You’ll need a double length of rope to do this!
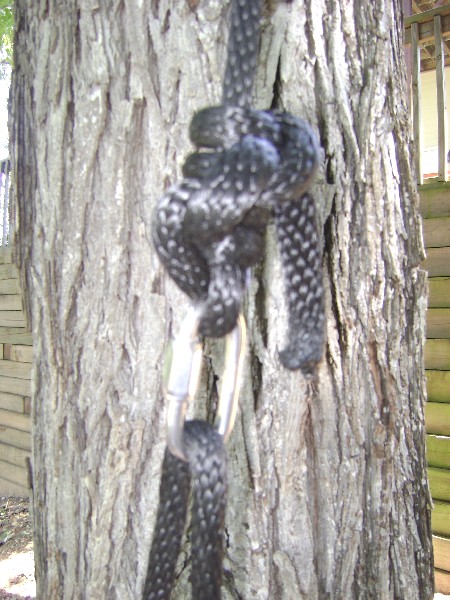
Next, I tied a Running Bowline in the rope and pulled it up snug against the tree limb, all from the comfort of standing safely on the ground. Here’s the result:
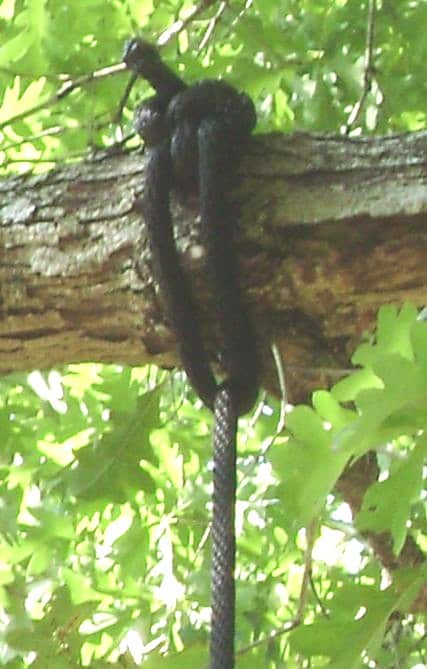
Do the same for both ropes:

Cut each rope hanging from the tree limb off at ground level. Remember it requires a double length of rope to drape it over the tree limb and run the Running Bowline knot up to the branch. For example, if your branch is 20 feet high you’ll need 80 feet of rope (80 ft = 20 ft * 2 for the temporary double length over the branch * 2 for the branch suspension ropes). Adjust your estimates accordingly based on the height of the tree branch.
Stopper Knots for the Rope Swing Seat
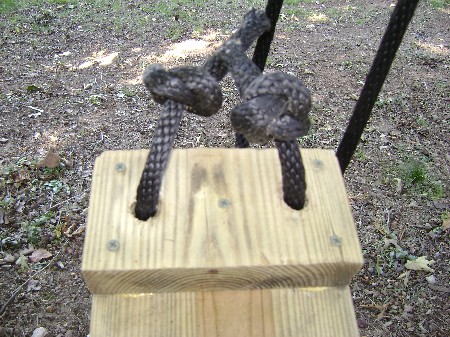
Measure a 10 feet length of rope and push each end through the top holes in the seat end. Tie an Ashley’s Stopper Knot in each end of the rope as shown here:
With another 10 foot length of rope, do the same for the opposite end of the seat. Take care to adjust the position of the 2nd stopper knot to ensure the seat is level. Leave a short pigtail in the knots as shown for extra security.
Rope Tree Swing Final Assembly
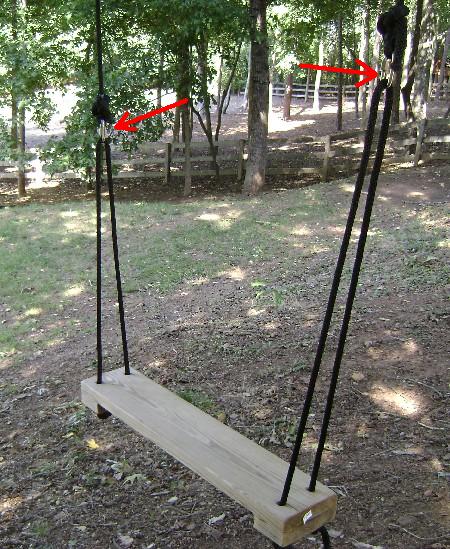
Install a 5/16in stainless steel quick link (also known as a “chain link”) on each of the seat rope loops. This product has a working load of 1760 lbs – more than strong enough for this project. Do not use aluminum or cheap look alikes as commonly seen on school backpacks – those will break and get you hurt.
The red arrows point to the quick links:
Hanging the Rope Tree Swing Seat
Adjust the slack so the swing seat is about 24 inches above the ground, and tie the rope hanging from the tree limb to the stainless steel quick link with a Buntline Hitch. Here’s a closeup of the steel quick link and knot:
Before tying off the Buntline knot at the opposite end, place the carpenter’s level on the swing seat and adjust the final knot position so both ends of the seat are even.
The steel quick link will bite into the hollow core braided rope (red arrow) as shown in the next photo making a flat spot in the rope. This is essential for stability such that the seat doesn’t spill over. Tipping has never had a problem on my swing.
If seat tipping becomes a problem, try looping the rope once around the steel quick link to increase friction.

Rope Tree Swing Construction Tips
- Melt the synthetic rope ends with a butane lighter to seal the braids so it doesn’t unravel.
- Check the tree limb every season to see that’s it’s healthy, strong and the rope is in good shape.
Update: 3 Years Later
These next photos were taken 3 years later to clarify how the swing is setup in response to several reader questions. The ropes are looped over an uneven branch, the two points maybe 14 or 18 inches difference in height. The ropes are very long about 15 feet from the swing seat to the branch. The swing moves straight because the difference between the two attachment points to the tree branch is small relative to the total length of the ropes.
Close up view from above:
What If You Don’t Have a Tree?
A reader asked me:
Hello Bob, I have wanted a tree swing in my back yard for EVER. Problem is, I don’t have a big tree. Darn it. I thought a great tree replacement would be a light pole that are used for traffic lights. I have tried to get information about the light poles and have found dead ends everywhere. I live in Minnesota. I think the light poles are aluminum? I think they could be very strong if they were secured to the ground with footings and decorative pillar looking bases. What do you think? am I nuttier than normal? Could you help me accomplish a dream so I don’t have to wait to grow a tree?
Thanks much,
Julie Schnell
Rope Swing Support Frame Design
I doubt the arm of a lamp post would be strong and durable enough to support a rope swing, but Julie’s thinking is in the right direction. If you don’t have a suitable tree to hang the swing from a branch, the following scale diagram for a rope swing supported by wood posts will work:
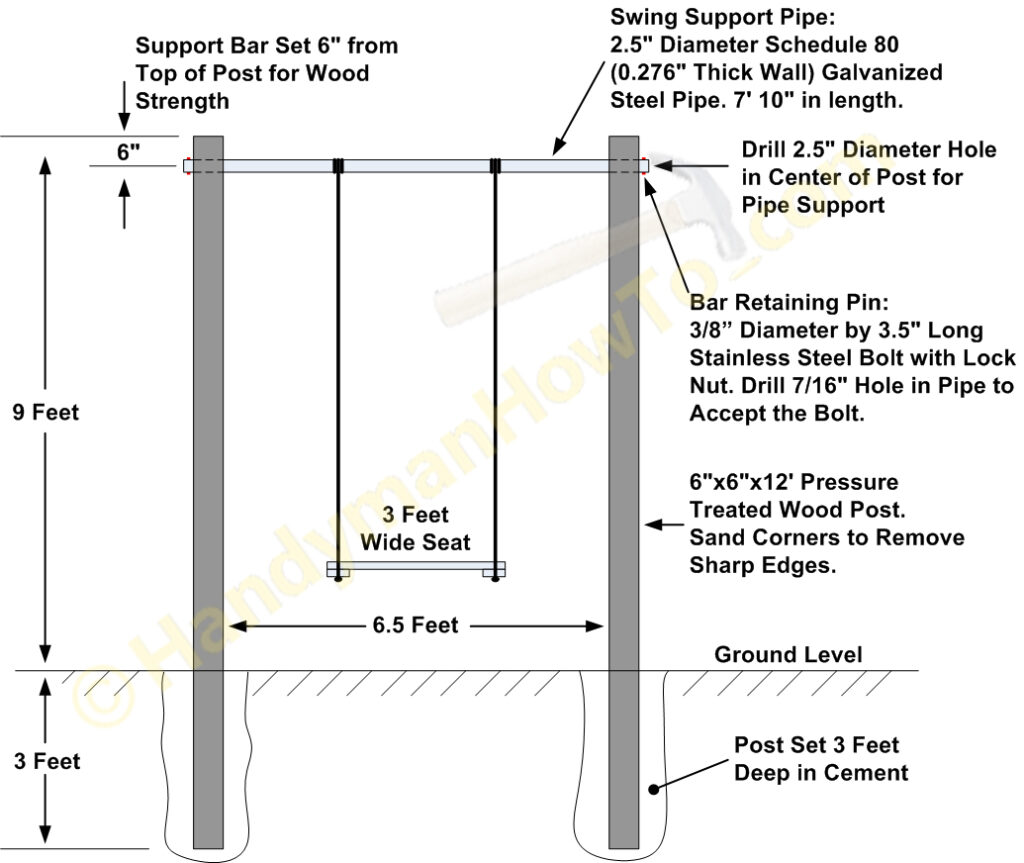
The key elements are:
- 6in by 6in by 12 feet pressure treated wood posts. 6×6 posts are very strong.
– Round off the corners of the posts to remove sharp edges that could cause injury. - A heavy galvanized Schedule 80 (.276″ thick) steel pipe set in the center of the posts to support the swing. The scale drawing shows 7’10” long, but you leave it at 8′ in length for simplicity.
– The pipe wall thickness is extremely important for strength! - The galvanized support pipe is fixed in place by two 3/8″ diameter bolts (retaining pins) in each end.
- Build the swing seat and tie the knots in the normal way as shown in this project.
The swing support frame can be built for about $250 in materials:
- ~$66.00 for two 6x6x12 pressure treated #2 Southern Yellow Pine posts @ $33 each.
- ~$125.00 estimate for an 8 foot long by 2.5″ diameter Schedule 80 (~1/4″ thick pipe wall) galvanized pipe.
- ~50.00 for ten 50lb bags of Quikrete® Fast Setting Concrete Mix at $5/bag each.
- Couple of dollars for 3.5″ x 3/8 dia. bolts, lock washers and nuts.
Rope Tree Swing Improvements
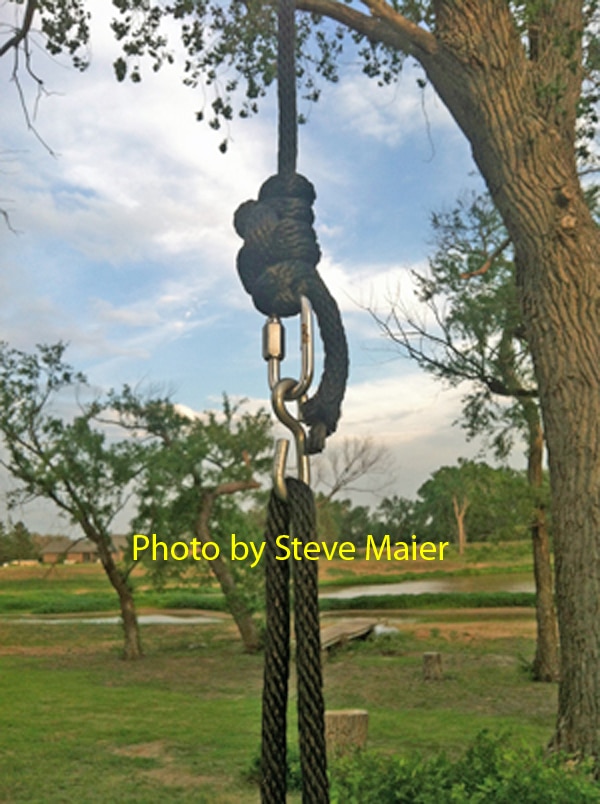
Steve Maier improved built the rope tree with several great improvements:
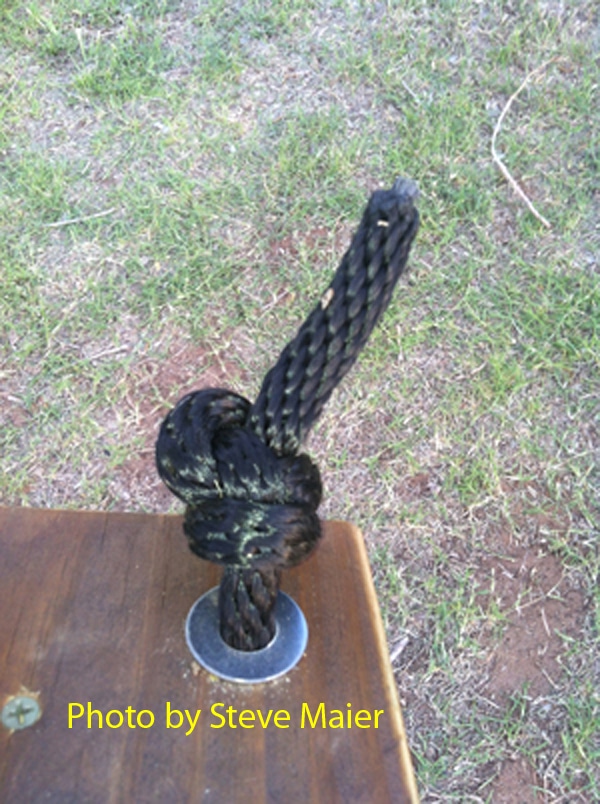
- Steel seat washers for the Ashley’s Stopper Knot.
- Quick release S hooks to remove the seat and attach a disc seat, tire or rope foot loop.
- A knot or two above the steel quick links for handholds when using the foot loop.
See Steve’s comments below dated May 27, 2013 at 3:38 pm for a complete description. Steve was kind enough to send photos of his swing – very nice job! I like the stained wood seat.
Rope tree swing tied to a 34 feet high branch on a cottonwood tree:

Quick release S hook below the steel quick link:
Seat washer for the Ashley’s Stopper Knot:
Have fun,
Bob Jackson