The basement patio French Doors were sagging, resulting in a torn weatherstrip on the active door and a 1/2 inch gap in between the two doors. To fix the problem I replaced the hinges with heavy duty ball bearing units made by Hagar Co. The Hager hinges feature heavy gauge metal and ball bearings that are much better suited for carry the 65 lb. weight of the French Doors.
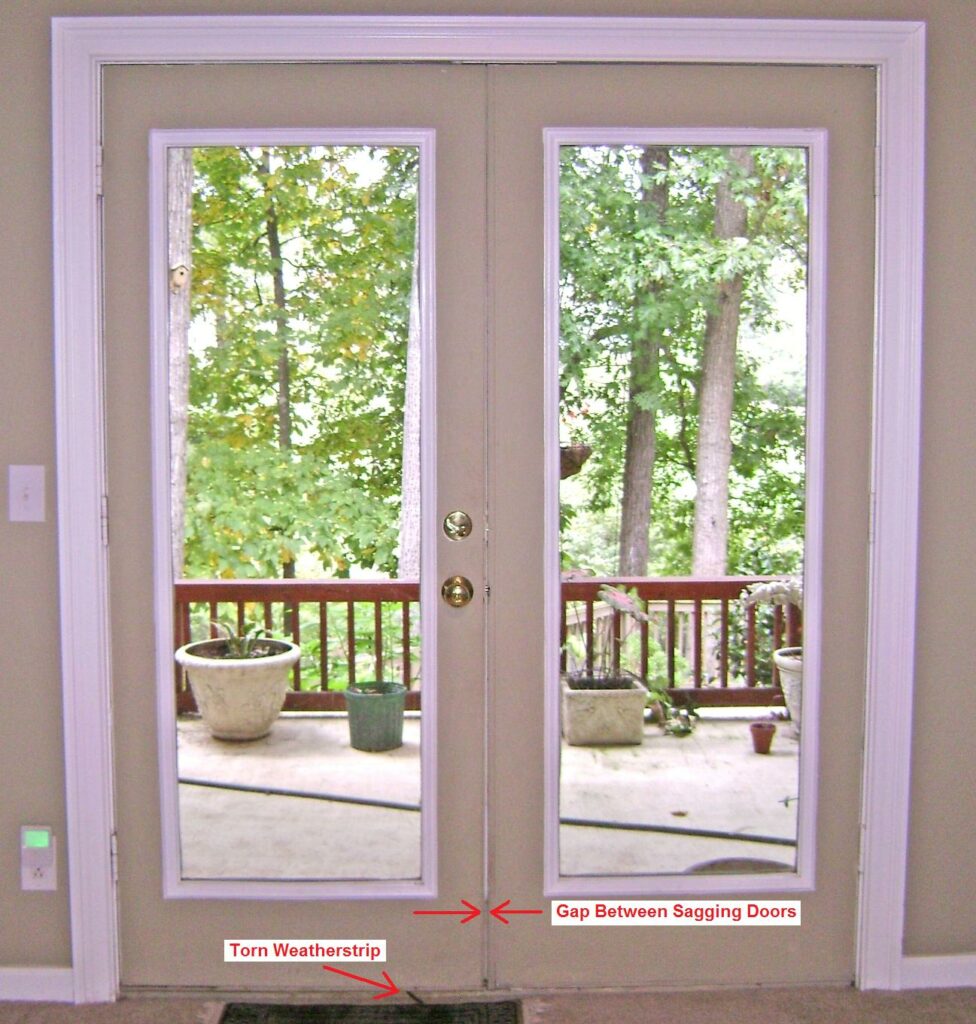
The job turned out to be a bit more extensive than simply replacing the hinges. When I removed the door, I found more problems and replaced the torn weatherstrip, rotted door bottom and split t-astragal molding between the doors.
What Causes Doors to Sag
Doors take a lot of abuse and frequent opening and closings. Several things can cause a door to sag, the most common causes are:
- The hinges relax due to metal fatigue – especially the top hinge which has the greatest stress.
- The hinges screws start to work loose.
- The door jamb and/or frame gets twisted as the door swings open and closed.
- The wall has settled and the door frame is out of square.
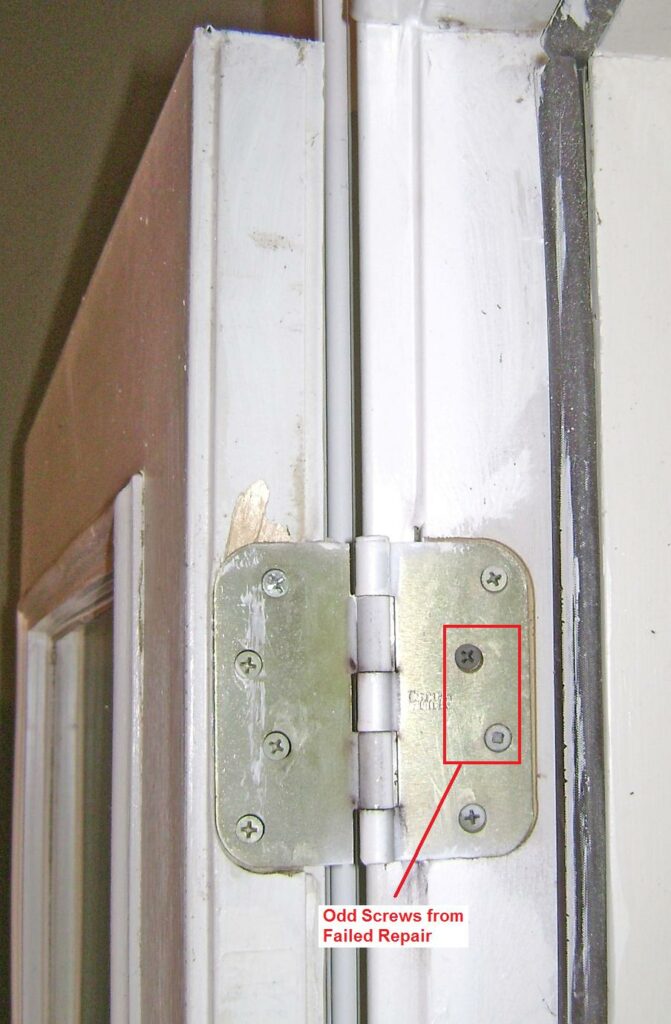
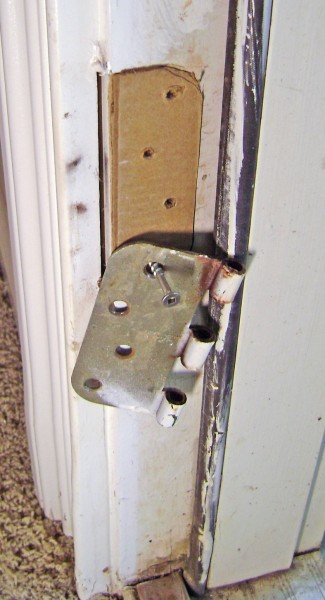
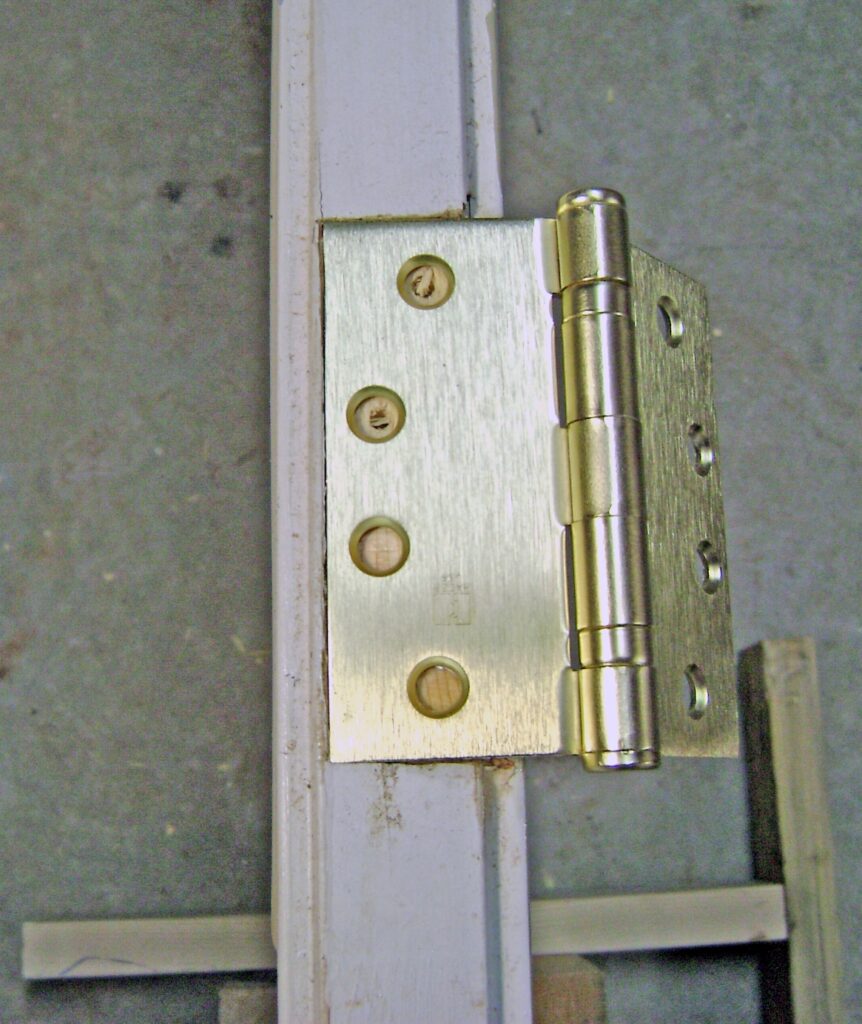
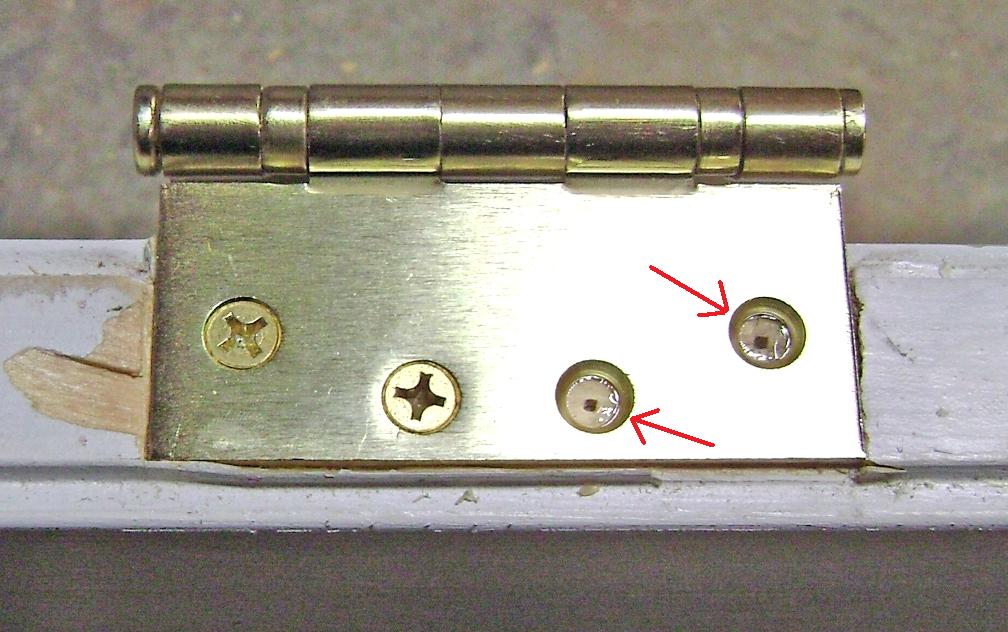
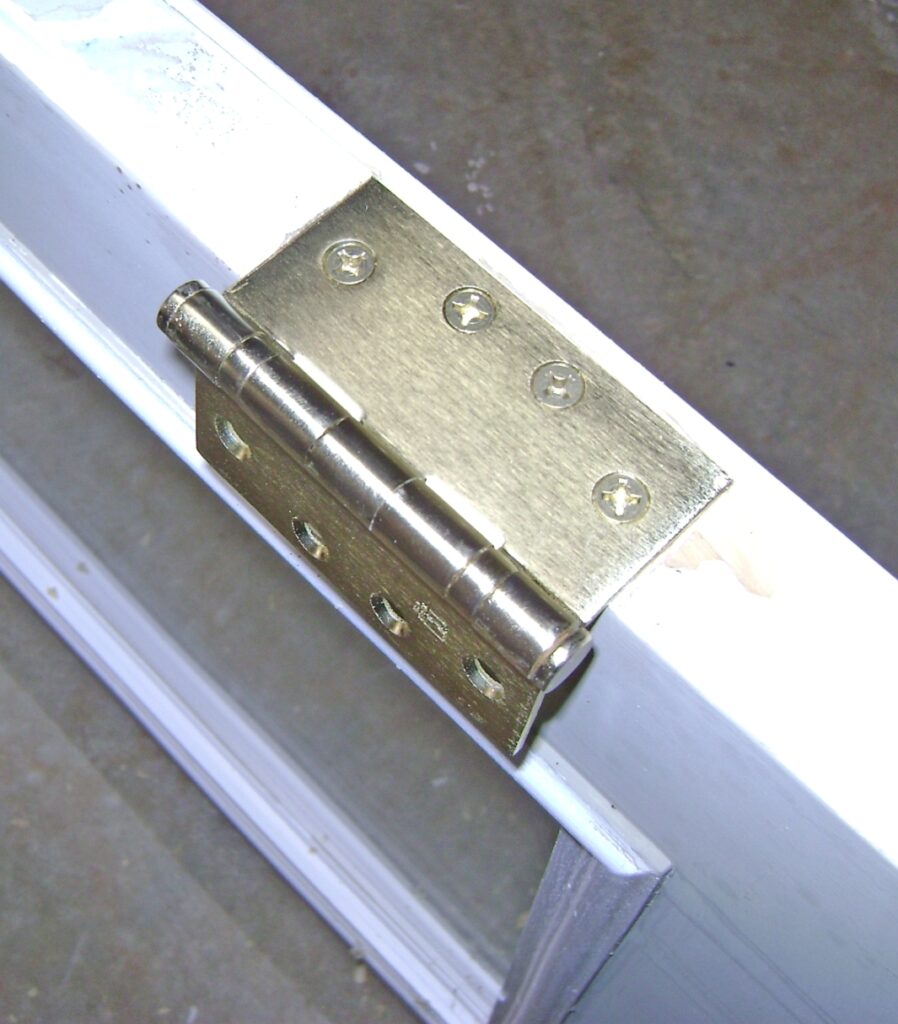
In my case, the wall sits on the concrete foundation, no wall settling has occurred, and the door frame is square and plumb. What I did find is the prior homeowner attempted to fix the problem by replacing the hinge screws with longer ones sunk into the 2×4 door frame, but this failed to remedy the problem because the top hinge had relaxed (bent) over time due to the 65 lb. door weight over 10 years of use. Notice the darker Philips- and square drive screws in the top hinge leaf. It also looks like the hinge has pulled to left by the gap between hinge and the edge of the mortise. These are a tell-tale signs of a failed repair.
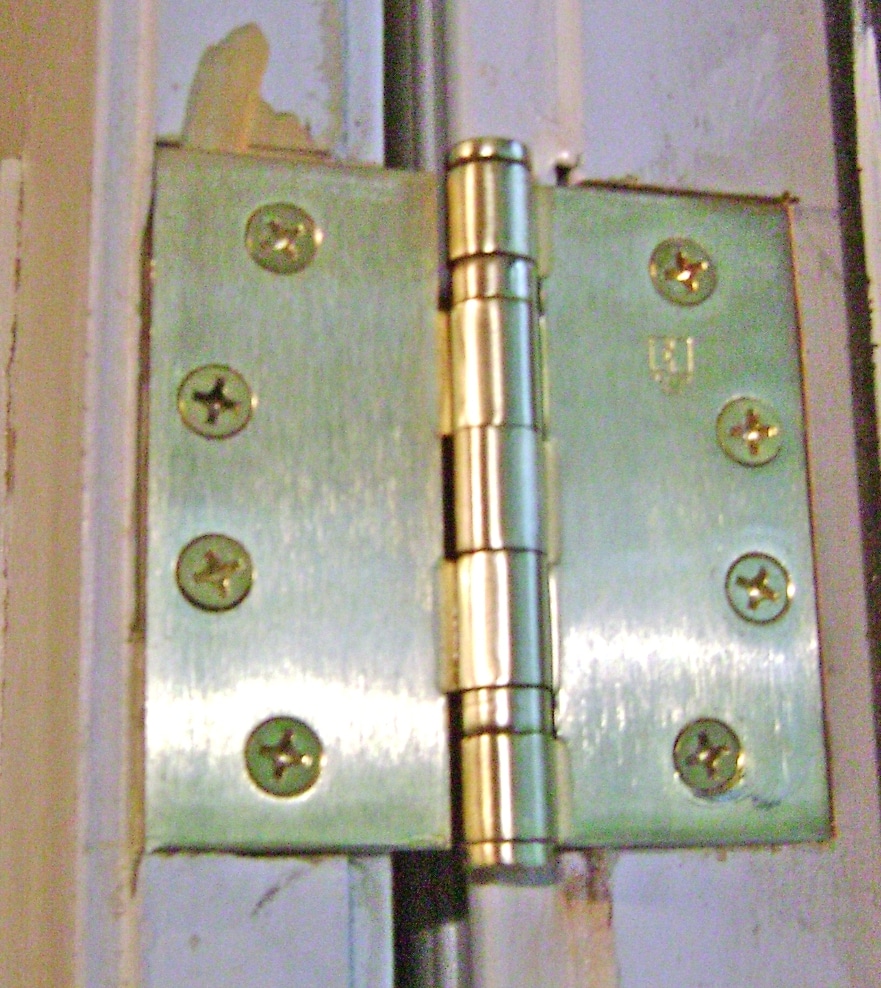
The bottom door hinge had obvious signs of repair with mismatched square drive and Philips head screws.
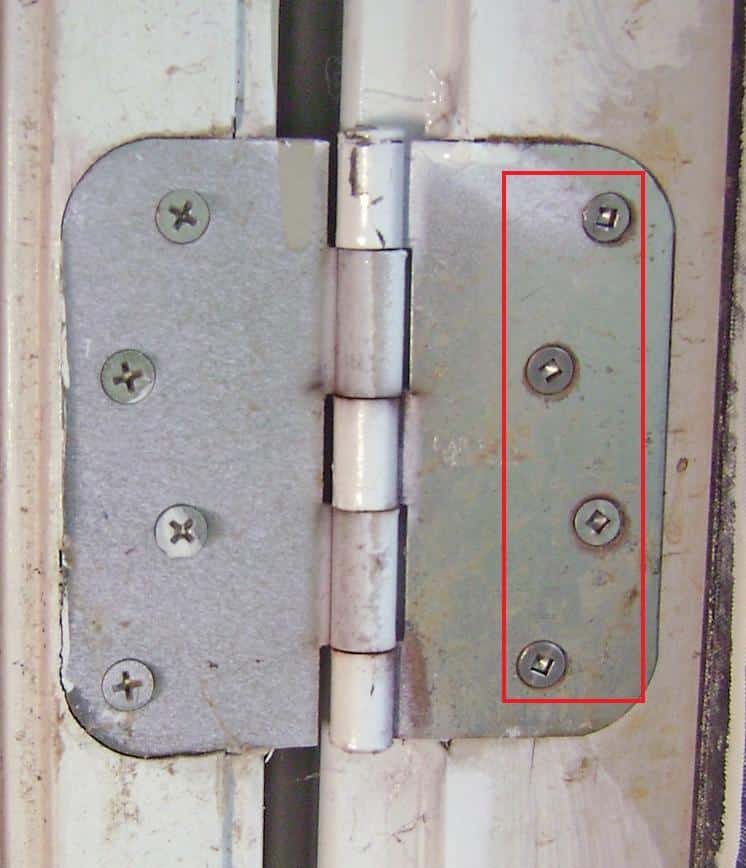
I happen to have small and large square drive bits for my Dewalt cordless drill, but things like mismatched screws are an unnecessary inconvenience. A further sign of a jack-leg repair job. You should always strive to use the same type of screws on a job.
Hagar Ball Bearing Door Hinges
The Hager Hinge Company specializes in door hinges for residential, commercial and architectural applications. I decided to upgrade basic residential hinges on the 65 lb. French Door with heavier models, and settled on the Hager BB1279 ball bearing Architectural hinges rated for doors up to 150 lbs. The BB1279 4 inch hinge costs about $15 each, compared to maybe $3 for the low-end hinges currently on the door.
Stanley Hardware also makes a very nice line of premium door hinges, but I settled on the Hager BB1279 hinges.
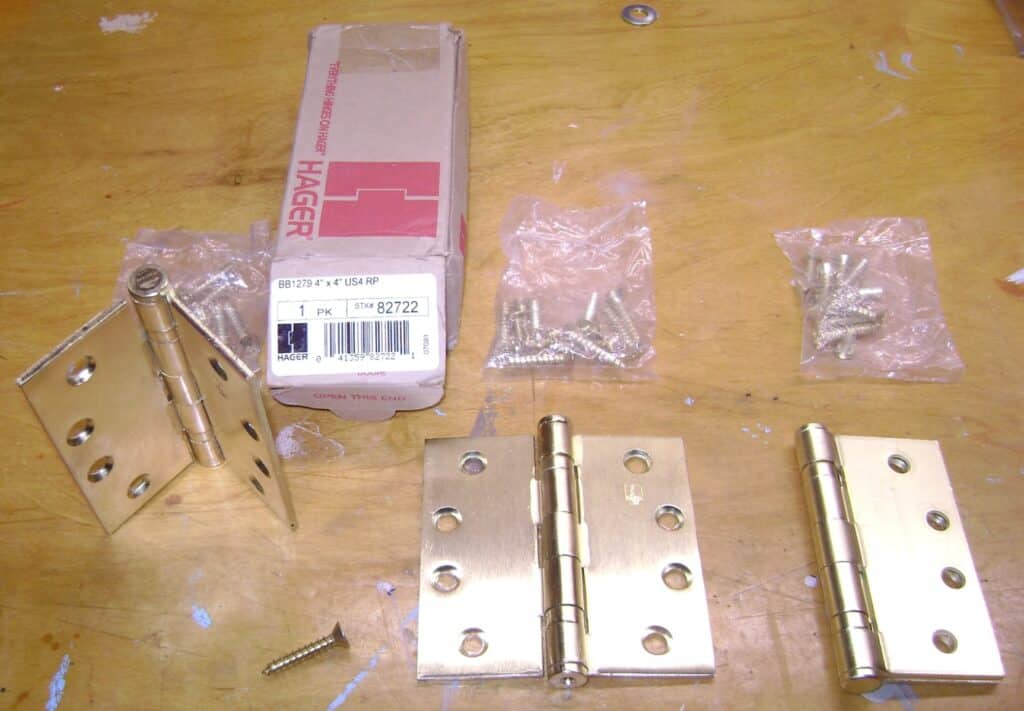
This is the box of three Hager BB1279 4 in x 4 in satin brass (US4 finish code) ball bearing hinges.
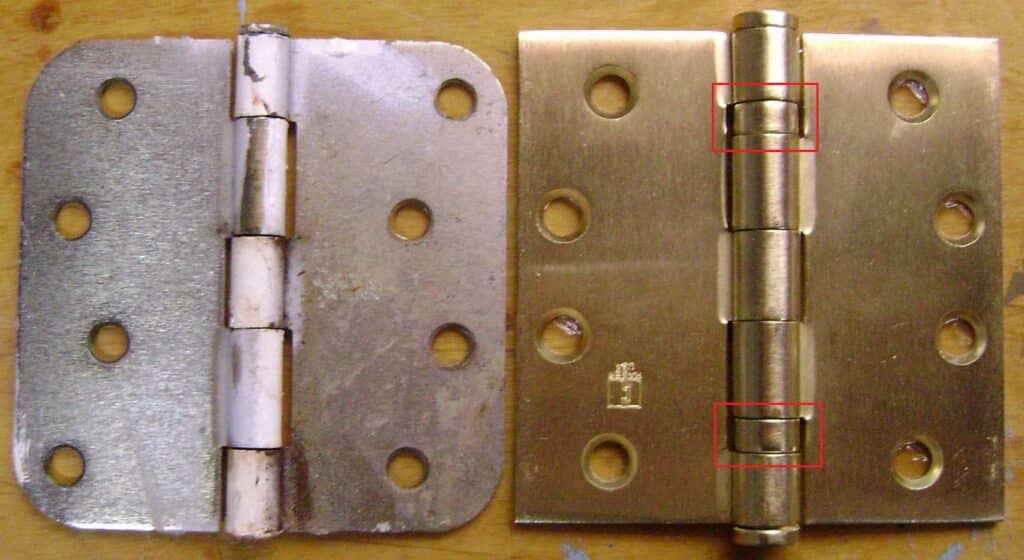
This is the Hager hinge compared to the old hinge that was on the door. The ball bearings in the Hager hinge are highlighted in the red squares. Notice the screw holes in the Hager hinge are countersunk given the heavier gauge metal where the old hinges are not.
End view of the two hinges. Quite a difference in the quality of the construction!
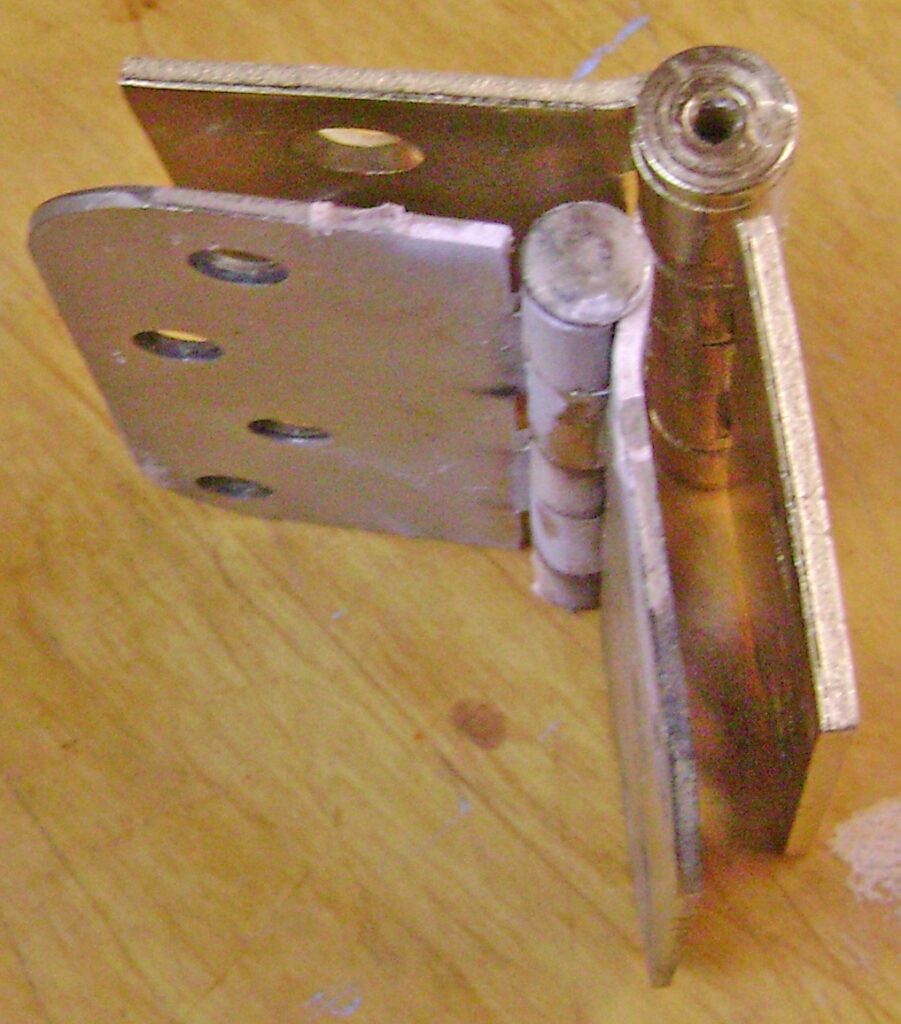
The Hager hinge (bottom) has square hinge leaves and (fortunately) a different hole pattern. The mortise will be recut for the square hinge leaves and the different hole pattern is good because I can sink the screws into virgin wood for greater strength.
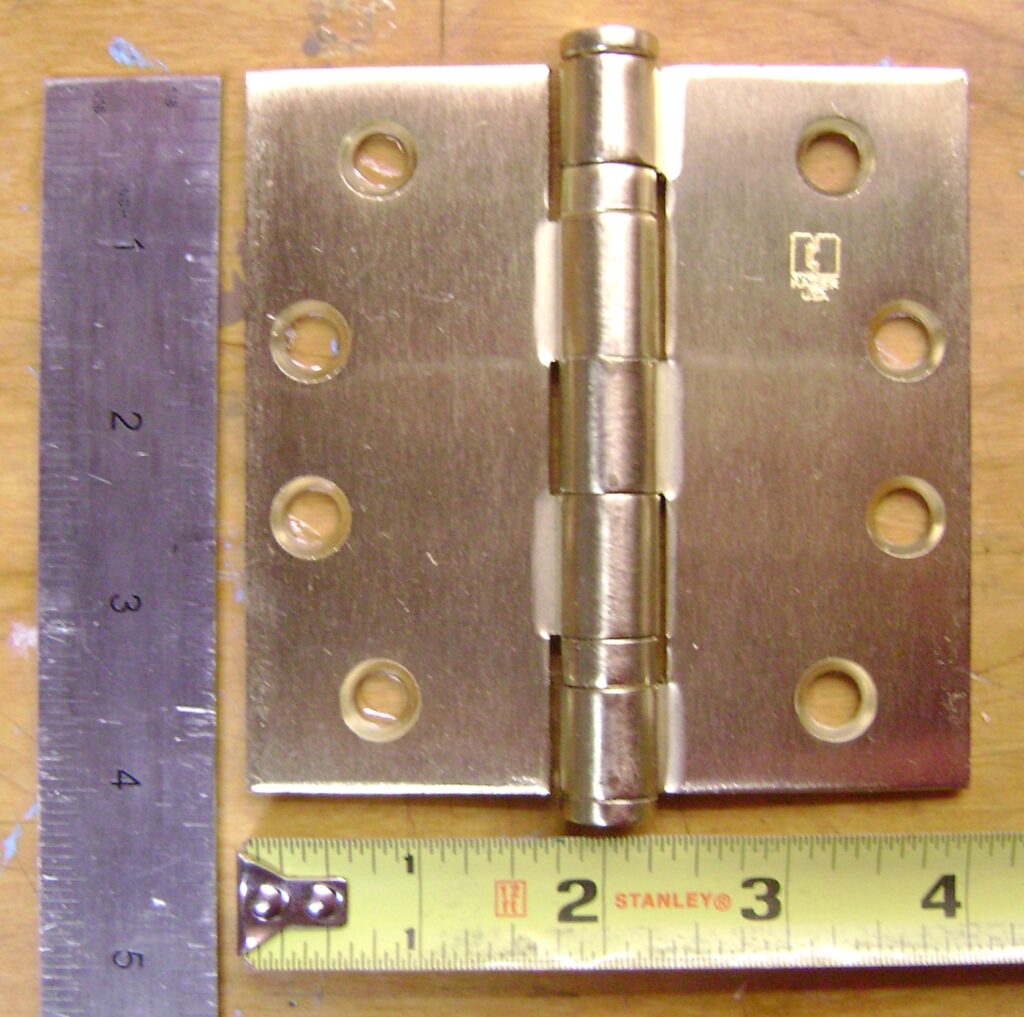
I bought 4 inch hinges to match the size already on the door.
Before moving on to the hinge installation, it’s helpful to have an understanding of how door openings are constructed.
Wood Frame Wall and Pre-Hung Door Construction
In the unfinished section of the basement, a pair of metal 6-panel exterior doors opens onto the basement patio which were made by the same company that manufactured the French Doors. The construction is identical except for the single light glass pane in the French Doors.
These doors are “pre-hung” – meaning the doors and hinges are already attached to the jambs. This is indicated by the large red box outline in the photo below. The door unit is set into the 2×4 framed rough opening, plumbed and leveled with shims, then nailed or screwed into the 2×4 frame. The door casing (also called moulding or brickmold) is the decorative finish trim that’s installed around the sides and top of door jamb to cover the gap between the jamb and 2×4 frame.
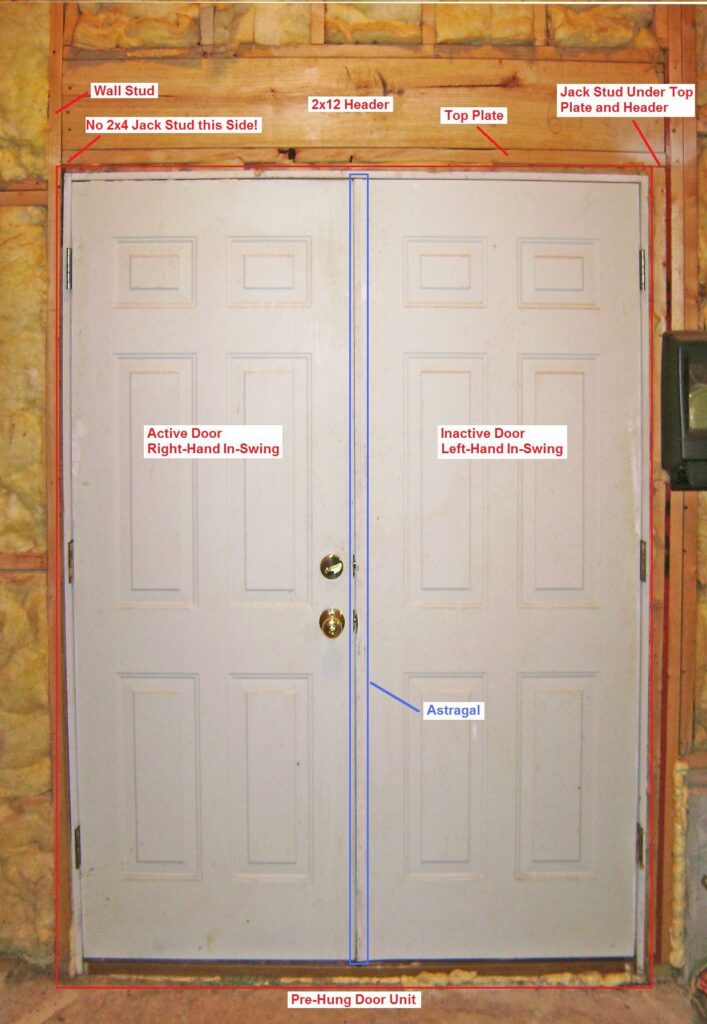
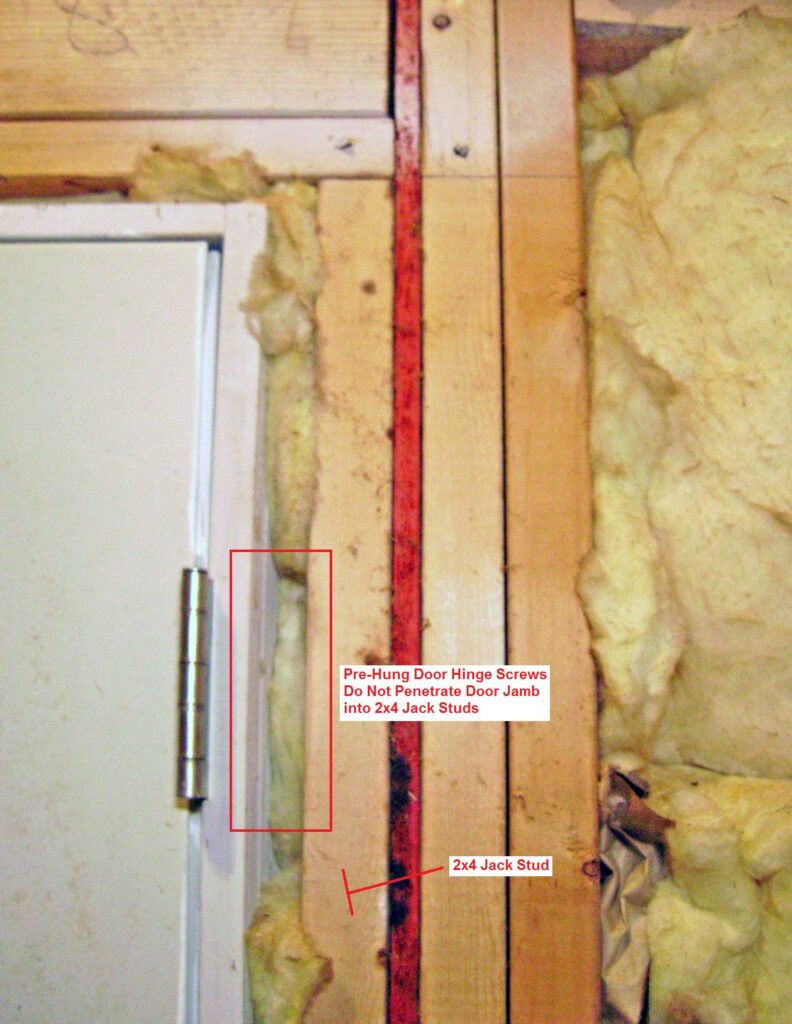
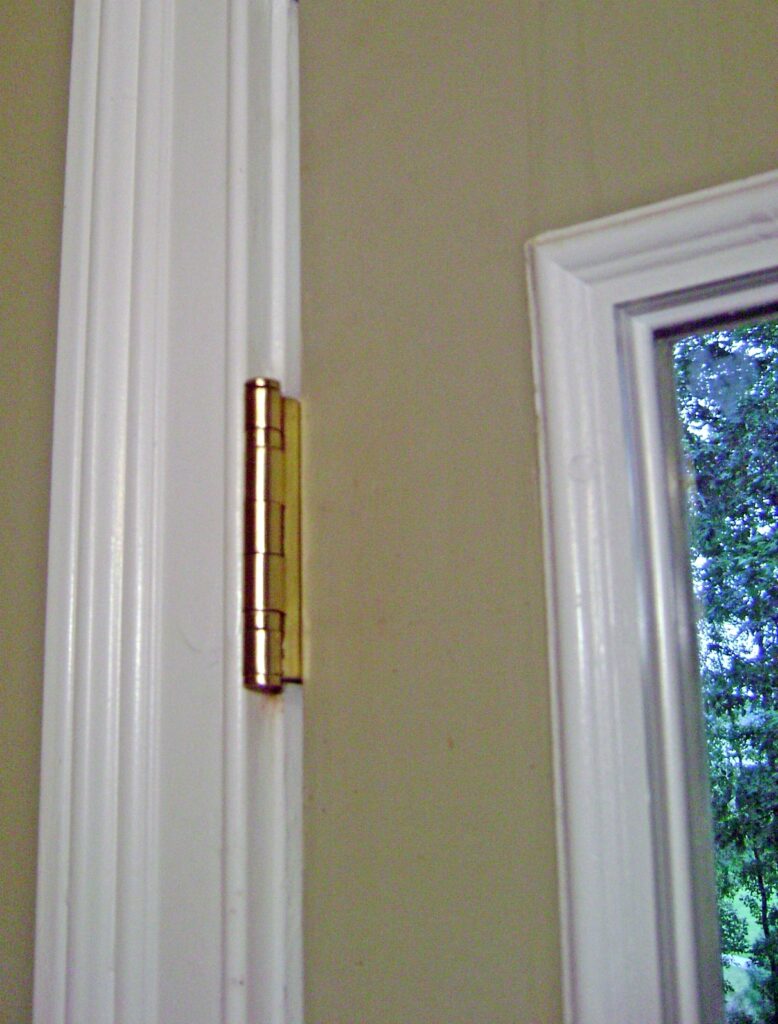
A closeup of the top right door hinge illustrates the hinge screws do not penetrate the 1 inch door jamb and it appears the door jamb is largely unsupported in this area. The relatively thin door jamb will not withstand the stress over time of a frequently used and/or heavy door. The door jamb will flex and twist – if ever so slightly – but enough to cause the wood screws holding the hinge to work loose over time. The jamb could also permanently warp causing a sagging door. The right door here is the “inactive” door that is locked into place with top and bottom slide bolts and therefore is rarely opened.
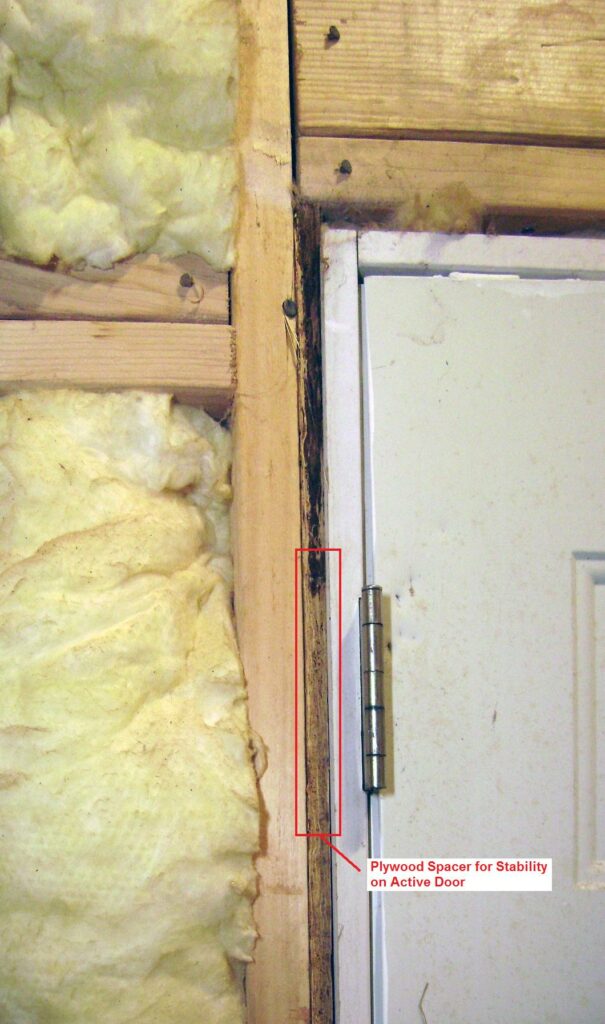
The left door is the “active” door with the door knob and dead bolt that gets regular use. The door jamb on this side is “coincidentally” reinforced with a section of plywood. It appears the carpenter was off in his door measurements and only had enough space for a plywood section instead of a full 2×4 jack stud.
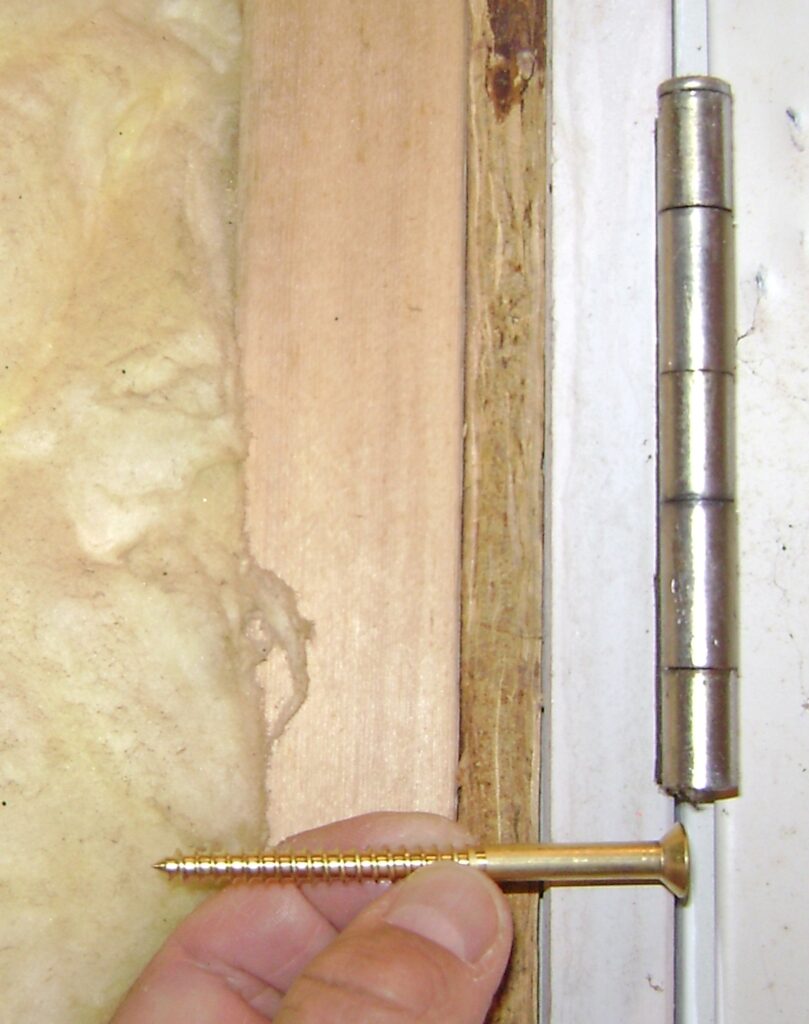
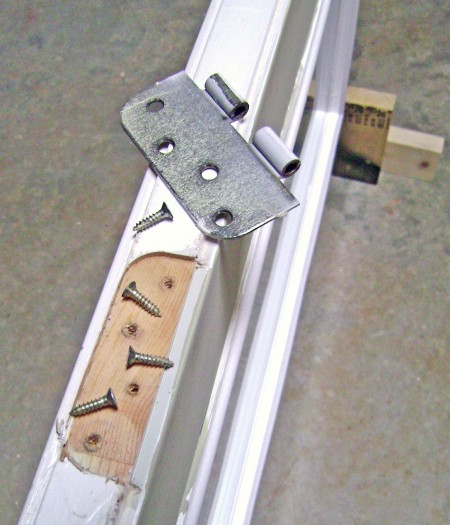
To reach the 2×4 framing studs behind the door jamb, I will substitute #12 x 3″ wood screws for the 1-1/2″ long wood screws (left) that are packaged with the Hager door hinge. I found the #12 x 3 inch screws at Home Depot.
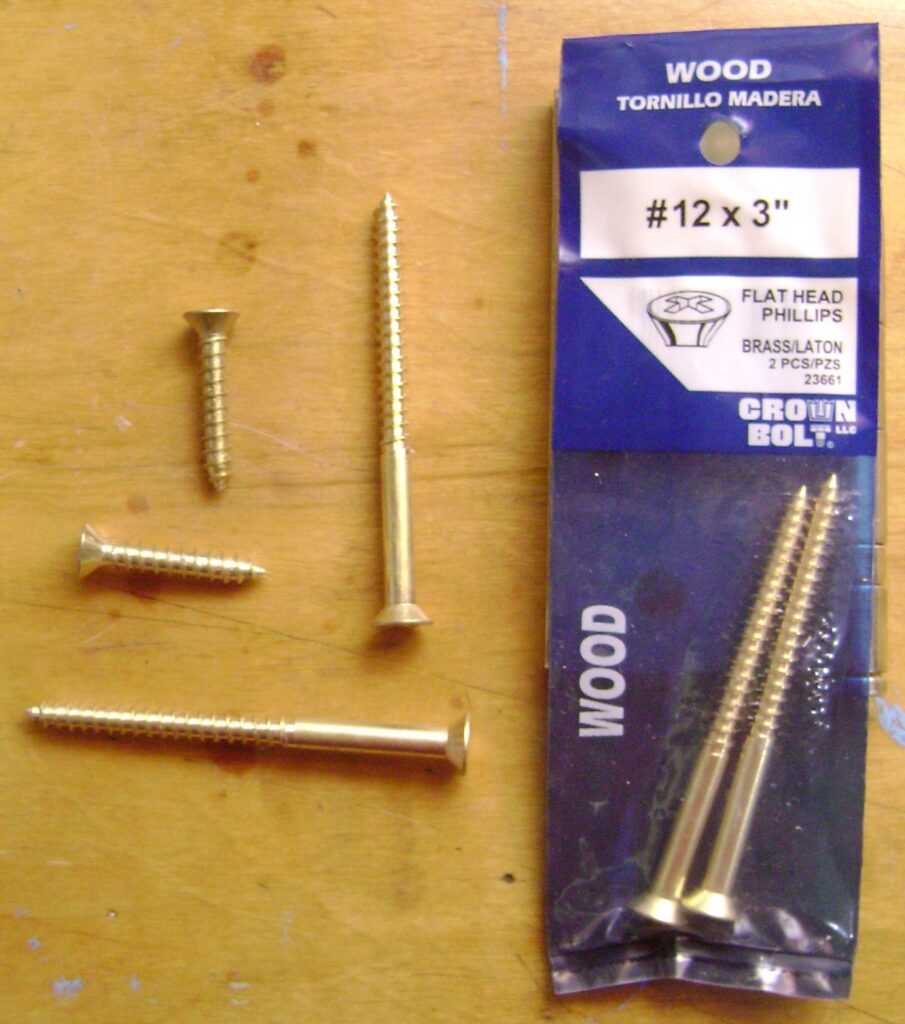
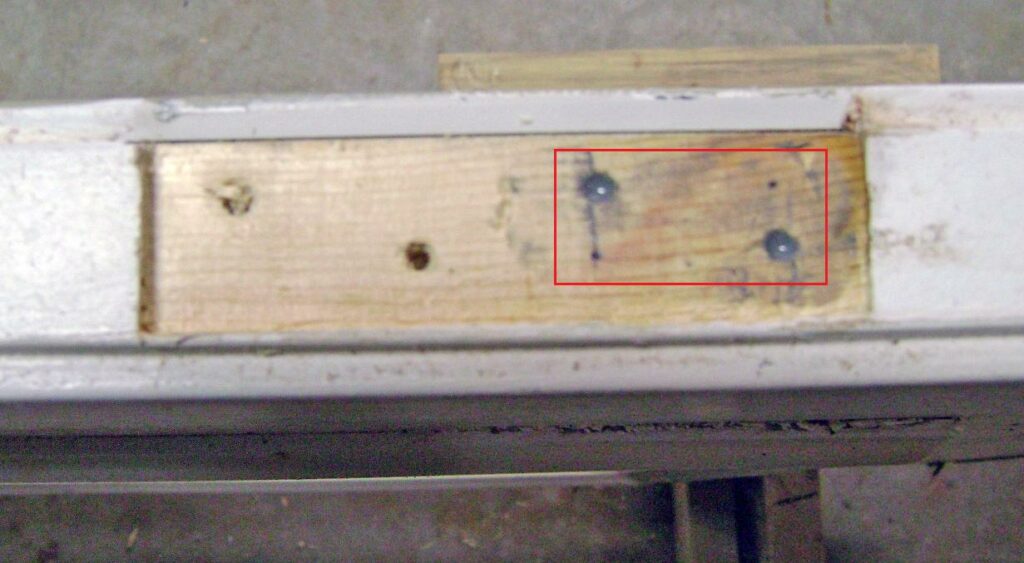
The following photo illustrates how the 3 inch wood screws will sink deeply into the 2×4 stud to firmly anchor the door hinges when I install the news hinges on the French Door.
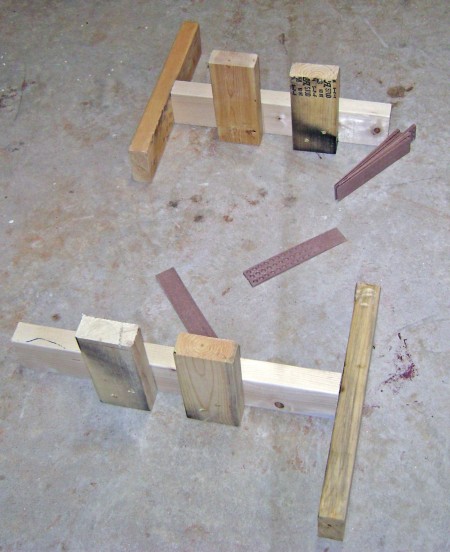
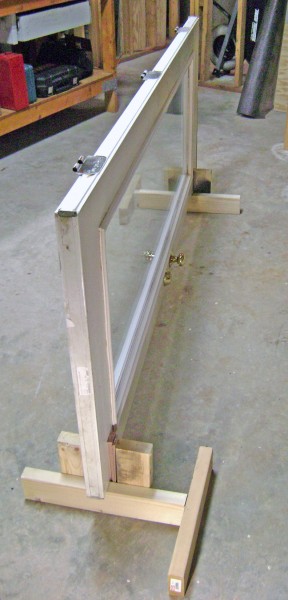
To install the new hinges, the French Door will have to be removed and stood on it’s edge in the workshop. A door is a large awkward item, so I made a pair of jigs out of scrap 2×4’s and 3 inch wood screws to hold the door edgewise. This is big convenience and time saver. I also didn’t want to risk breaking the door glass. The door is 1-3/4 inches wide and fits in the 2 inch wide vertical slots. Plastic wedges are inserted between the door and the 2×4’s to take up the slack.
How to Remove the Door
To remove the door:
- Open the door several inches.
- Place thin blocks and/or wedges under the free side of the door so it can’t drop when the hinge pins are removed.
- Have a helper hold the door so it doesn’t move. My French door weighs 65 lbs.
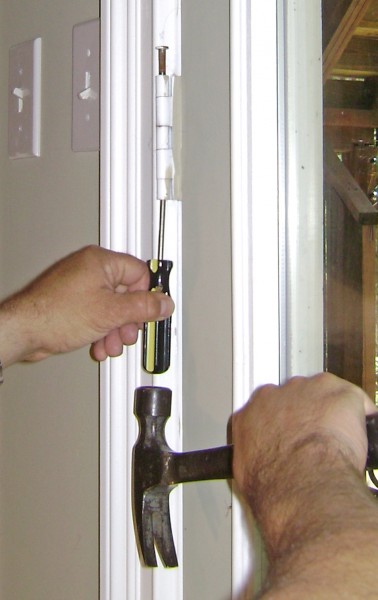
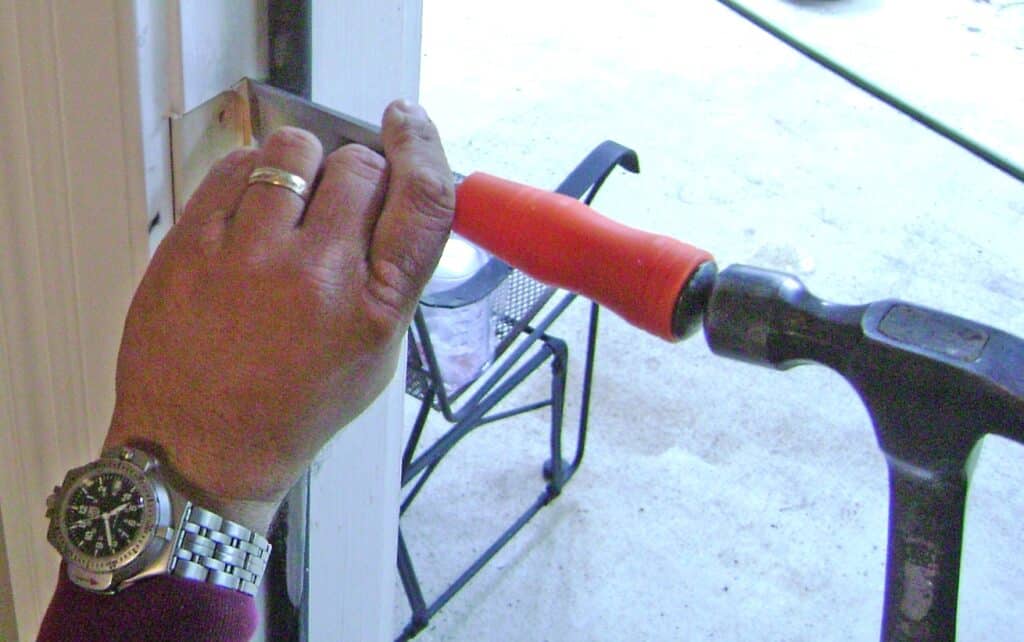
- Gently tap out the hinge pins from the bottom with a Philips head screw driver and hammer. I recommend starting with the bottom hinge first, then the middle and finally the top hinge.
- Squirt some WD-40 on the hinges if they won’t easily come out.
- Lift the door away when all hinge pins are removed.
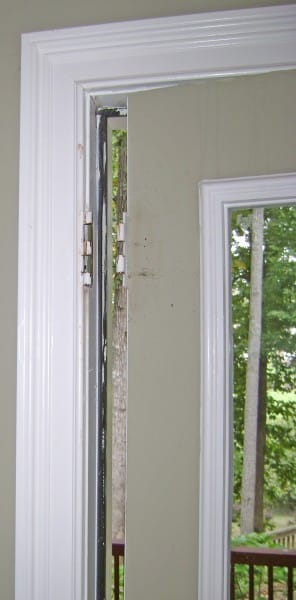
All hinge pins have been removed and the door is ready to be carried to the workshop.
The French Door is set in the 2×4 door jigs in the workshop and secured with plastic wedges to prevent wobbling. If you’re worried about marring the door finish, fold an old rag around door edges before placing it in the jig.
I found cardboard shims behind the bottom hinge, more evidence of a previous attempt to correct the door sag. The purpose of the shimming the bottom hinge is to pivot the bottom of the door out- and up to fix the sag. This can work well for minor problems. It didn’t fix the sagging problem with the 65 lb French Door.
The old hinge leaves taken off the door jamb. A variety of screws and cardboard shims were used in a prior failed repair – note this was my doing!
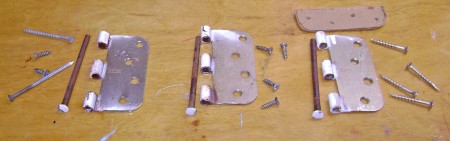
It was a snap to remove the old hinge leaves from the door with a cordless drill/driver.
With the French Door removed from the doorway, placed in a jig on it’s side to hold it securely, and the old hinges removed, I’m now ready to install the new Hager BB1279 ball bearing hinges.
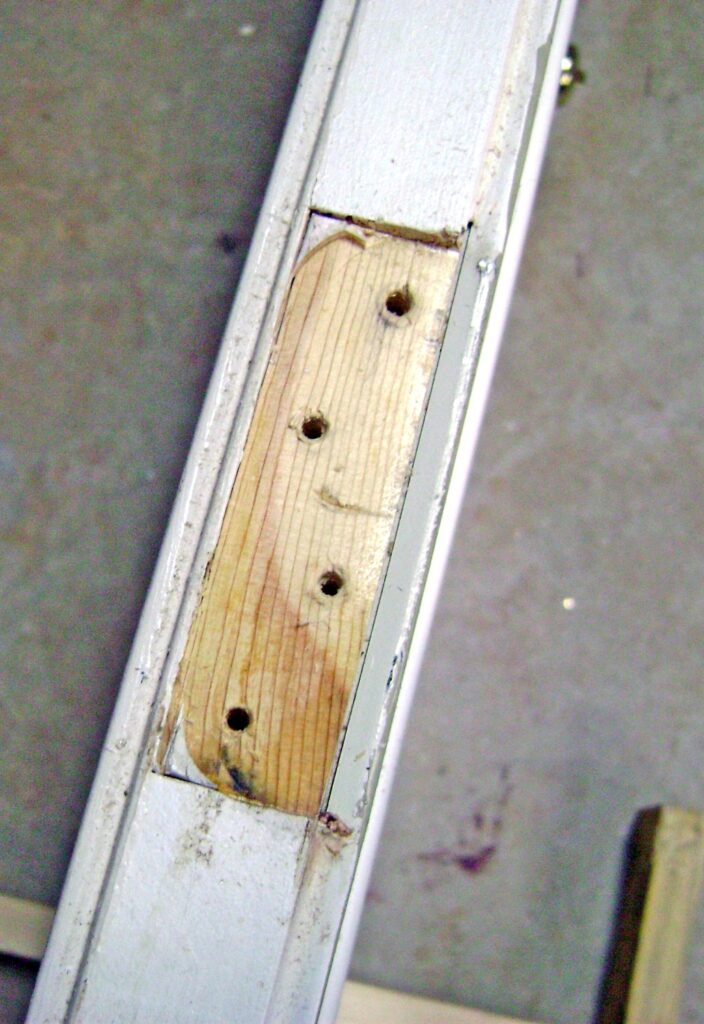
The Hager hinge has square leaves, but the mortise is radiused (i.e. has rounded corners) and is too shallow for the heavier gauge brass of the new hinge.
A wood chisel will make quick work of squaring and deeping the mortise to fit the new hinge.
How to Cut a Mortise for the New Door Hinge
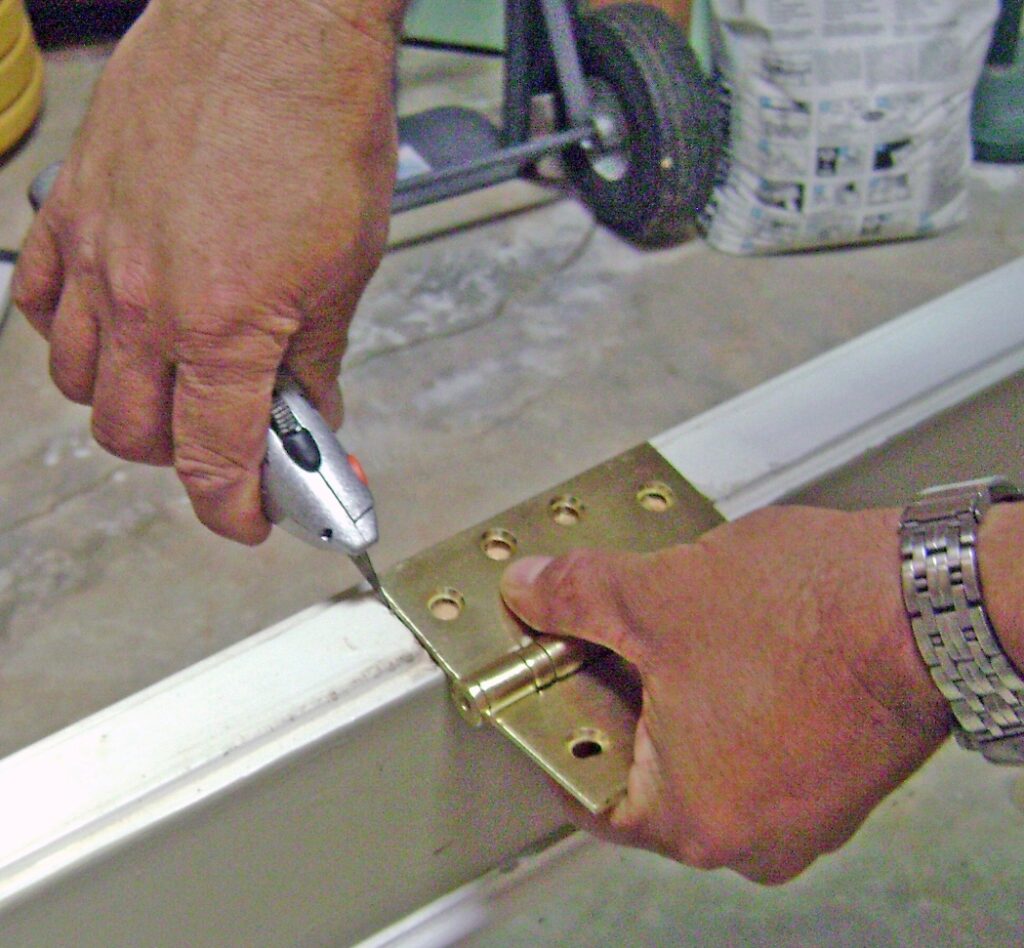
The new Hager door hinge is aligned with the old mortise to be squared and deepened. A sharp utility knife (a pencil will also do) is used to lightly score the outline of hinge.
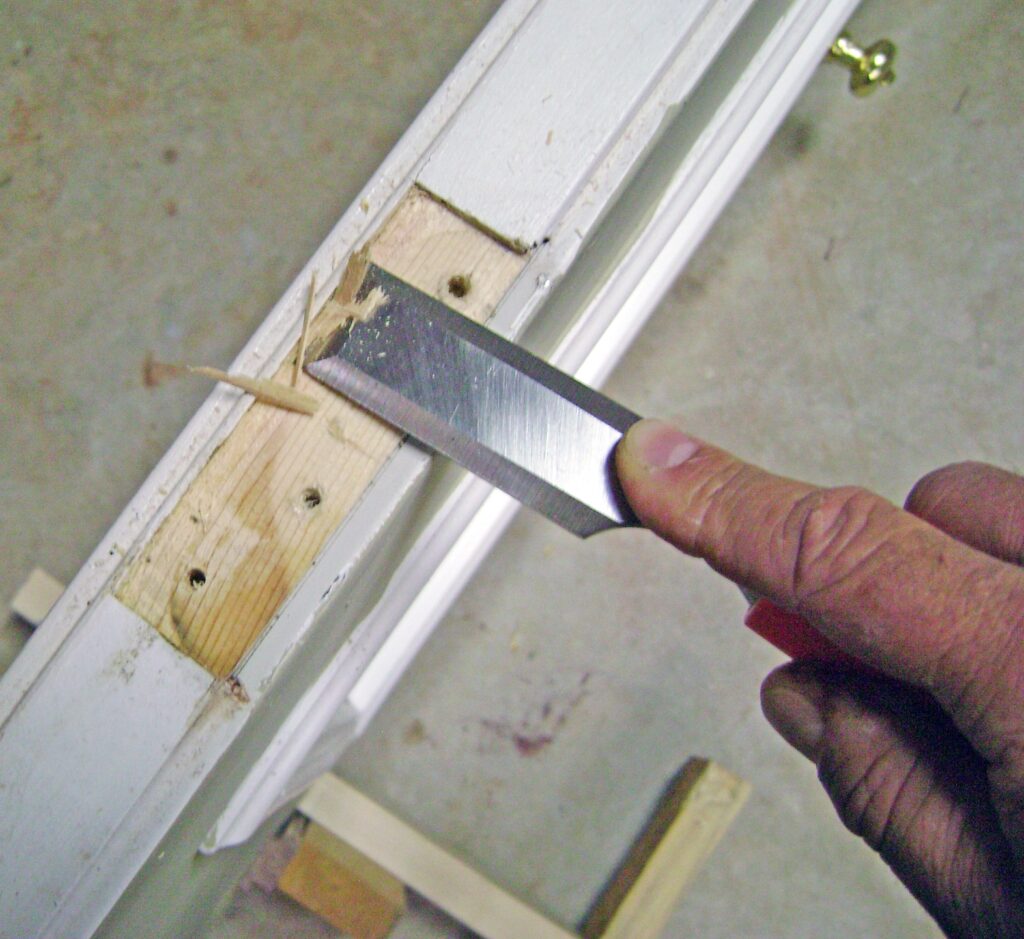
A very sharp wood chisel is used to cut along the lines marked with the utility knife. It is important the wood chisel be kept surgically sharp or you’ll just gouge and tear the wood. I use a diamond sharpening stone to keep an edge on my tools.
This is the hinge mortise after striking the corners with the chisel and hammer. One flat stroke of the chisel is all it takes to remove the corner wood pieces.
The Hager hinge leaf is much thicker than the original hinge leaf. The mortise must be cut 1/16 inch or so deeper for the hinge face to be flush with the door edge. The wood chisel is worked flat in the mortise to evenly remove wood shavings until the desired depth is achieved. Frequently check the fit with the new Hinge, eyeball and feel the edges, remove another layer of wood, then recheck the fit.
The hinge should lie flat (no high spots) and the hinge face flush with the edge of the door.
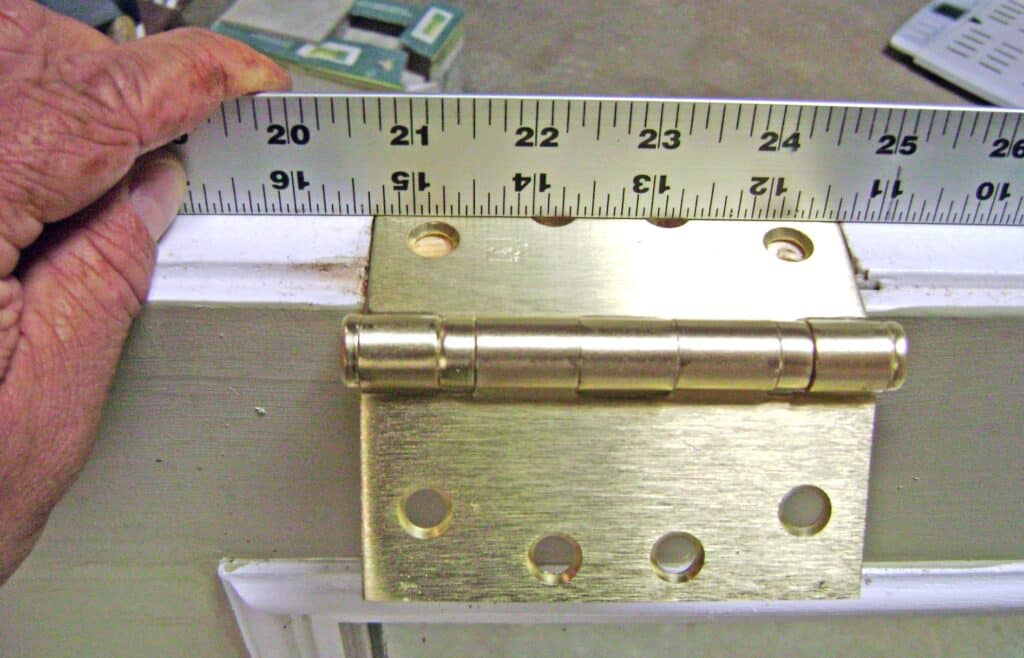
The steel ruler illustrates how the mortise is just deep enough for the hinge to be flush with the door.
The mortises on the door jamb are also squared and deepened to fit the new hinges.
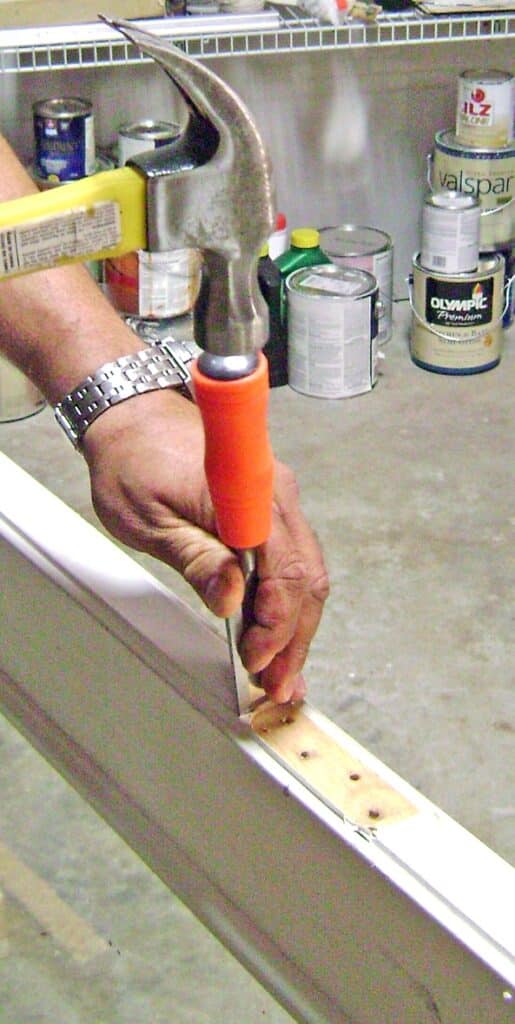
Two of the holes on the new hinge do not match the old holes, and filled with fast setting two-part epoxy putty to strengthen the door edge.
Having cut the mortises for the new Hager BB1279 ball bearing door hinges, I’m ready to attach the new hinges to the door. A long aluminum channel that doubles as a rip fence to cut plywood with my circular saw is used to align the hinges.
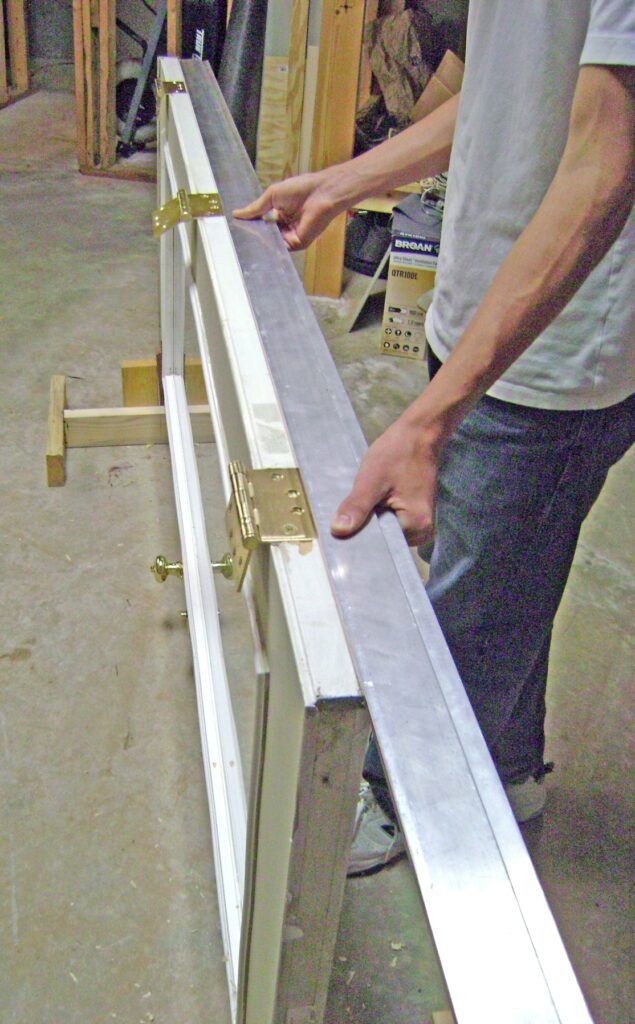
Install the New Hinges
Before you continue, take a moment and double check the hinge is properly oriented with the door. It helps to tilt your head sideways and imagine opening and closing the door while moving the hinge. If you’re not careful, you can install the hinge backward or upside down and the door won’t close.
The new hinges are installed by first attaching each hinge to the door using only one (1) screw in the corner of the hinge. This allows the hinge to pivot slightly around the screw. I was able to use a existing hole from the old hinge for this purpose.
The aluminum channel is held against the back of the hinges. The hinges are tapped gently to align the back of the hinge with the channel so that all hinges are straight and true with the channel. Is is critical for the hinges to be in perfect alignment or the door will bind on the hinges.
Here I’ve set two screws in the door hinge to fix the door hinge in place to keep the alignment. A sharp nail with a symmetrical point is used to center punch the screw holes. I could have used a center punch tool instead of a nail, but the nail was plenty accurate for this purpose.
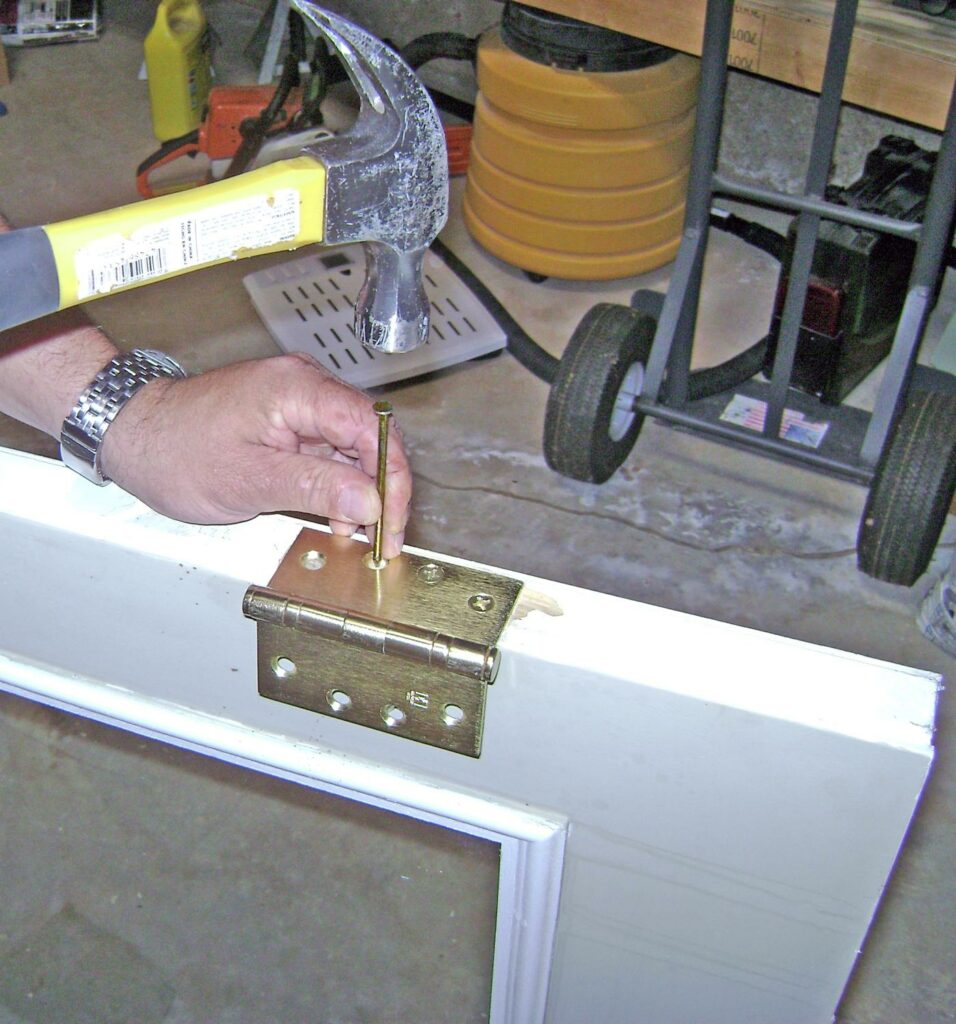
Center punches to accurately drill pilot holes for the new hinge screws.
Pilot holes are drilled using a drill bit that is slightly smaller than the threads of the screw to avoid splitting the door frame when the screws are attached. Take care drill a hole that’s straight and not canted to one side. Use a drill bit long enough such that you don’t contact the hinge with the drill chuck and mar the finish. If you don’t trust yourself, remove the hinge before drilling the pilot holes.

Install the hinge screws after drilling pilot holes. Go slowly and stop when the screw if seated in the hinge leaf. Do not over tighten the screws or you will tear out the wood and the screw will not hold. Repeat for the remaining door hinges.
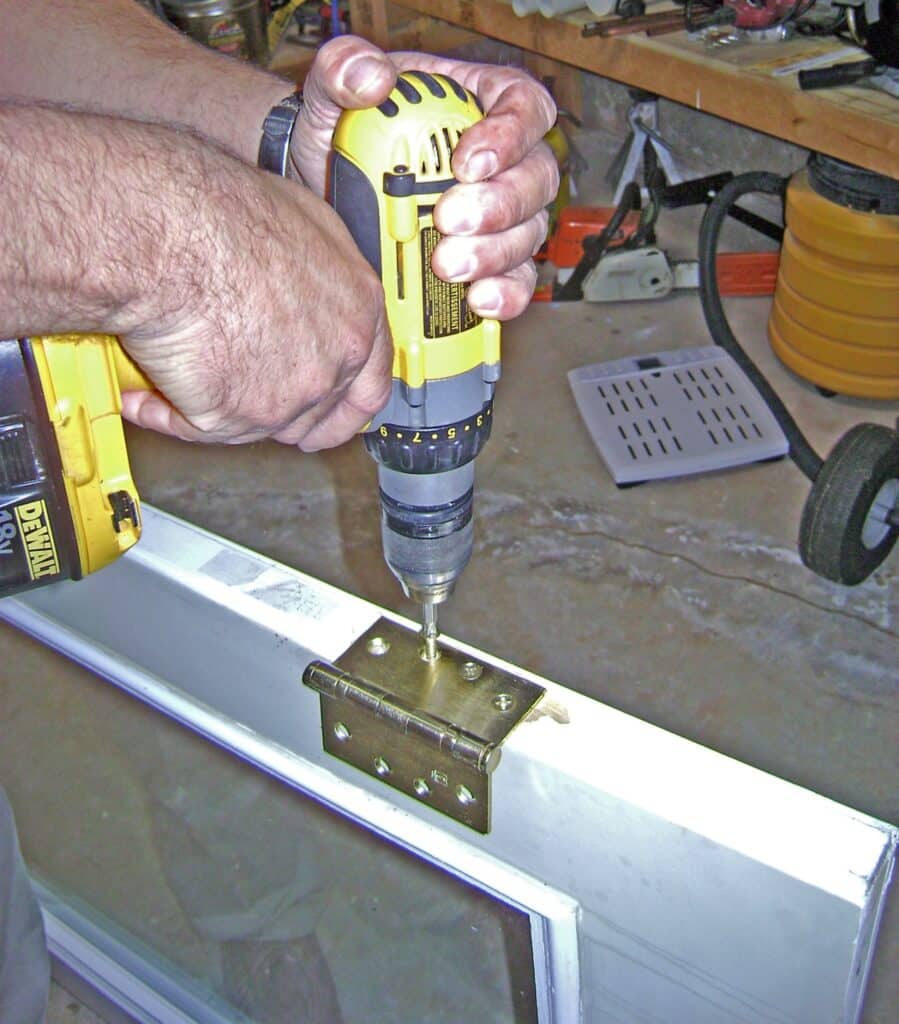
Hinge fastened to the door.
How to Rehang the Door
This part is a little tricky and requires attention to detail.
- Stand the door up in the closed position in the door way.
- Support the door on small blocks or wedges to align the hinge leaves with the mortises in the door jamb.
Always keep two hands on door such that it can’t fall – a helper is essential. - Check that the hinge leaves fit snugly in the door jamb – a flashlight helps to see inside the crack.
- Check the door latch and dead bolt operates without binding.
- Verify the door is plumb with a carpenter’s level.
- Mark the hinge positions on the door jamb with a pencil.
If the hinges aren’t seated properly in the mortise, use the wood chisel to make small adjustments. Since I was only refitting the hinges, the mortises were fine.
- Open the door 90 degrees such that the hinge leaves are flat.
- Support the door on small blocks and wedges. Make small adjustments to align the hinges in the mortise and with your marks on the door jamb.
- Mark, center punch and drill one (1) pilot hole only for the upper most screw in the top door hinge.
- Insert one (1) #12 x 3 inch brass wood screw into the hole just drilled in the top hinge.
- Mark, drill and install one 3 inch wood screw in the middle and bottom hinges, checking the alignment with your marks on the door jamb.
- While supporting the door, remove the blocks and wedges.
- Gently close the door to check for fit and alignment. Operate the door latch and deadbolt.
- Is everything good? Great! Gently open the door, support it with blocks / wedges, and install the remaining 3″ wood screws.
- If the door isn’t perfectly aligned, figure out what adjustment(s) are needed. You might possibly need to adjust the hinge position in the door jamb – which is why only one screw was fastened in each hinge, place a shim between the door jamb and bottom hinge leaf, or deepen the mortise for the top hinge. Take your time and study the problem.
This is the newly installed top door hinge. (BTW – That small chip in the door edge wasn’t my doing.)
This is the new hinge and rehung door.
No More Sagging Patio Door
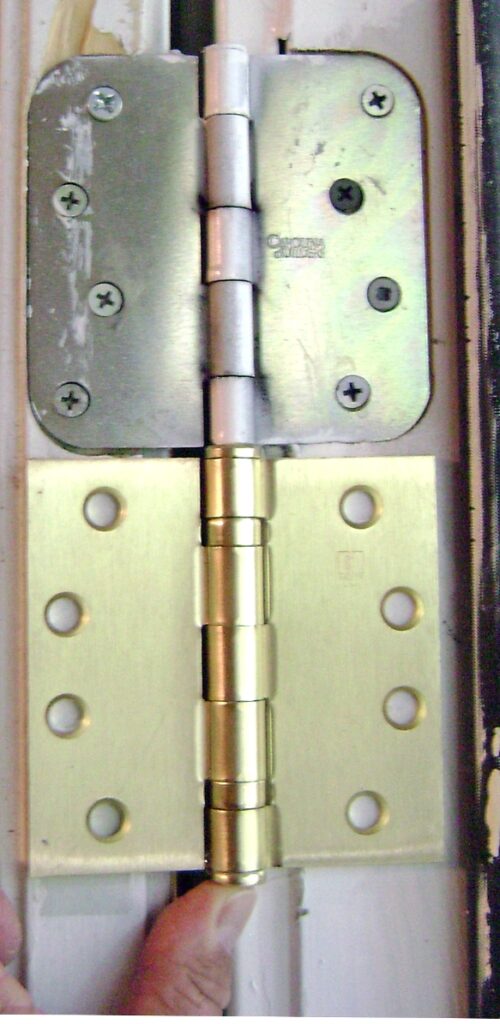
The new Hager BB1279 ball bearing hinges can be seen on the left in the photo below. The French door is now true and no longer sags.
The difference a ball bearing door hinge makes is amazing! The door glides smoothly and opens effortlessly like the door on German luxury sedan. It’s too easy now to slam the door and I have to remind the kids to watch it.
Notice the black weatherstrip on the left door bottom? I describe how I replaced the torn weatherstrip and repaired the door bottom in this project.
Thanks for reading,
Bob Jackson