How to install a bauco plus II drywall access panel by Access Panel Solutions in a suspended drywall ceiling. This project continued from the bauco panel overview.
Concealed Utilities in the Ceiling Crawlspace
The original homeowners hired a contractor to finish the basement and made the mistake of not filing for a Building Permit, which resulted in several Building Code violations with respect a to disconnected/improper location for a smoke alarm, ungrounded wall outlets (discovered during the home inspection) and a concealed natural gas shutoff valve for the fireplace (see the following photo). The original homeowners didn’t want a Building Permit because it would inform the tax assessors office of the added living space and corresponding increase in property taxes. What the naïve homeowners didn’t know is contractors may take shortcuts when they won’t be answering to the Building Inspector. You do want to file for the proper Building Permits and the Building Inspector is your friend. BTW – I’ve filed several for several Building Permits for work on the finished basement which corrected the finished square footage in the tax records and increase in property taxes has been very reasonable.
bauco plus II Drywall Access Panel Installation
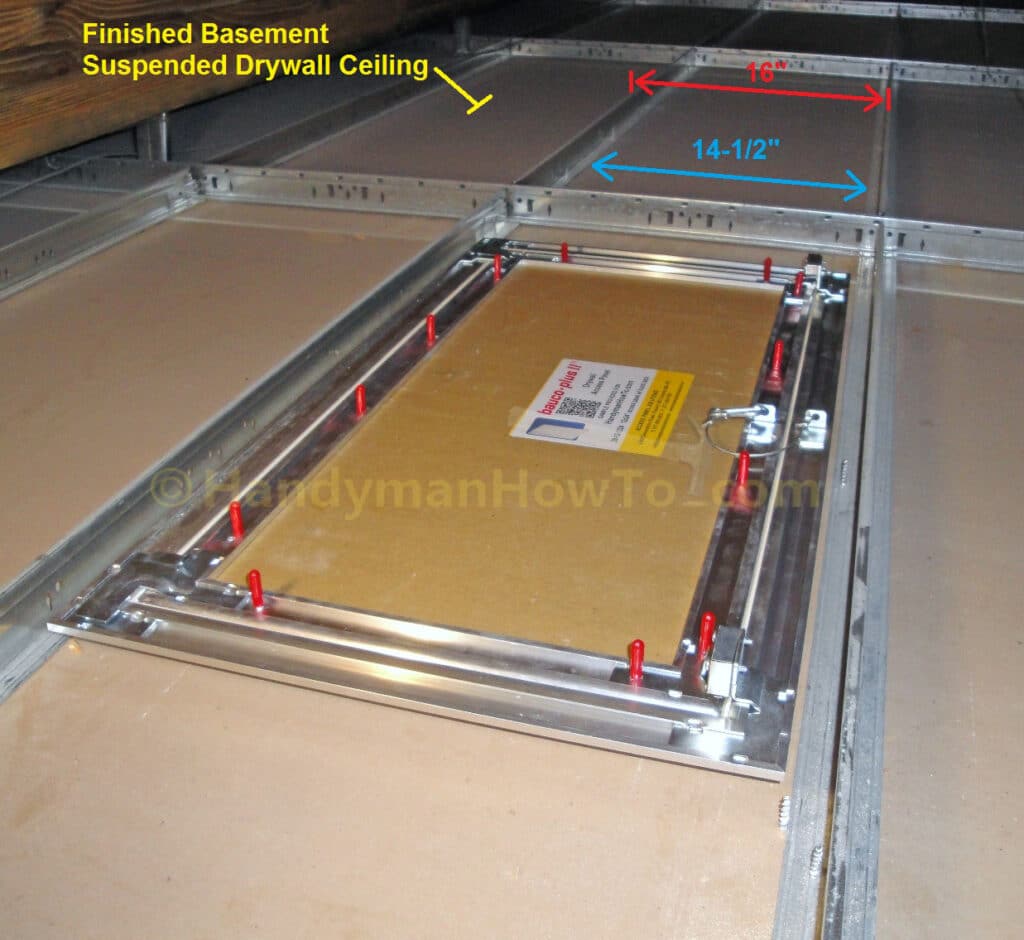
A 12″ x 24″ bauco plus II drywall access panel made by Access Panel Solutions (if you’re an Amazon shopper, here’s an alternative)will be installed in the suspended drywall basement ceiling at the location marked by the green X in the following photo:
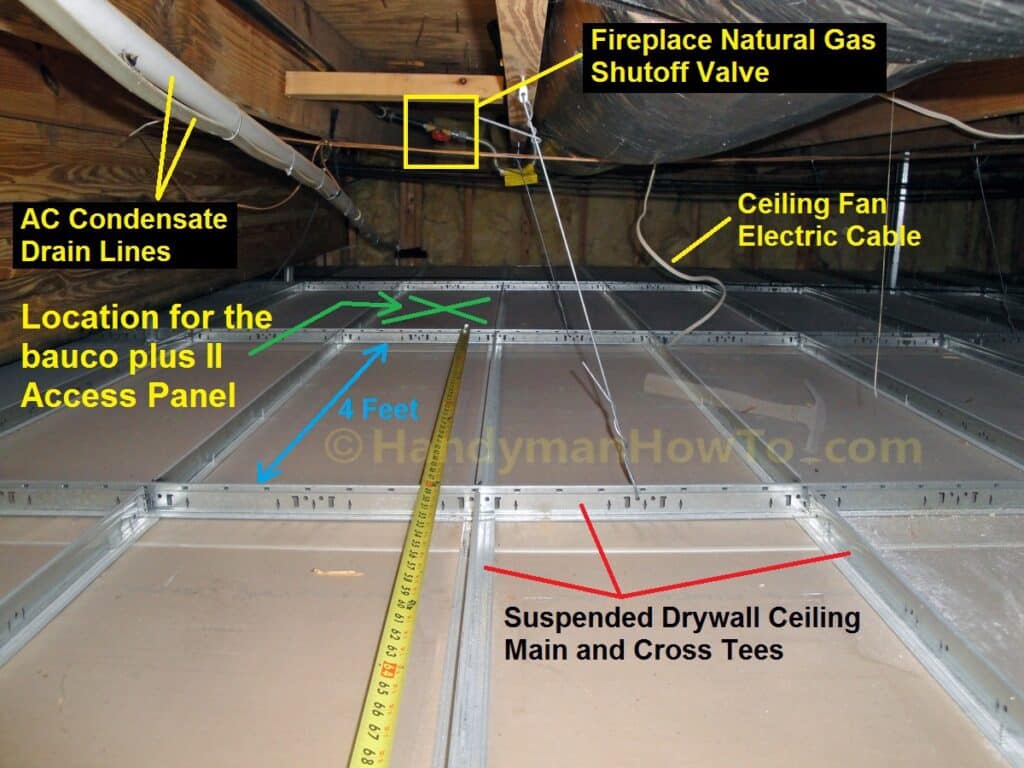
I reached between the wall studs and placed the 12″ x 24″ bauco plus II panel between the ceiling suspension tees. As indicated by the green X in the above photo, the panel will be located in the 3rd ceiling grid directly ahead.
The bauco access panel will provide access to the ceiling crawlspace for several maintenance purposes:
-
Access to the fireplace natural gas shutoff valve.
There’s a keyed gas shutoff valve on the fireplace mantel, however the shutoff valve below the floor joists (see above) at the flexible gas line must not be concealed. - Possible work on the HVAC condensate drain lines.
The 1 inch rigid white PVC condensate drain pipe serves the AC unit in the attic. The clear flexible tube that’s zip tied to the rigid PVC drain line was abandoned when the prior homeowner’s installed an Aprilaire whole-home humidifier. Previously, water was driven by the basement air handler condensate pump through the flex tube to the outdoors. The problem is the whole-home humidifier runs in the winter and the bypass humidifier water will freeze in the cold outdoor air and block the flex tube, therefore this flex was abandoned and a new flex line routed to an indoor sewer pipe. Freezing water isn’t a problem for the rigid PVC drain line from the attic air handler because the attic unit doesn’t have a humidifier and only operates in the summer. -
Future Electrical Work
Home improvement projects often require fishing new electric cable above the basement ceiling. An access panel makes the job much easier.
Jumping ahead, this is the installed bauco plus II 12″ x 24″ model #20-12-1224 drywall access panel prior to drywall finishing and painting:
Drywall Access Panel Installation: Measure & Locate
Before starting work, study the bauco plus II installation guide and videos.
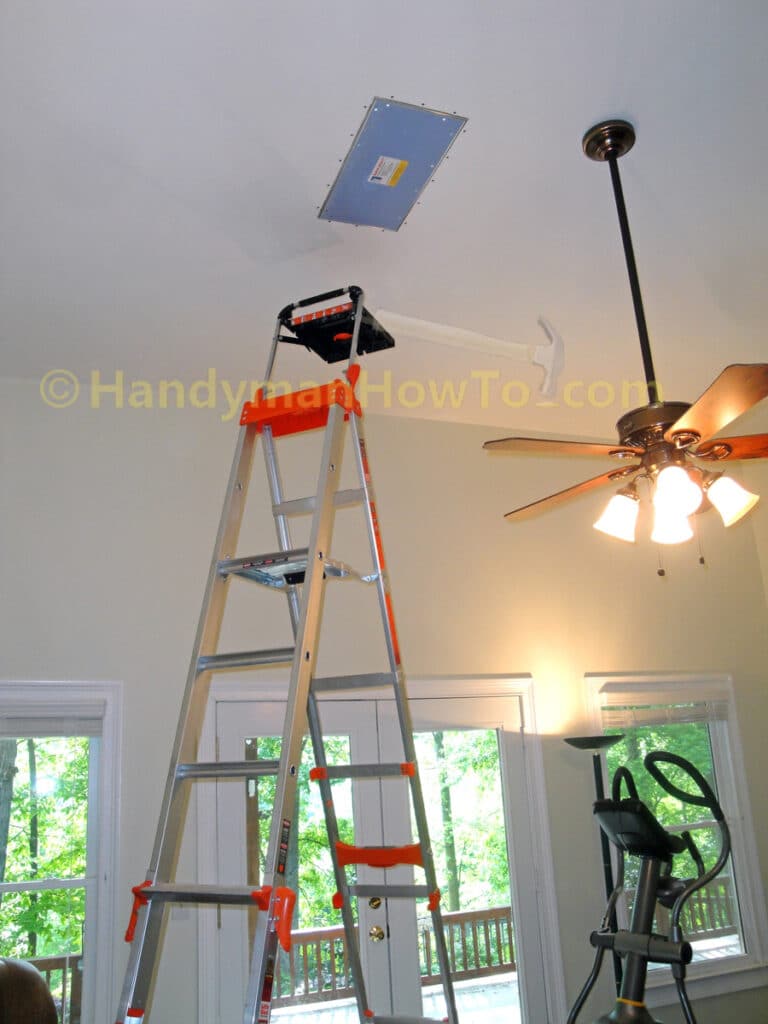
My home sits on a hillside with a walk-out “daylight” basement. Due to the deep basement, the suspended drywall basement ceilings are 12 feet high and my 6 foot step ladder was far too short for the job.
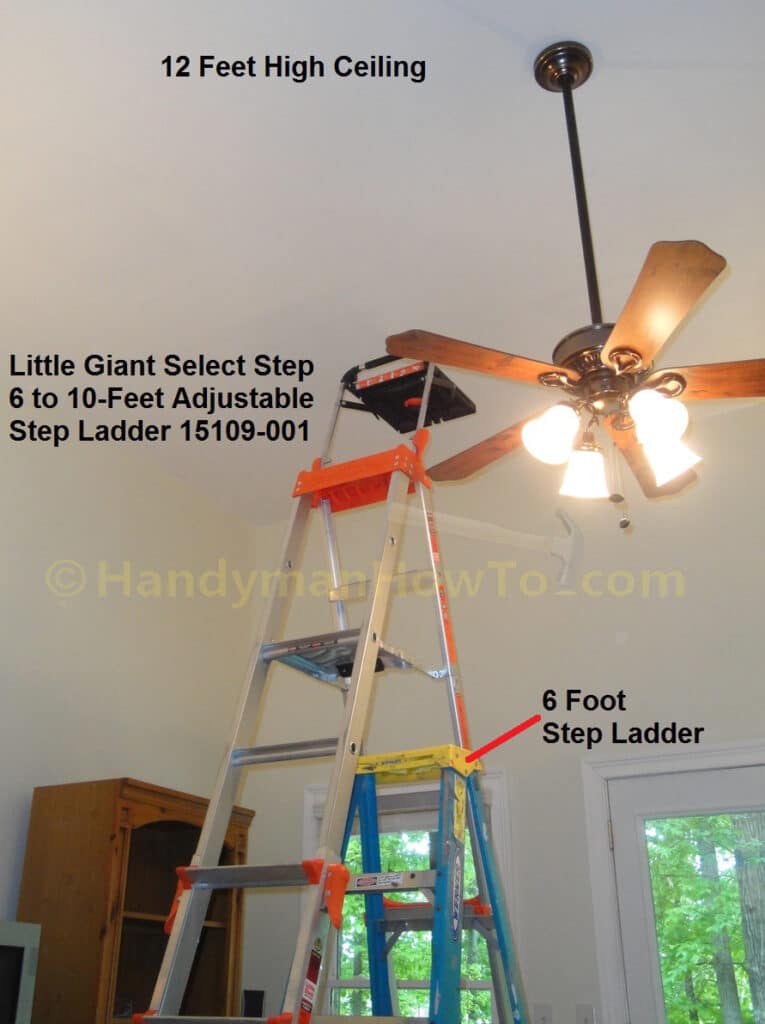
My philosophy is a job is an excuse to buy new tools. After researching tall step ladders, I purchased a Little Giant Ladder Systems 15109-001 Select Step 6-Feet to 10-Feet Adjustable Step Ladder
Ceiling Panel Measurement Challenge
The bauco access panel is easy to install. My unique challenge was to measure and locate the exact position where the bauco plus access panel will be installed in the basement ceiling. The drywall ceiling steel suspension tees are set on a grid measuring 16″ x 48″. I confirmed the approx. distance from the edge of the room to the 3rd ceiling grid with a tape measure.
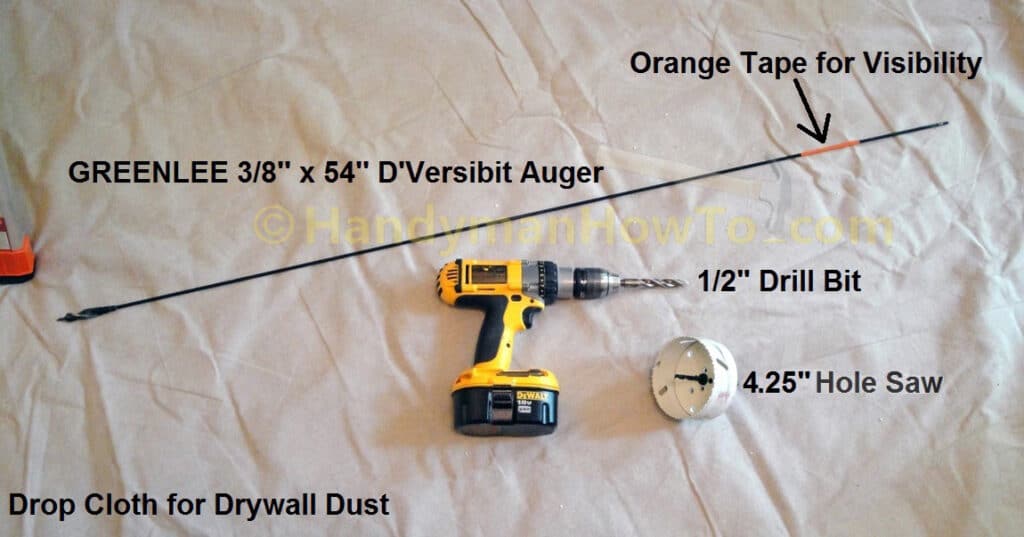
The tools I used to drill a pilot hole in the ceiling and refine the location of the ceiling cutout for the access panel are:
- 1/2″ drill bit
- 4.25″ hole saw
- 3/8″ x 54″ auger
The auger wasn’t for drilling, rather I used it as a convenient flag pole as explained below. - Large painter’s drop cloth to catch the drywall dust.
If your wall or ceiling has wood studs, a stud finder can be used to locate the wall studs or ceiling joists. I tried locating the ceiling steel suspension tees with my stud finder set to “metal scan”, however the results were erratic so I used the manual approach:
- Measure and mark a point on the ceiling that is two (2) 48 inch ceiling grids away from the wall, then added 8 inches to be well into the 3rd ceiling suspension grid for a total of 104 inches from the wall. I referenced an AC vent on the wall for lateral ceiling grid alignment.
- Drill a 1/2″ pilot hole at the marked location.
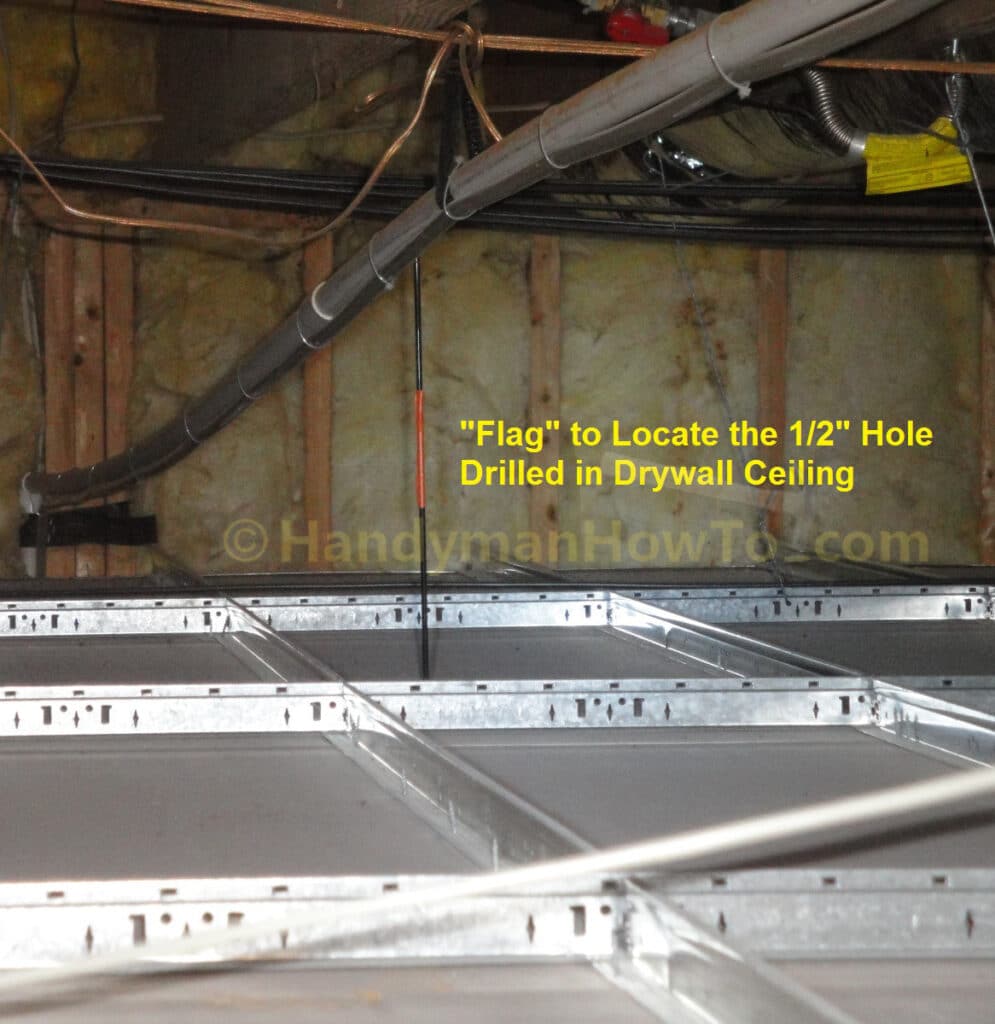
If I really messed up my measurements, a 1/2″ hole is easy to patch! - Insert the 54″ inch long auger bit into the 1/2″ pilot hole to mark the position as viewed in the ceiling crawlspace.
Any small rigid rod can be used here, my long auger bit just happened to fit the purpose.

Back to the ceiling crawlspace, where is the pilot hole? It’s inside the 3rd ceiling grid where I wanted it!
Now that I know where my pilot hole is located in reference to the ceiling suspension tees, I used a 4.25″ hole saw to make a hole large enough for my hand set further into the 3rd suspension grid. (Note: The top left suspension tee is in reality several inches further (i.e. greater clearance) away than indicated on the photo.) If you don’t have a hole saw, just cut a similar sized hole with a drywall jab saw.
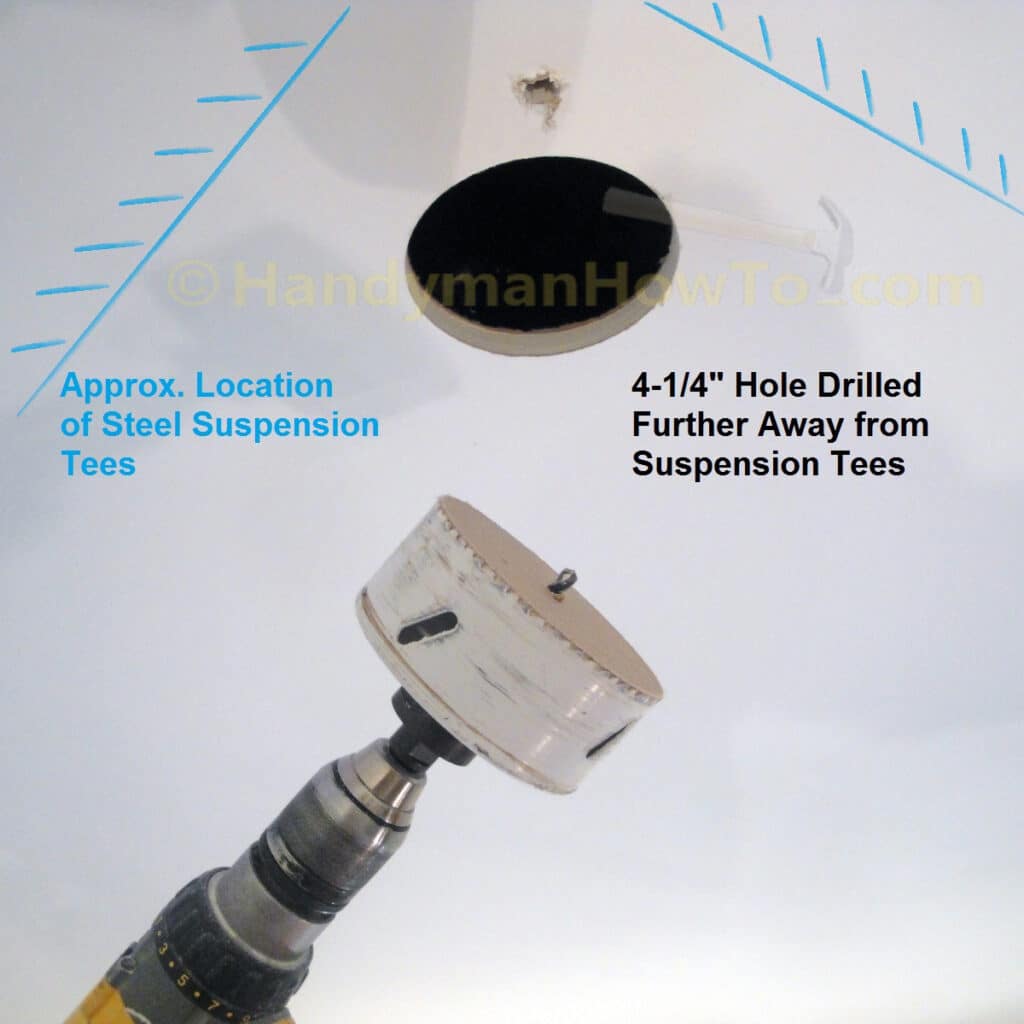
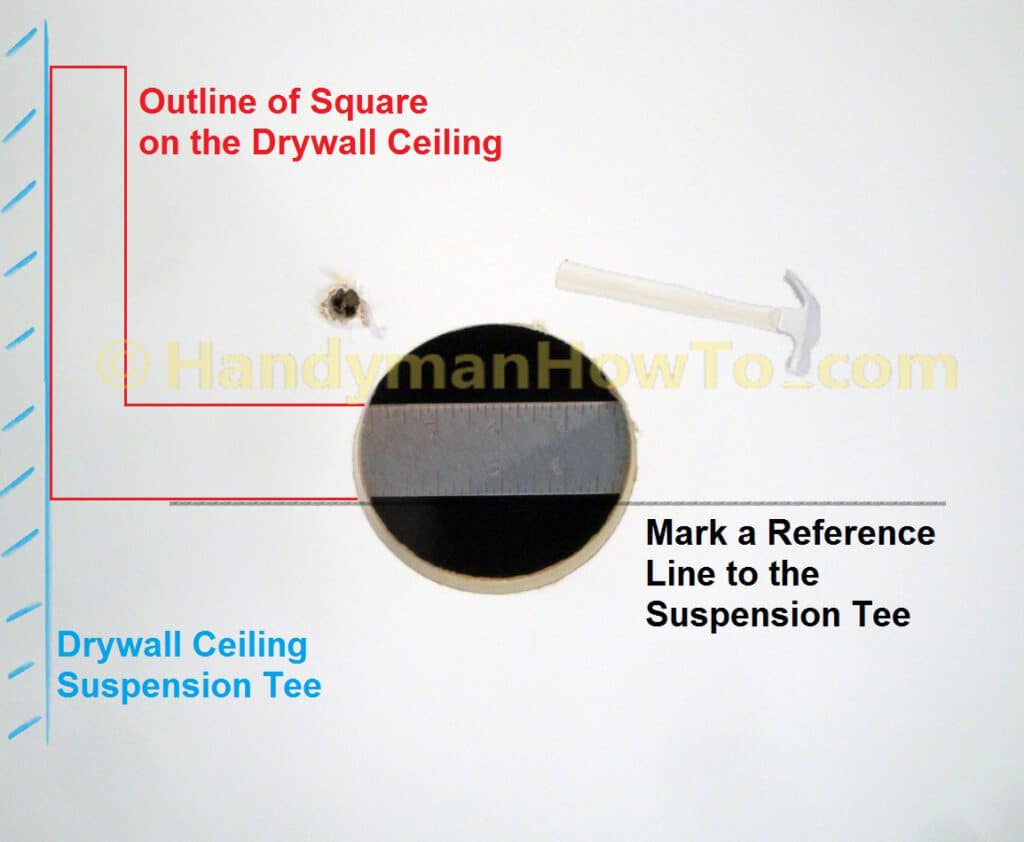
I reached my hand inside the hole and felt around for the steel suspension tees to confirm the relative position to the hole. I’ve got plenty of clearance. Next, I slipped a small carpenter’s square inside the hole to set it against the suspension tee to mark a perpendicular (90°) reference line to the suspension tee.
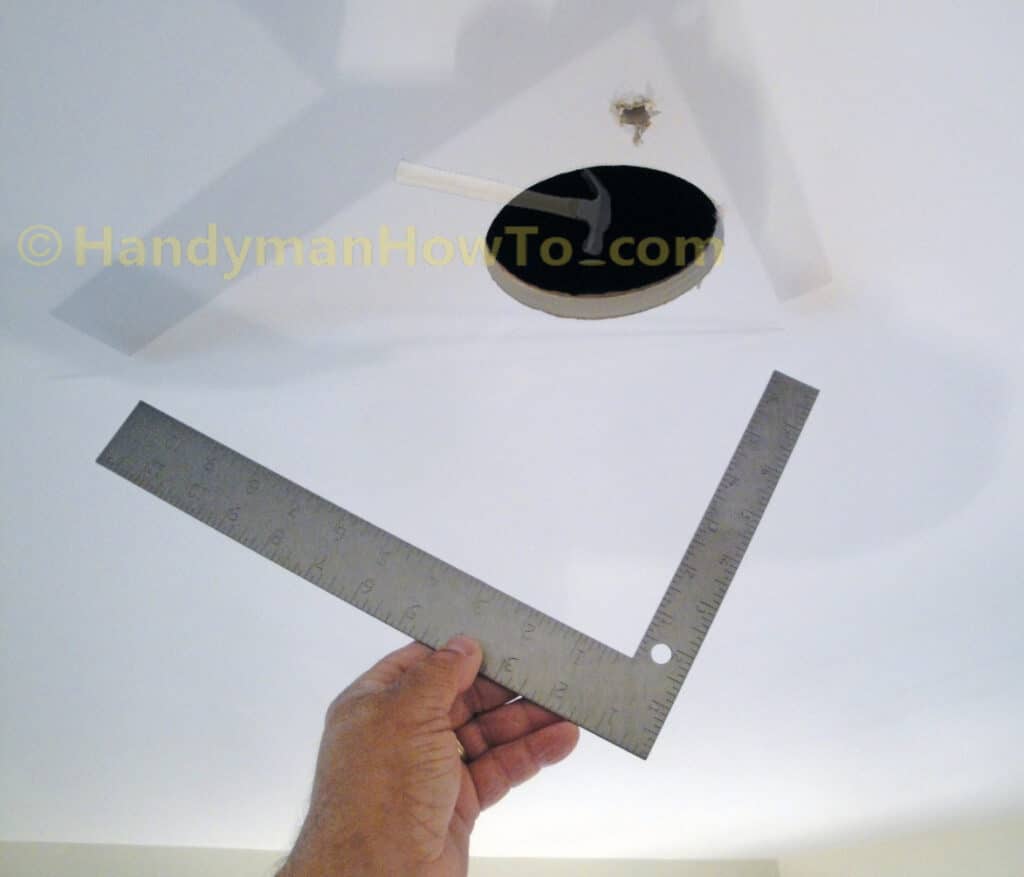
This illustration shows how the square is set against the ceiling suspension tee to mark the 90° reference line. The 90° reference line will be my take-off for further measurements to cut the hole for the bauco plus II drywall access panel.
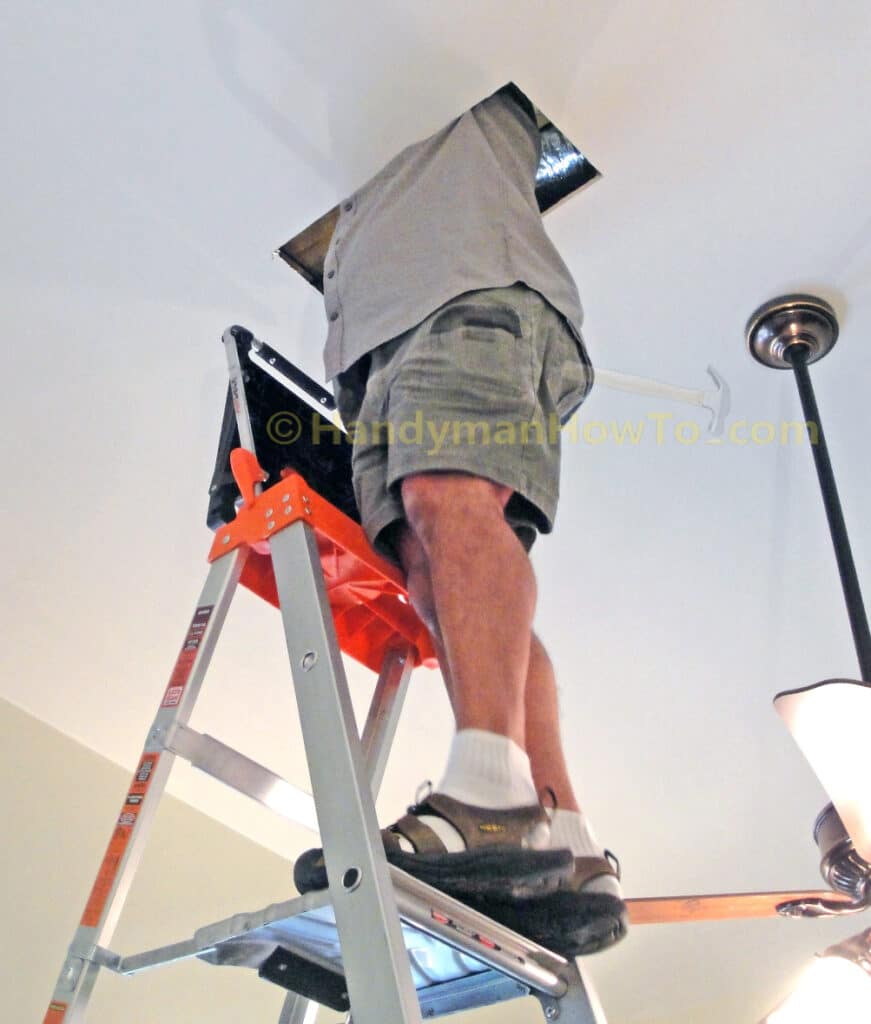
Using the previously marked 90° reference line, I used the square to mark a rectangular hole large enough to poke my head and tools through, The exact size of the rectangular hole isn’t important. What is important is the hole is far smaller than the 12″ x 24″ bauco panel and I stay well away from the ceiling suspension tees. 1/2″ pilot holes are drilled in the corners of the marked rectangle to start the Stanley 6-Inch FatMax Jab Saw
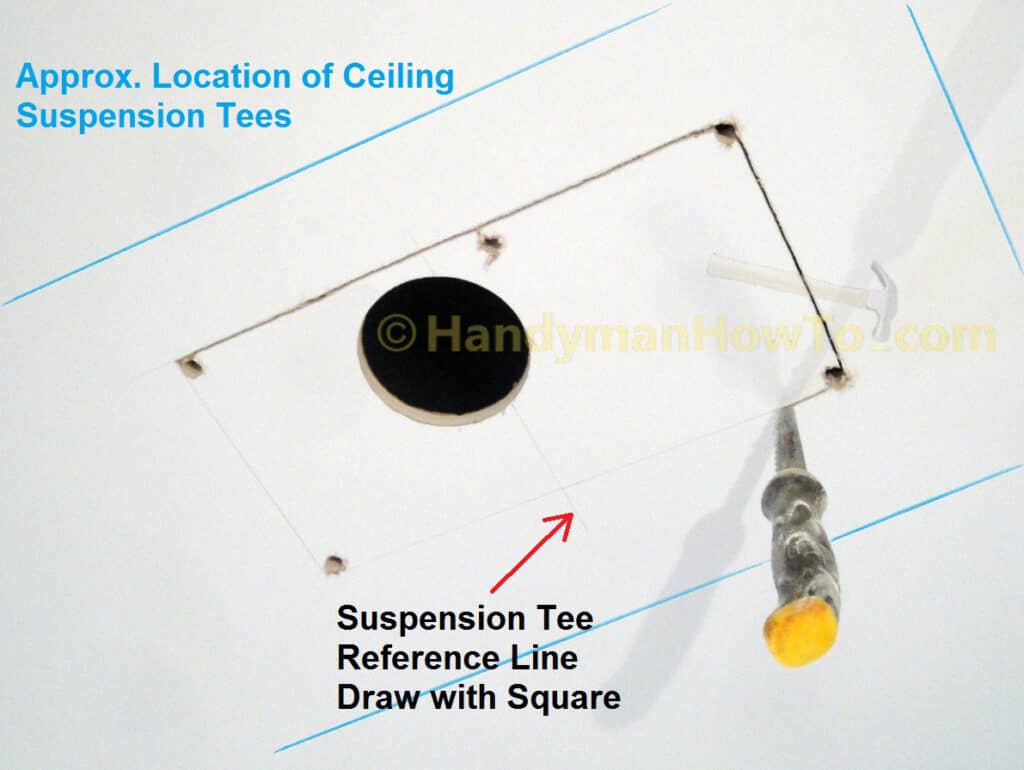
The preliminary opening sawed in the suspended drywall ceiling:
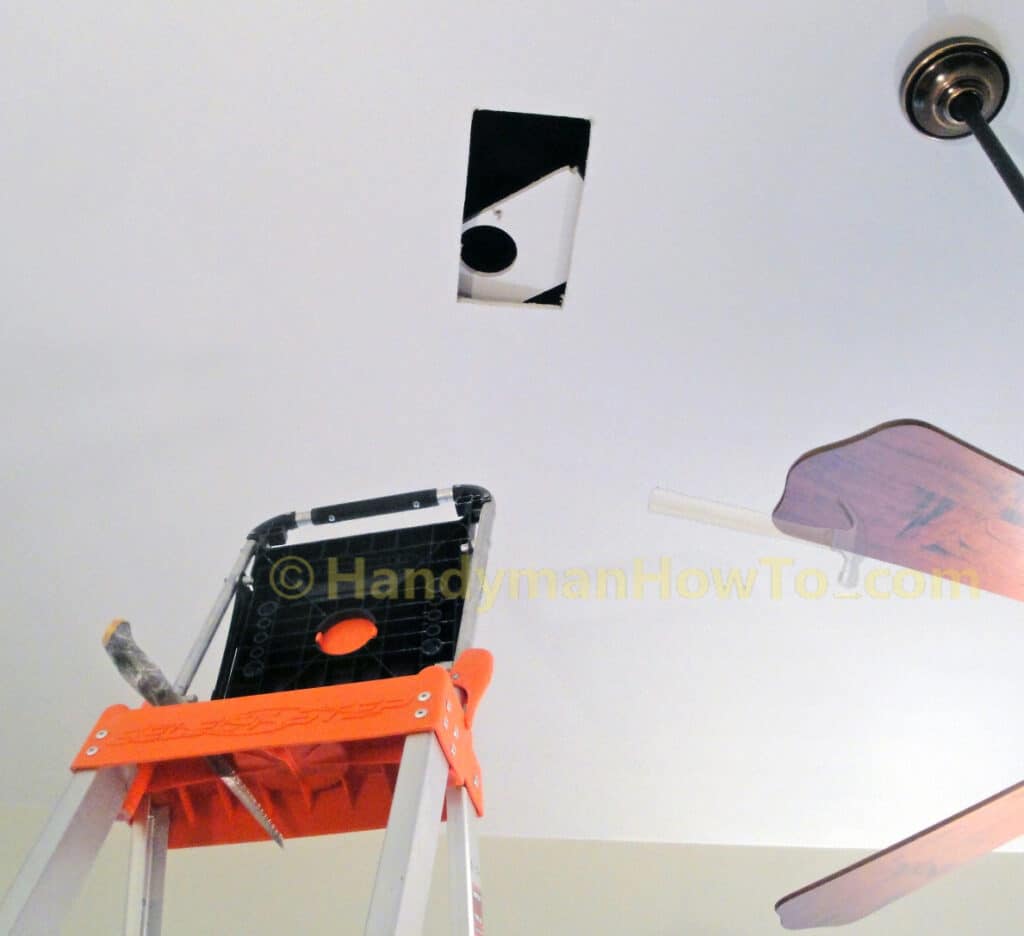
Refine the Ceiling Measurements
The preliminary opening (see above) allowed me get a look inside the ceiling to verify the location of the ceiling suspension tees and use the large carpenter’s square to mark additional reference lines to enlarge the cutout. I’m taking a successive refinement, or incremental, approach because you only get one chance to when sawing; a mistake could mean time consuming drywall repairs.
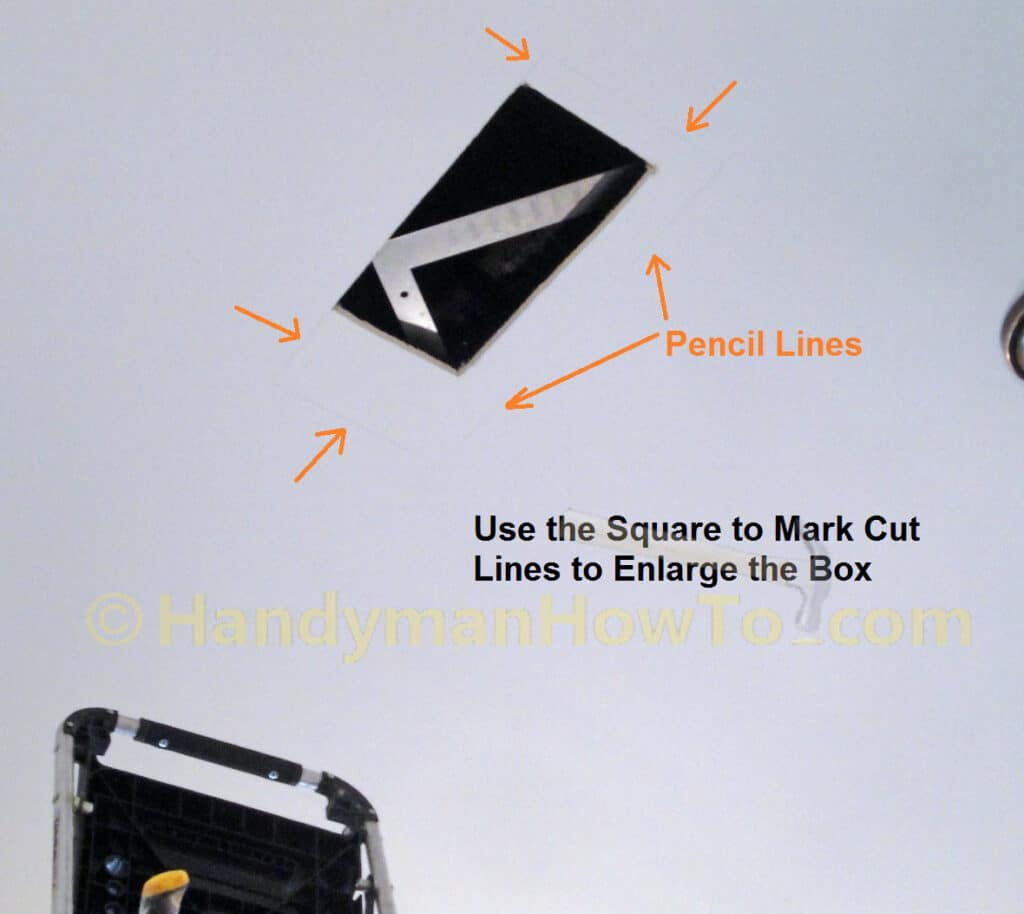
The enlarged ceiling cutout is about 2 inches smaller than the 12″ x 24″ bauco plus II drywall access panel:
The refined ceiling cutout is now large enough for me to work inside the ceiling to make precise measurements for the final access panel cutout dimensions:
This project is continued in How to Install a bauco plus II Drywall Access Panel – Part 2.
Thanks for reading,
Bob Jackson