This project explains how to install a hardwired smoke alarm in a bedroom drywall ceiling. This tutorial is a fast-track installation because I don’t have the problems of relocating the abandoned smoke alarm and connecting it to a non-switched AC power circuit as described in How to Install a Hardwired Smoke Alarm – Part 1.
I recently finished a basement bedroom which qualifies as “living space” and as such, a smoke alarm is required to comply with the Building Codes that are based on the National Fire Protection Association (NFPA), NFPA 72®, National Fire Alarm and Signaling Code®. The NFPA’s Report “Smoke Alarms in U.S. Home Fires” states in part (bold and red emphasis added):
“Both the 2007 and 2010 editions of NFPA 72, National Fire Alarm and Signaling Code require smoke alarms in every bedroom, outside each sleeping area, and on every level. They should also be interconnected so that when one sounds, they all sound. New homes should have hardwired smoke alarms. Most homes do not yet have this level of protection. A 2010 Harris Interactive survey done for the NFPA found that roughly two out of every five households had smoke alarms in all bedrooms. Only one-quarter of all homes had interconnected smoke alarms.”
The sad fact is a Google search for “house fire kills no smoke alarms” returns several million results. My goals are to provide a safe home for my family and not to be a statistic.
Bedroom Smoke Alarm Installation
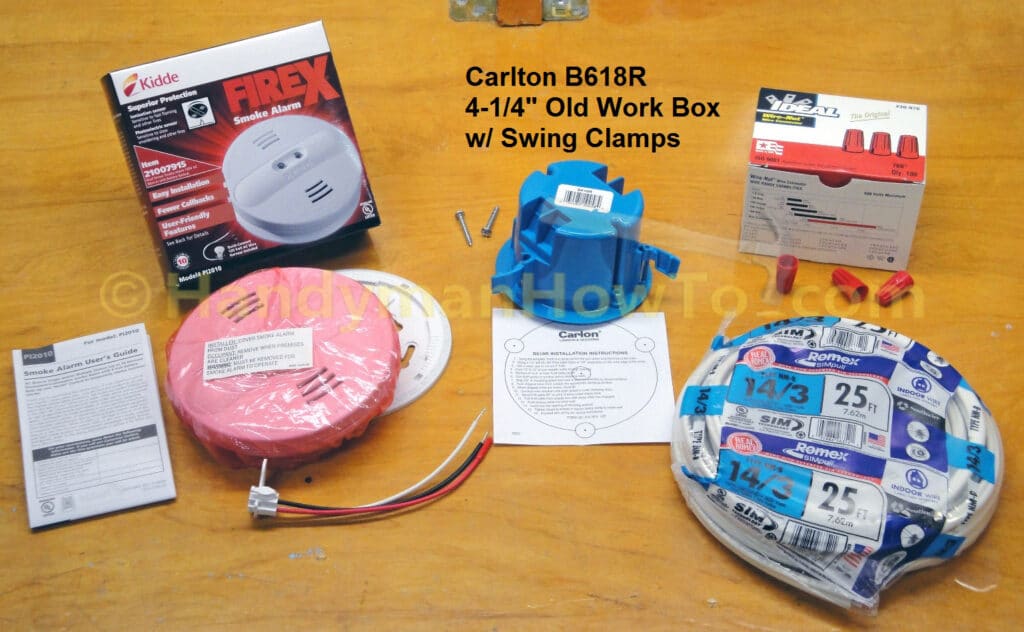
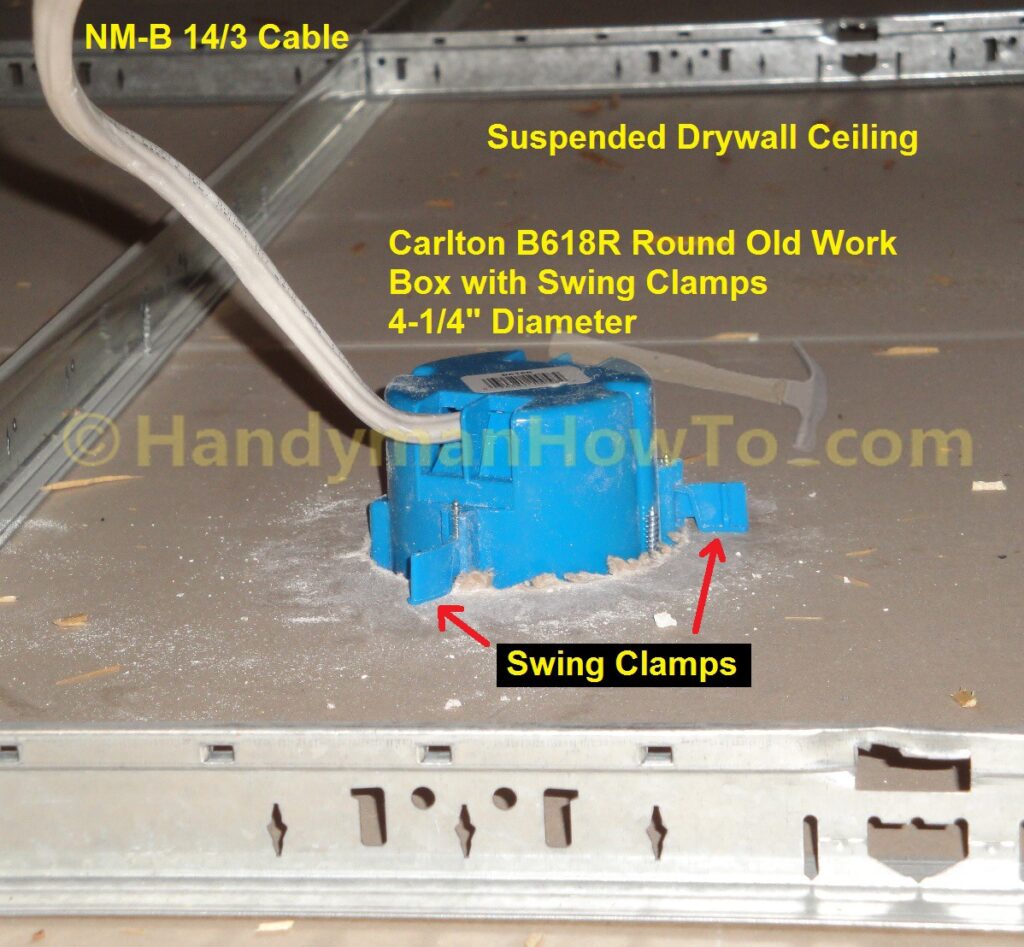
A new Kidde/Firex® model PI2010 Dual Sensor (Ionization and Photoelectric) AC powered hardwired smoke alarm will be installed in suspended drywall ceiling of the basement bedroom. The smoke alarm, NM-B 14/3 cable and old work round electrical box are shown here:
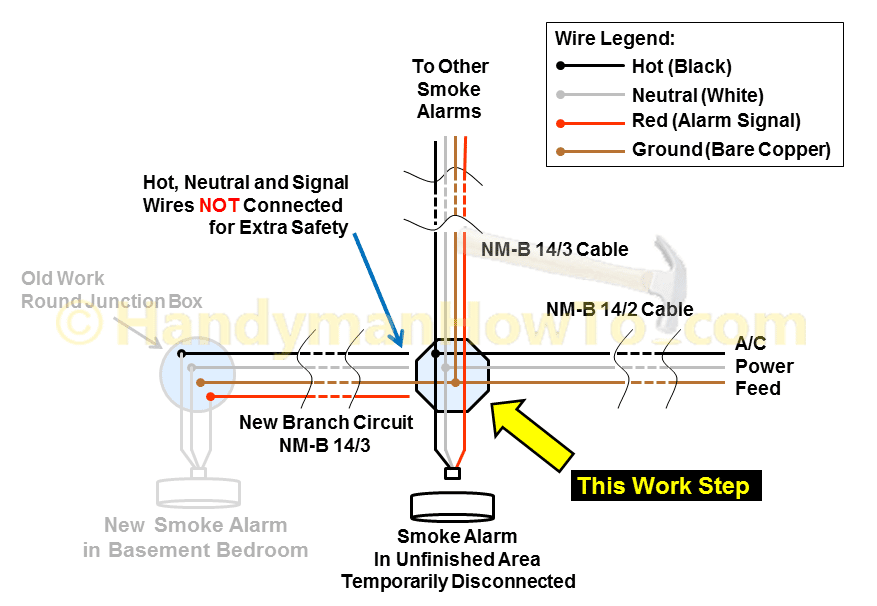
Smoke Alarm Wiring Diagram
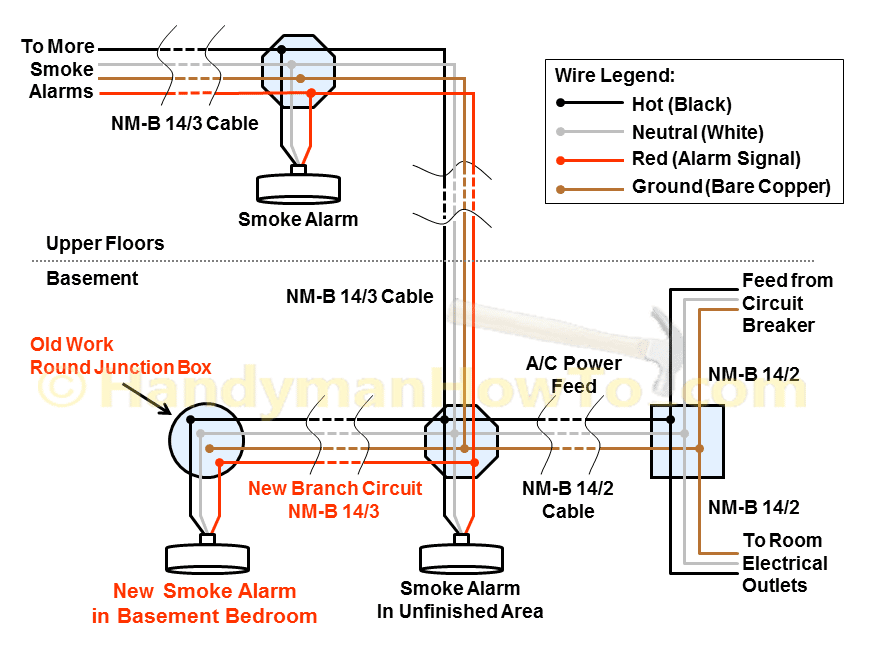
The new smoke alarm in the basement bedroom will be wired to the junction box in the unfinished basement area per the drawing below.
Note: The new smoke alarm will make a total of four (4) NM-B cables tied to the junction box in the unfinished area, I omitted an existing NM-B 14/3 cable from the wiring diagram so the drawing wouldn’t be too cluttered. The omission has no impact on the correctness of this tutorial.
Smoke Alarm Old Work Ceiling Box
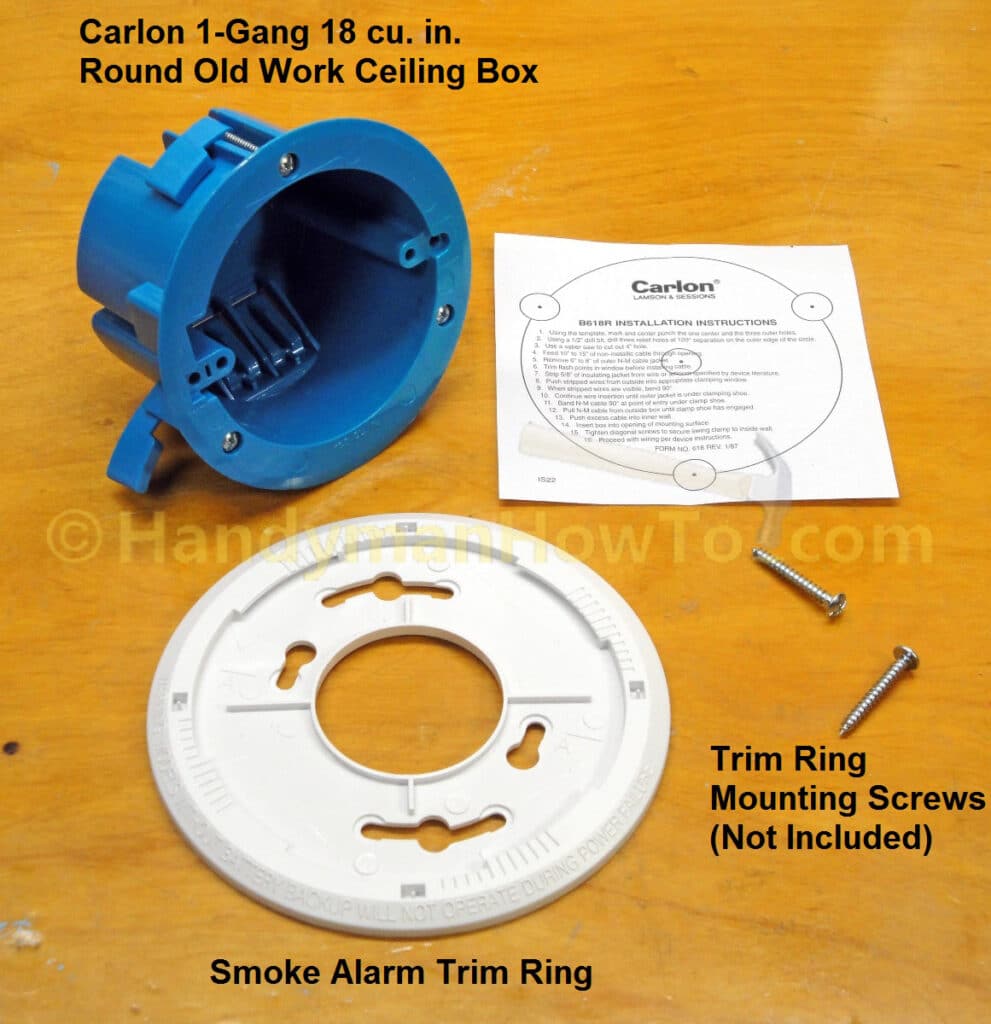
A rectangular or round old work ceiling box may be used for the new smoke alarm. I’ve used a rectangular old work box before because I had one leftover from a previous job. I purchased a new Carlton B618R round ceiling box for this project because round holes are easier to layout on the ceiling compared to a rectangular hole; a rectangular hole should be aligned with the wall for a neat appearance and requires extra measurements, while a round hole doesn’t.
Caution: The B618R old work box must not be used to support a fixture such as a light or ceiling fan! Smoke alarms are not “fixtures” and may be mounted to the old work junction box. See pages 8 and 12 of the Carlton Zip Box Blue Outlet and Switch Boxes FAQs for details.
The smoke alarm trim plate mounting screws are not included with the B618R old work ceiling box nor the smoke alarm. I rummaged through my miscellaneous screw collection, trying various sizes until I found a pair of #8 1-1/2″ pan head course thread screws that fit the old work box. The old work box screw holes smooth (not threaded) and the screw will cut its own threads when driven:
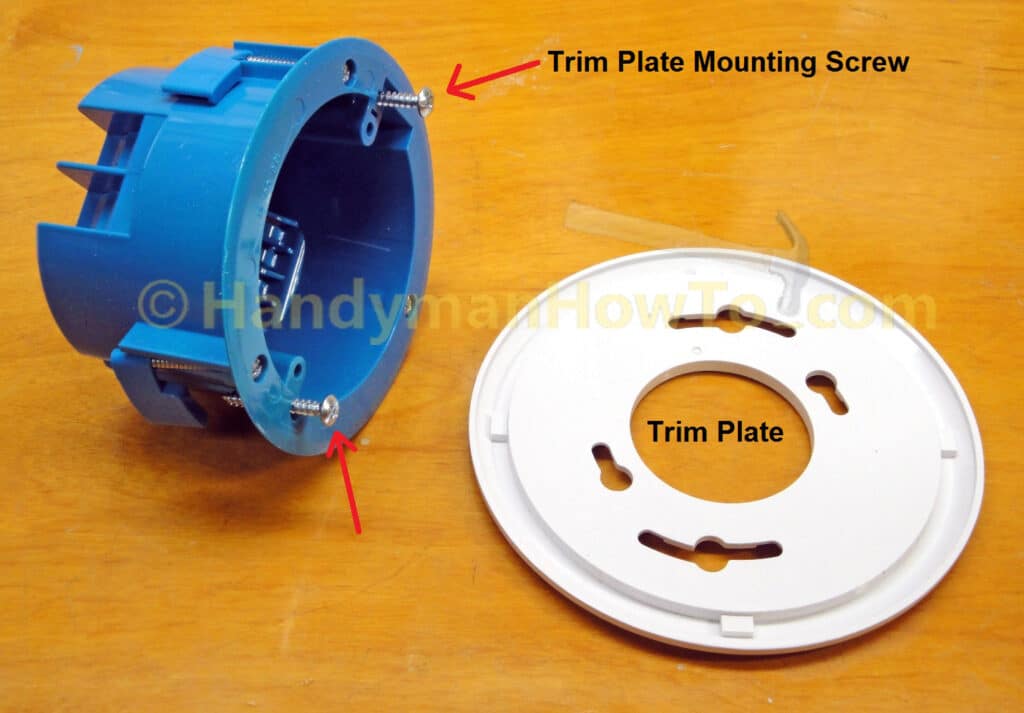
The Kidde/Firex smoke alarm trim plate has several mounting slot sizes and the widest slot fit the old work box perfectly. Pan head screws are necessary for a flush fit against the trim plate.

The old work ceiling box mounts to the drywall by:
- Insert the ceiling box through the hole saw in the drywall with the swing clamps in the closed position.
- The swing clamps (a.k.a. “flippers”) will rotate outward as the clamp screws are tightened.
- The clamp is pulled against the back side of the drywall as the screw tightens to clamp the box face against the drywall. Do not over tighten the clamp screw because it will crush the drywall.

Looking ahead in this project, this photo shows how the Carlton B618R swing clamps operate to secure the old work ceiling box to the drywall ceiling:
Smoke Alarm Wiring: NM-B 14/3 Cable
The new smoke alarm circuit to the basement bedroom will be wired to the metal junction box in the unfinished area of the basement. The following wiring diagram illustrates the work at this step in the project:
Shutoff the Electricity
The electricity must be shutoff at the circuit breaker panel before working on the wiring to avoid shock, injury and/or death. If you are uncomfortable working with electricity, hire a licensed electrician. Verify the electricity is Off by testing the wires with a voltage detector.
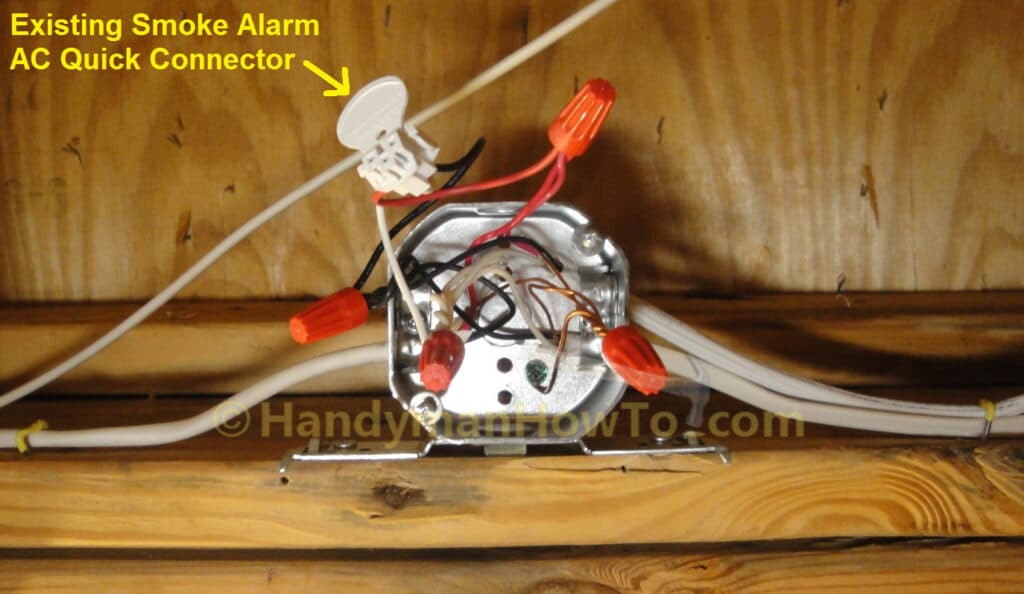
Octagon Junction Box Wire Splice
Working in the unfinished area of the basement (see the above wiring diagram), I removed the Kidde/Firex PI2010 smoke alarm unit and trim plate to expose the AC Quick Connector and NM-B wiring. The steel octagon ceiling junction box current has three cables:
- One (1) NM-B 14/2 cable for 120VAC power.
- Two (2) NM-B 14/3 cables to serve other smoke alarms.
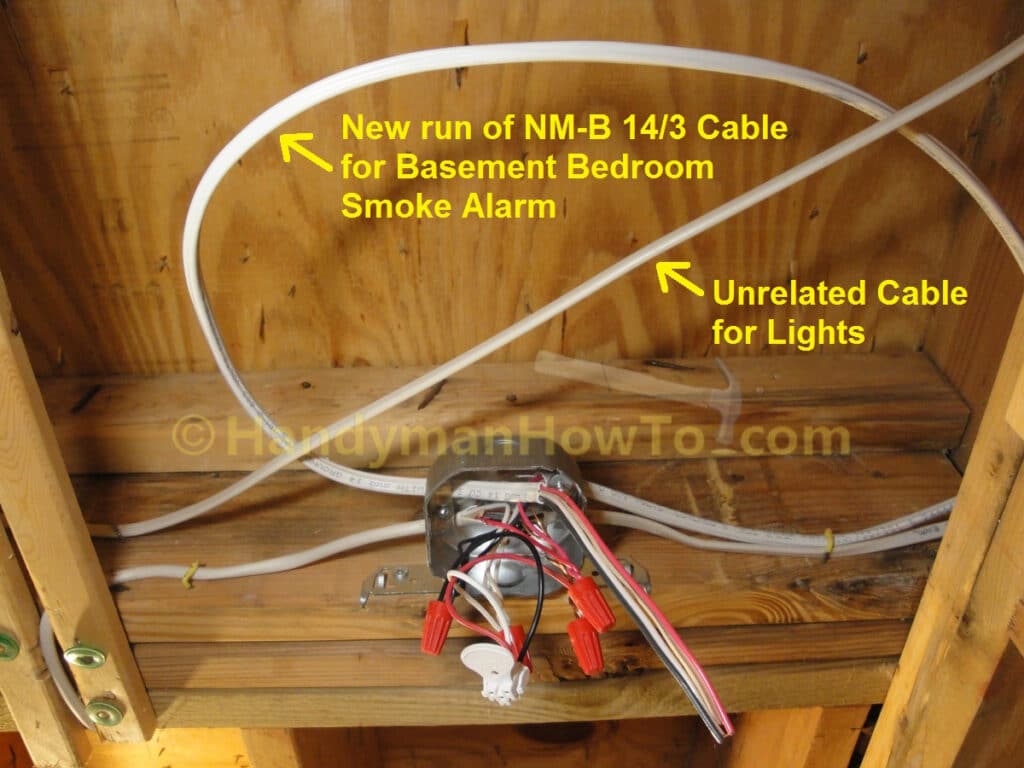
The octagon junction box is designed to accept up to four NM-B cables. A new run of NM-B 14/3 cable is installed by:
- Loosen the octagon box cable clamp on the left side of the box.
- Insert the new NM-B 14/3 cable into the octagon box.
- Remove about 8 inches of the NM-B 14/3 outer insulation jacket.
Give yourself plenty of wire extending from the octagon junction box. This will be trimmed to length later.
Adjust the new NM-B 14/3 cable such that the outer insulation jacket extends at least 1/4 inch beyond the cable clamp, then tighten the clamp until the cable is snug. Don’t over do it and crush the cable because it could damage the insulation.
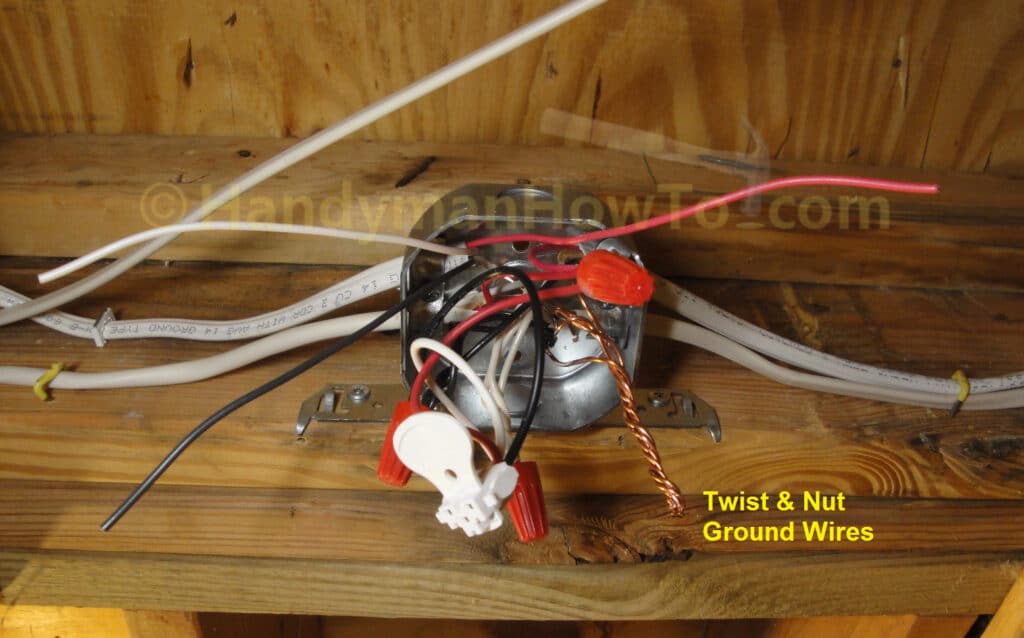
Secure the new cable by stapling to the floor joist within 12 inches of the junction box with an NM-B wire staple. Note the white wire staple at the upper left of the following photo.
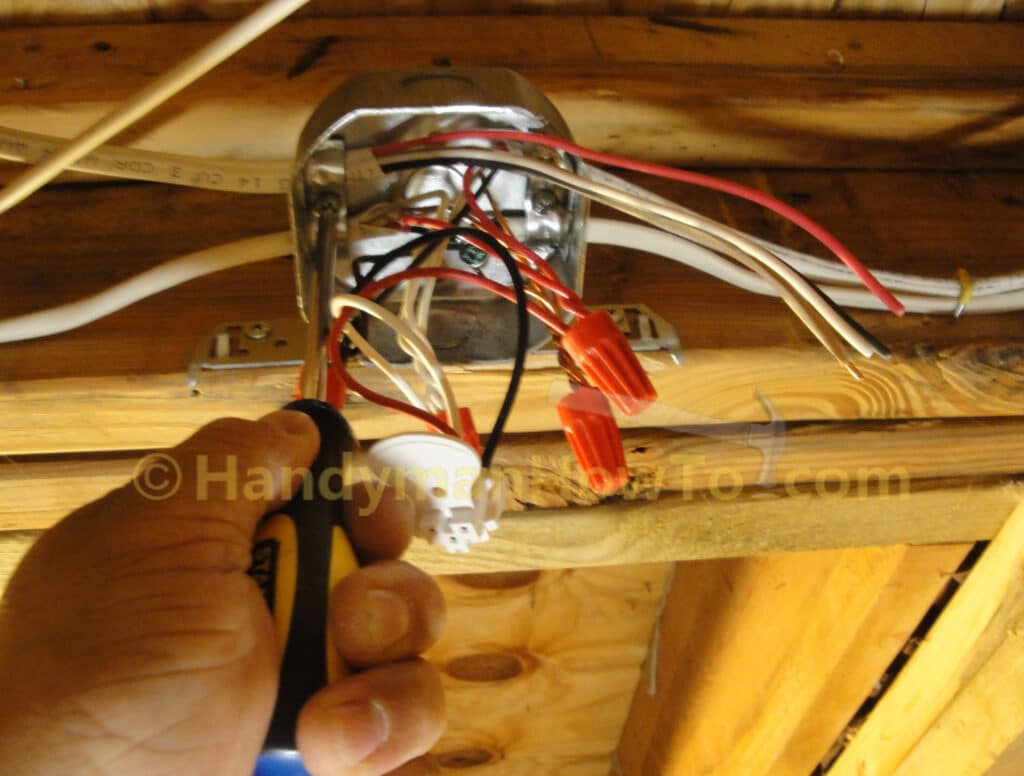
Next, right-hand (clockwise) twist the new ground wire to the existing ground wires using lineman’s pliers and secure with a wire nut. I prefer to connect ground wires first such that there’s a better ground than my body for safety. Cut off any excess ground wire that extends past the pigtail so the wire ends are even.
Do not connect the hot (black), white (neutral) or red (alarm communication) wires at this time. Why? For safety in case you or someone else mistakenly turns on the circuit breaker while wiring the new smoke alarm so new branch circuit cannot be energized:
Run the new NM-B 14/3 cable along the ceiling joists and/or walls as needed to reach the room. It was relatively easy for me to run the cable along the floor joists above the suspended drywall ceiling to the new bedroom. The NM-B cable must be supported at intervals not exceeding 4-1/2 feet. I stapled the cable to the joists every 4 feet.
This project is continued in How to Install a Hardwired Smoke Alarm – Part 5.
Take care,
Bob Jackson