How to Install a Kitchen Instant Hot Water Dispenser, Faucet and Water Filter – Plumbing diagram and connections for the water filter and hot water dispenser. This project is continued from How to Install an Instant Hot Water Dispenser – Part 3.
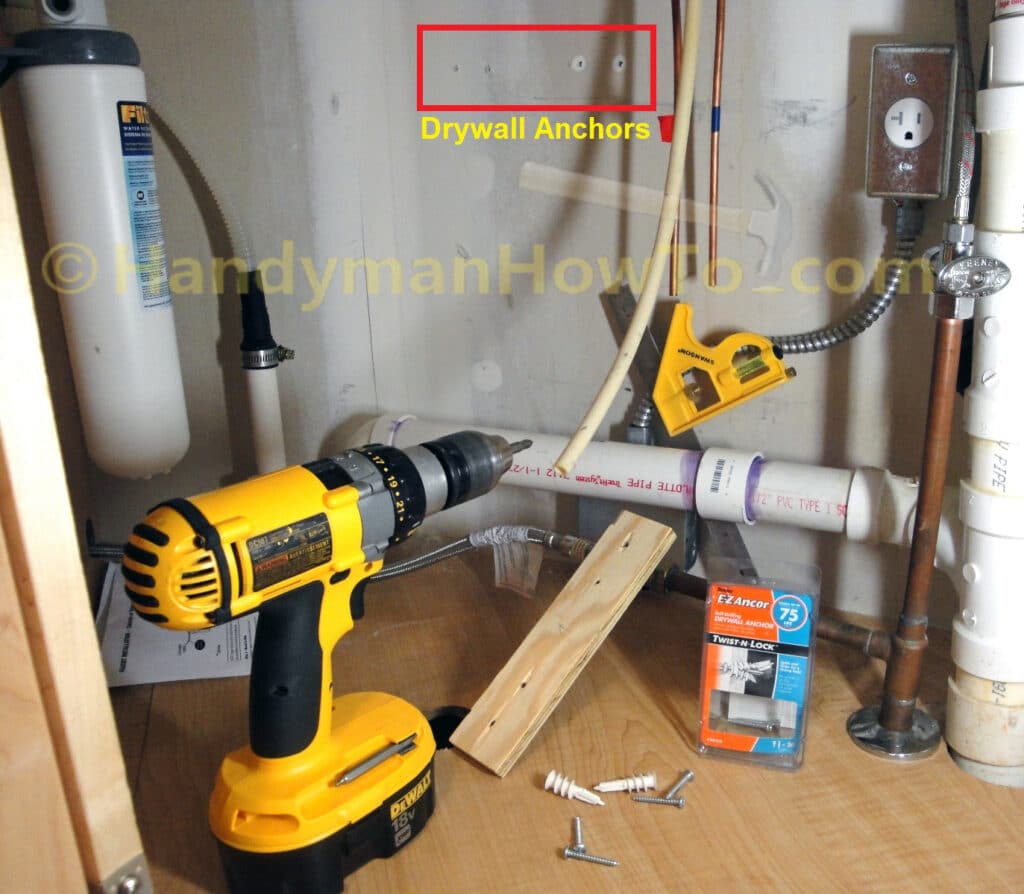
The Waste King Hot & Quick instant hot water dispenser tank includes a small metal mounting bracket. I could have mounted the metal bracket directly with two drywall anchors, but I preferred a more durable wall attachment. My solution was to fasten a ~8 inch piece of plywood as a baseplate to the drywall with four anchors.
Mount the Instant Hot Water Tank
I set the plywood baseplate as follows:
- Marked a straight line down the center of the plywood.
- Drilled four 1/8 inch holes near the ends, leaving room in the center for the metal mounting bracket.
- Marked a level line on the drywall with the combination square where the baseplate will be mounted.
The combination square has a built-in bubble level. - Held the baseplate against the drywall on the level line to use a template for locating the drywall anchors.
- Marked the positions for the drywall anchors through the holes drilled in the plywood.
I extended the lead in my mechanical pencil to reach through the 1/8 inch holes drilled in the plywood to reach the drywall. - Drilled 1/8 inch holes in the drywall at the marked anchor positions to verify there were no 2×4 studs at those locations.
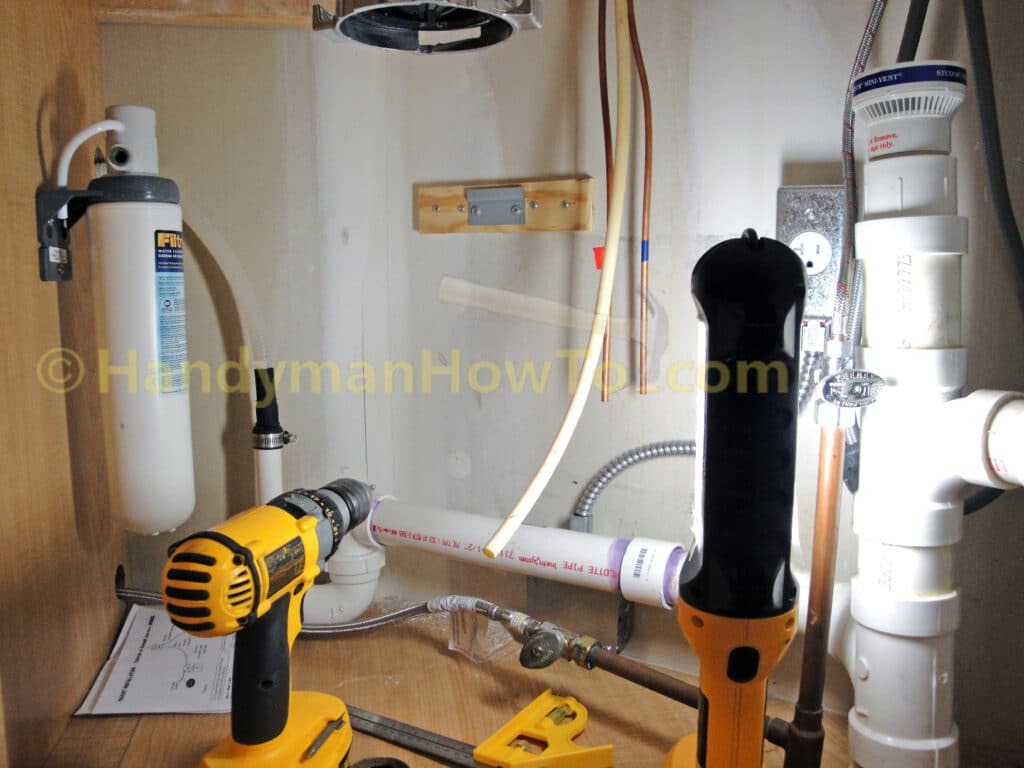
Had a 2×4 stud been located behind one of the proposed drywall anchor positions, that would be fine. I would skip the plastic drywall anchor and install a wood screw instead. (My battery powered stud finder was broken, so I did this the “old school” way.) - Set the four drywall anchors at the positions marked on the wall to match the holes in the plywood baseplate.
I have set two of the four drywall anchors in the above photo.
After setting drywall anchors, the plywood baseplate is fastened to the wall with screws provided with the anchors. The Waste King tank mounting bracket is leveled and fastened to the plywood with two pan-head wood screws:
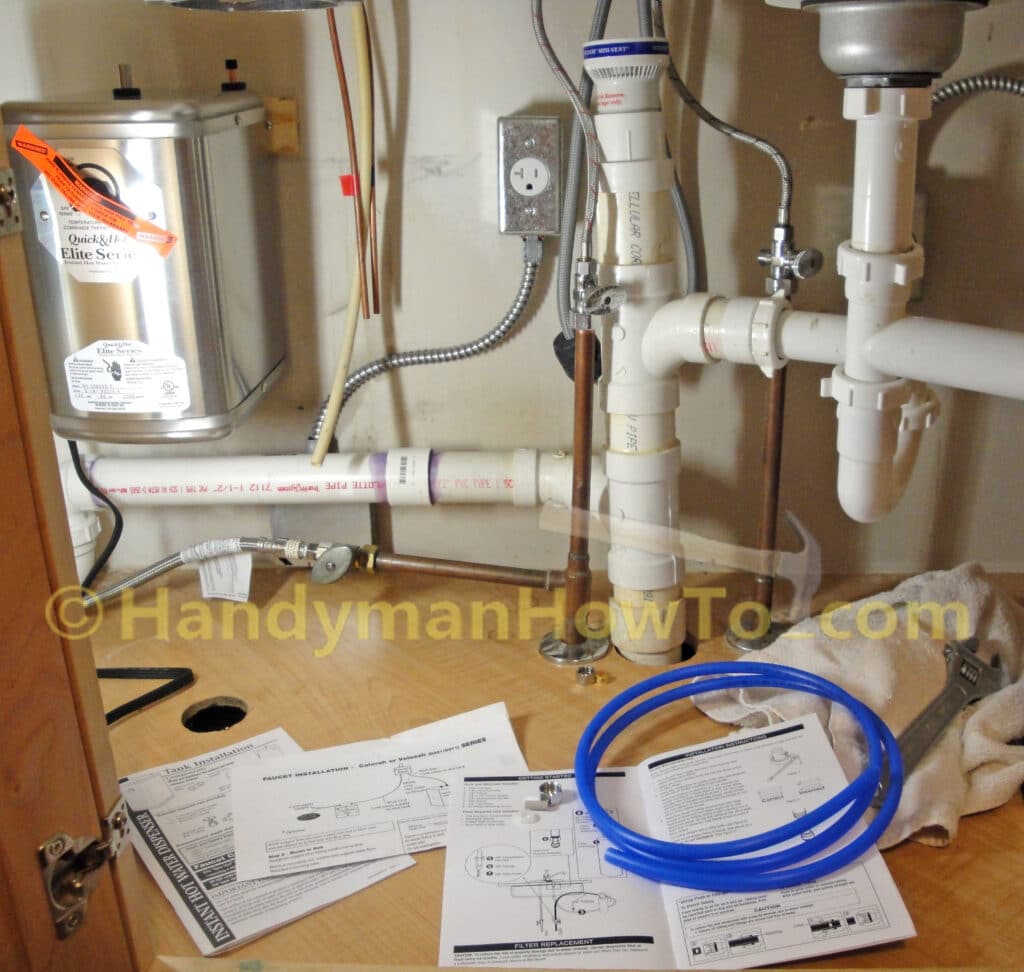
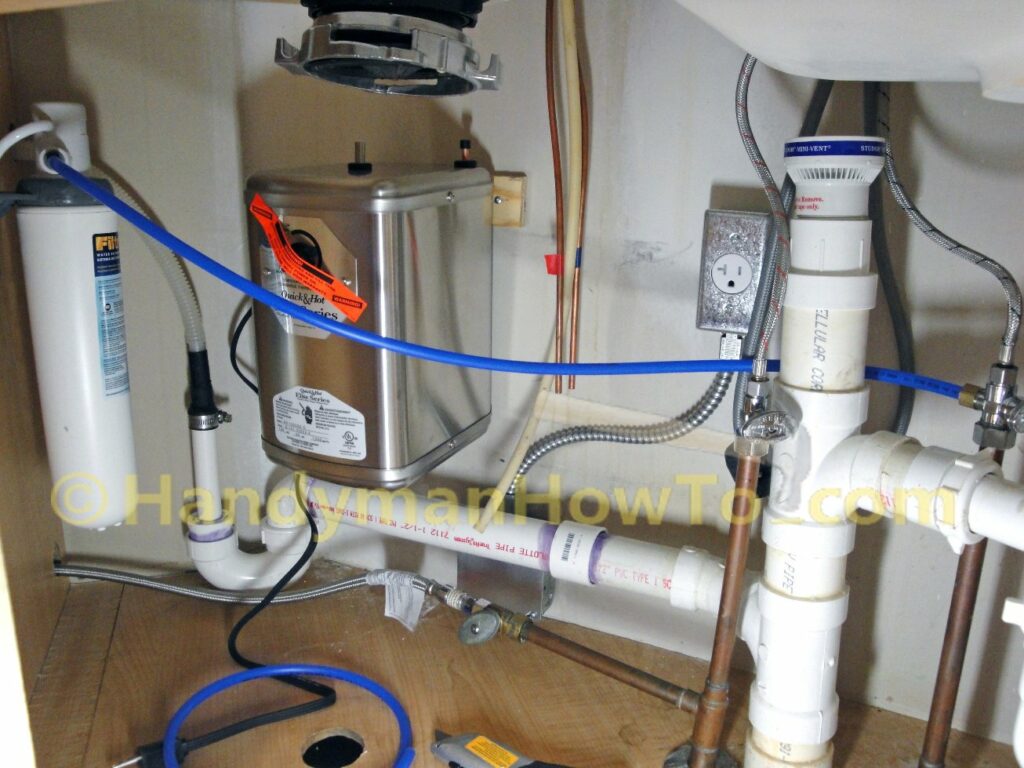
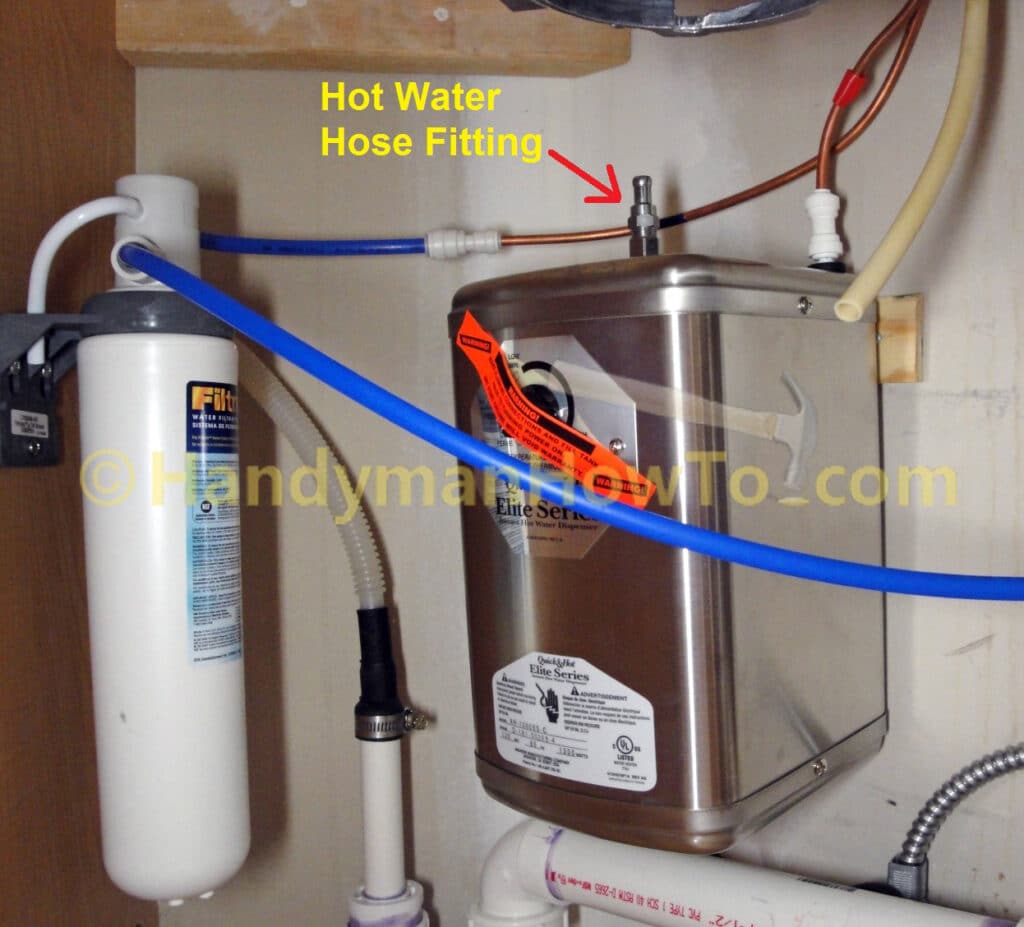
I set the Waste King Quick & Hot® instant hot water heater on the mounting bracket (see the next photo). Now that’s a rugged wall mount! Notice the several inches of clearance between the bottom of the tank and horizontal run of PVC pipe for the dishwasher drain line. The tank is close to the 20 AMP single receptacle located about a foot to the right, and the instant hot water faucet lines are plenty long to reach the tank.
Filtrete Water Filter Plumbing Connections
Next I’ll connect the 3/8 inch blue plastic water line provided with the Filtrete water filter to the new Keeney quarter turn 3-way stop valve on the house cold water supply. Note that the Filtrete water filter is for cold water only.
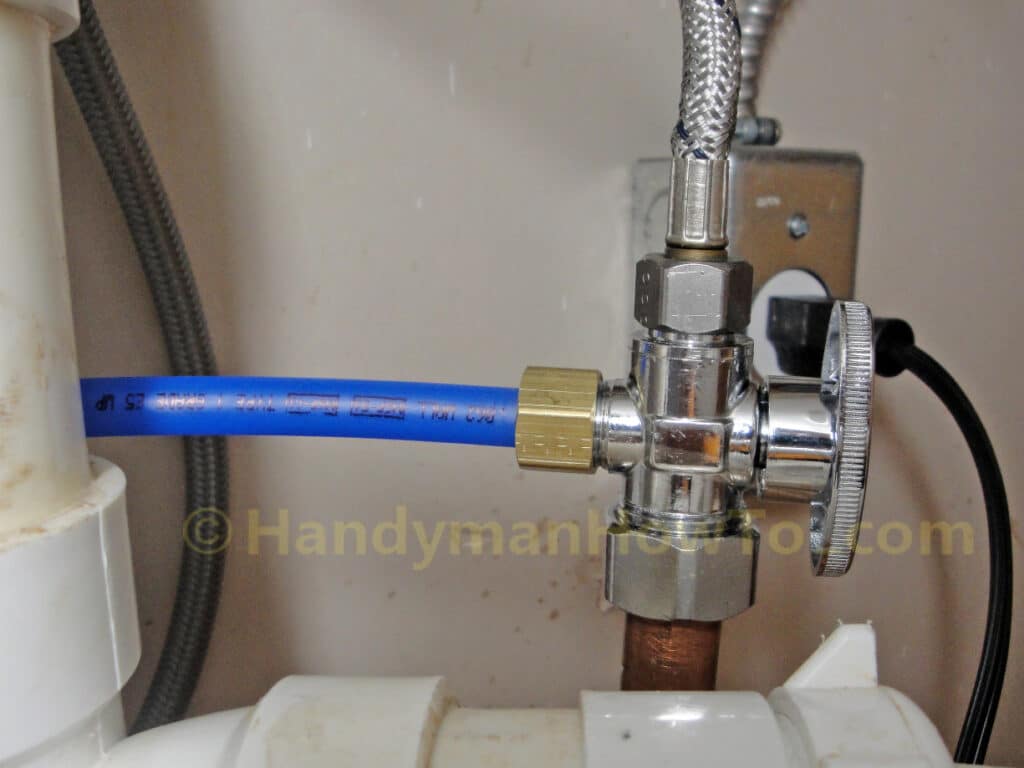
Closeup of how the 3/8 inch gray tube insert, beveled white plastic ferrule and 3/8 inch compression nut fits on the blue plastic water line for attaching to the 3/8 inch outlet on the Keeney 3-way stop valve. Take care that the tapered side of the ferrule faces the end of the tube as shown.
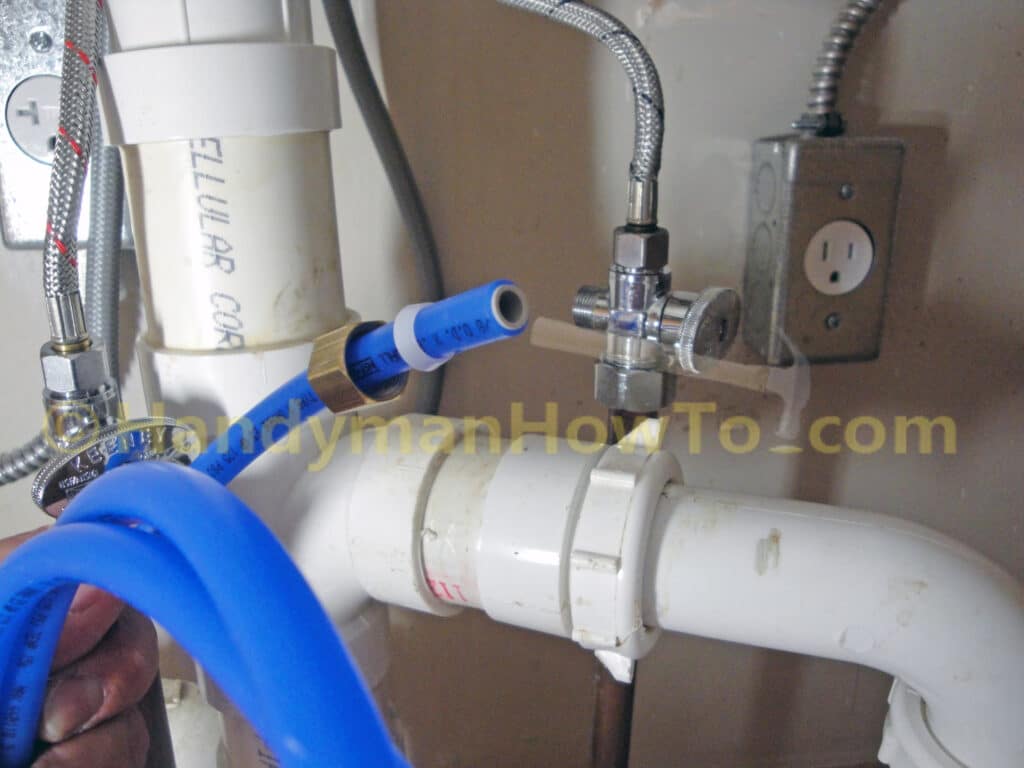
Hold the blue line against the stop valve outlet and spin the 3/8 inch compression nut onto the stop value outlet, then tighten with a wrench. When you feel the nut bite as the plastic ferrule is seated, turn it an extra 3/4 turn. Don’t over do it because the plastic ferrule can be crushed.
Closeup of the water filter line connected to the 3/8 inch side outlet of the 3-way stop valve:
Route the blue water line so it won’t interfere with the garbage disposal, drain pipes, etc. I held the end of the blue water line up to the water filter head, added another 2 inches or so for a margin of error on the long side, then cut the plastic line to length with a utility knife. It’s important the line is cut “square” so it will seat evenly in the water filter head. Give yourself enough slack such that the blue plastic line has wide turns.
The water line is inserted into quick connect push-in fitting on the supply inlet of the water filter head as shown. Press the line in firmly until you feel it seat completely against the backstop inside the push-in fitting. These quick connect / push-in fittings work really well. If you notice a leak, it’s because the line isn’t fully seated in the fitting.
Water Filter 3/8″ to 1/4″ Reducer Coupling
The Filtrete under sink water filter installation instruction assumes the water filter will be connected to the cold water faucet with the included 3/8″ to 1/2″ faucet adapter fitting.
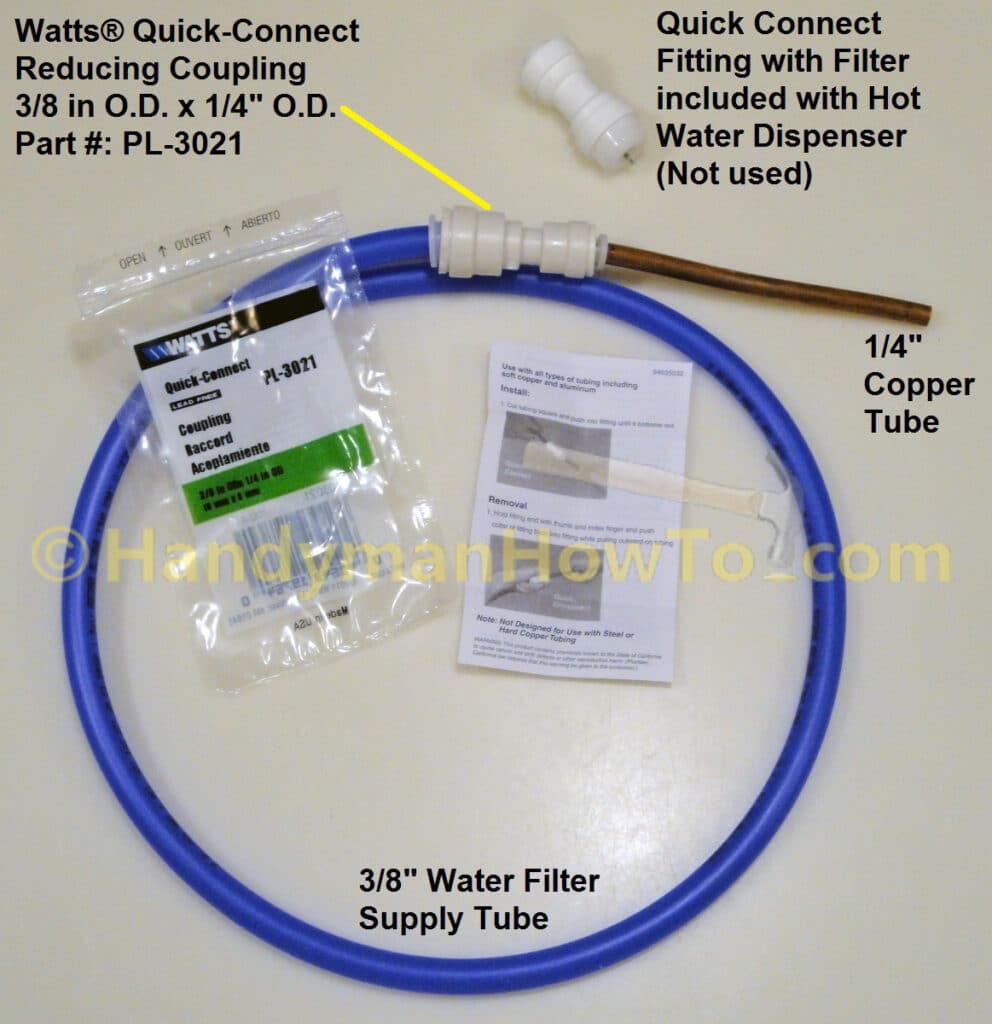
The Waste King instant hot water dispenser instructions assume the 1/4 inch copper faucet tube is connected the house cold water supply via another 1/4 inch copper tube to a 1/4 inch shut off valve outlet (or saddle valve) with the included Quick Connect 1/4 x 1/4 inch fitting (see top right of next photo).
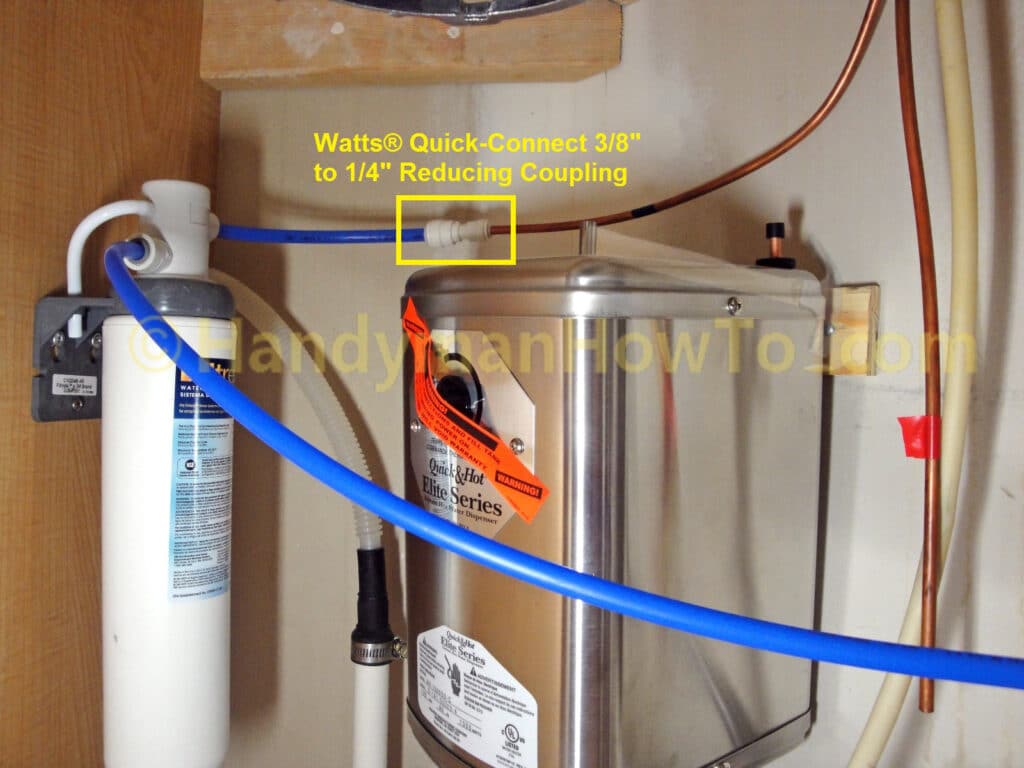
My installation required a WATTS Quick-Connect PL-3021 3/8 inch to 1/4 inch reducing coupling to connect the two tubes:
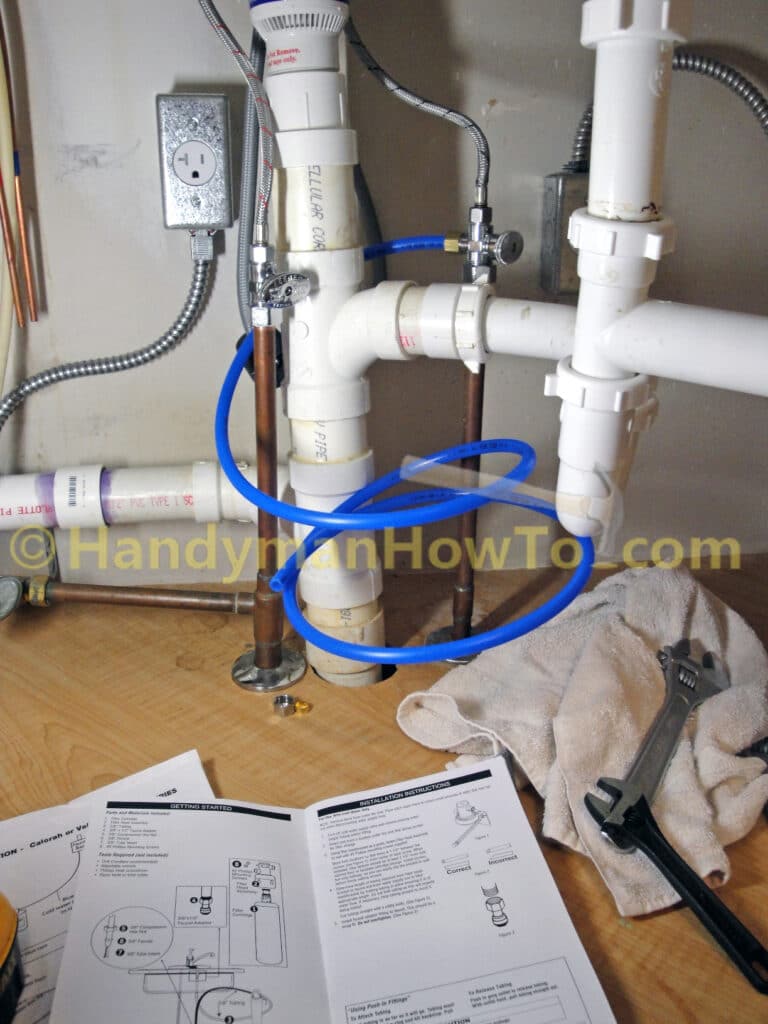
It’s helpful at this point to review the hot water dispenser plumbing diagram to see how everything connects:
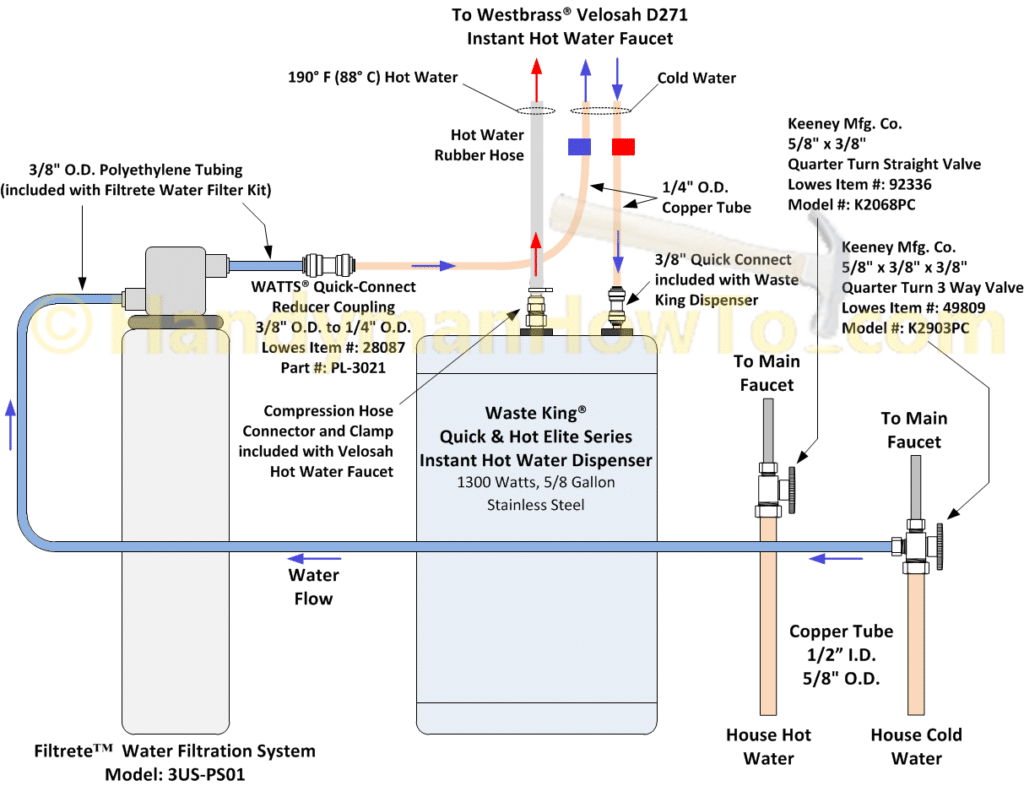
The remaining section of 3/8″ blue plastic tube is cut to length and inserted into the outlet side of the water filter head. The 3/8 inch blue plastic line is joined to the “blue tagged” 1/4 inch copper faucet tube with the WATTS PL-3021 reducing coupling as shown. Push the lines firmly into the Quick Connect fitting until fully seated.
Instant Hot Water Faucet to Tank Plumbing Hookup
Cold Water Faucet-to-Tank Copper Supply Line
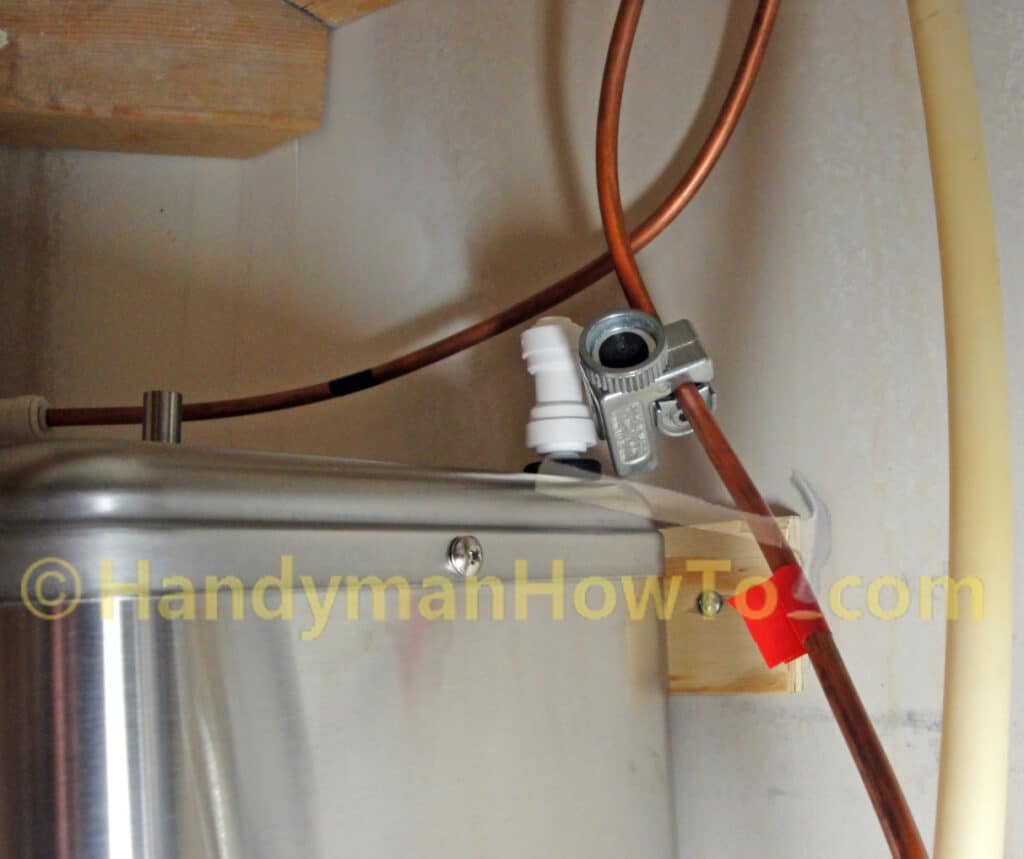
Remove the black rubber cap from the cold water corner inlet tube on the top of the water tank and push on the 1/4 x 1/4 inch white Quick Connect fitting provided with the Waste King tank.
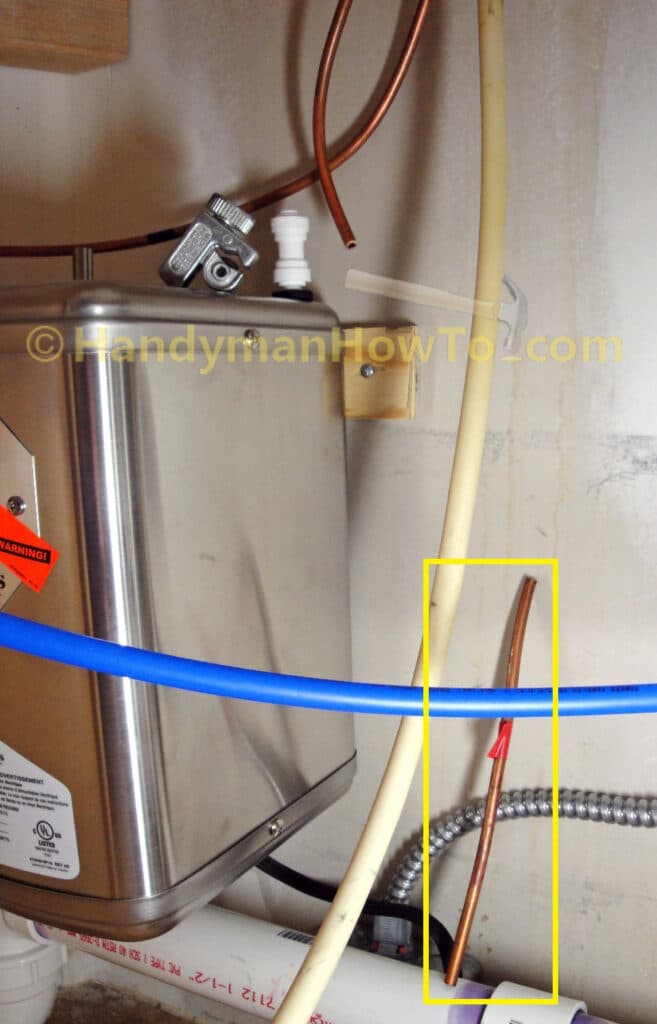
The 1/4 inch copper tube marked with the red tape connects to the white Quick Connect fitting on the corner inlet. This tube is too long and will be cut to length. I gently bent the 1/4 inch copper tube to near the final position to fully seat inside the quick connect fitting and marked a cut line with a felt tip marker. The line will be cut with the close quarters tubing cutter lying on top of the tank.
The tubing cutter is tightened on the copper line by turning the knob, then the cutter is turned around the copper line so the internal cutting wheel can do it’s job. Tighten the adjustment knob every turn or two so the cutting wheel can bite deeper in the copper line. The line cuts cleanly in just several turns.
The 1/4 inch copper faucet line cut to length with the tubing cutter:
The 1/4 inch copper line is bent and adjusted so it aligns with the white quick connect fitting, then inserted into the fitting until it seats all the way against the internal backstop.
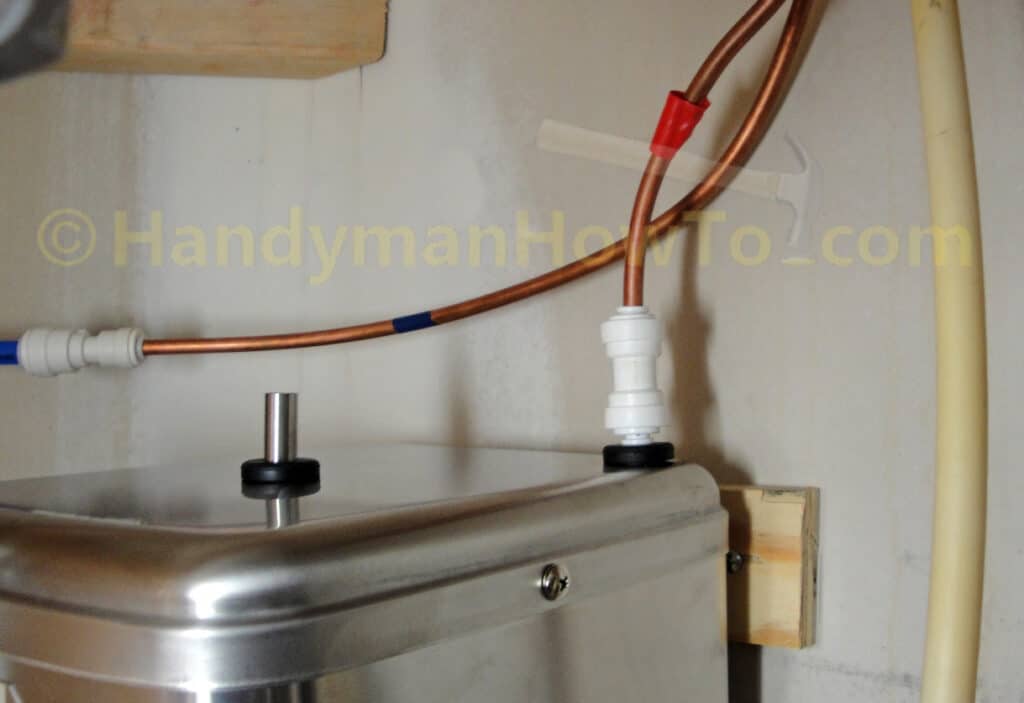
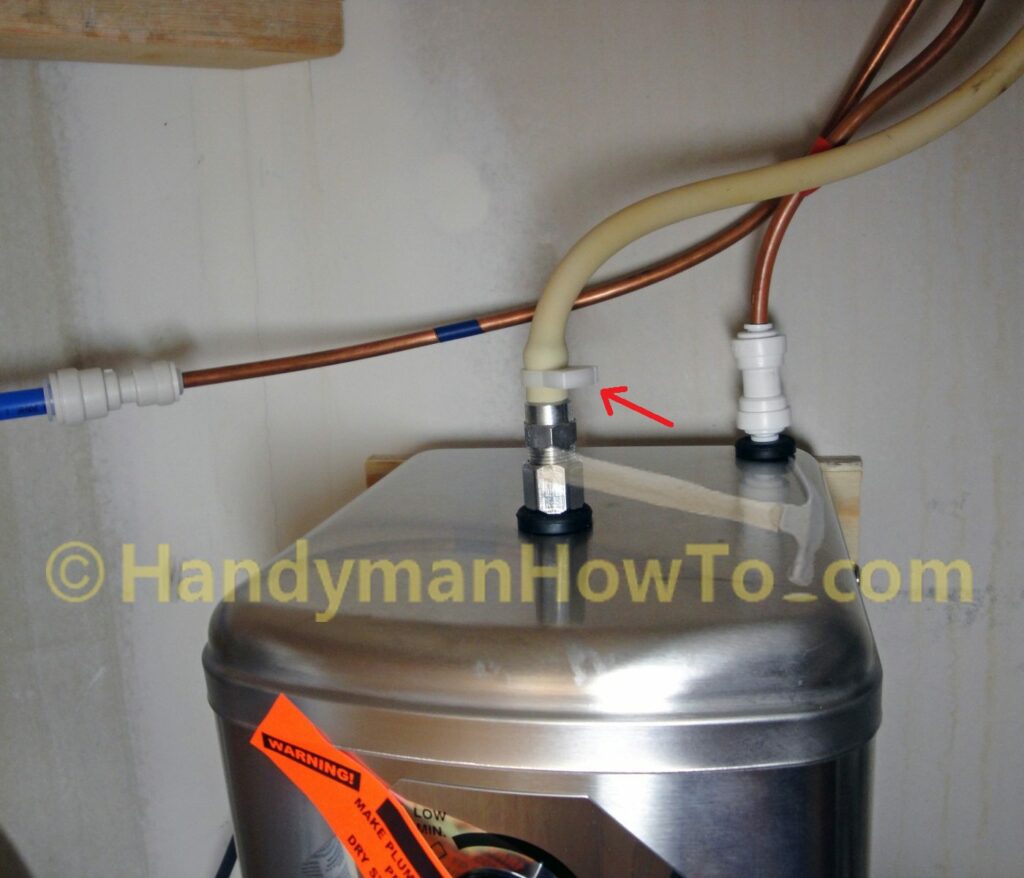
Hot Water Tank-to-Faucet Supply Hose
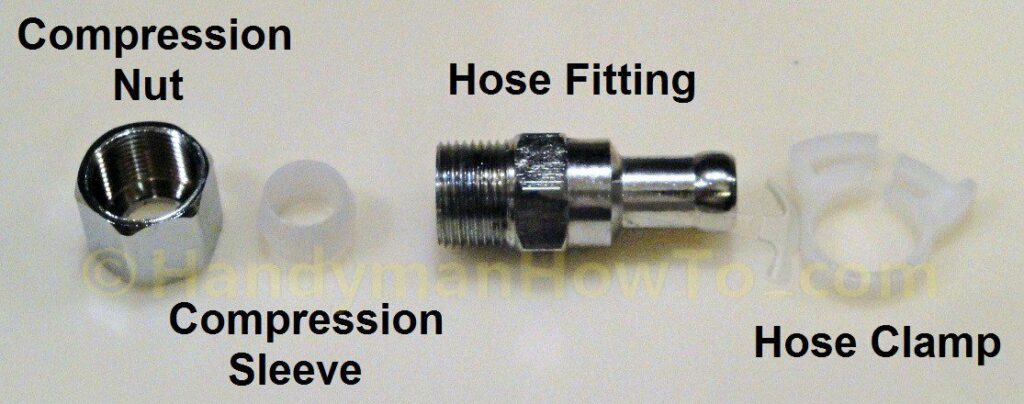
The hot water rubber hose fitting for the tank is provided with the Westbrass Velosah instant hot water faucet. The hose fitting consists of the following parts:
- Compression nut
- Compression sleeve
- Hose fitting
- Hose clamp
The fitting is installed on the center outlet of the tank as follows:
- Place compression nut over the center outlet, threads facing up.
- Slip the compression sleeve over the outlet.
- Set the hose fitting over the outlet.
- Tighten the compression nut.
Next, cut the white rubber hose with scissors so it will fit the tank without kinking.
Slide the hose clamp over the end of the white Santoprene rubber hose, then work the end of the hose onto the tank hose fitting:
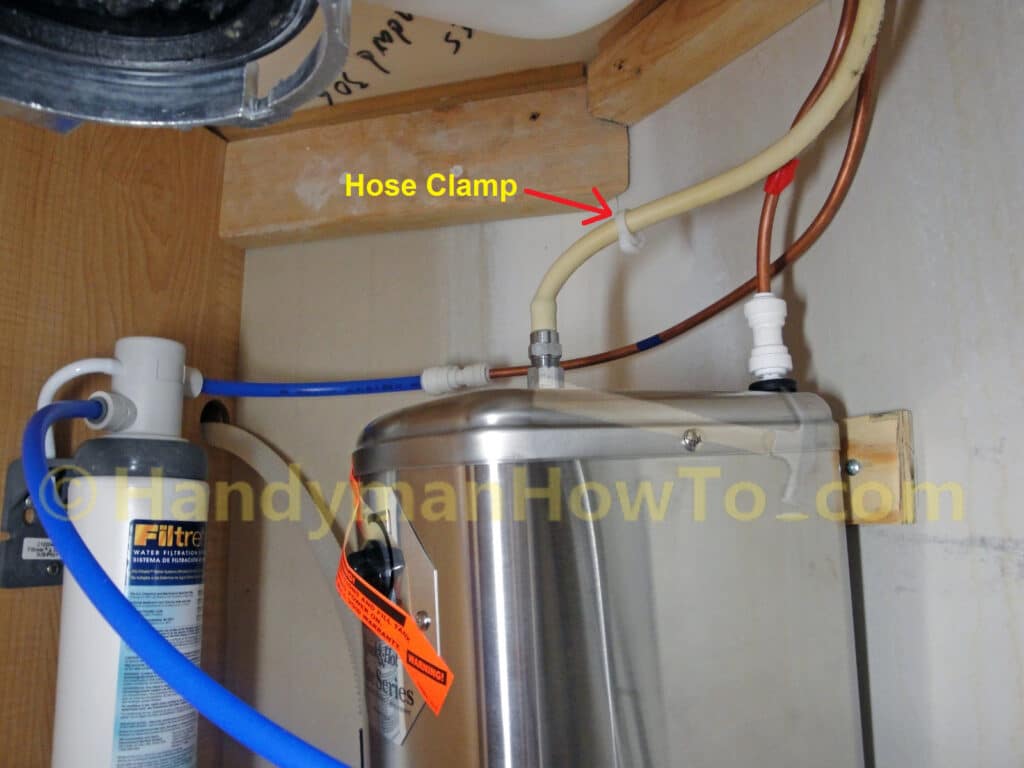
The hose clamp works like a zip tie; squeeze the jaws shut with a pair of pliers until its snug around the rubber hose.
This project is concluded in How to Install an Instant Hot Water Dispenser, Faucet and Water Filter – Part 5.
Thanks for reading,
Bob Jackson