This article is part of a project series on how to replace a broken garbage disposer with a new Waste King® Legend L-8000 1 HP unit that features a Lifetime In-Home Service Warranty. I also changed the hardwired electrical hookup to a single wall outlet for use with a plug-in power cord.
Garbage Disposal Replacement Project Series:
This project is split into 3 parts:
- Part 1: Removing the old garbage disposal (this article)
- Part 2: Wire the garbage disposal switch and outlet
- Part 3: Installing the new garbage disposal
Old Garbage Disposer Stopped Working
The 10+ year old 1/3 HP InSinkErator® garbage disposer stopped working. I could’ve picked up a replacement unit from my local home improvement store, but decided to broaden my horizons and do some research on what was available in terms of quality and price.
Waste King Legend 8000 Garbage Disposer
Consumer Reports rated the Waste King Legend 8000 as the best unit in the August issue. The Waste King L-8000 features a Lifetime In-Home Service Warranty. I bought mine for $124.80 at Amazon.com, down from the $339 normal retail price, with no sales tax and it arrived in 2-days by UPS with free Super-Saver Shipping. What a deal!
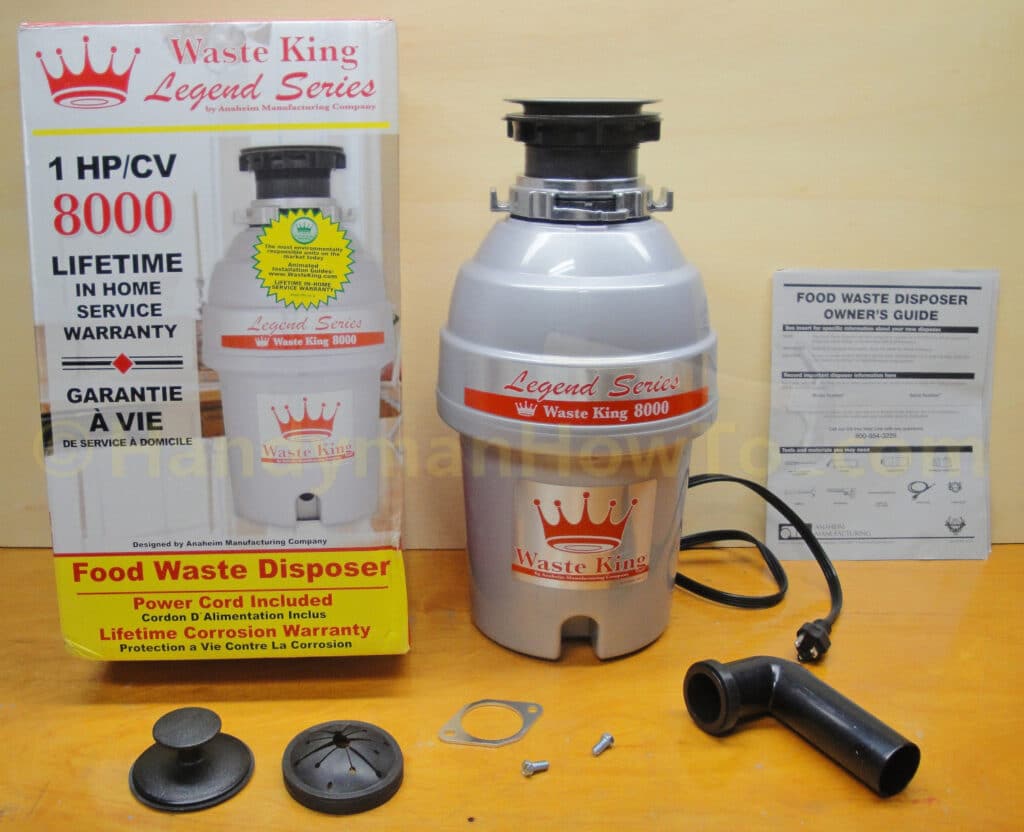
The Waste King Legend 8000 comes with the power cord already attached, uses standard 120VAC power and draws 7 AMPs of power, which is well within the standard 15AMP household circuit. The Waste King features an FAQ: EZ Mount System which I found to be simpler than the traditional 3-bolt mount and needed no tools to install the EZ Mount.
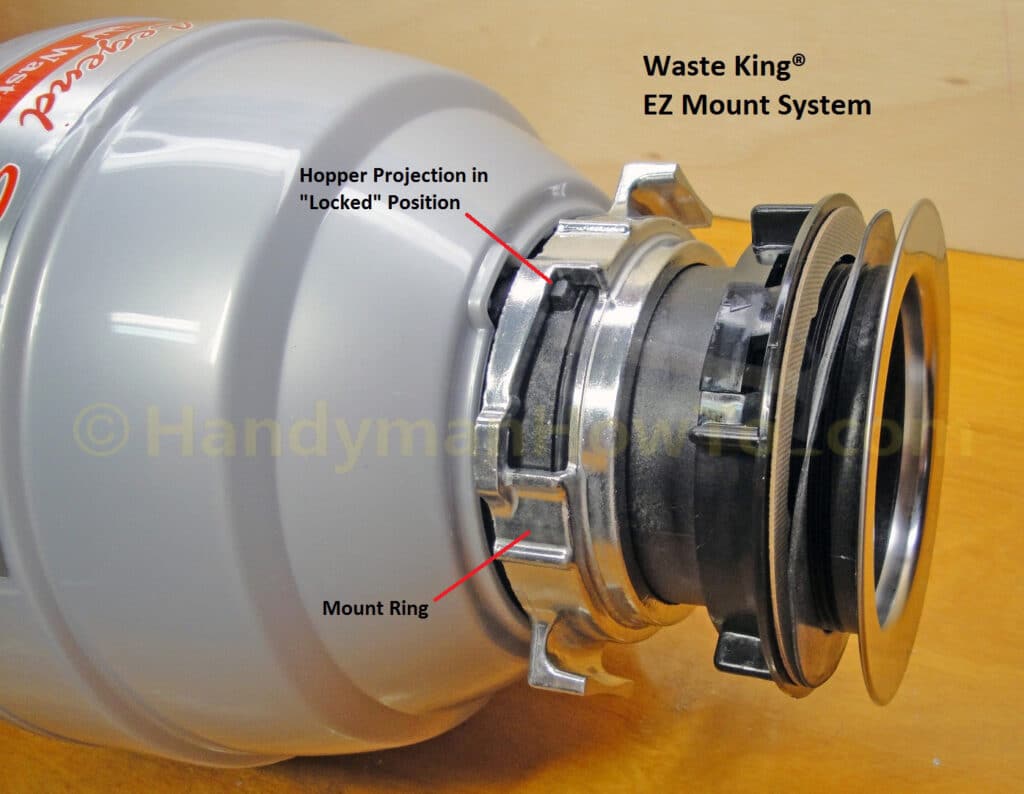
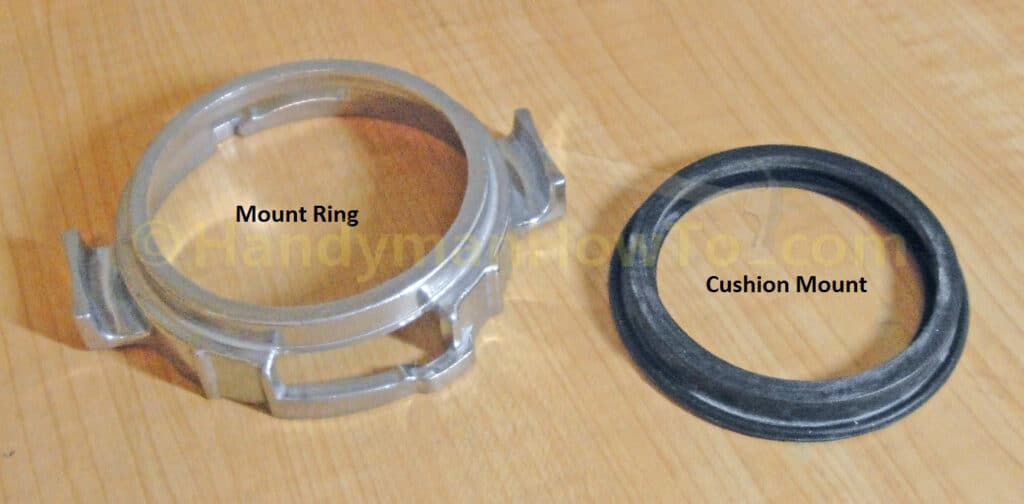
Closeup view of the EZ Mount components:
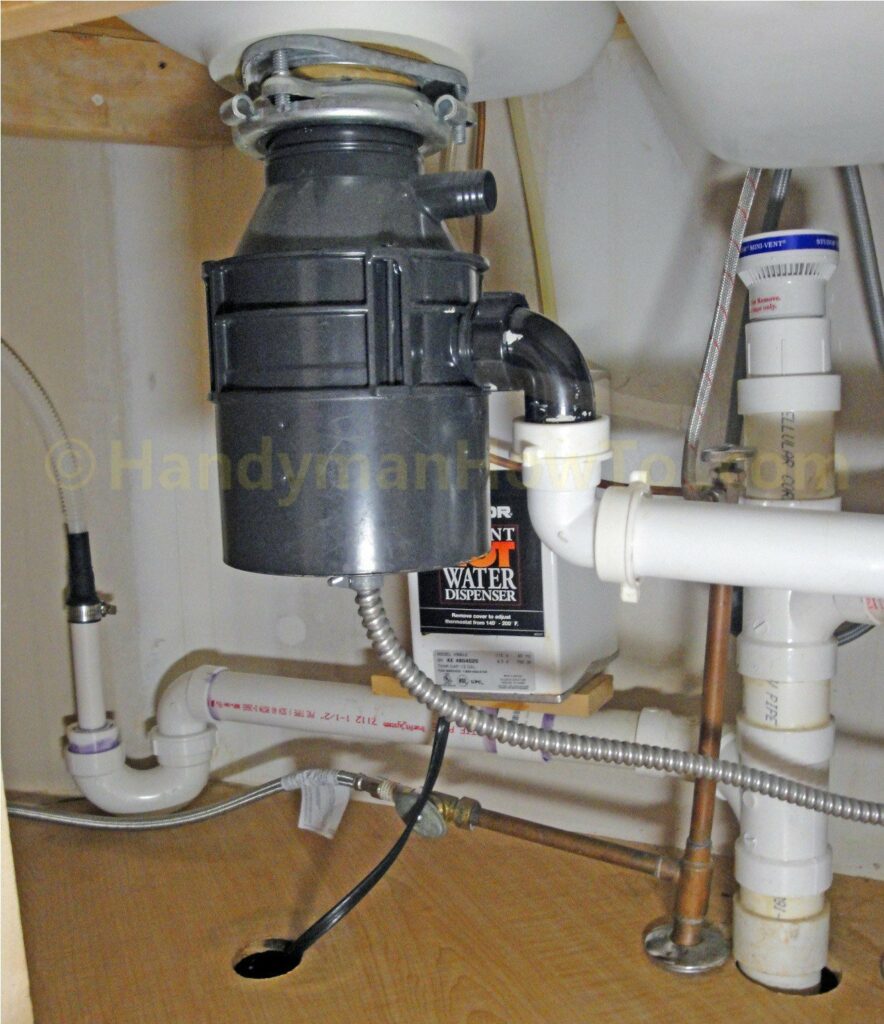
Leaky Hot Water Dispenser
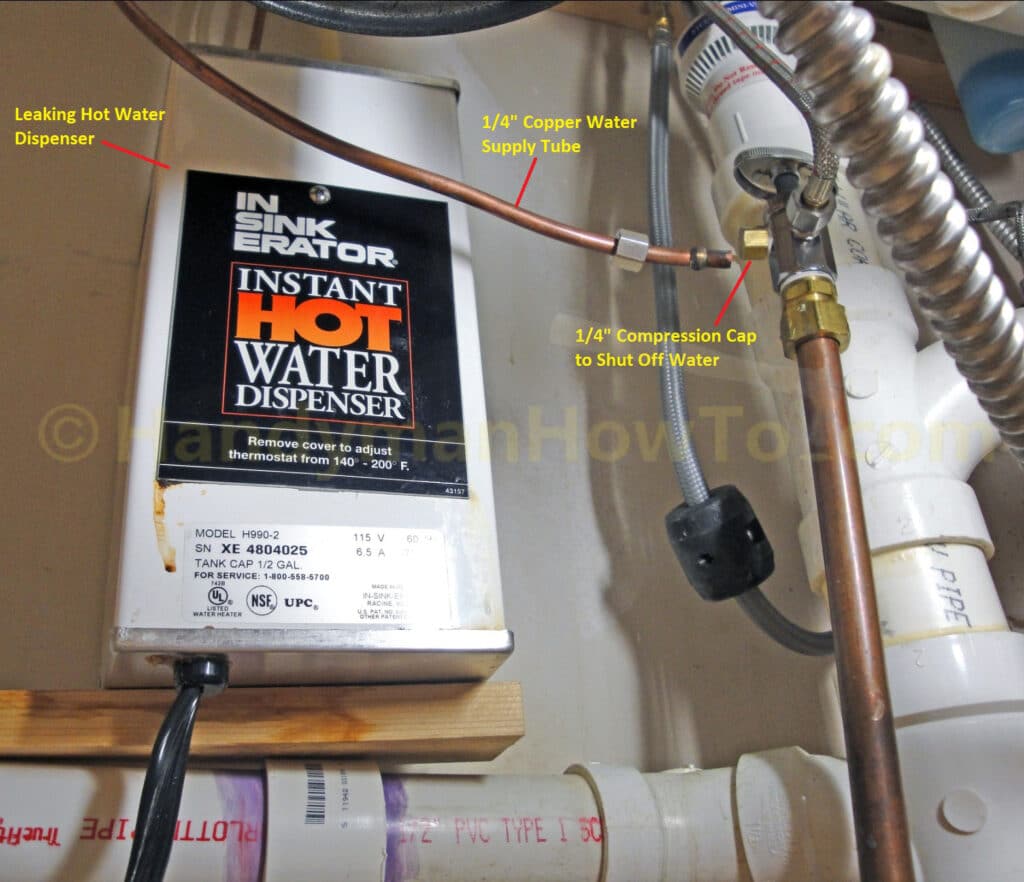
After I cleared out the cabinet in preparation for removing the old garbage disposal, I noticed my InSinkErator Instant Hot Water Dispenser (also 10 years old) was leaking. The surprising thing was the hot water dispenser was still working and hadn’t tripped the GFCI outlet. I removed the hot dispenser by:
- Unplugging the dispenser electrical cord.
- Shutting off the water valve.
- Unscrewed the nut on the 1/4″ copper tube compression fitting.
- Capped off the water valve with a 1/4″ brass compression cap.
- Removed the copper and plastic tubes from the top of the hot water dispenser unit.
- Turned the water supply valve on and checked for leaks.
A brief inspection found this unit was in really bad shape:

I later replaced the instant hot water dispenser.
Removing Old Garbage Disposal Plumbing and Wiring Connections
The cabinet is emptied for easy access to the broken garbage disposer. The garbage disposer is removed by shutting off the circuit breaker then disconnecting the discharge elbow, dishwasher drain hose (if present), 3-bolt mount and hardwired electrical connection.
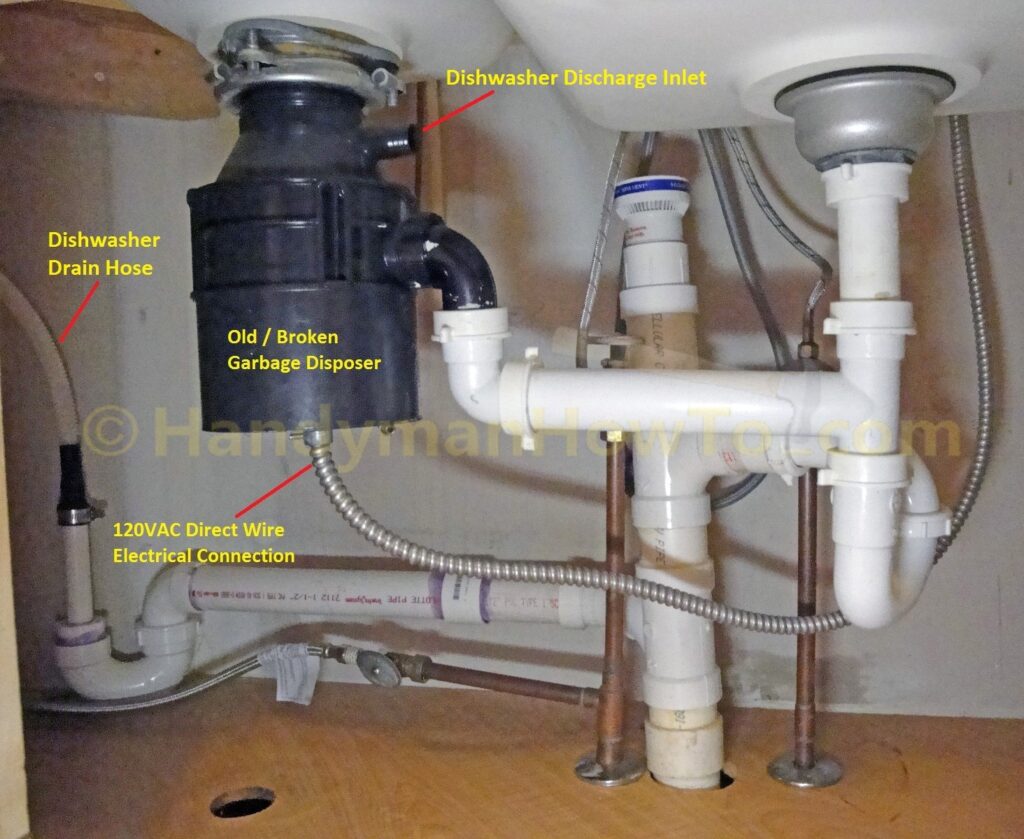
My dishwasher drain hose is connected directly to the drain pipe, your dishwasher drain hose may be connected to the dishwasher discharge inlet on the disposal unit.
Shut Off the Electricity
A properly installed garbage disposer will be on a dedicated circuit breaker in the main electrical panel. Turn off the circuit breaker to avoid electrical shock.
Disconnect the Discharge Elbow
Unscrew the two plastic nuts on the garbage disposer discharge elbow and wiggle it off. Have a paper towel ready to catch any drips and stuff the paper towel in the disposal outlet. Remember not to chew on your finger nails from this point on.
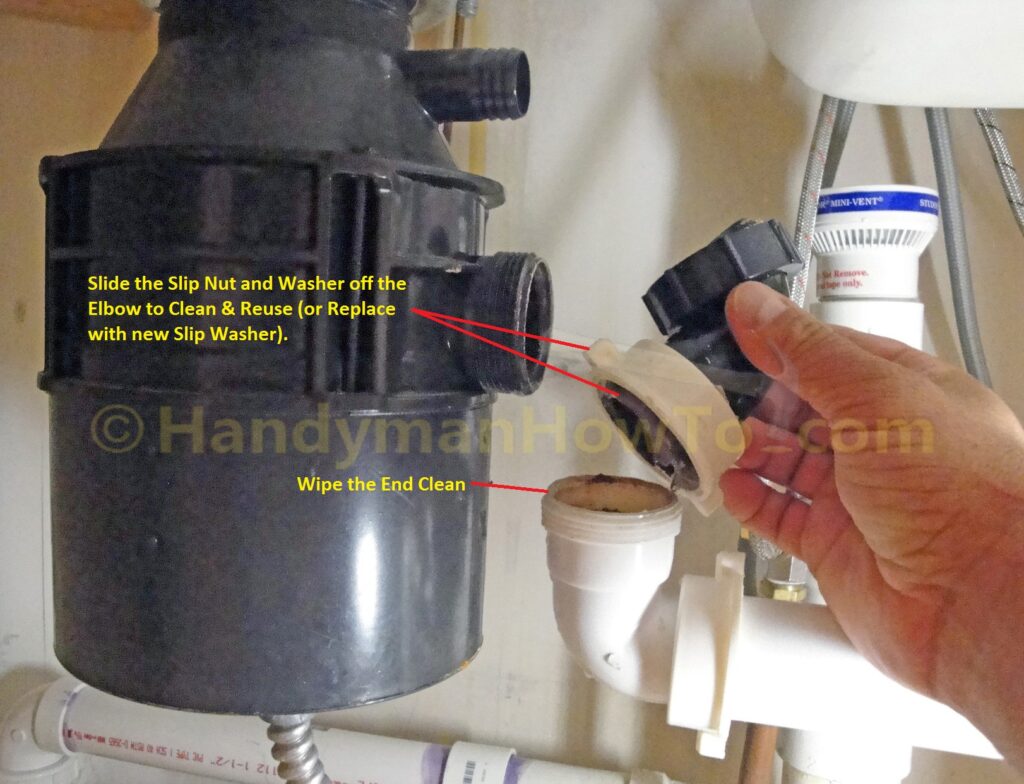
Wipe the threads and inside lip of the white elbow joint clean with a paper towel as indicated in the above photo. You’ll also need to clean and reuse the slip nut and slip washer. The slip washer can be reused, however, I recommend buying a new 1-1/2″ washer for about 50 cents at the hardware store as these can be crushed if the nut was over tightened.
Garbage Disposal Mounting Ring
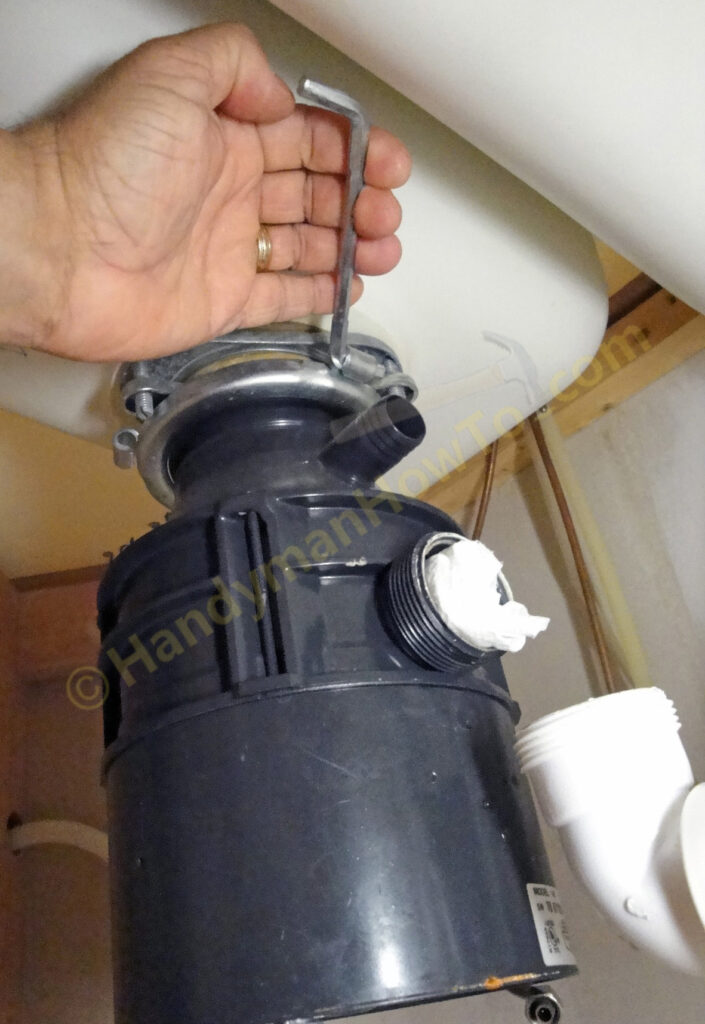
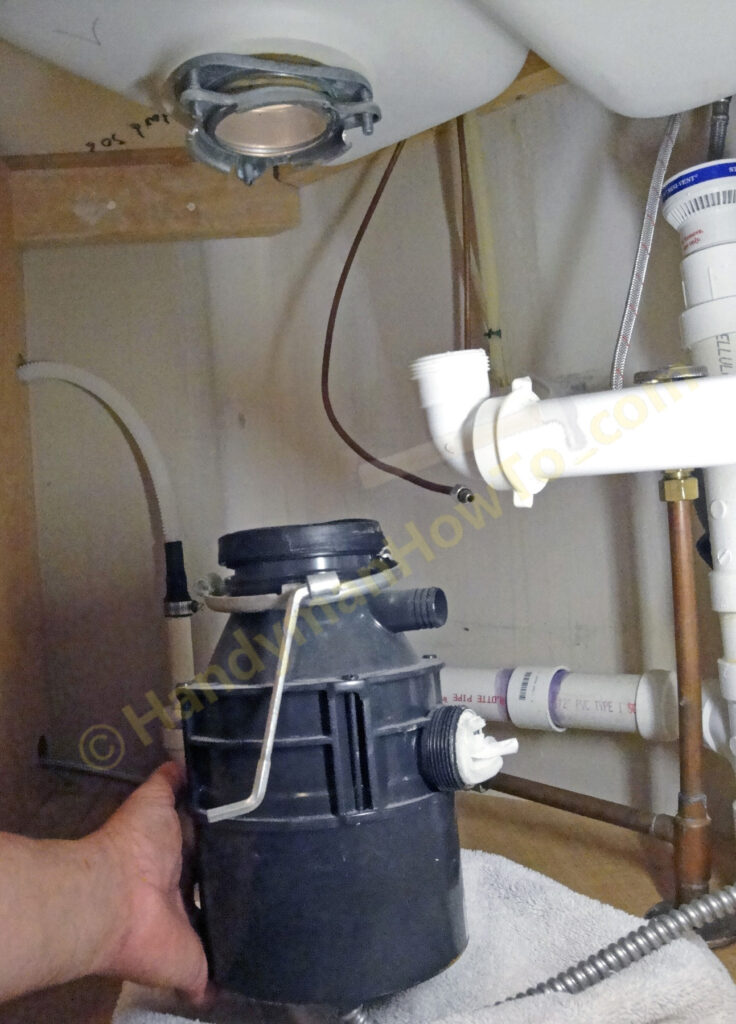
Support the garbage disposer and insert a wrench or large screw driver into the lug of the mounting ring and turn as shown. Be ready, the garbage disposer will fall free after 1/4 turn. I’m using the original InSinkErator® Jam-Buster™ wrench saved from a disposer installed in my former home. If your mount ring is jammed, tap the lug with a hammer.
Garbage disposal dropped from the 3-bolt sink mount:
Disconnect the Hardwired Electrical Cable
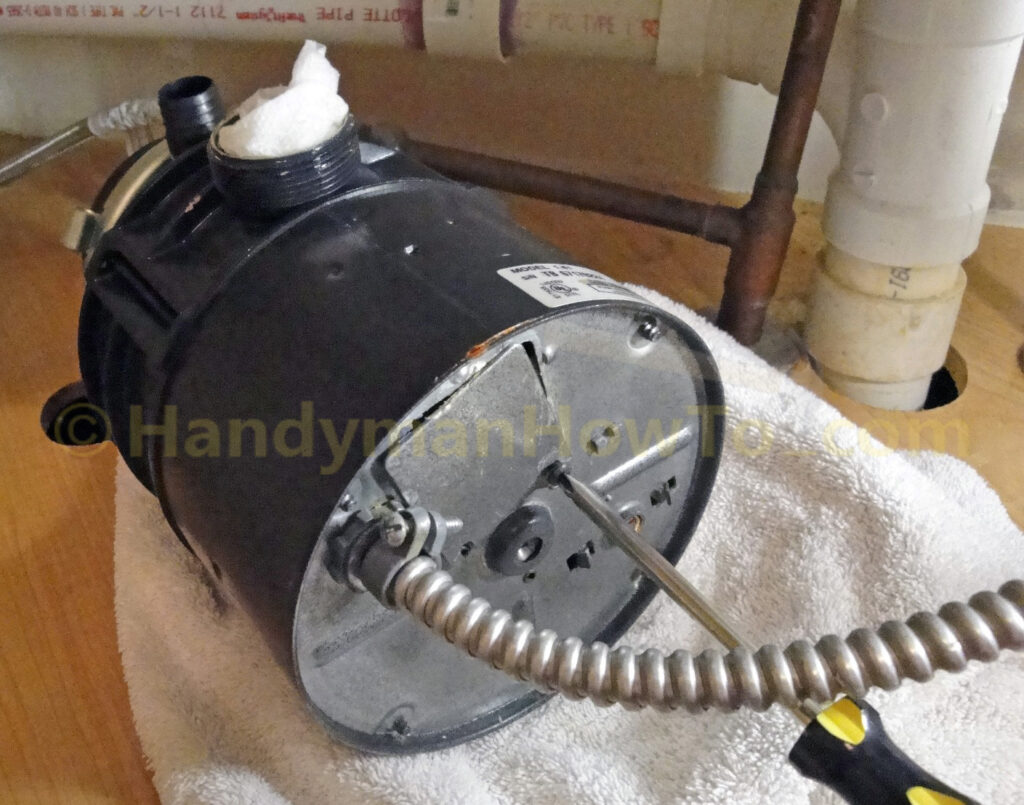
Lay the disposer on a towel with the discharge outlet facing up. Remove the electrical plate with a screwdriver.
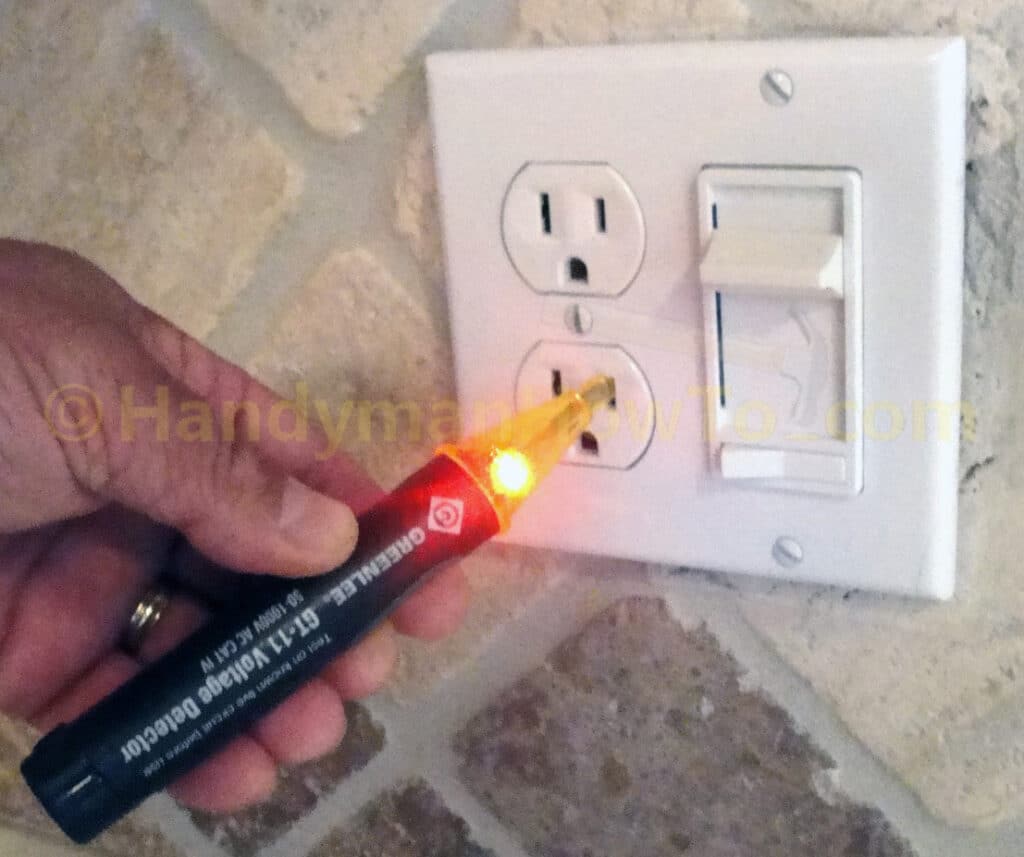
Verify the electricity is off with a voltage detector before touching the wires. I like the Greenlee Non-Contact Voltage Detector because it doesn’t require direct contact with the wires to sense voltage. If power is present, it beeps and flashes a bright red.
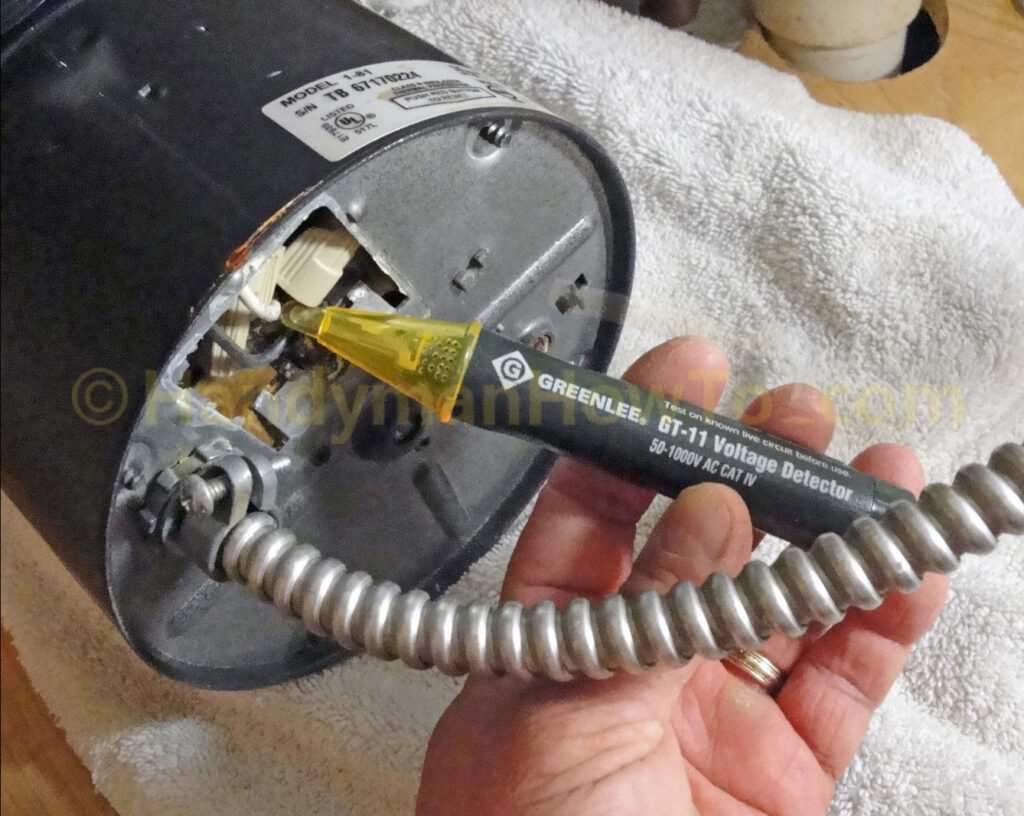
If you’re unfamiliar with a non-contact voltage detector, it’s a user-friendly device. Just hold it near a power source and it will alarm if voltage is present. You can never be too cautious around electricity.
To disconnect the electrical wiring from the disposer:
- Pull out the wires and remove the wire nuts from the black and white wires.
- Unscrew the ground screw and remove the bare ground wire.
- Loosen the clamp screw on the strain relief fitting on the flexible electrical conduit.
- Loosen the spur nut on strain relief fitting.
- Unscrew the strain relief threaded fitting from the bottom of the disposer.
- Gently pull/wiggle the wires free from the disposer.

Remove the Disposal 3-Bolt Sink Mount
Dried and Brittle Plumber’s Putty: Hey! Why would I want to remove the 3-bolt mount when there’s an adapter kit available for the Waste King garbage disposer? Because the plumber’s putty on my sink flange was mostly dried and brittle – this is asking for a leak. The sink flange and mount are easy to install so why not do the job right with fresh putty? An extra 10 minutes of effort now may avoid water damage and fixing a leak later.
Loosen the mount screws by several turns. This relieves the pressure on the snap ring just beneath the mount.
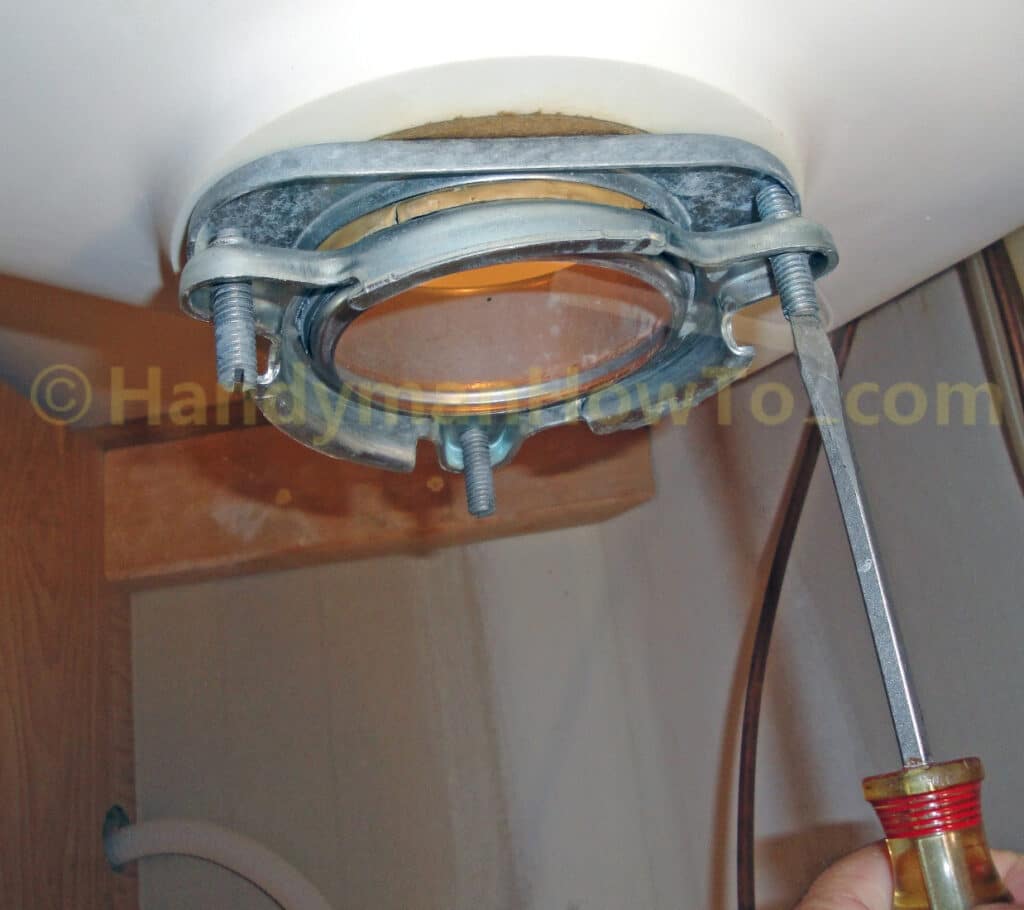
Pry off the snap ring with the tip of the screwdriver, allowing the snap ring and mount ring to drop free from the sink flange.
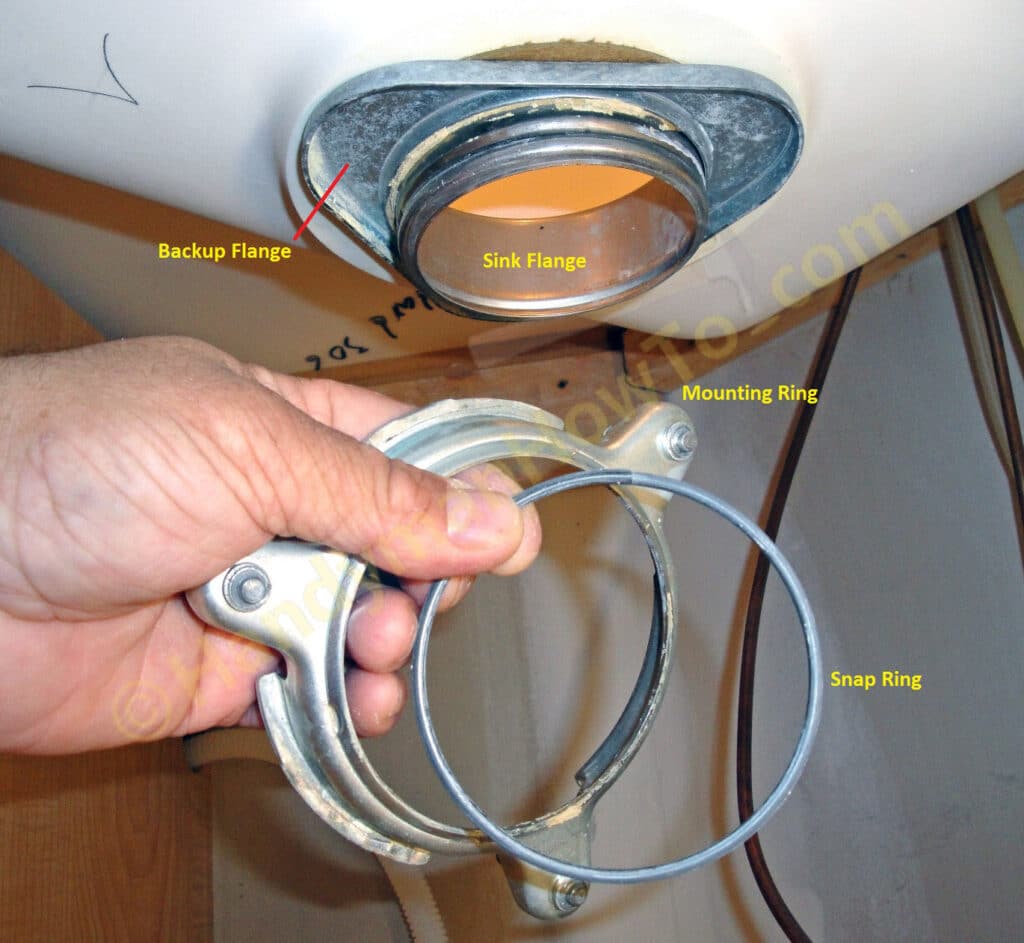
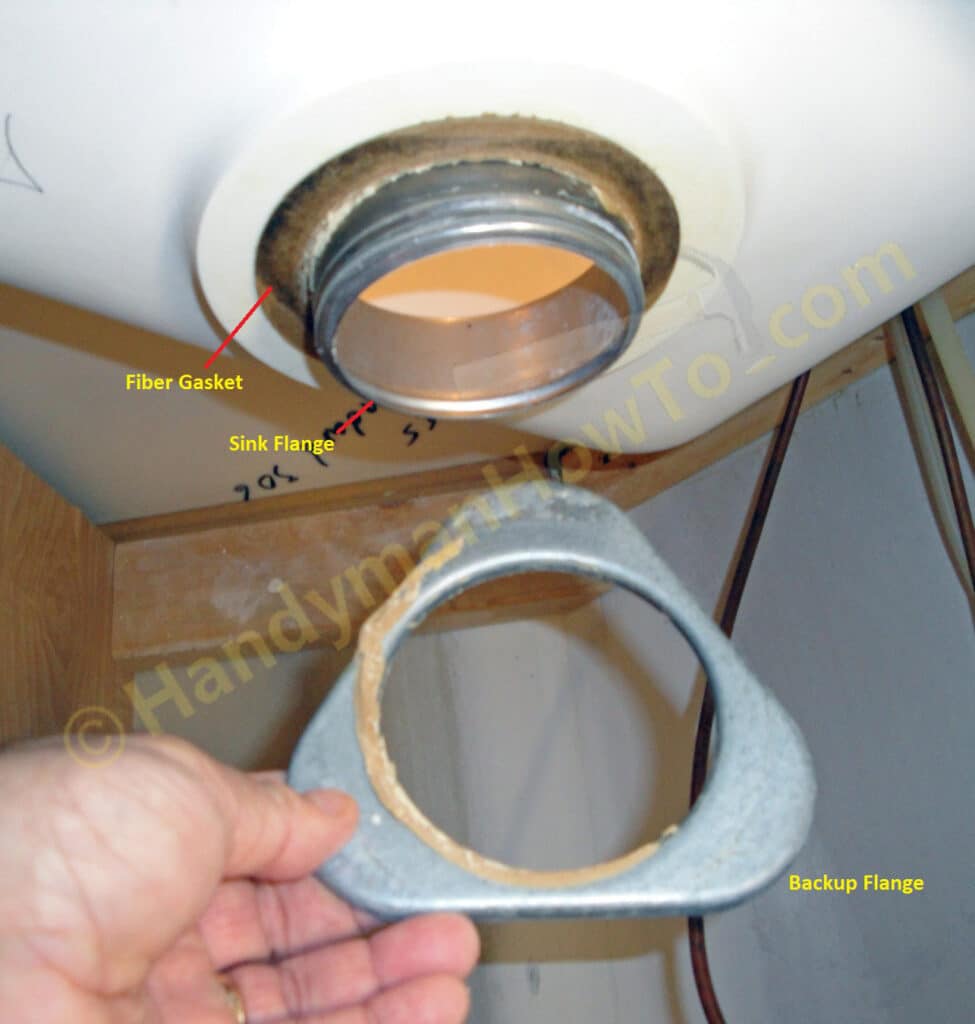
Pull off the backup flange and fiber gasket. My backup flange and gasket were lightly stuck in place by plumber’s putty after so many years. The plumber’s putty was cracked and brittle.
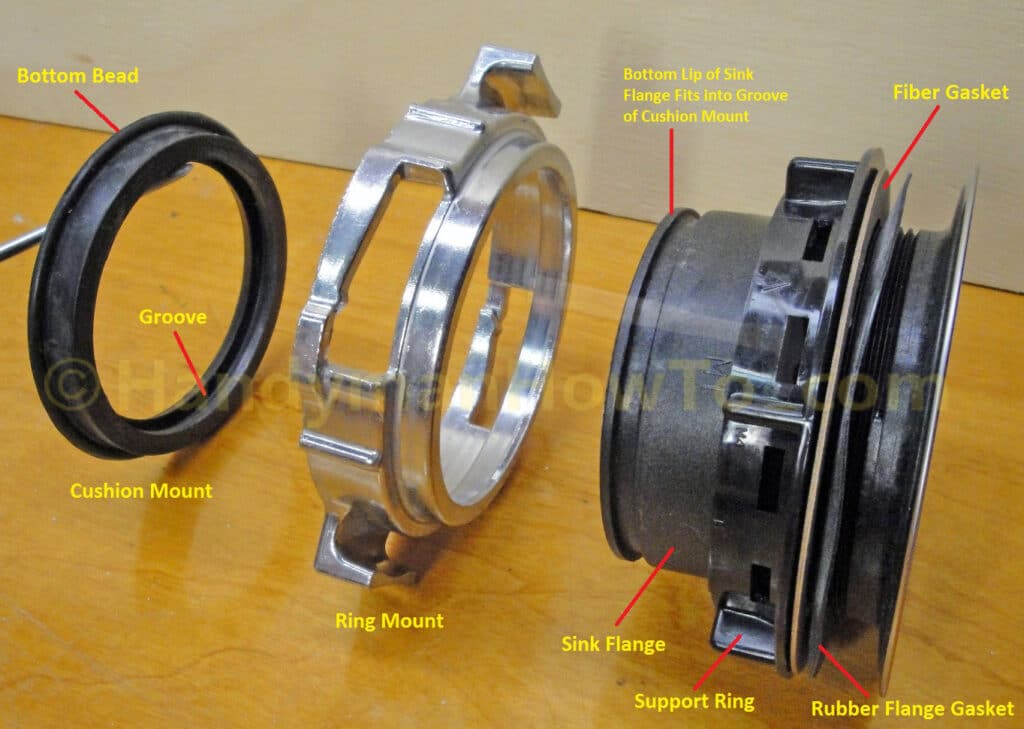
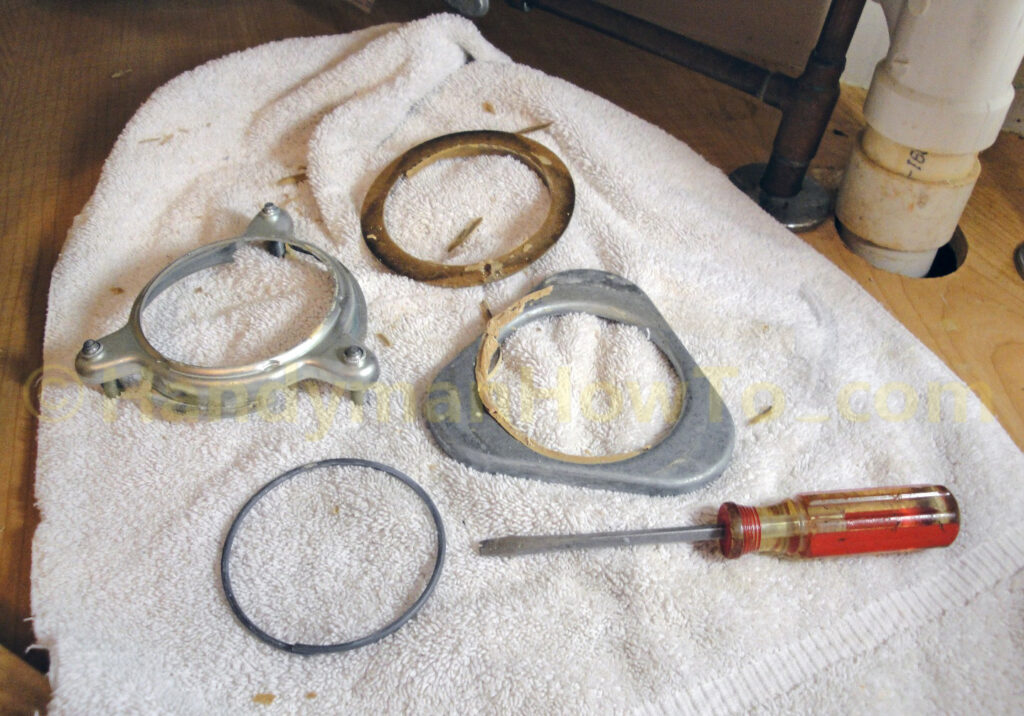
The various parts of the 3-bolt mount after removal:
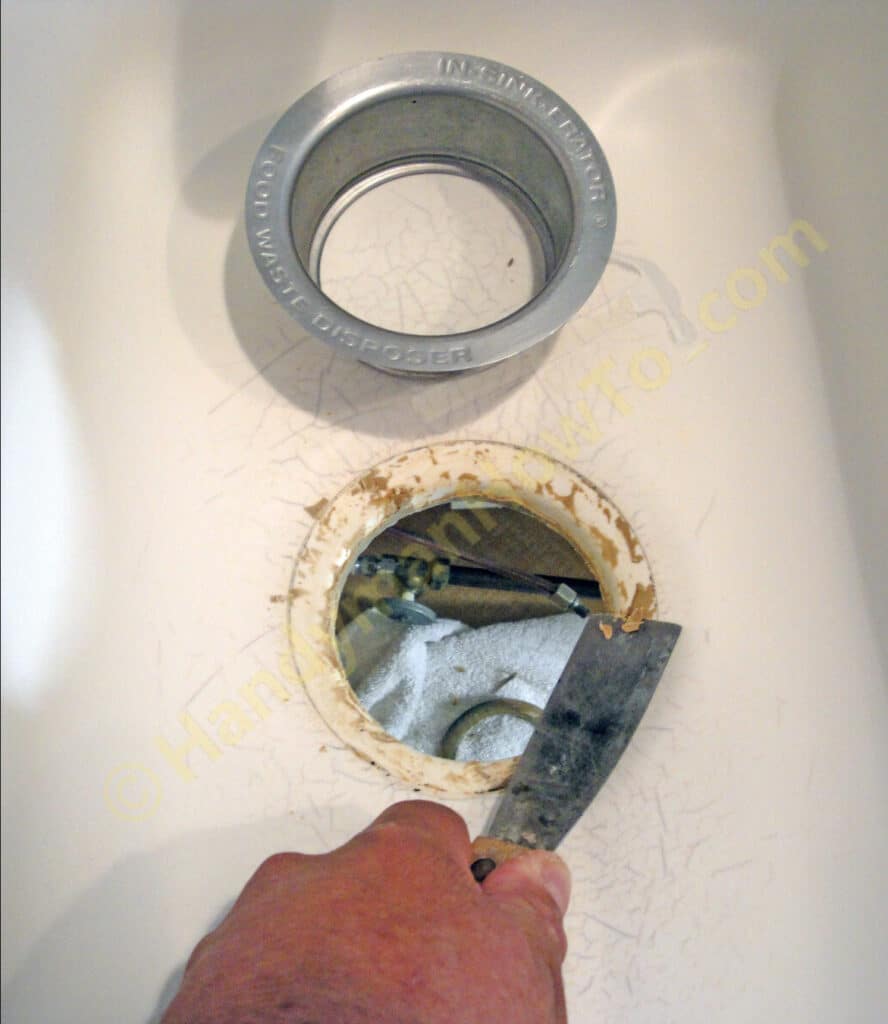
Scrape Off the Old Plumber’s Putty
Reach in and pull out the sink flange. Mine came out with minimal effort. As you can see, the plumber’s putty had become dry and brittle after 10+ years, loosing its effectiveness as a water seal.
Scrape off the old putty with a small putty knife, taking care not to scratch or gouge the sink.
A plastic scouring pad will safely polish the drain hole without damaging the sink to remove every last bit of putty. A clean sink surface is required for a water tight seal against the sink flange.
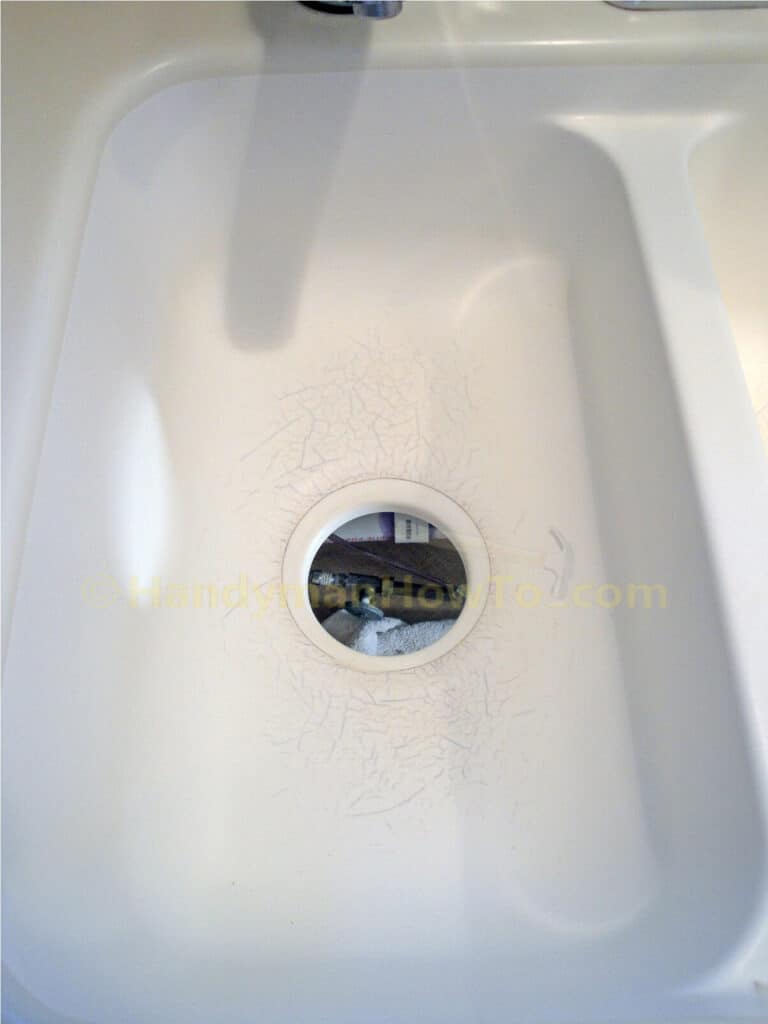
Take care to clean the plumber’s putty off the bottom of the drain, too.
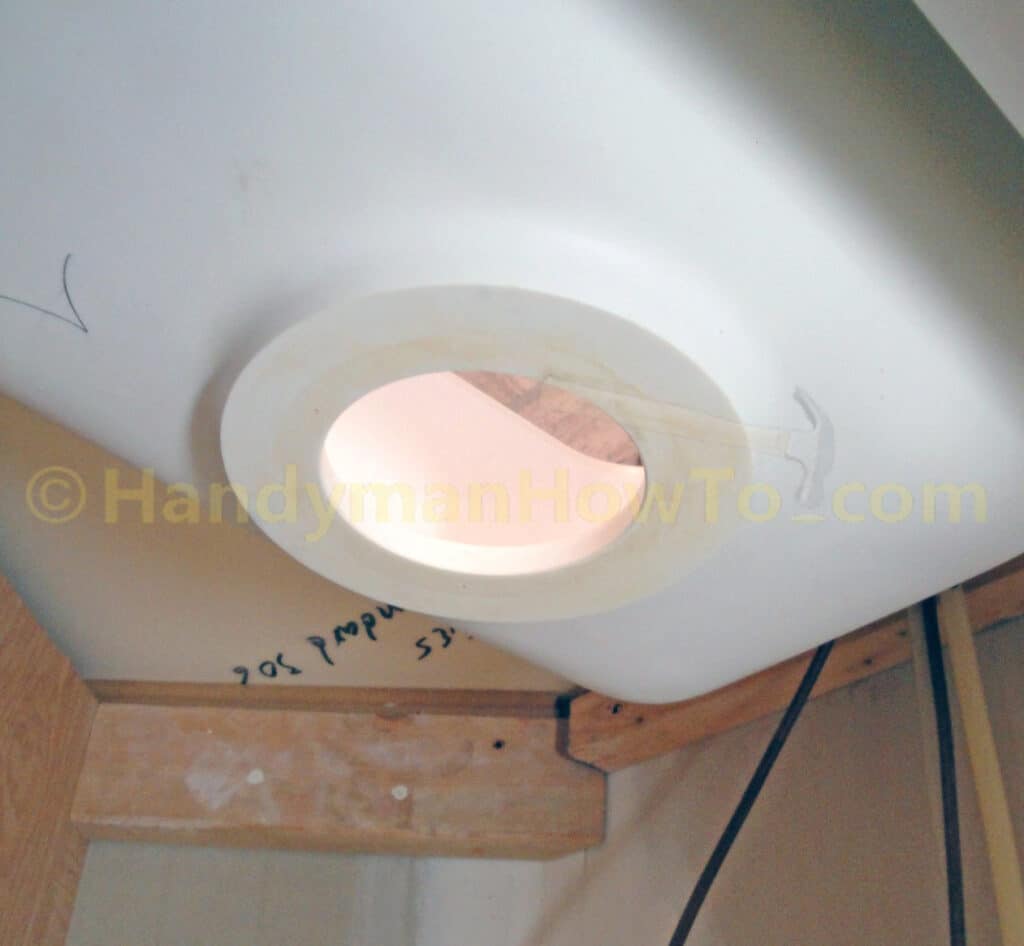
Mounting the New Garbage Disposal
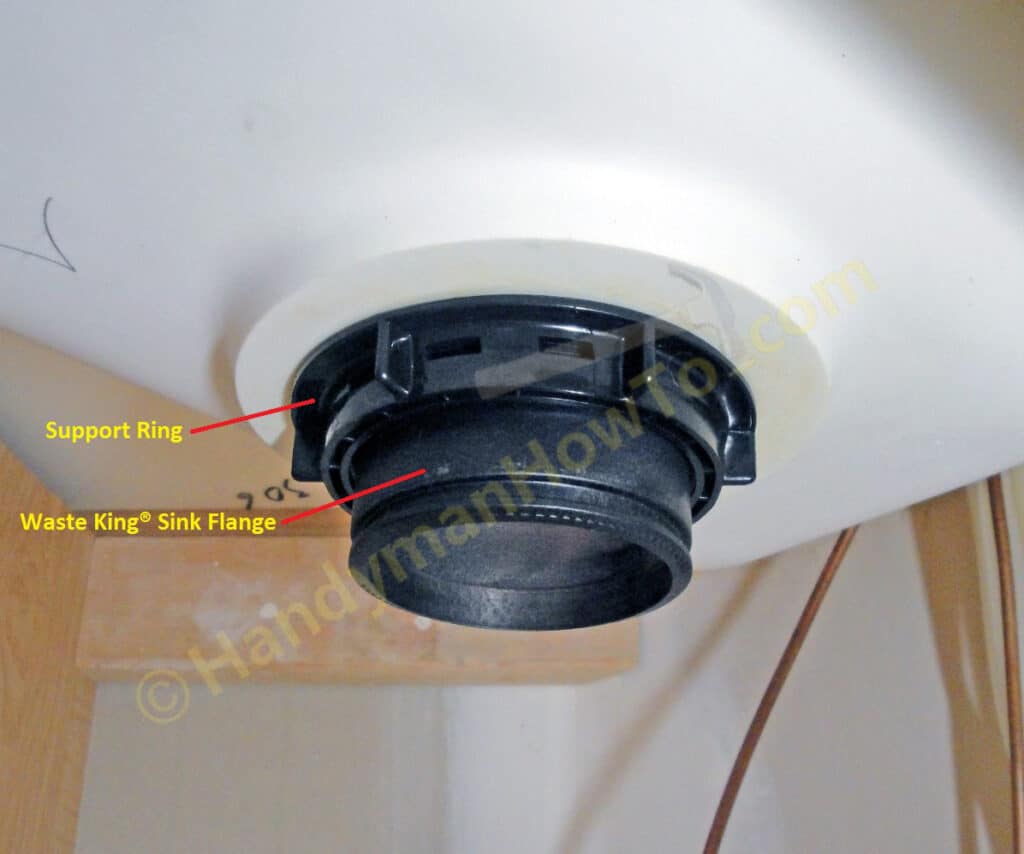
The new Waste King® Legend 8000 garbage disposer is temporarily mounted to the sink to test fit the plumbing connections. I began by setting the sink flange in the drain hole and spinning on the support ring until it made contact with the bottom of sink. Do not use plumber’s putty or tighten the support ring because this is a temporary installation.
Install the Waste King EZ Mount Garbage Disposal
The Waste King EZ Mount Ring and Cushion Mount go on next. Orient the two parts as shown:
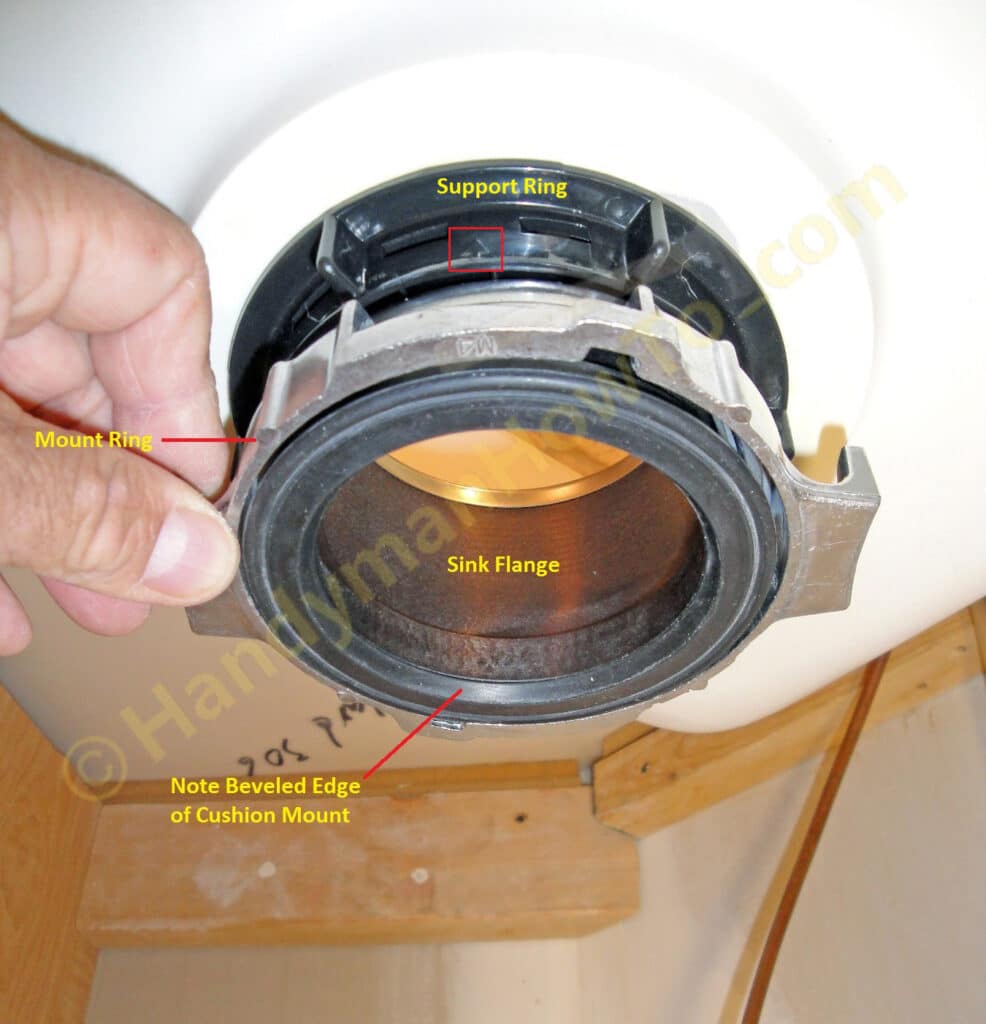
Slip the mount ring over the sink flange, then press the cushion mount over the lip of the sink flange. The cushion mount holds the mount ring in place. The lip of the sink flange fits in the groove of the cushion mount. Inspect the cushion mount fit to ensure it’s even against the flange as shown:
Test Fit the Garbage Disposer
The garbage disposer is temporarily mounted to check if adjustments to the plumbing are needed. To mount the Waste King disposer:
- Lift the disposer up to the mount ring.
- Line up the hopper projection with groove in the mount ring.
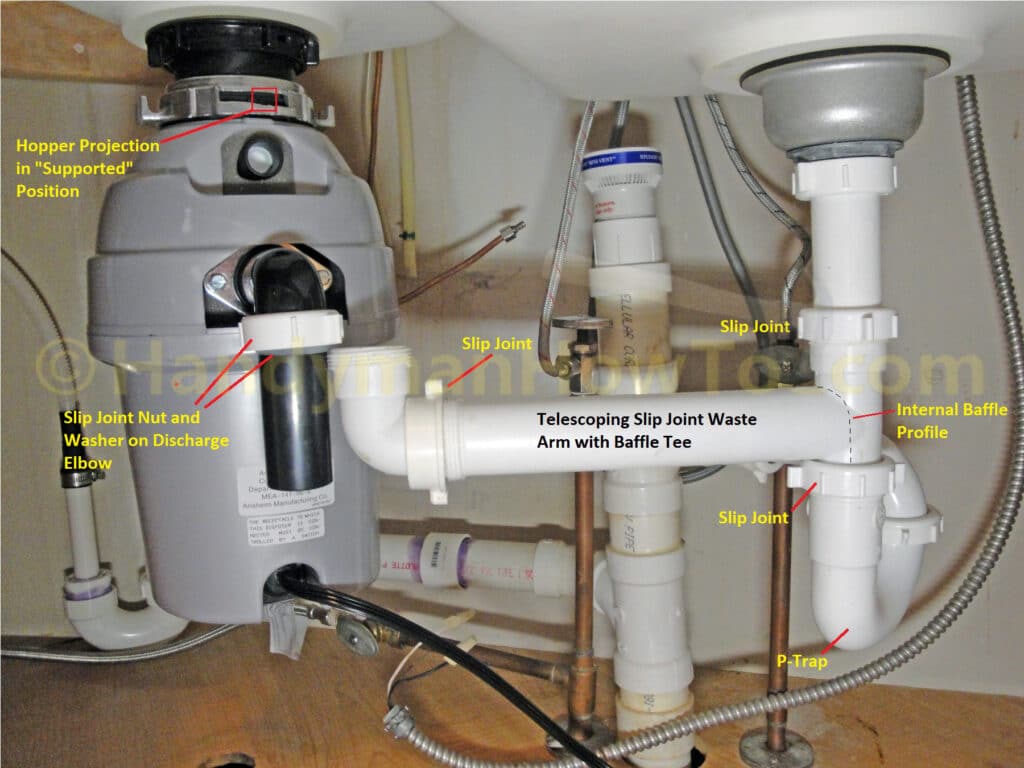
- Turn the mount ring about 1/2″ so the hopper is projection is in the “supported” position.
The disposal can be rotated by turning the mount ring for alignment with the plumbing connections. Be careful to turn only the mount ring because if you turn the disposer body you can cause it to fall from the mount.
Connect the Discharge Elbow & Waste Arm
Attach the discharge elbow to the garbage disposer using the metal gasket and two screws. Note that you will need to supply a 1-1/2″ slip nut and washer for the discharge elbow as shown above; these are available in the plumbing section at home improvement stores for a dollar or two.
The 1 HP Waste King Legend 8000 is much larger than my original 1/3 HP disposer so it was necessary to swing the waste arm forward and extend the telescoping arm to meet the Waste King elbow at an angle as shown above. To do this, I loosen the nuts on the slip joints at the Tee and Arm.
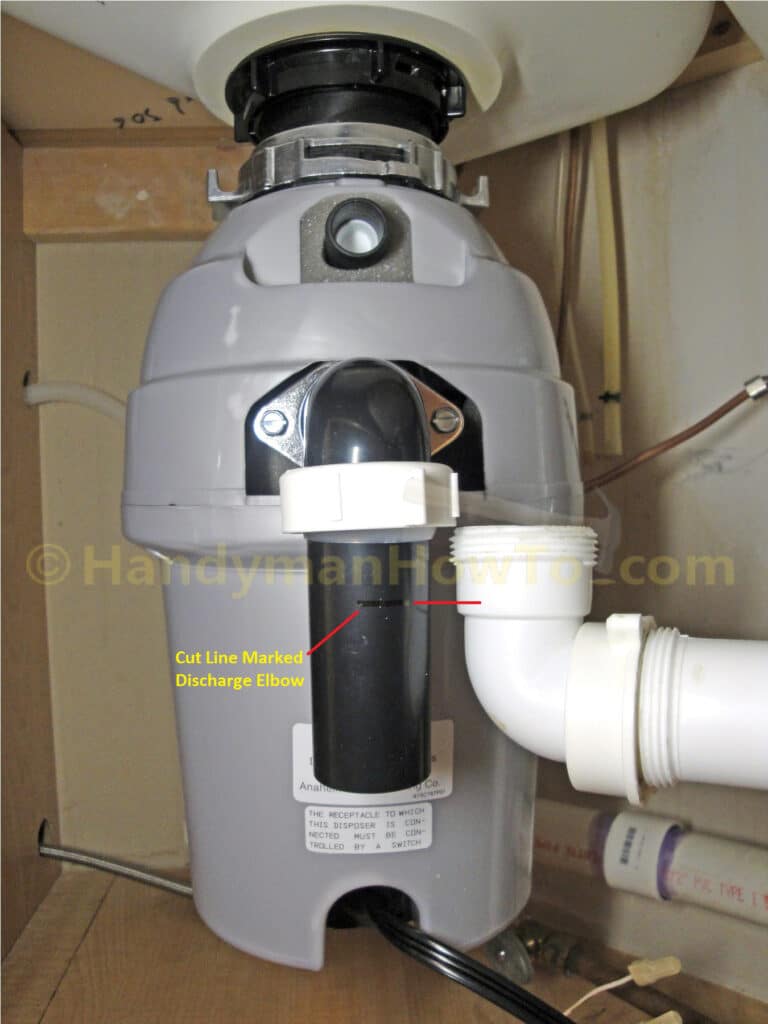
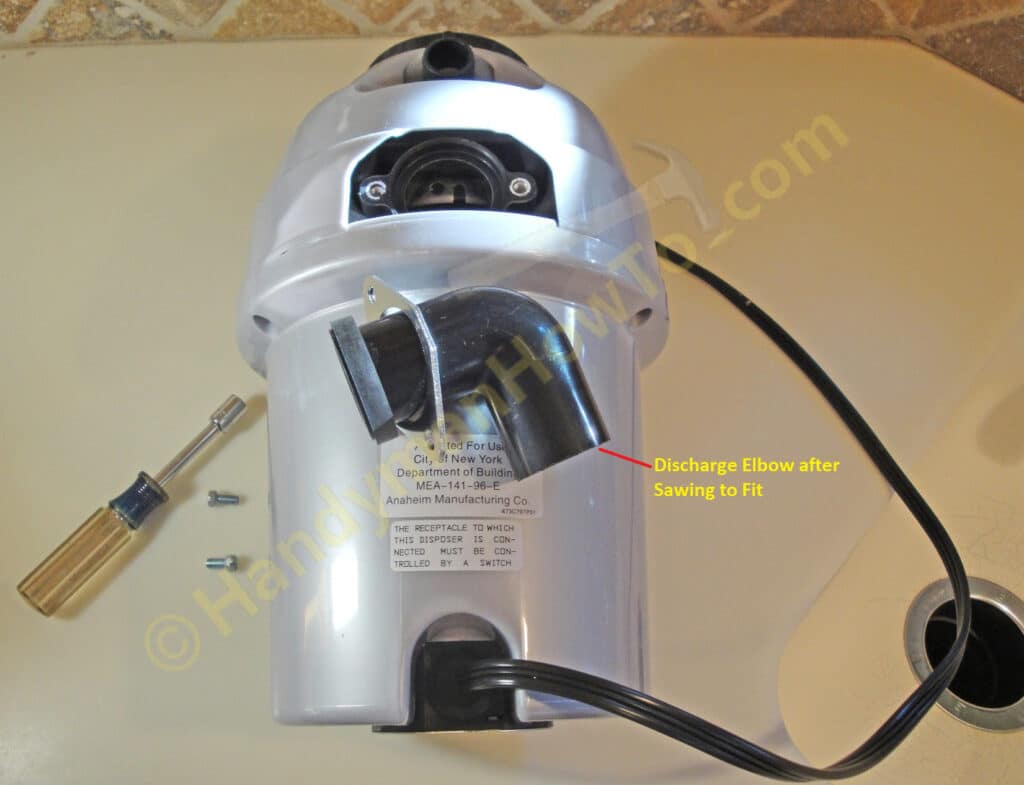
The discharge elbow is clearly too long to fit in the waste arm elbow and will be shortened by sawing off the end. Referring the next photo, mark the cut line as follows:
- Make sure the waste arm is level – eyeballing it will be close enough.
- Orient the disposer and waste arm such that the two elbows are side by side.
- Mark a cut line on the discharge elbow about 1/8″ above the flared pocket of the waste arm elbow.
My cut line is shown here:
Double check your measurements, then cut the elbow a hack saw or miter saw. Remove any burrs for a smooth clean end. I set the disposer on the kitchen counter to better illustrate the shortened elbow here:
Reattach the discharge elbow, making sure it’s pointing straight down and tighten the two bolts.
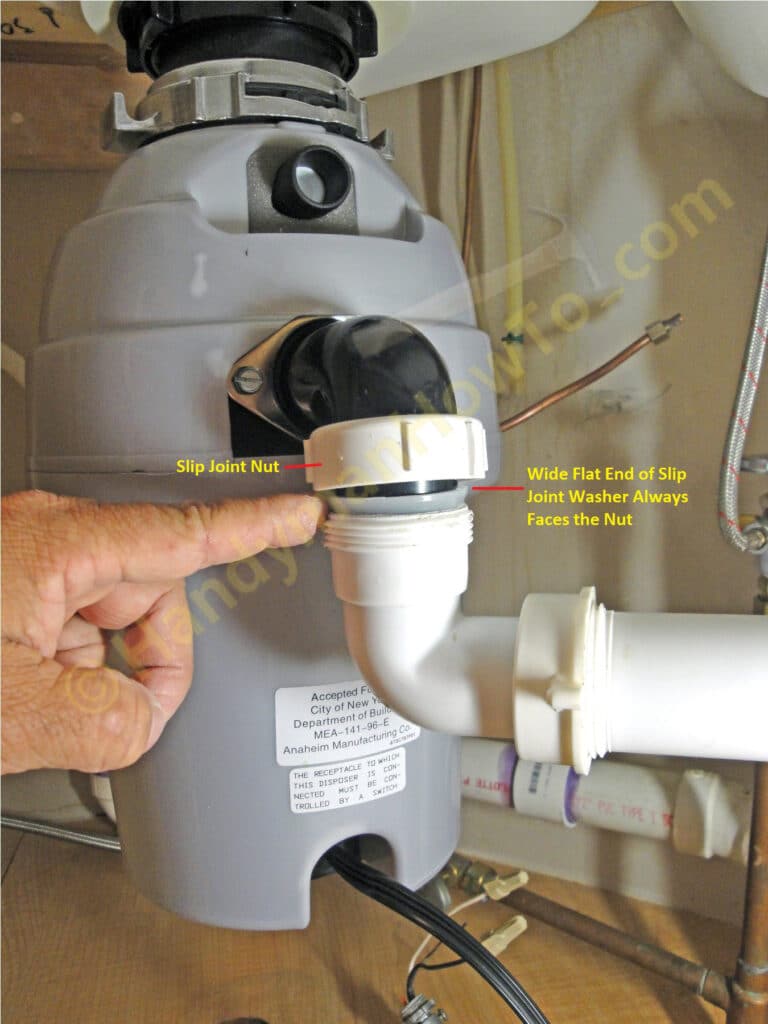
Re-mount the disposal under the sink – remember! this is temporary only – and slip on the nut and washer. Note the slip washer installs with the wide/flat end against the nut and narrow end in the pipe as shown.
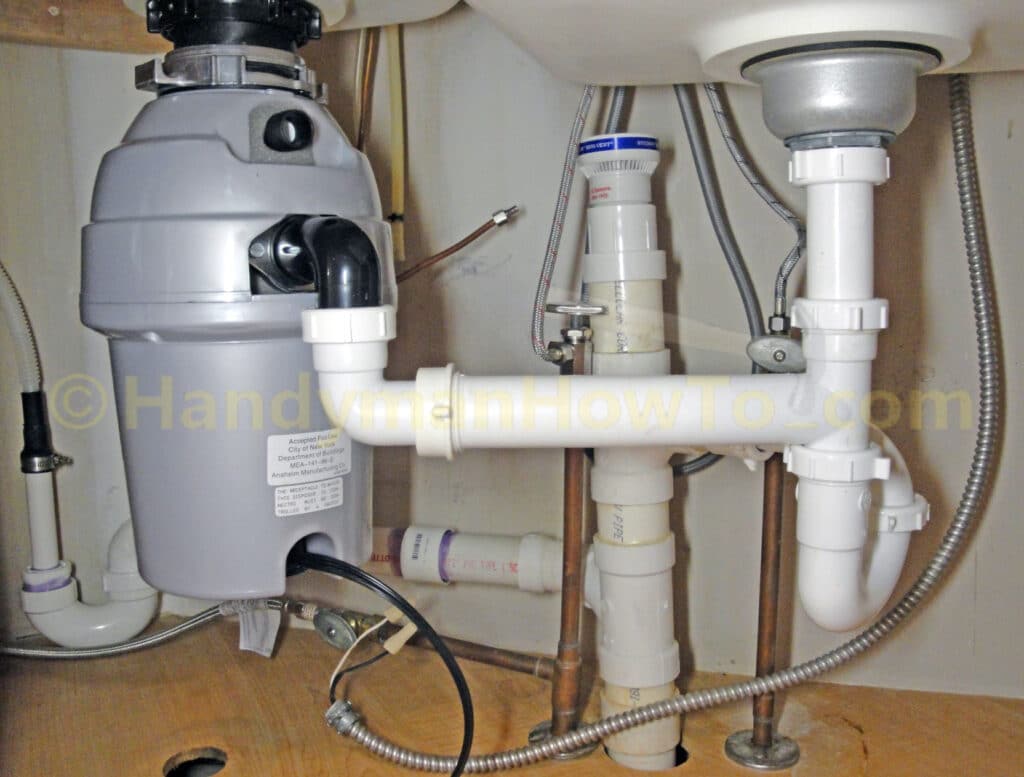
Extend the telescoping waste arm and place the discharge elbow inside the waste arm elbow. Tighten the slip nut until snug.
Look over your work to check that every fits OK:
This project is continued in part 2: Garbage disposal electrical wiring.
Take care,
Bob Jackson