This tutorial explains the Windows 10 OpenVPN client configuration steps for remote connectivity to a Ubiquiti EdgeRouter OpenVPN server. Create a .ovpn configuration file and import it into the Viscosity OpenVPN client.
Project series index:
- Ubiquiti EdgeRouter Lite SOHO Network Design
- Ubiquiti EdgeRouter Lite SOHO Network Configuration
- EdgeRouter Lite SOHO Network Firewall Rules
- Ubiquiti EdgeRouter DNS Security & Content Filtering – Block Ransomware, Botnets, Phishing and Inappropriate Content
- Ubiquiti EdgeRouter: How to Enforce Different DNS Servers per VLAN
- Ubiquiti EdgeRouter OpenVPN Server-Client Configuration Tutorial
- EdgeRouter OpenVPN: Create Public Key Infrastructure with Easy-RSA
- EdgeRouter OpenVPN Server – Client Mode Configuration Steps
- OpenVPN iPhone Client Configuration Steps
- OpenVPN Windows 10 Client Configuration Steps (you are here)
OpenVPN Windows PC Client Configuration Steps
This tutorial was last updated on April 7, 2018 for the latest versions of OpenVPN, Easy-RSA 2.0 and Viscosity. See the project introduction for details.
The Windows 10 client configuration steps are summarized in the following snippet from the OpenVPN configuration process diagram:
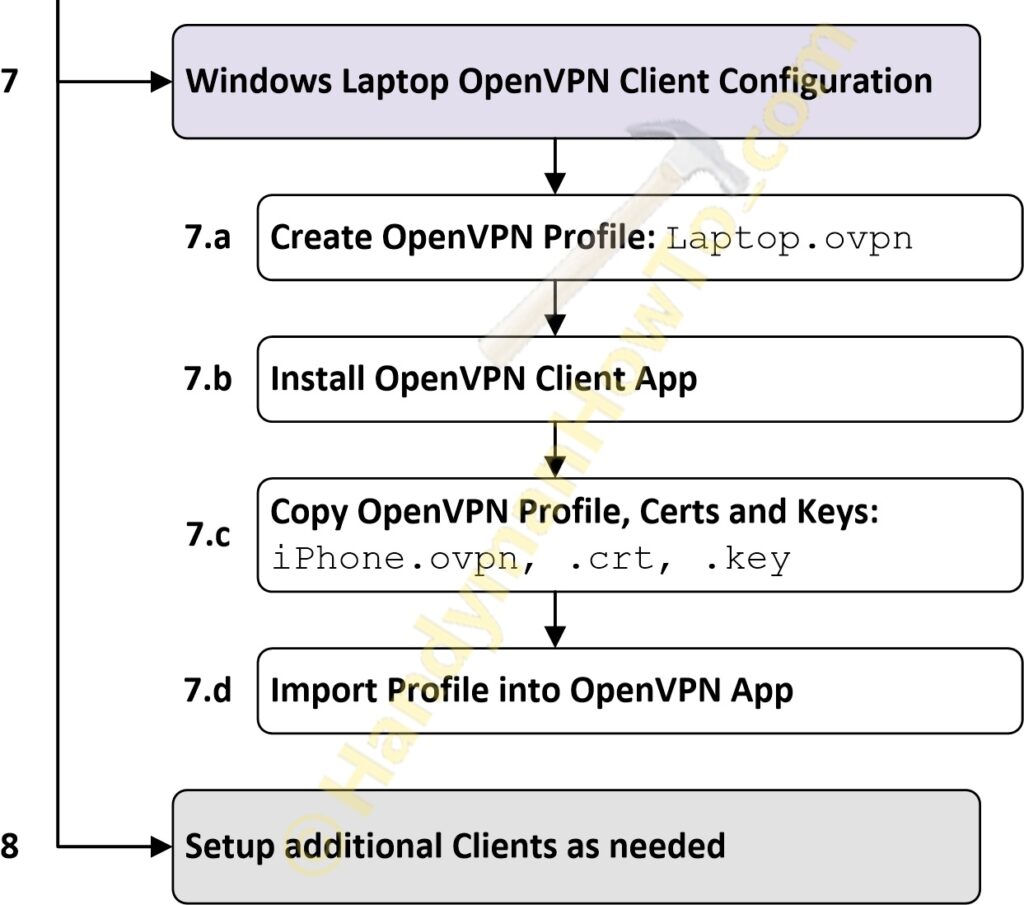
7. Windows Laptop OpenVPN Client Configuration
Recall the Public Key Infrastructure (PKI) was generated on a Windows 10 Admin Desktop PC. The certificates and keys which will now be transferred to the Windows laptop:
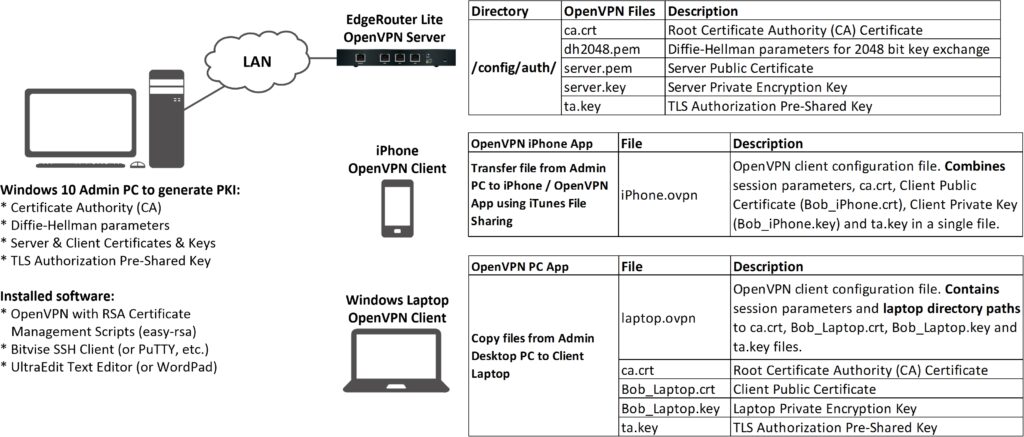
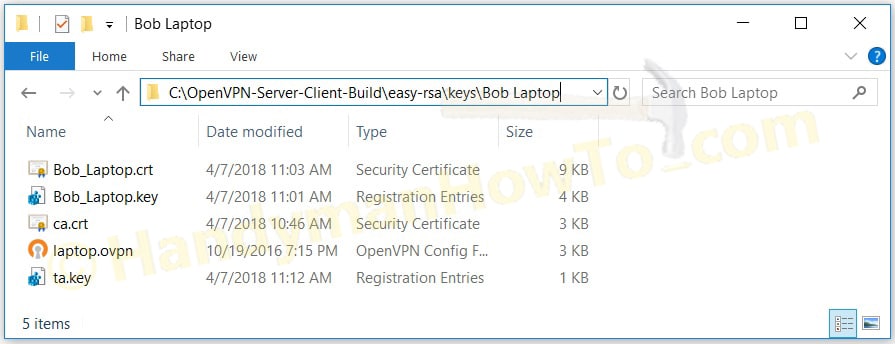
The certs and keys for Bob_Laptop on the Admin Desktop PC are in the C:OpenVPN-Server-Client-Buildeasy-rsakeys> folder:
Create a new Bob_Laptop subfolder (C:OpenVPN-Server-Client-Buildeasy-rsakeysBob_Laptop>) and copy the files:
from C:OpenVPN-Server-Client-Buildeasy-rsakeys
to C:OpenVPN-Server-Client-Buildeasy-rsakeysBob_Laptop
A .txt extension is added to the files at the above links so your web browser doesn’t try to interpret these in a special way. The certs and keys are for illustration purposes only – be sure to generate your own to avoid a severe security risk. I deleted my PKI after verifying everything works and created a new one so the files have no value to a hacker.
You’ll also need to create a laptop.ovpn client configuration file. Download my template and save it in the Bob_Laptop directory with the other files; it will be edited to match your network:
7.a Create OpenVPN Profile: Laptop.ovpn
The laptop.opvn client configuration file needs customizing to match your network. Modify the following sections:
remote:
# Connect to the server at port 443 at yourdomainname.com (replace with your
# actual domain name, if you’ve setup dynamic (or static) DNS, or put your
# static external IP address if not)
remote BobER3.dyndns.org 443
verb:
# Use medium level verbosity for the logs. For debug purposes, increase this to
# a value between 6 – 11, where higher numbers give far more detail about what
# is happening. 3 is standard.
verb 8
Certificate and Keys Directory Paths:
Unlike the iPhone.ovpn config file where the certs and keys have to copied & pasted inline, the Windows PC config requires the full path and file name for each cert and private key. Decide where you will put these on the Windows 10 client and update the following parameters to match. Directory path backslashes must be escaped with a double backslash:
# These files must be installed on the OpenVPN laptop client.
# Change the folder path to match your setup.
ca “C:UsersBobDocumentsOpenVPNProfileca.crt“
cert “C:UsersBobDocumentsOpenVPNProfileBob_Laptop.crt“
key “C:UsersBobDocumentsOpenVPNProfileBob_Laptop.key“
tls-auth “C:UsersBobDocumentsOpenVPNProfileta.key“
Save the your changes.
Copy all files from the PKI Admin Desktop PC (C:OpenVPN-Server-Client-Buildeasy-rsakeysBob_Laptop*.*) to a USB flash drive, then from the flash drive to the Windows PC client, in this case my laptop (C:UsersBobDocumentsOpenVPNProfile*.*). Do not send the certs and keys via e-mail because it’s not safe from prying eyes. I recommend an encrypted flash drive such as the Apricorn Aegis Secure Key or if using a standard USB drive, securely erase the files afterwards with R-Wipe & Clean in case you lose the drive.
7.b Install OpenVPN Client App
I prefer the Viscosity OpenVPN Client for Mac and Windows because it’s user-friendly with unique features. Try it free for 30 days and a license inexpensive. The OpenVPN client configuration is a breeze, too. See the Viscosity Quick Start Guide for Windows or MAC.
The next steps are performed on my Windows 10 Bob Laptop client.
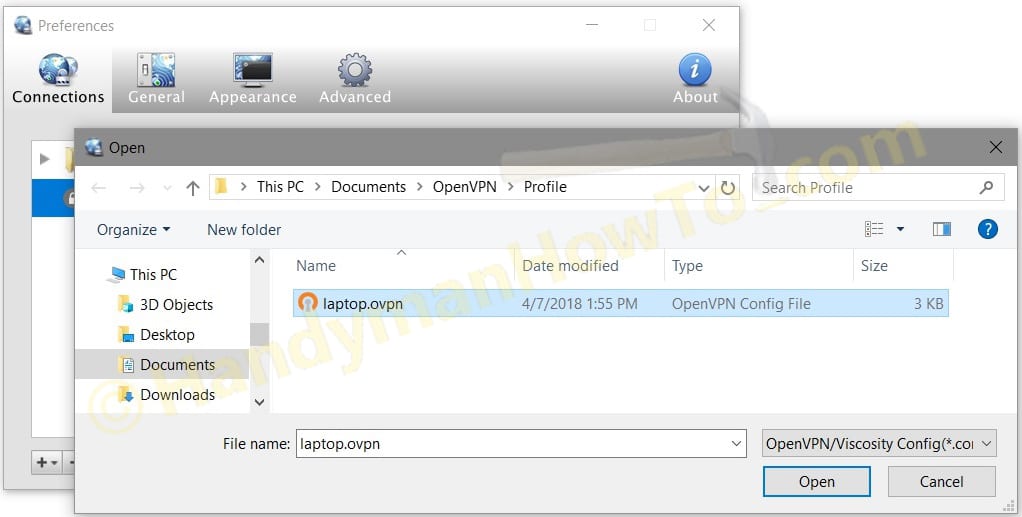
Start Viscosity, then click the + sign at the bottom left of the window. Select Import Connection → From File…
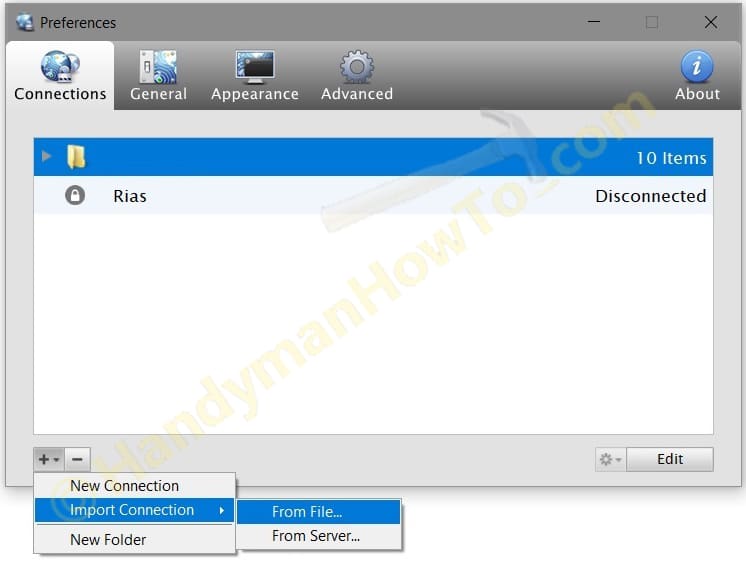
Navigate to the folder where your OpenVPN configuration file (.ovpn) is located. e.g. C:UsersBobDocumentsOpenVPNProfilelaptop.ovpn:
Viscosity Connection Settings
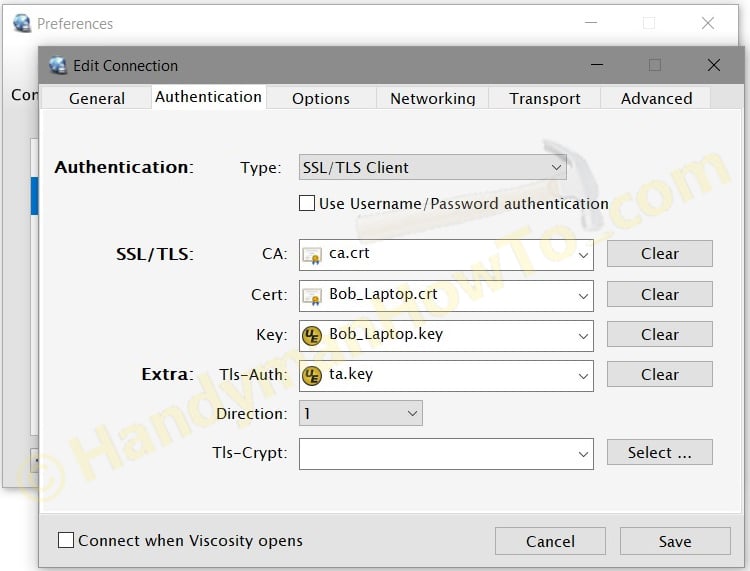
Click on the Connection row to open the Viscosity Connection Settings. The Connection Name is based on the laptop.ovpn file name. You can change it something more meaningful like “EdgeRouter Lite Home Network” to distinguish between several VPN networks:

The Authentication Settings are preconfigured per the .ovpn config file:
Networking Settings
All Traffic: Send all traffic over VPN connection is a really great feature! Use this to force all traffic, including web browser traffic through the EdgeRouter and your home Internet connection. If you need privacy at work, hotel or coffee shop then check the box. Suppose you want to access YouTube at work but your company firewall blocks YouTube. Now you can by forcing all Internet access through the EdgeRouter and your home ISP connection.
My EdgeRouter Lite is configured as the DNS server with a private IP address of 10.10.0.1 and I want to use my DNS for the remote access VPN. Therefore I selected Mode = “Full DNS (Use VPN for all traffic)” and input the EdgeRouter IP address in the Servers field:

Click the Save button.
Verify all traffic is forced over the VPN by Googling “What’s my IP address?” – it will show the EdgeRouter WAN Public IP. Note that this provides privacy over the VPN link but it’s *not* anonymous Private Internet Access (PIA). Your Internet speed may be slower because the EdgeRouter is handling both VPN and Internet access. I can still reach the EdgeRouter and LAN clients so it’s the best of both worlds.
Verify OpenVPN Remote Access
If you’re at home with the EdgeRouter, verify the OpenVPN configuration is working correctly by enabling Personal Hotspot on your iPhone and connecting to it via Wi-Fi from the laptop. Your Internet connection is now through your mobile phone carrier’s network instead of the cable or DSL modem serving the EdgeRouter.
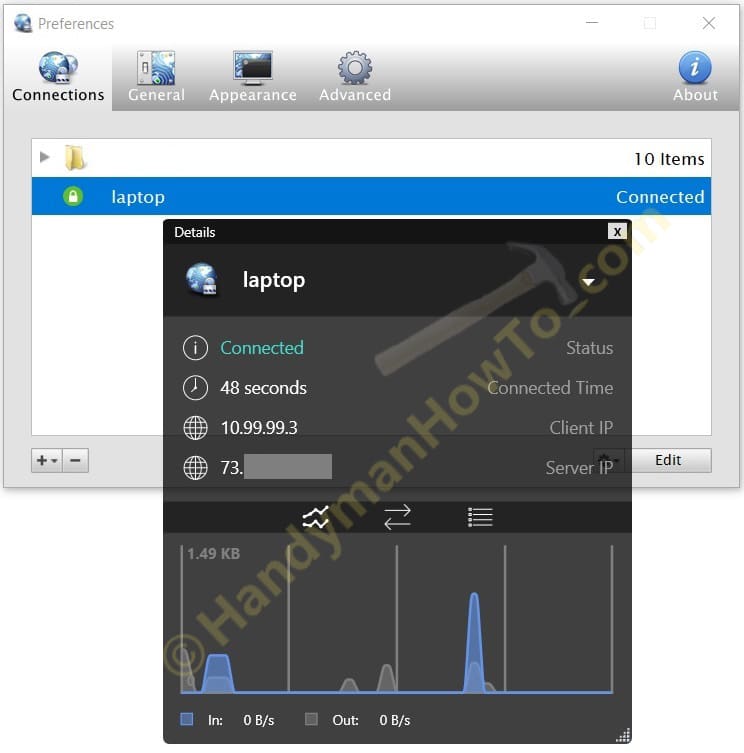
Click the laptop row in the Viscocity window to connect to OpenVPN on the EdgeRouter. If successful, the status icon will show a green padlock (see the following image).
You should be able to log into the EdgeRouter GUI and access your LAN clients.
Clicking the Viscosity icon in the System Tray and choosing “Details” displays the traffic graph. The log messages are also available for debugging by clicking the tabular icon above & right of the graph:
Thanks,
Bob