This project shows how to repair a sagging wood deck by jacking up the deck, remove the old 6×6 inch wood deck post, pour a new concrete footer reinforced with rebar and install a new post.
I rebuilt the deck rail and replaced the deck boards with numerous other improvements to comply with the Georgia Amendments Prescriptive Deck Details based on the 2012 International Residential Code to make the deck safer. Contact your local Building Department or Authority Having Jurisdiction (AHJ) for the specific deck construction codes in your area, however most deck codes are based on either the 2009 IRC or newer 2012 IRC and will be very similar to Georgia’s.
Sagging Wood Deck Problem
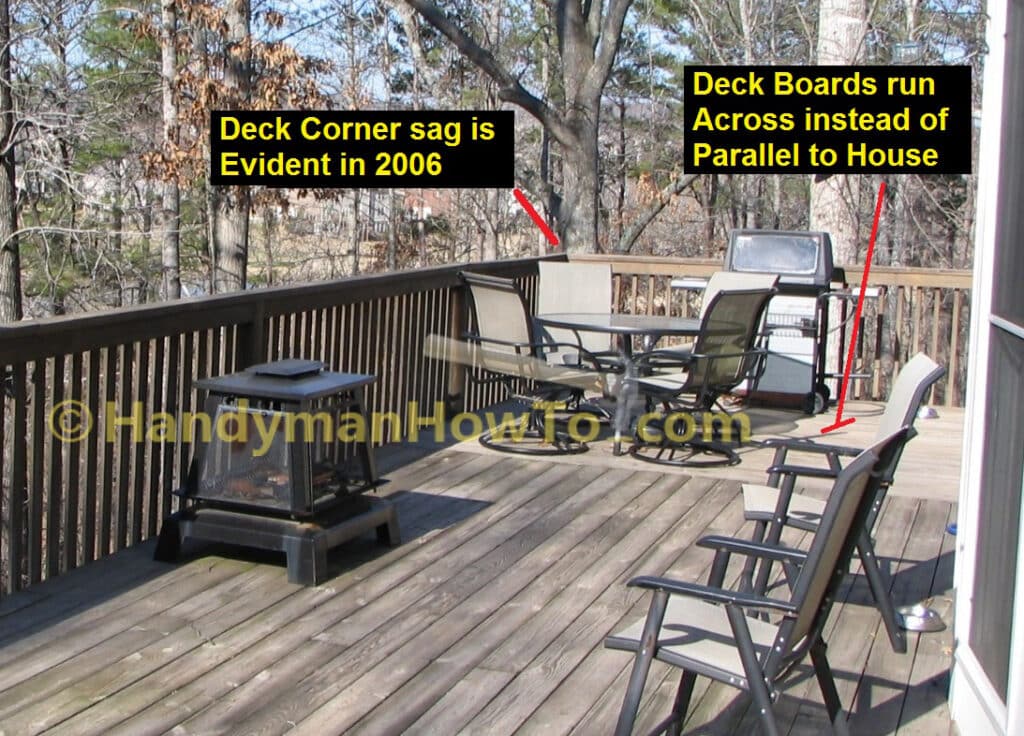
My house was built in 2000 and has a 12 feet wide by 53 feet long wood deck that runs the width of house. Looking back at a photo I took before buying the house, it’s apparent the outside corner was sagging by a couple of inches. I didn’t really notice it at the time and it appears the prior owners had strategically positioned the patio furniture to mask the area. Also notice the deck boards at the far end are improperly installed parallel to instead of across the deck joists like the boards in the foreground:
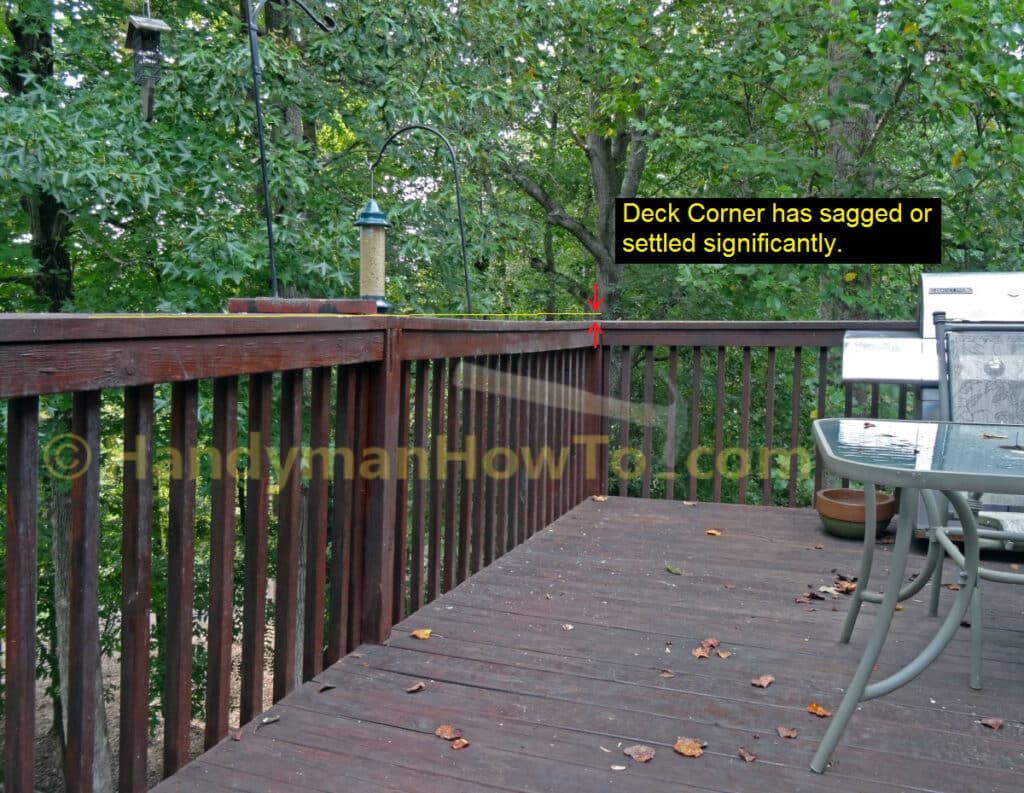
This photo was taken before I began rebuilding the deck and better illustrates how much the outside corner has sagged. Note the yellow level-line and red arrows:
Improperly Built Wood Deck Addition
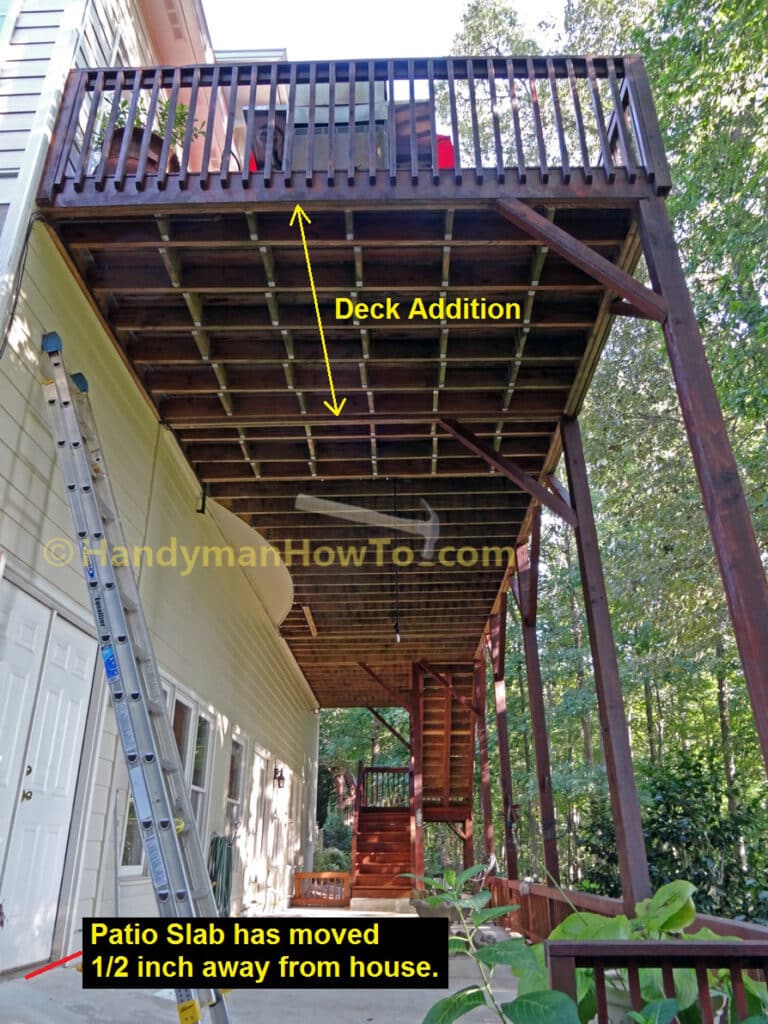
My house was originally made of brick and was struck by lightning shortly after it was completed in 2000. The new buyers expanded the floor plan. The builder tore it down to ground level and rebuilt it with a stucco and HardiPlank siding. A corresponding section of wood deck was added to match the larger floor plan as shown here:
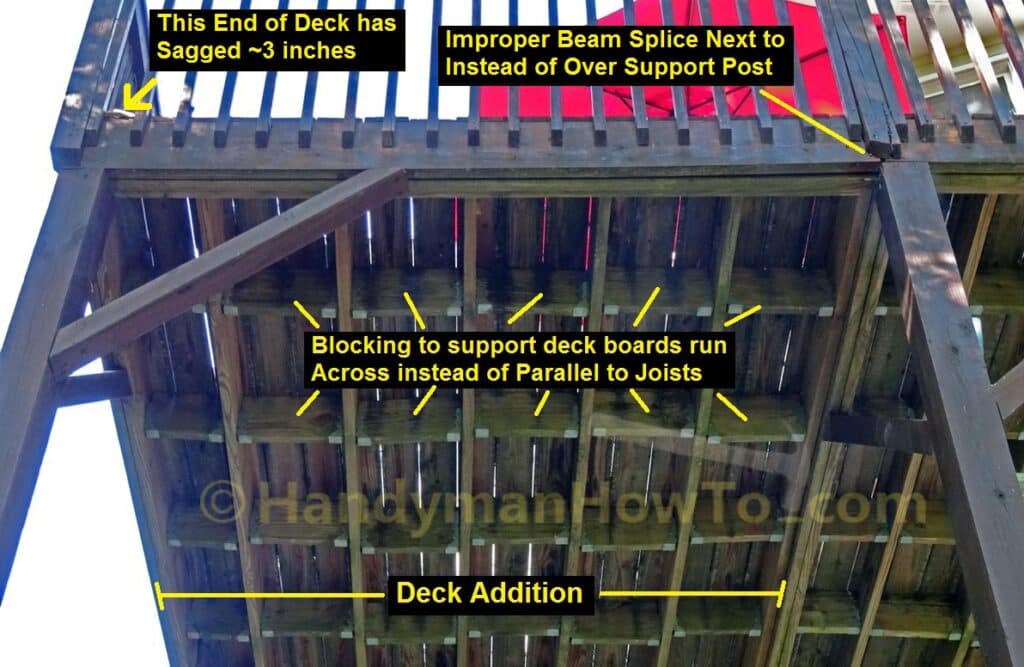
The problems with the deck addition are:
- Improper outside joist beam splice is made beside the 6×6 deck post instead of over the post.
See the right side of the following photo. - The left corner of the deck has sagged about 3 inches, caused by too small and shallow concrete post footer that has moved and subsided as I will later discover. The subsidence is causing the deck addition to separate and pull away from the main deck. The deck would eventually collapse if not repaired.
- The deck boards are installed parallel to (i.e. in the same direction of the joists) instead of 90 degrees across the joists.
The improperly installed deck boards causes many problems:- The deck boards do not stiffen the joists.
- The reason for the excessive blocking between the joists is to support the deck boards.
- Nails were driven through the ends of the deck boards into the ledger board and flashing where the deck meets the house. The nail holes in the flashing allows water intrusion which can rot the ledger board and cause a deck collapse.
I wonder how the deck addition ever passed the building inspection? Thinking back to when I was buying the house, my home inspector looked puzzled at all the blocking between the joists but didn’t question it or the improper beam splice in his report.
Note: I removed the 4×4 knee brace (“Y” style 4×4 support member) at the right 6×6 post to better inspect the beam splice.
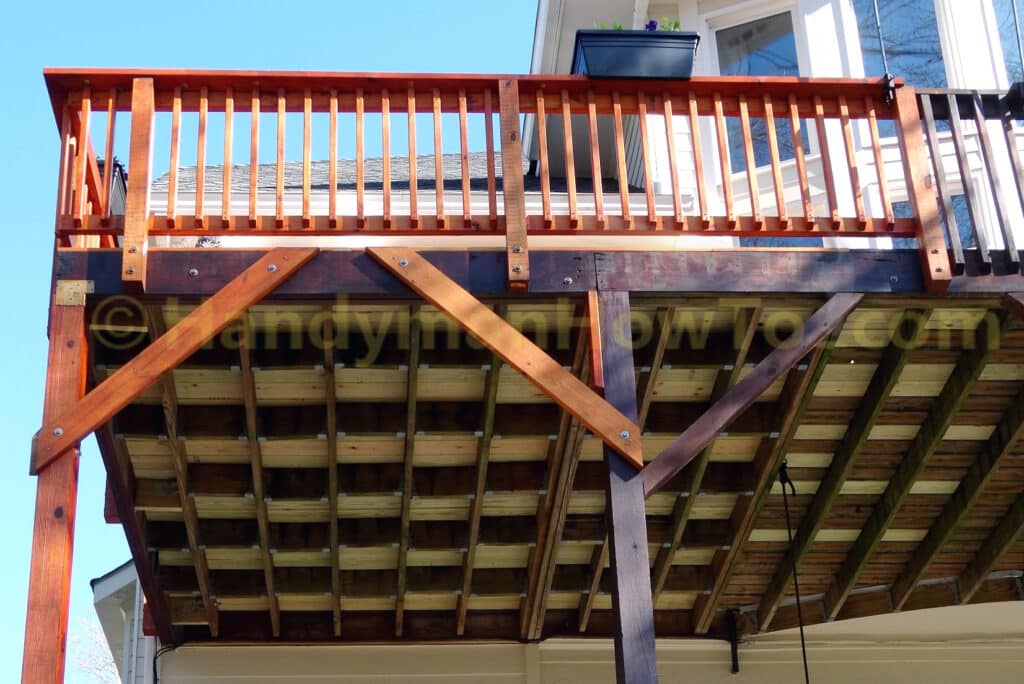
The following is a closeup of the improper and unsupported beam splice next to the 6×6 deck post instead of over the post as required by the deck building code. The 4×4 guard post has split and the 2×10 joists have pulled about 3/4 inch away from the post.
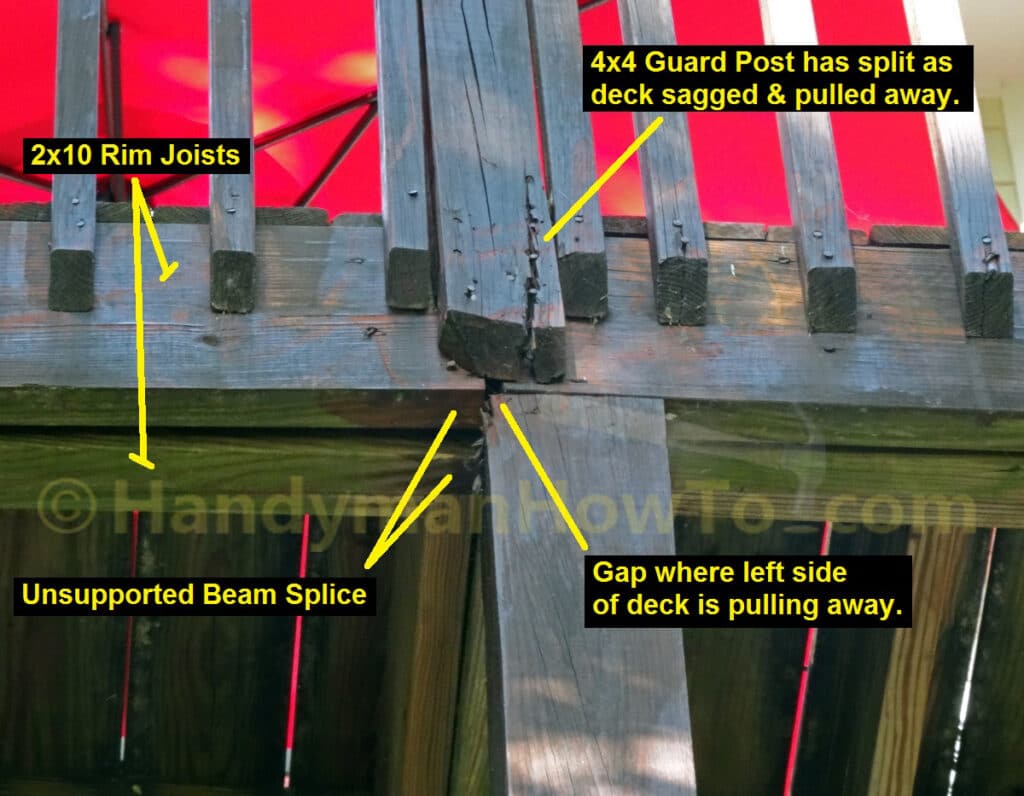
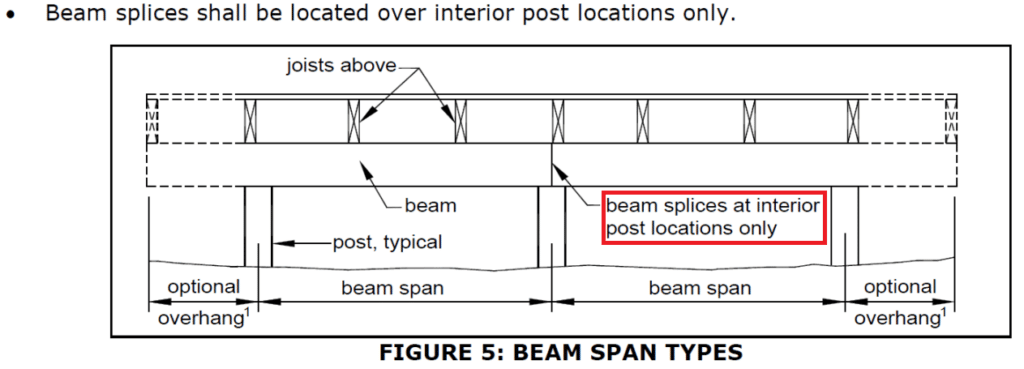
Note per Figure 5 on page 5 of the Georgia Amendments Prescriptive Deck Details “Beam splices shall be located over the interior post locations only.“:
The improper beam splice as viewed from below the deck. The 2×10 rim joist has slipped below the 6×6 deck post!

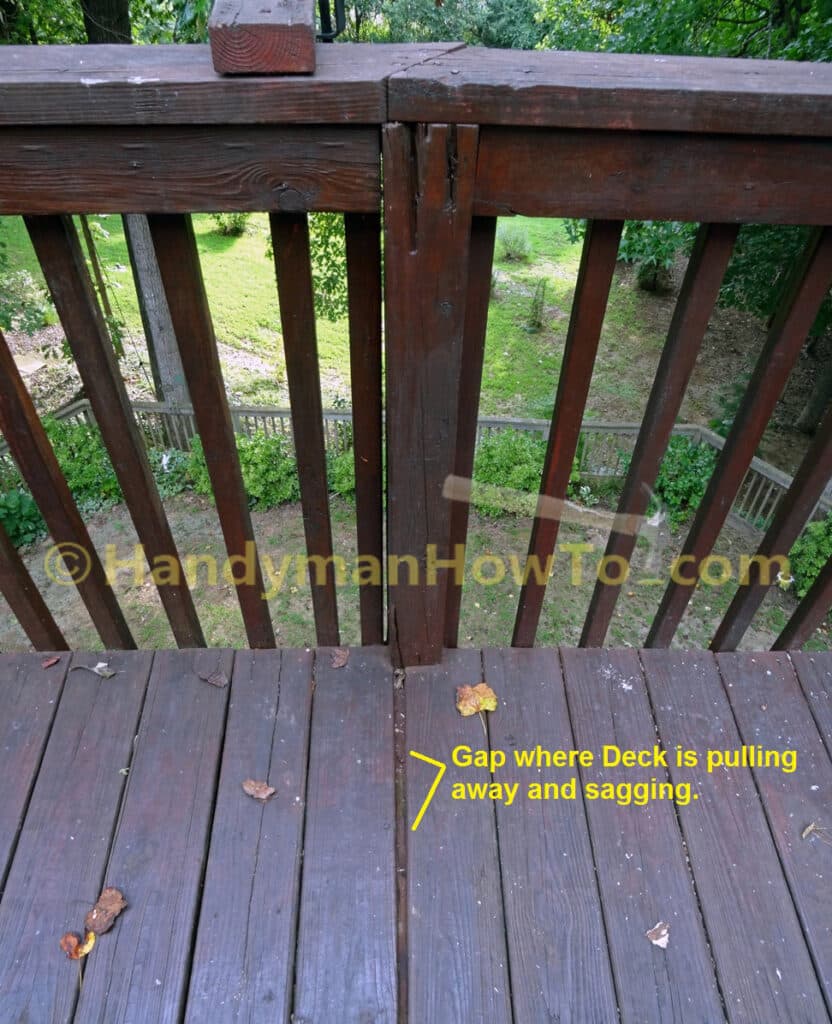
The deck boards have separated directly above the improper beam splice:
The following is the deck as viewed from the basement patio. The corner 6×6 deck post has subsided (or sunk) and moved outward because:
- As I’ll learn when removing the concrete patio slab with jackhammer, the concrete post footer was set too shallow and is above the frost line.
- The prior homeowners hired a contractor to pour the basement patio concrete slab without filing for a Building Permit (they liked doing work without permits to avoid higher property taxes, resulting in subpar work with numerous code violations). The contractor took shortcuts and failed to pour a proper footer with rebar and install reinforcing wire mesh in the slab. The slab cracked at the post on the left side of the photo, then migrated about 1 inch downhill, causing the corner deck post to sink and move with it. The too shallow patio footer allowed soil erosion and chipmunks to undermine the concrete patio, further contributing to the slab subsidence.

How to Repair a Sagging Wood Deck
Now that I’ve identified my wood deck construction problems and errors, I did my homework:
- Study the deck construction codes.
- The Georgia Amendments Prescriptive Deck Details based on the 2012 International Residential Code is the governing document where I reside.
- The City of Chicago Porch Design & Construction Guidelines is a helpful reference with numerous drawings. Chicago has one of most stringent deck codes in existence.
- Design a new concrete post footer (see the following scale drawings).
- Learn about deck framing and construction connectors.
- The Simpson Strong-Tie Build a Safe, Strong Deck website and Deck Framing Connection Guide is well illustrated and very helpful.
- Prepare a list of materials that I’ll need to buy.
- Plan the sequence of work
The work plan is especially important to maintain the structural integrity of the deck during the repairs so it doesn’t fall causing injury and/or death! - Meet with my local Building Inspector to ask specific questions and file a Building Permit.
A Building Permit is extremely important to ensure the work complies with the deck building code for safety. Work done without permits and inspections can result in all sorts of bad things including legal liability, code enforcement actions, loss of homeowner’s insurance, decreased in real estate value and costly “do overs”.
Note: The Building Inspector cannot design the deck for you, but can answer questions if a certain practice or technique is compliant with the “Prescriptive” deck code or would require certification by a Licensed Professional Engineer as an “engineered solution”.
Working mostly by myself, the deck repair work took 3.5 months to complete on the weekends, holidays and evenings. My total cost was about $1500 for materials, hardware, tools, tool rentals and other supplies. It was labor intensive, difficult and often dangerous work.
Completed Wood Deck Repair Photos
It’s helpful to understand the completed deck repairs as your read about the each step of the project.
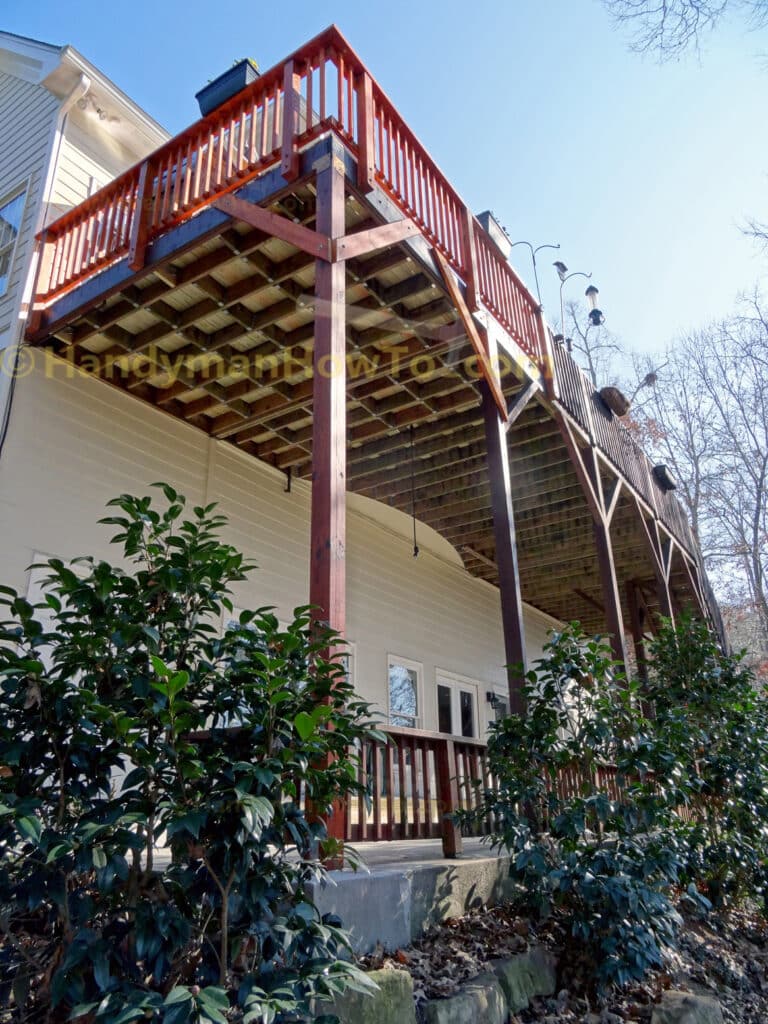
The old 6×6 post set in the concrete slab was removed with a gas concrete saw and jackhammer, then a new concrete footer poured with a rebar cage. The new 6×6 post was fastened with a Simpson Strong-Tie PBS66HDG Standoff Post Base and ACE6Z End Post Caps steel connectors. The work required jacking up the deck with 6 ton hydraulic bottle jack and placing temporary support posts:
View of the bolted 2×6 knee braces, 2×6 sister block (against the right post) to support the improper beam splice and rebuilt deck rail. The new 5/4 x 6 inch deck boards have been correctly installed across the deck joists:
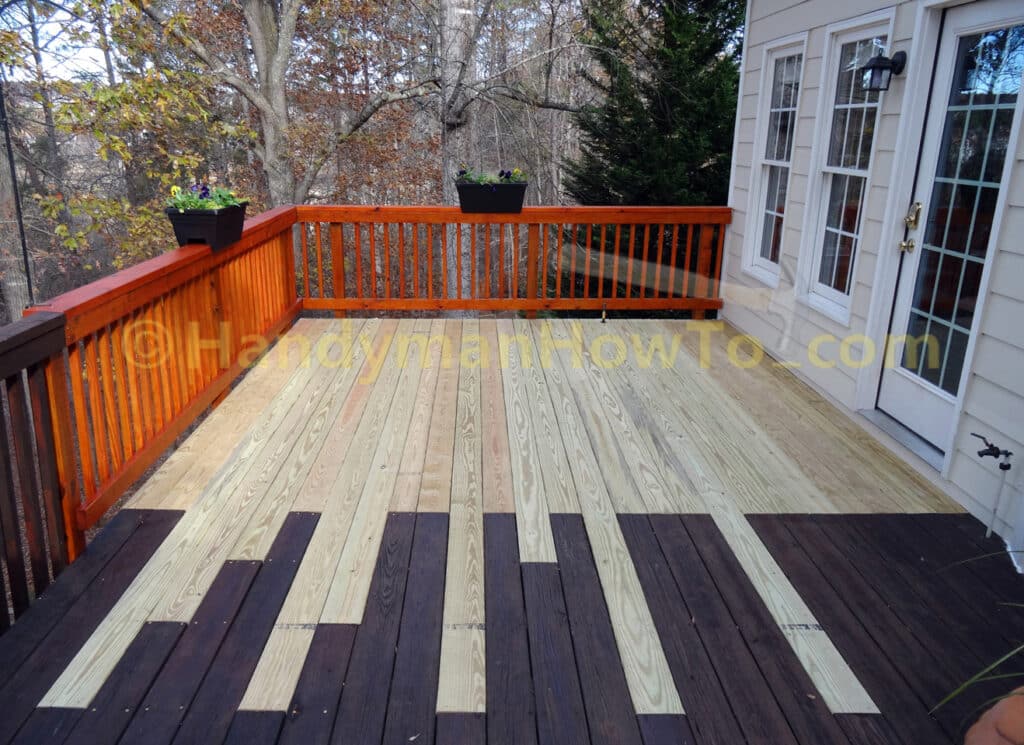
The deck rail has been rebuilt in compliance with State of Georgia and 2012 IRC deck building code. The improperly installed deck boards were removed and new decking woven in with the old deck. I had to tear off the bottom rows of HardiPlank lap siding to install new ledger board flashing because nails were driven into the old flashing:
The Building Inspector approved the work and signed the final inspection on my building permit.
In the future months I’ll rebuild the rest of the deck rail (about 40 feet of railing!) so everything matches:
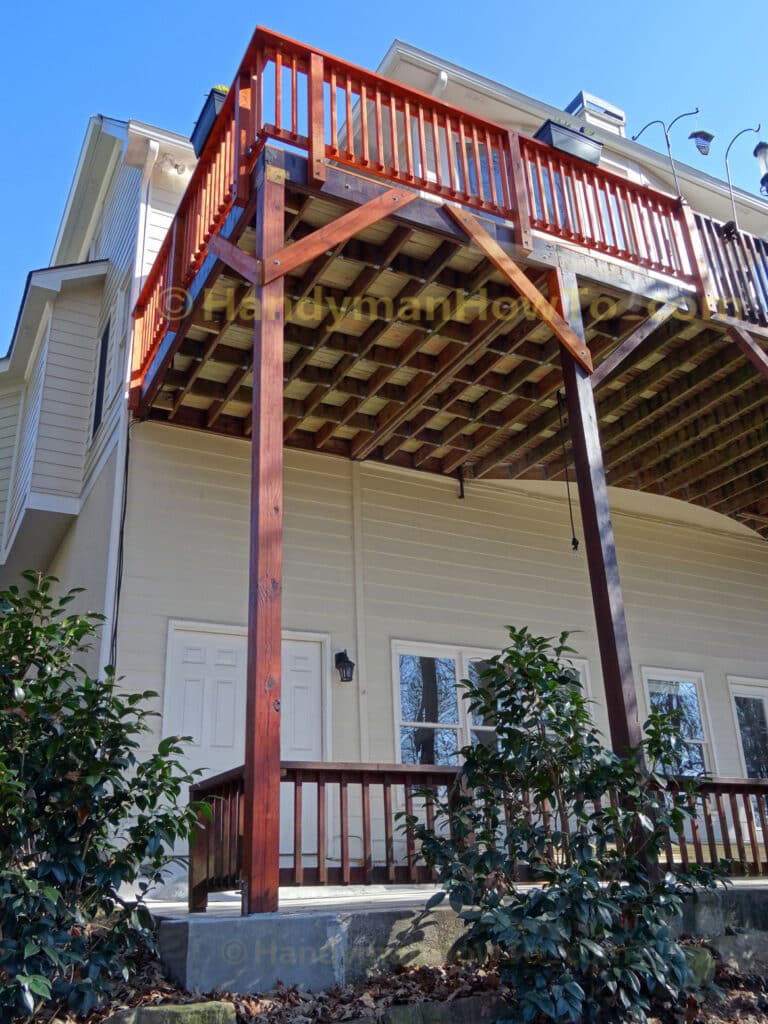
Roof and Screen Porch Built on Wood Deck
Fast-forward 9 months and after completing the wood deck repair/rebuild, I hired a deck builder to construct a roof and screened porch. The porch was built with cedar lumber:
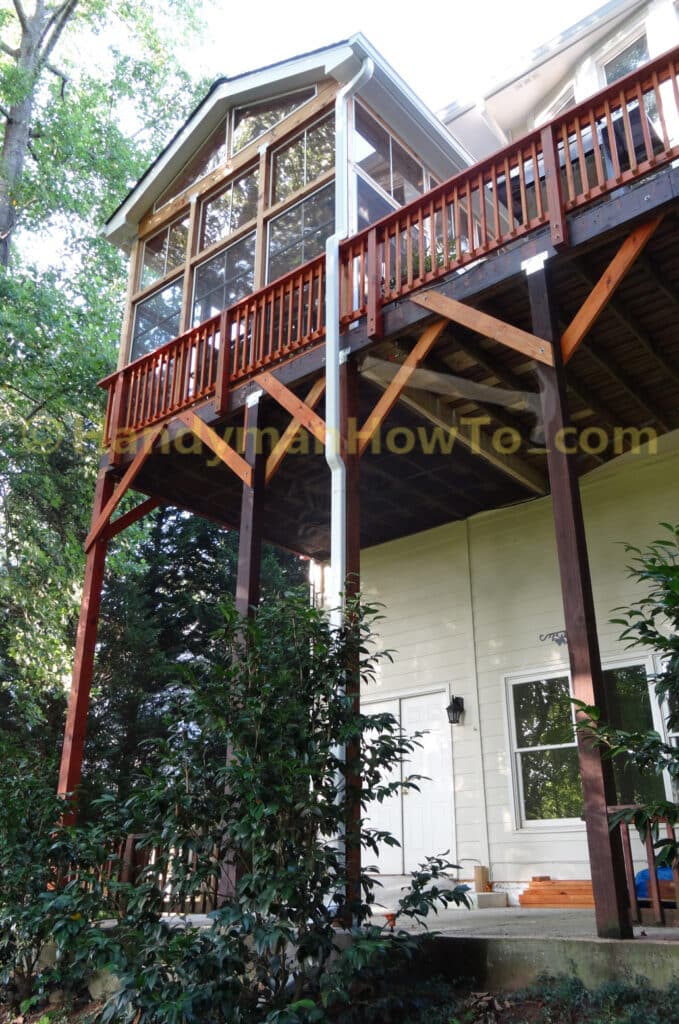
I bought and installed the EZE Breeze windows and door saving about 40% versus the price the deck builder wanted:
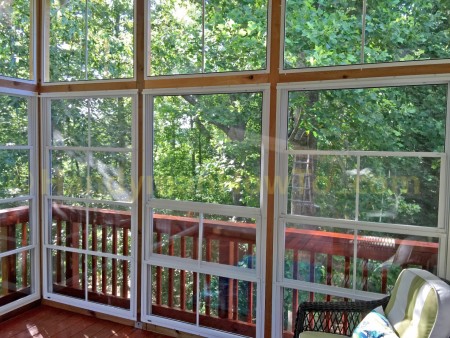
Now I have a rain, wind and bug-proof screened porch! My wife would call it a “three season” room but I’ll use it the entire year. A detailed project write-up is coming soon.
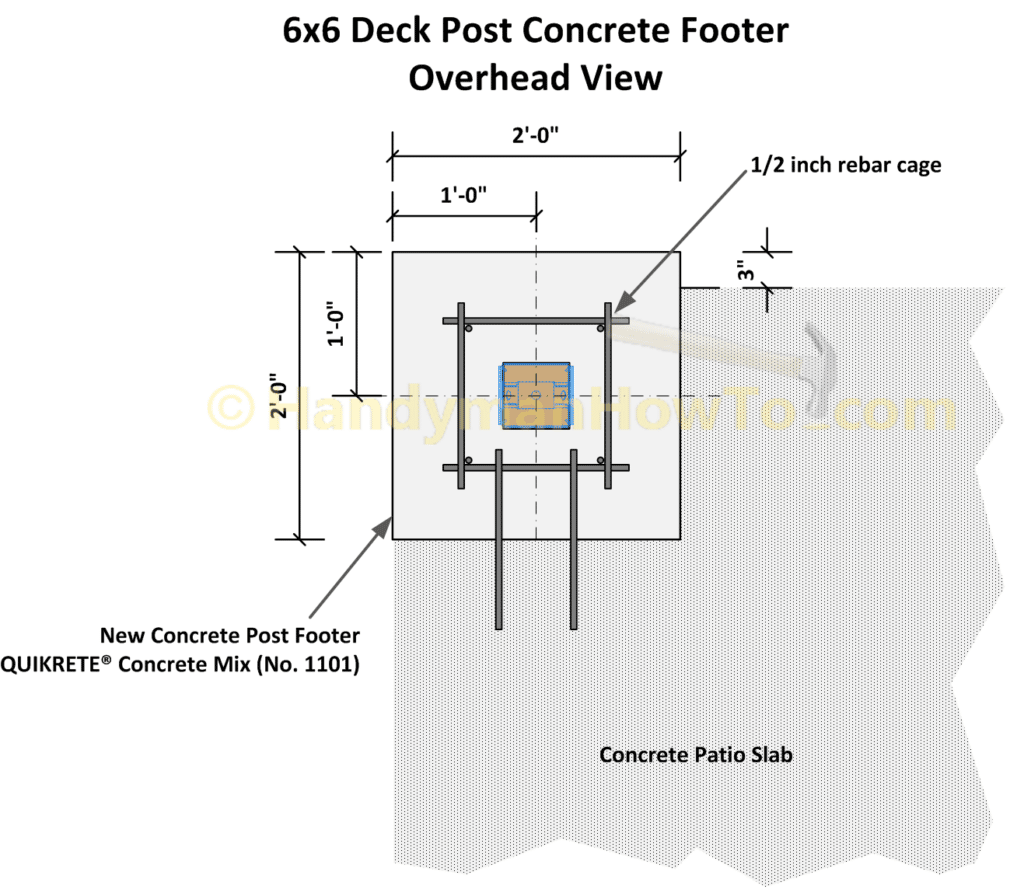
Deck Post Footer Drawings
I measured the deck and prepared scale drawings in Microsoft Visio for the new concrete deck post footer. These drawings are essential to the project. The new post footer will also anchor the concrete patio slab to prevent further slab movement:

Bird’s eye view looking down:
Sagging Wood Deck Repair Series Index
The deck rebuild steps are explained in the following project series:
- How to Repair a Sagging Wood Deck (what you’re reading now).
-
How to Sister a Wood Deck Post for Beam Splice Support
Build a jack post with 2×6’s and 2×4’s, jack up the deck and install a support block. -
How to Pull Together a Sagging Wood Deck
Stabilize the deck with a cable wench. -
How to Replace a 6×6 Wood Deck Post
Build a full height temporary support post, jack up the deck to level it. -
How to Replace a 6×6 Wood Deck Post – Part 2
Install the temporary support post before sawing down the old post. -
How to Remove a Deck Post in Concrete Slab
Saw down the old post, cut the patio slab with a concrete saw, drill weakening holes in the slab. -
How to Remove a Deck Post in Concrete Slab – Part 2
Jackhammer the concrete patio slab to remove the old post stump. -
How to Dig a Deck Post Footer
Deck post footer design, dig the footer, cut and build a rebar reinforcing cage. -
How to Pour a Concrete Deck Post Footer
Make a concrete form, pour concrete and install the Simpson Strong-Tie Standoff Post Base. -
How to Install a 6×6 Wood Deck Post
Jack up the deck, install the new 6×6 post and remove the temporary support post. -
How to Drill Accurate Holes for Deck Post Bolts
Use a drill guide to make accurate holes for 1/2 inch bolts. -
How to Build Code Compliant Deck Railing
Rebuild the deck rail per the 2012 International Residential Code (IRC) requirements. -
How to Build Code Compliant Deck Railing – Part 2
Install the spindles to complete the deck rail. -
How to Install Deck Post Knee Braces
Install beam-post knee bracing to resist lateral loads. -
How to Replace Wood Deck Boards
Remove the incorrectly installed old boards and install new boards across the joists. -
How to Replace Deck Ledger Flashing
Remove the house lap siding to replace the ledger board flashing because it was full of nail holes. -
How to Replace Deck Ledger Flashing – Part 2
Bend the metal flashing drip edge with a hand seamer. -
How to Install a Natural Gas Shutoff Valve for a Grill
Install a gas shutoff valve, black iron pipe fittings and pipe plug. -
How to Install a Natural Gas Shutoff Valve for a Grill – Part 2
Install the remaining black iron pipe fittings, quick connect coupling and gas grill hookup hose.
Begin Work: Wood Deck Ledger Board Fastening Reinforcement
The ledger board supports the deck joists and requires a secure load bearing attachment to the house band board to prevent the deck from pulling away from the house. The deck must be raised with jack to replace the post and I wanted a secure connection here. The ledger board is fastened with nails and two 1/2 inch lag bolts spaced about 3 feet apart for the deck addition. I’ll reinforce the ledger board to the band board (a.k.a. “rim board”) attachment with FastenMaster LedgerLok 5 inch long structural wood screws:

My 18V DeWALT cordless drill/driver wasn’t strong enough to drive in the LedgerLoks (Tip: Lubricate the screws with soap so they’ll drive easier), so I used my Makita HP2010N 6 Amp 3/4-Inch Hammer Drill for the job. The Makita HP2010N features a “selectable action mode” to choose between rotation-with-hammering and simple rotation (drill/driver mode).
I set the LedgerLok screws per the pattern shown in Figure 20 on page 11 of the Georgia Deck Code, i.e. 4 fasteners at the ends with a zig-zag pattern between joist bays:

The informed deck builder might say: “Bob – the Georgia Deck Code and 2012 International Residential Code requires 1/2 inch through-bolts with washers and nuts!” and you are correct. I elected to use LedgerLoks instead of bolts because:
- Installing through-bolts would be a problem because part of the basement has a finished drywall ceiling preventing access to the interior side to install a nut and washer.
- Should the Building Inspector question the LedgerLok, I’ll shown him the LedgerLok Professional Engineering seal for the State of Georgia. You can find the approval seal for your state on the DrJ Engineering site.
- Prior work is grandfather in with new building code updates and I wasn’t required to make any changes here.
On a related note, a study by Washington State University found that lag screws alone are sufficient and that nails are really the problem. This is part of the effort to have deck lateral load anchors (threaded rod tensioning systems passing through the band board) removed in the 2015 IRC update.
References:
Deck Lateral Load – The Truth Revealed by Glenn Mathewson and the North American Deck and Railing Association (NADRA).
Next I’ll build a jack post, raise the deck with hydraulic bottle jack and install a 2×6 sister block on the 6×6 deck post to support the improper beam splice in How to Sister a Wood Deck Post for Beam Splice Support.
Take care,
Bob Jackson