This project describes the Ubiquiti EdgeRouter Lite (and EdgeRouter 4), EdgeSwitch 24 and UniFi Access Point network design for a SOHO (Small Office/Home Office) network.
Home networks are rapidly becoming more complex and taking on the characteristics of small enterprise networks. My network has almost 30 IP connected devices ranging from PCs to smart TVs to Internet of Things (IoT) which are notorious for poor security safeguards. I completely disabled remote access and held off buying a NAS over security concerns. A network upgrade was needed for better security, management and monitoring.
My home network used to be fairly simple – a cable modem, consumer-grade WiFi router and PoE switch in a “flat network” configuration. This worked well enough but lacked many advanced features and capabilities including long-term manufacturer support, regular firmware updates to fix security vulnerabilities, firewall, traffic monitoring, logging, VLAN and OpenVPN support. After extensive research I chose the Ubiquiti EdgeRouter Lite due it’s excellent performance, robust features, sub $100 price and extensive user support.
The EdgeRouter Lite is a high-end consumer / small business class device that has a fairly steep learning curve if you’re not a “router guy” (or girl) who configures networks on a regular basis. I learned by reading the User Guide (.pdf) which is mainly a GUI walk-through) and especially the EdgeMAX forums, Knowledge Base, Layman’s firewall explanation and Vyatta Firewall Reference Guide. The Vyatta Firewall Best Practices Guide is also helpful. The EdgeRouter operating system is based on Vyatta 6.3 so the firewall guides are relevant.
Ubiquiti EdgeRouter Lite Home Network Design
It’s tempting to plug in the router and begin configuring the network but that will likely result in confusion and problems. “If you fail to plan, you are planning to fail.” – Benjamin Franklin. A methodical and well documented approach is best.
Define the Network Requirements
I began by defining my network requirements. What do I want from my home network? What applications and services should it support? My requirements are:
-
Fast – ready for 1 Gigabit Internet.
I currently have 120 Mbps download / 24 Mbps upload cable modem service but looking forward to affordable 1 Gbps Internet service. - Security – configurable firewall with logging to drop “bad” Internet traffic, thwart hackers and scanners, isolate Guest WiFi and manage Internet of Things (IoT) devices that I don’t fully trust.
-
Secure Remote Access – I wanted a highly secure and encrypted means for Internet remote access to my home network from my iPhone and laptop. The EdgeRouter supports OpenVPN which is configured to listen on TCP Port 443 so it looks like normal HTTPS web traffic to get through corporate firewalls that otherwise block VPNs.
- A corollary is port-forwarding shall NOT be enabled. All remote access must go through the VPN tunnel.
- VLAN Support – to isolate and segment the LAN network for performance and security. No more “flat networks” for me.
- WiFi – The majority of home network devices are wireless. Guest and private wireless network support, fast 802.11ac, VLAN support and network management/monitoring capabilities. The UniFi Access Point fit the bill.
Network Inventory
I inventoried all of my network clients (desktop/laptops, printer, network video recorder/cameras, home automation controller, Ethernet wall jacks, etc. etc.) and created an Excel spreadsheet itemizing the make, model #, MAC address, Serial #, port number/service, firmware version (only if manual upgrades are required), user name, password and LAN IP address (dynamic or manual/static assignment). It’s the only way to keep track because everything has to be migrated from the old network and assigned to a new VLAN, subnet and static LAN IP if not dynamically assigned.
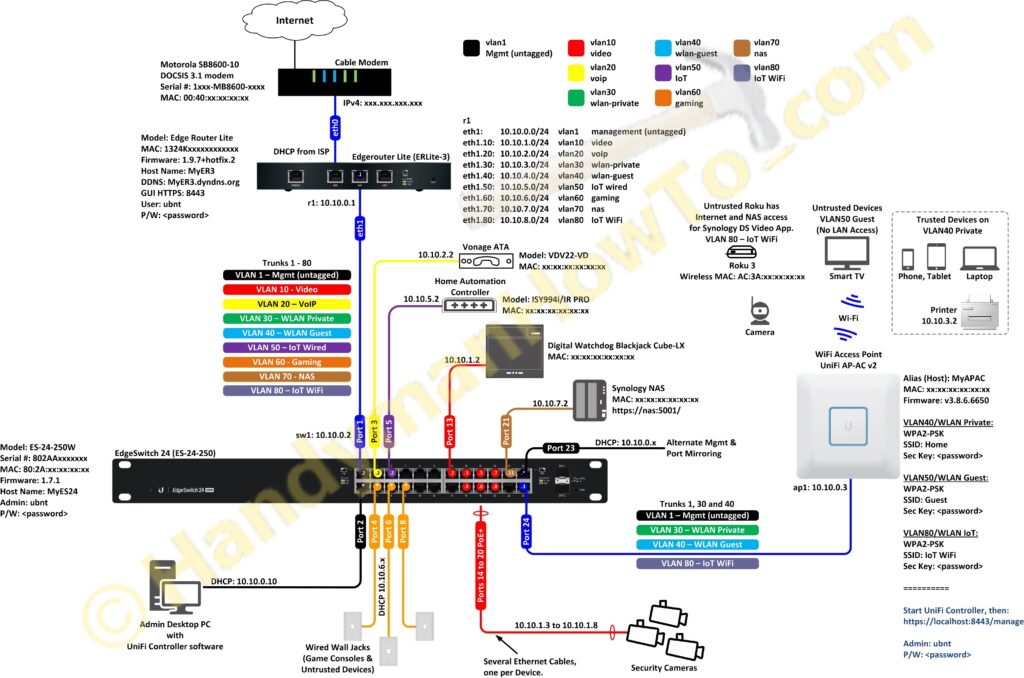
EdgeRouter Lite (ER3) Home Network Design
My home network diagram was inspired by the EdgeMAX – VLAN Walkthrough with EdgeSwitch using Sample Enterprise Topology tutorial. It was drawn in Microsoft Visio using the EdgeMAX stencils:
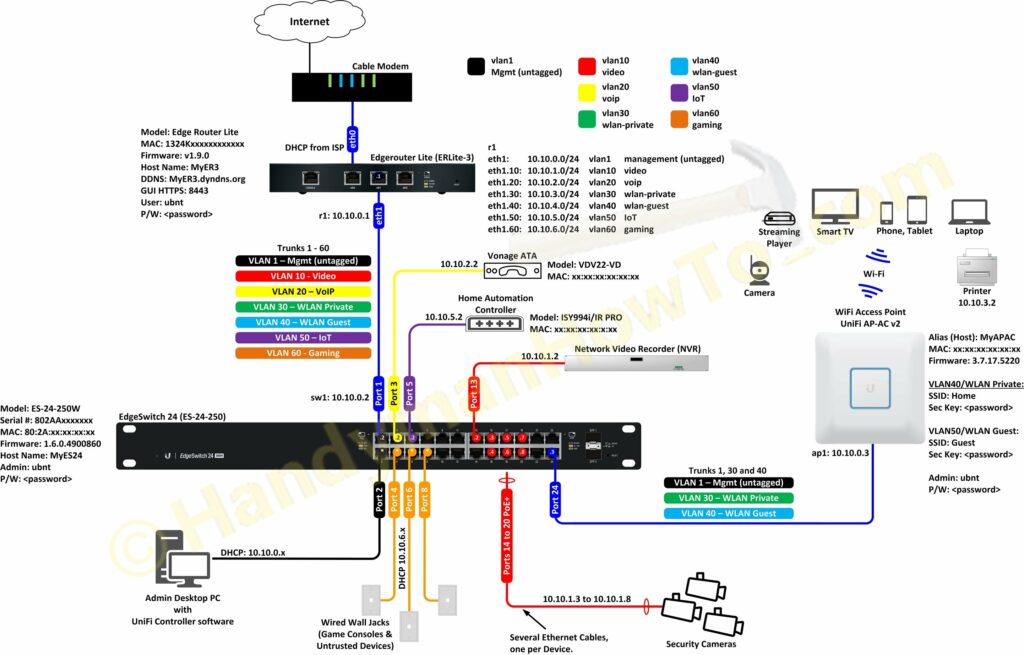
This layout is called a “router on a stick“. The network diagram defines the key information needed to configure and managed the network:
- Physical ports and connectivity.
- VLAN IDs and IP subnets.
- EdgeSwitch 802.1Q VLAN connections and attached network clients.
- Dynamic DNS (DDNS) host name.
- WiFi SSIDs
- Firmware versions so I know what’s installed when an upgrade is needed.
- Login credentials – although having this in the diagram acceptable for my personal use, good security practice would document this information elsewhere. The diagram is sanitized for publication. I deleted the “ubnt” factory default Admin user account as you should too.
EdgeRouter Lite Physical Network
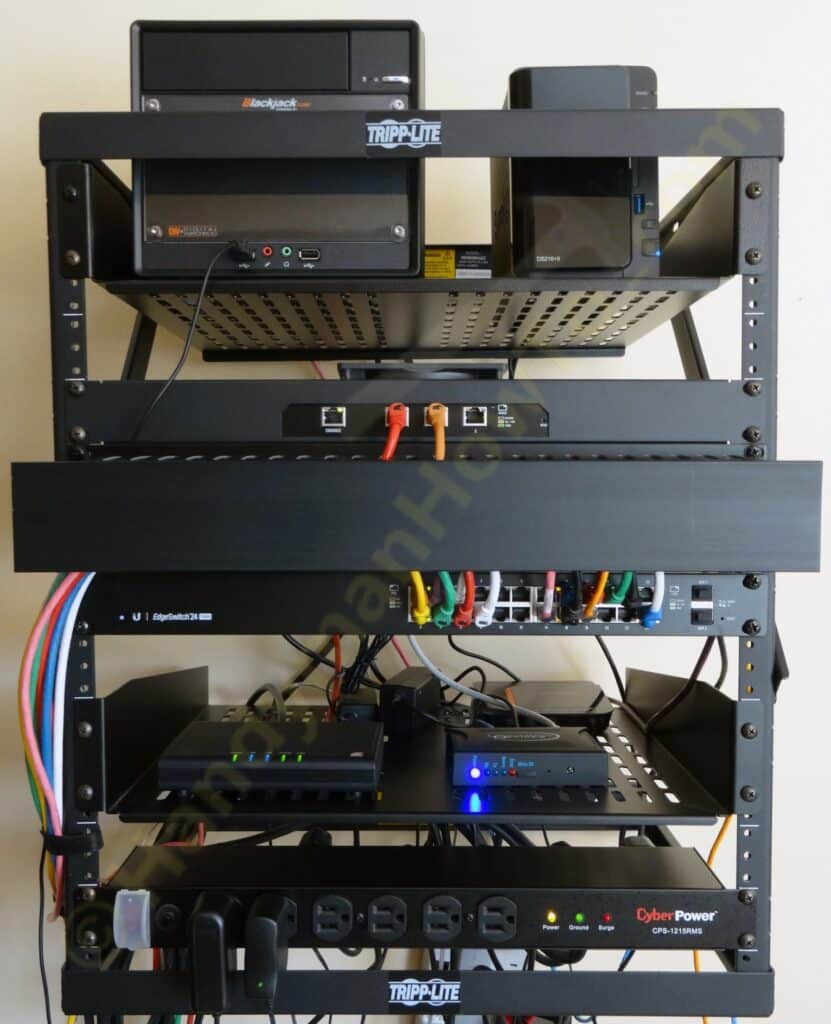
The physical network is mounted in a 19 inch wide by 22 RU wall mount rack. Two APC Smart-UPS SMX750 Rack/Tower battery backup units are on the floor (not shown) to power the rack:
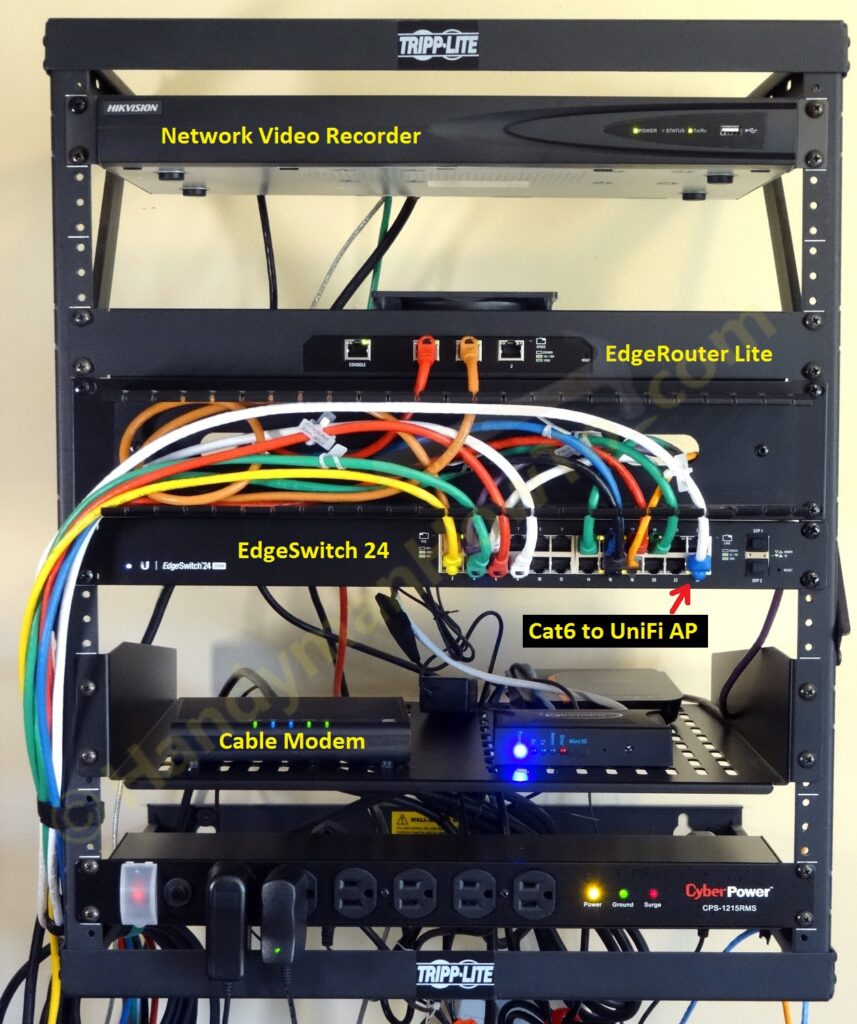
The EdgeRouter Lite is rack mounted using a Universal Rackmount adapter.
My network components are:
- Ubiquiti EdgeRouter Lite
- Ubiquiti EdgeSwitch ES-24-250W
The EdgeSwitch also provides PoE+ to power the UniFi Access Point and security cameras. - Ubiquiti Networks UniFi AC Enterprise WiFi System – UAP-AC
- Tripp Lite Expandable Wall-Mount 2-Post Open Frame Rack
- StarTech 2U Universal Vented Rack Mount Cantilever Shelf for 19-Inch Server Racks
The shelf is needed for the cable modem, home automation controller, Vonage ATA and other desktop devices. - Horizontal Cable Management Panel
- Cable Matters 5-Color Combo, 7 feet Cat6 Snagless Ethernet Patch Cable
A set of 1 ft. and 3 ft. patch cables is also beneficial for making short connections between rack equipment. - CyberPower Rackmount Power/Surge Strip – 12-Outlet 15A 1800VA
- Two (2) APC Smart-UPS 750VA 600W 120V Rack/Tower Battery Backup Power Supply (SMX750)
The CyberPower strip is plugged into one APC SMX750 for rack power. The 2nd SMX750 provides battery backup for non-critical devices including my desktop computer (for controlled shutdown so I don’t lose my work), Vonage ATA (everyone has a cell phone) and Insteon home automation controller (powerline devices don’t work when there’s a power outage).
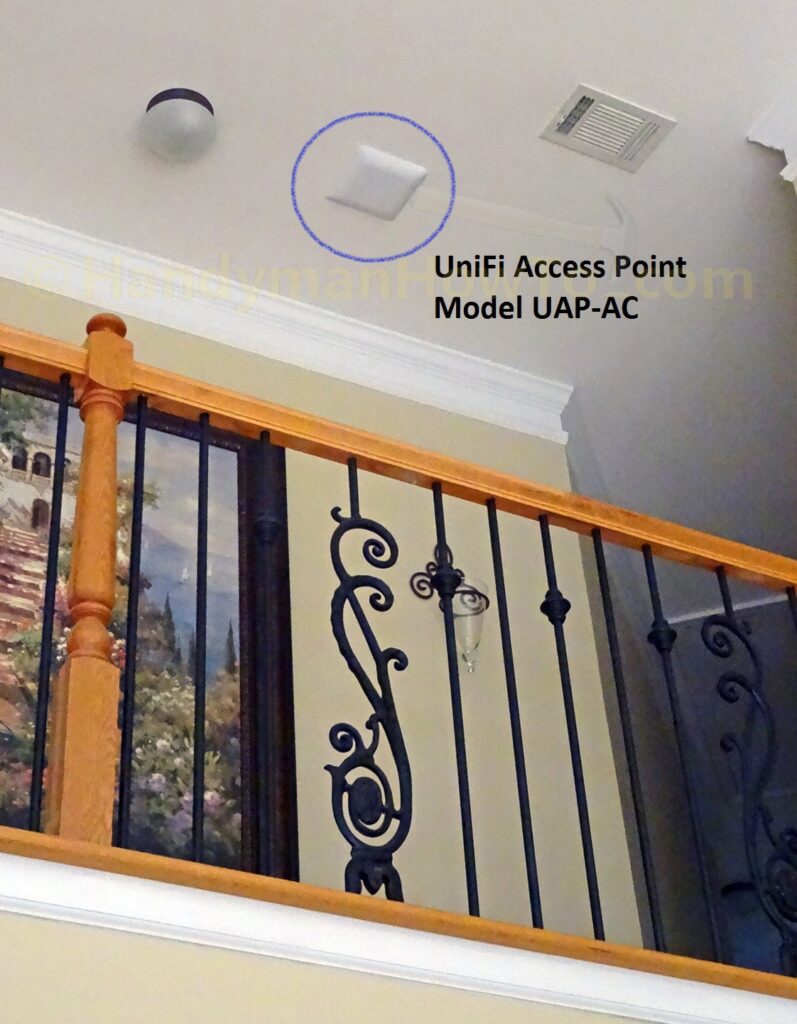
UniFi Access Point Ceiling Mount
The UniFi Access Point is mounted on drywall ceiling in the upstairs hallway. The WiFi signal strength is excellent throughout the house including the basement:
I installed the metal backing plate between the attic joists where there aren’t any 120VAC electric cables that could cause interference with the Cat6 UTP (Unshielded Twisted Pair) cable. The backing plate is normally intended for use with drop ceiling acoustic tiles but I liked it better than using the included plastic drywall anchors. It was simple enough to place the plastic mounting bracket against the ceiling in the upstairs hallway, mark and drill four 1/8 inch dia holes for the M3x50 flat head screws, then install the screws and tighten the lock nuts. A 1/2 inch dia hole was drilled to feed the Cat6 cable and Ethernet plug through the ceiling. I left a generous length of cable inside the attic for a service loop:
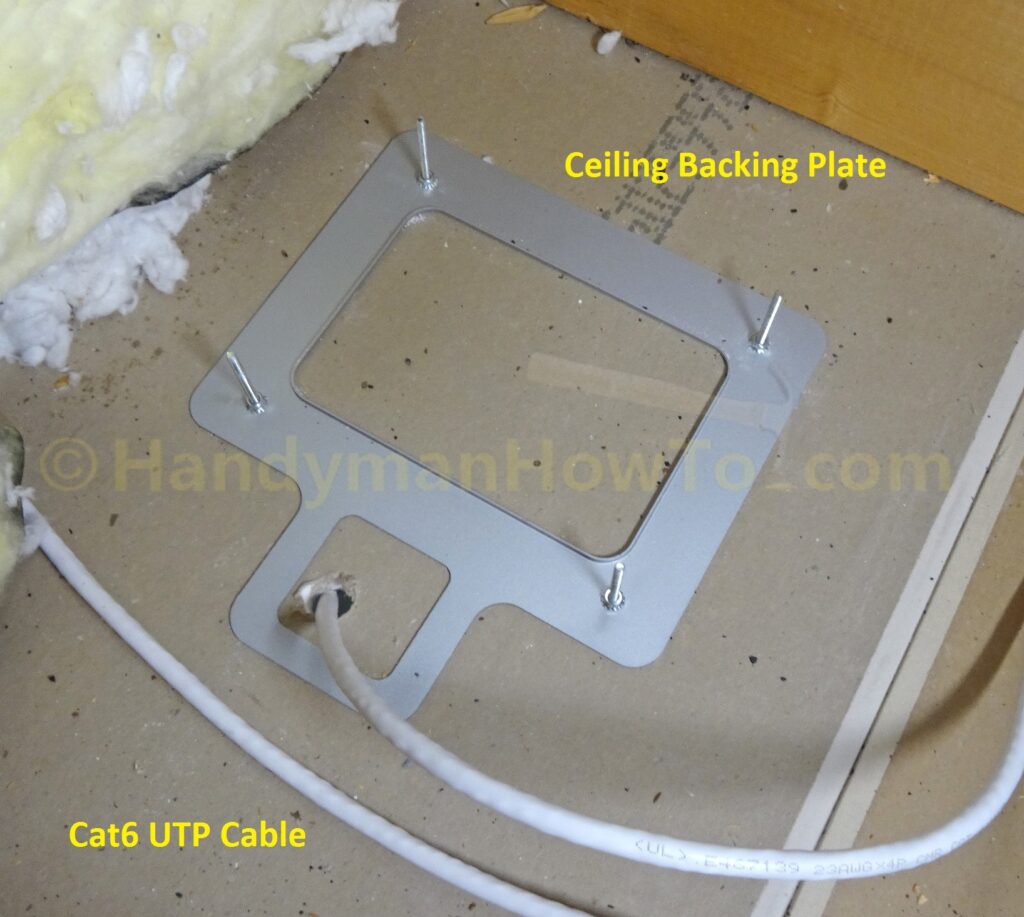
The Cat6 cable is plugged into the UniFi Access Point (AP) then the AP is snapped onto the plastic mounting bracket:
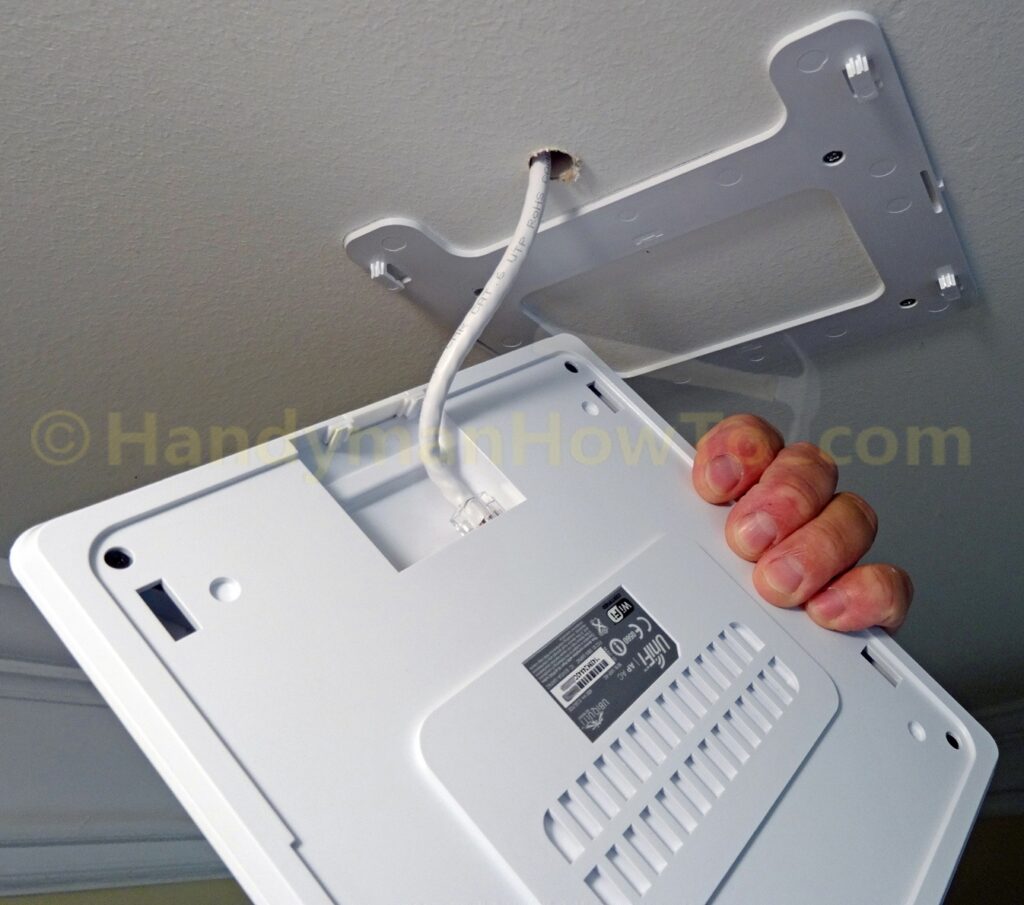
My UAP-AC was square shaped initially, but the mounting bracket system is the same for the newer round models.
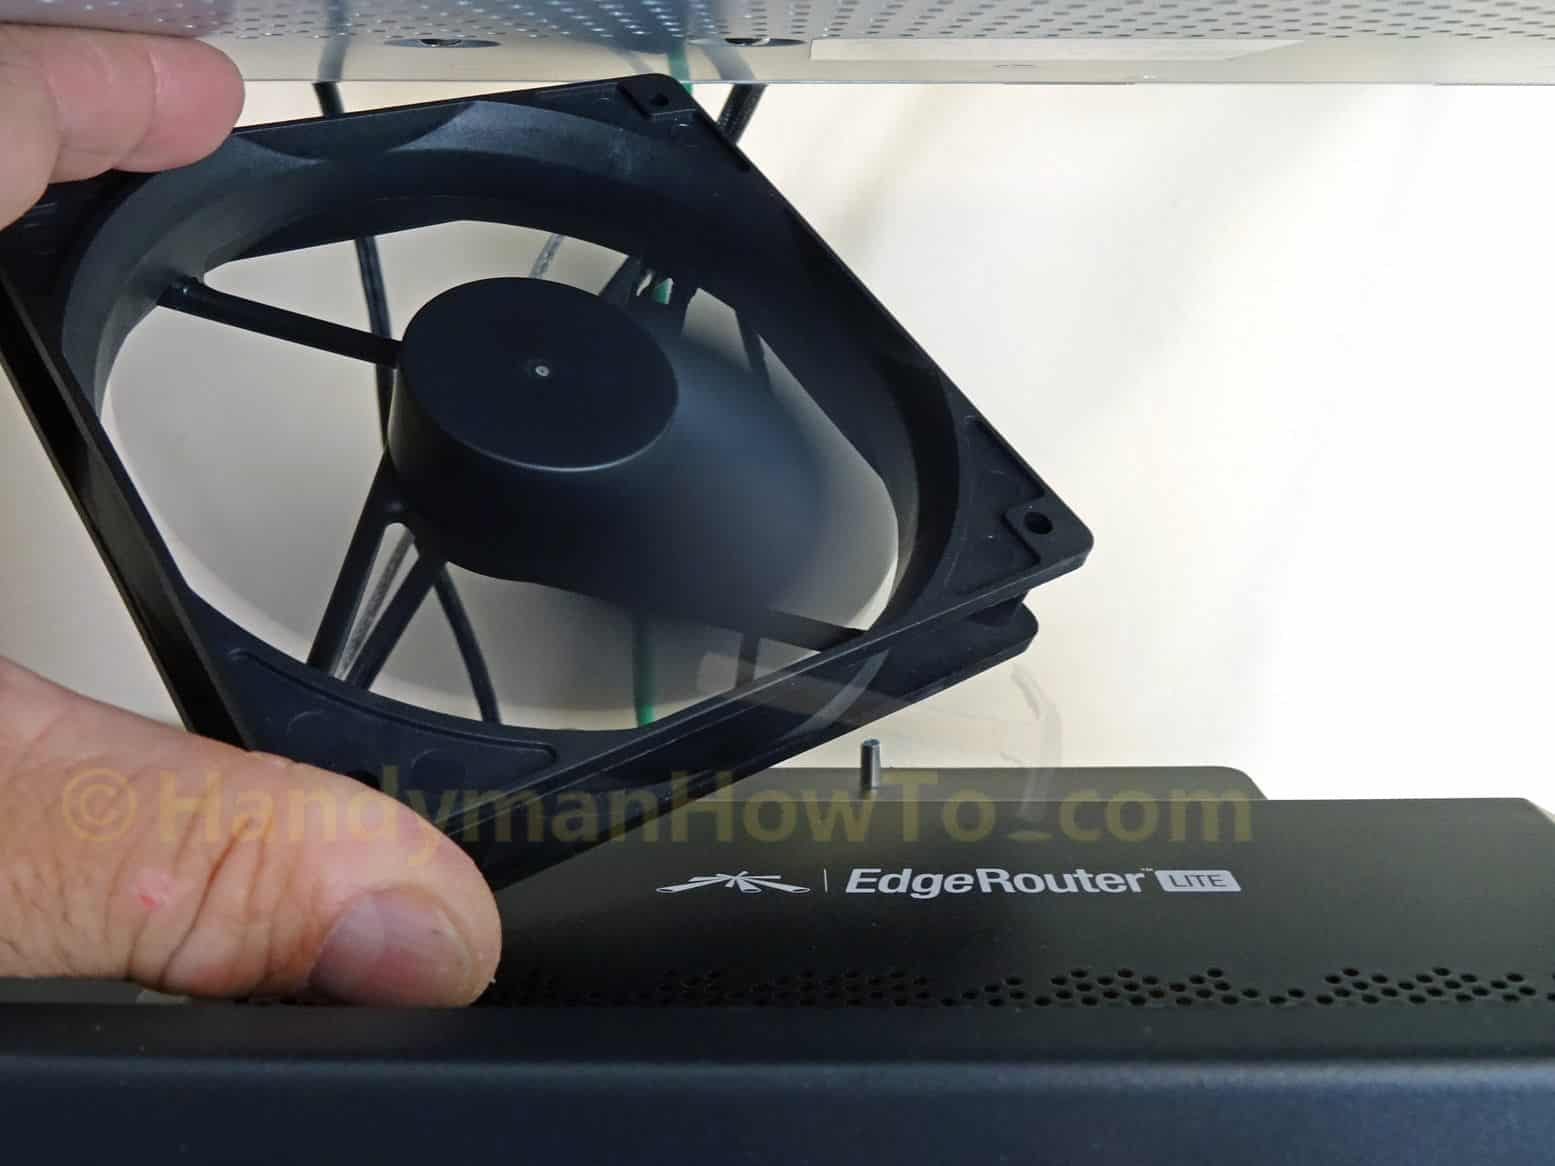
EdgeRouter Lite External Cooling Fan
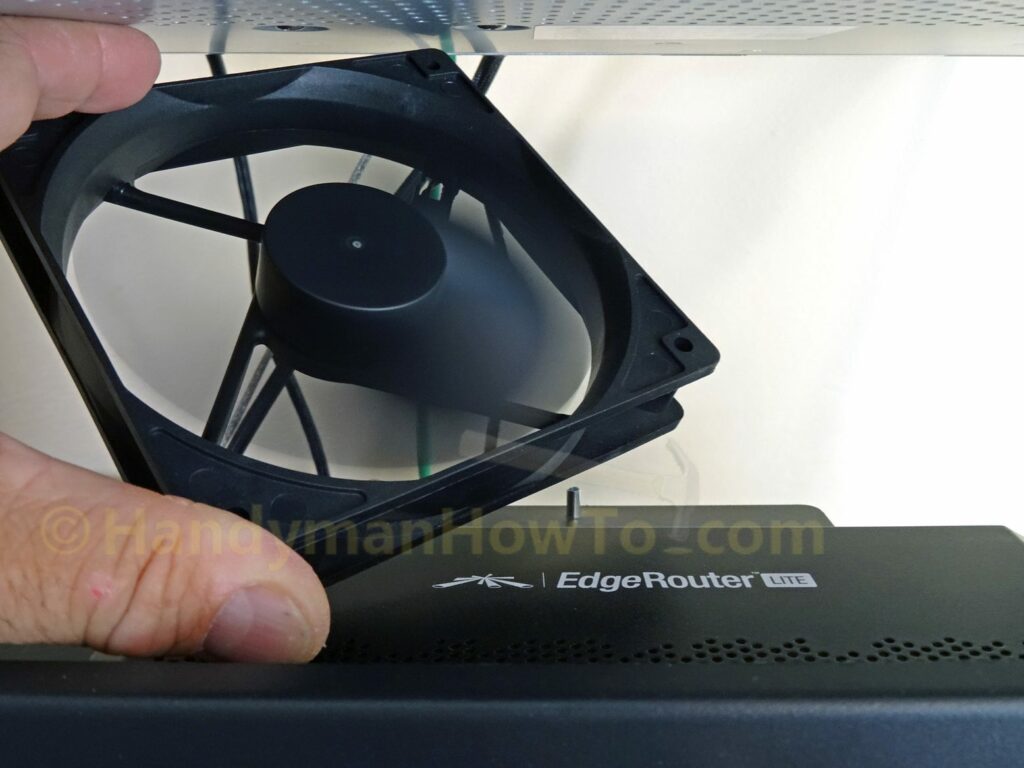
The EdgeRouter Lite doesn’t have an internal cooling fan and can get very warm; this is normal. As an upgrade I bought a Coolerguys Quiet 120mm AC Powered Receiver/Component Cooling Fan. The fan operates on 5 volts DC from the included power supply. It’s absolutely quiet and vibration free. I set the fan on top of the EdgeRouter so it blows downward forcing air into the top vents and out the rear vents:
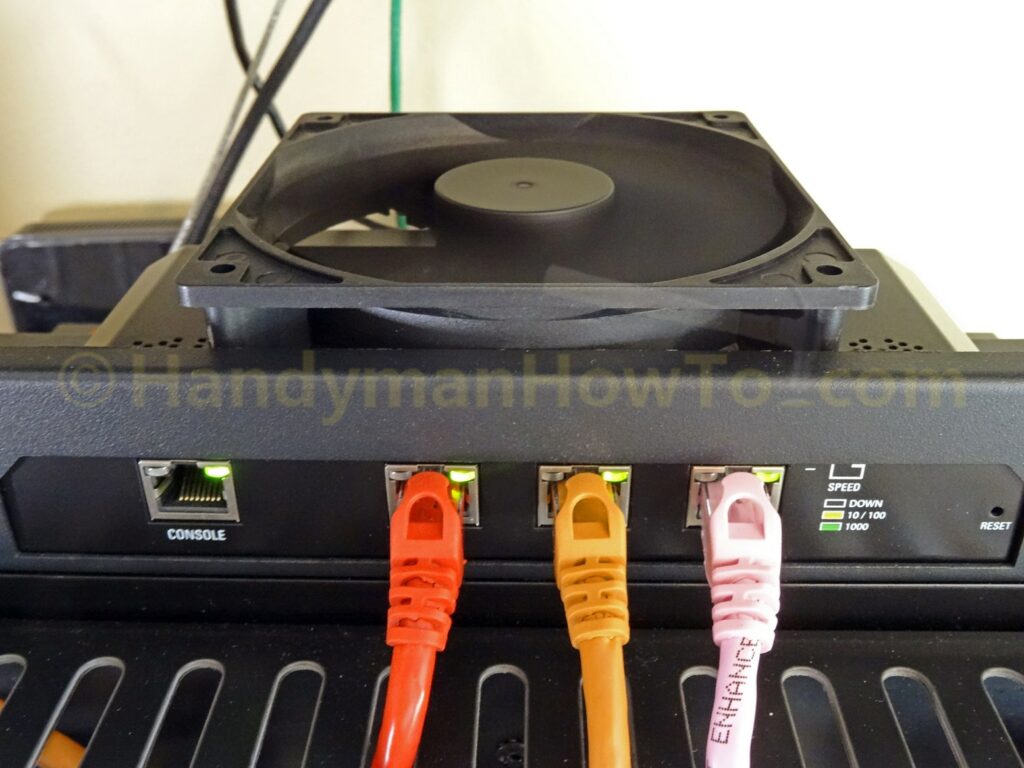
The fan does an amazing job! The EdgeRouter case now feels cool to my touch:
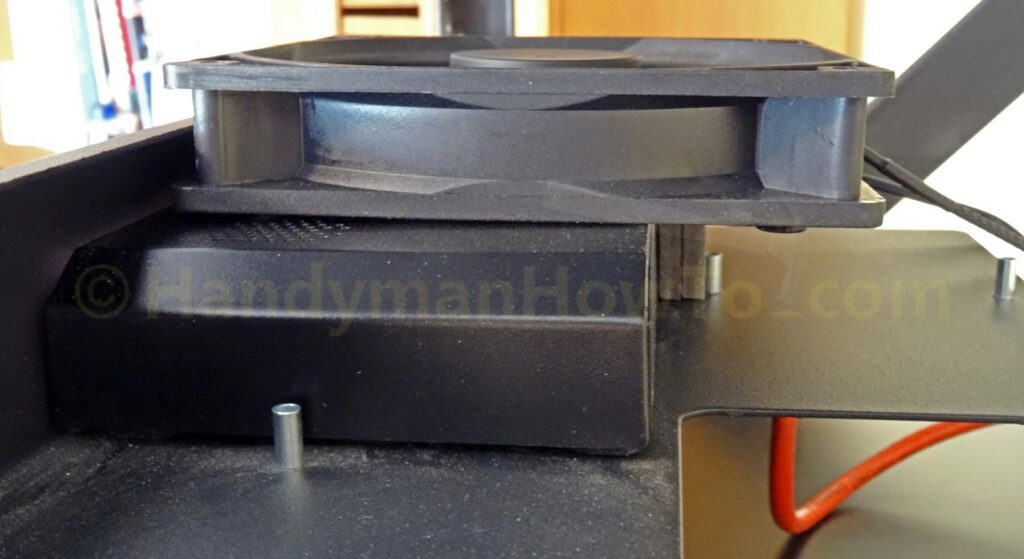
Side view of the 120mm cooling fan sitting on the EdgeRouter Lite:
Synology Network Attached Storage (NAS) Upgrade
I’ve since upgraded my network with the following changes:
- Installed a Digital Watchdog CUBE-LX 6TB enterprise class Network Video Recorder (NVR). The CUBE-LX has a beautiful user interface and advanced capabilities. It’s expensive but worth it. (Editor’s Note: the product above is no longer available, I would recommend this more modern product now)
- Added a Synology DS218 NAS with 6TB of storage. (Editor’s Note: original NAS was a DS216, which is unavailable now)
The NAS is “always on” with minimal power consumption when idle and takes the file sharing/storage load off my desktop PC. It’s amazingly simple to install hard disk drives and the DiskStation Manager learning curve is short. - Added another rack-mount shelf for the NVR (top left) and NAS (top right):
The revised network design is:
Changes to the network design are:
- VLAN70 (NAS) for the Synology NAS on switch port 21 for fine-grained access control policies and access logging.
- VLAN80 (IoT WiFi) to isolate Roku players and other untrusted devices. Added IOT_WIFI_PROTECT firewall rules.
- Enabled switch port 23 on VLAN1 as an alternate Management port and for port mirroring.
I learned the hard way to when I enabled port mirroring on switch port #2 connected to my Admin PC to run a WireShark packet capture and locked myself out of the switch admin interface (because port mirroring is a listen-only setting). Fortunately I’d not saved the changes to the boot config, so rebooting the EdgeSwitch cleared the setting. - Adjusted firewall rules to allow LAN-to-WAN Internet access for the Digital Watchdog NVR for Ubuntu security patches, e-mail notifications, NTP synchronization, DW Spectrum software updates and online camera license key validation. Unsolicited Internet WAN-to-LAN requests are still blocked.
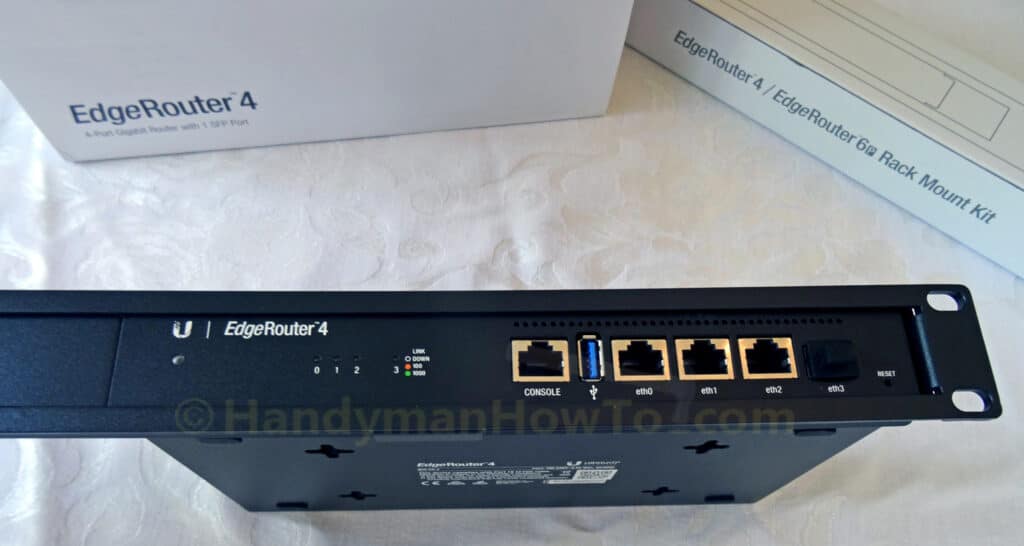
EdgeRouter 4 Upgrade
The EdgeRouter 4 (ER4) has double the CPU cores, CPU frequency and memory with better Packets-per-Second (PPS) performance compared to an EdgeRouter 3 (ER3). The ER4 is affordable at roughly twice the cost of an ER3. The main reason I upgraded is faster OpenVPN performance because it’s a heavy load on the CPU. My ER4 network diagram:
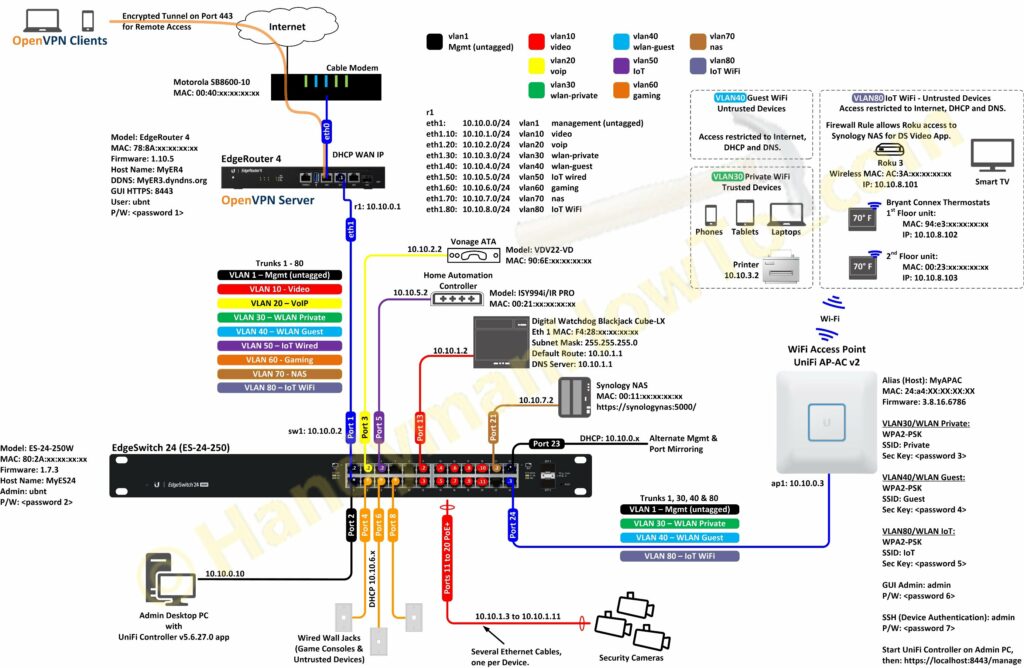
The most significant change is I’ve isolated the insecure WiFi thermostats on VLAN 80 (IoT WiFi) which maps to a unique wireless network (SSID) on the Ubiquiti Access Point.
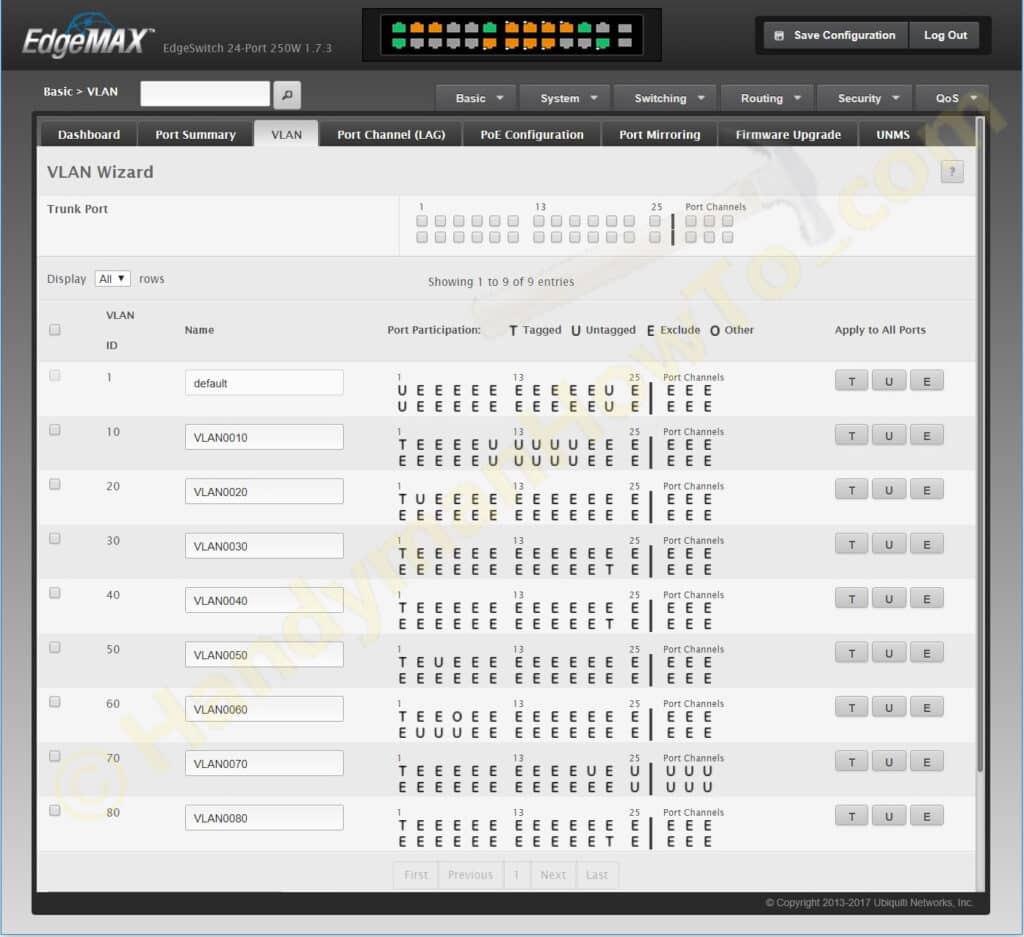
The EdgeSwitch VLAN Wizard summary screen illustrates the VLAN definitions and port memberships:
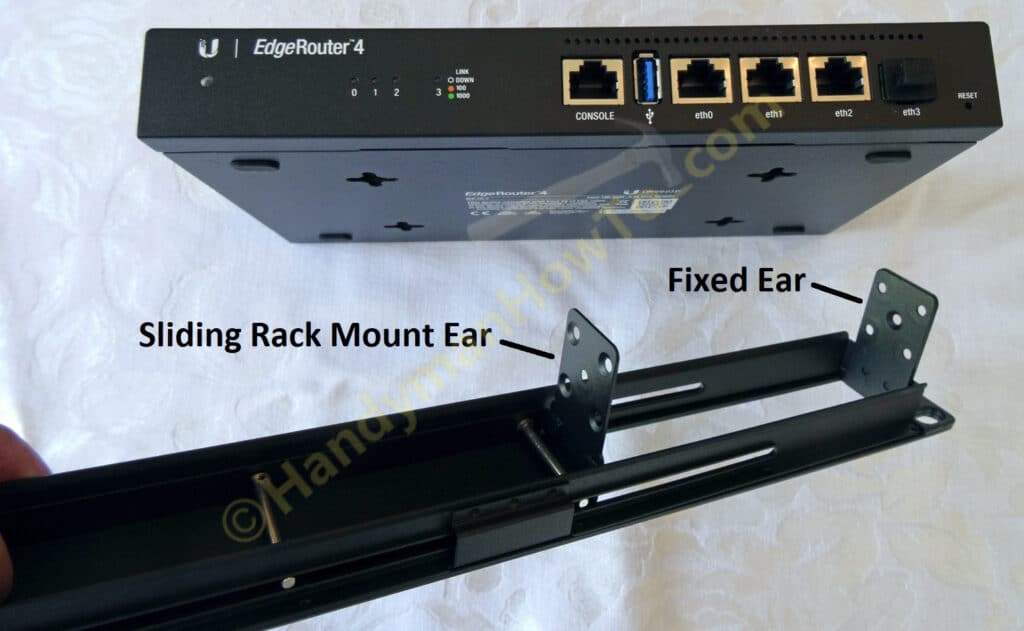
EdgeRouter 4 Rack Mount Kit
I bought an EdgeRouter 4 Rack Mount Kit for my 19 inch wall rack:
The rack mount kit has a sliding ear that adjusts to fit the router. Screws for the ears and rack (not shown) are included:
The EdgeRouter 4 mounted in the wall rack:
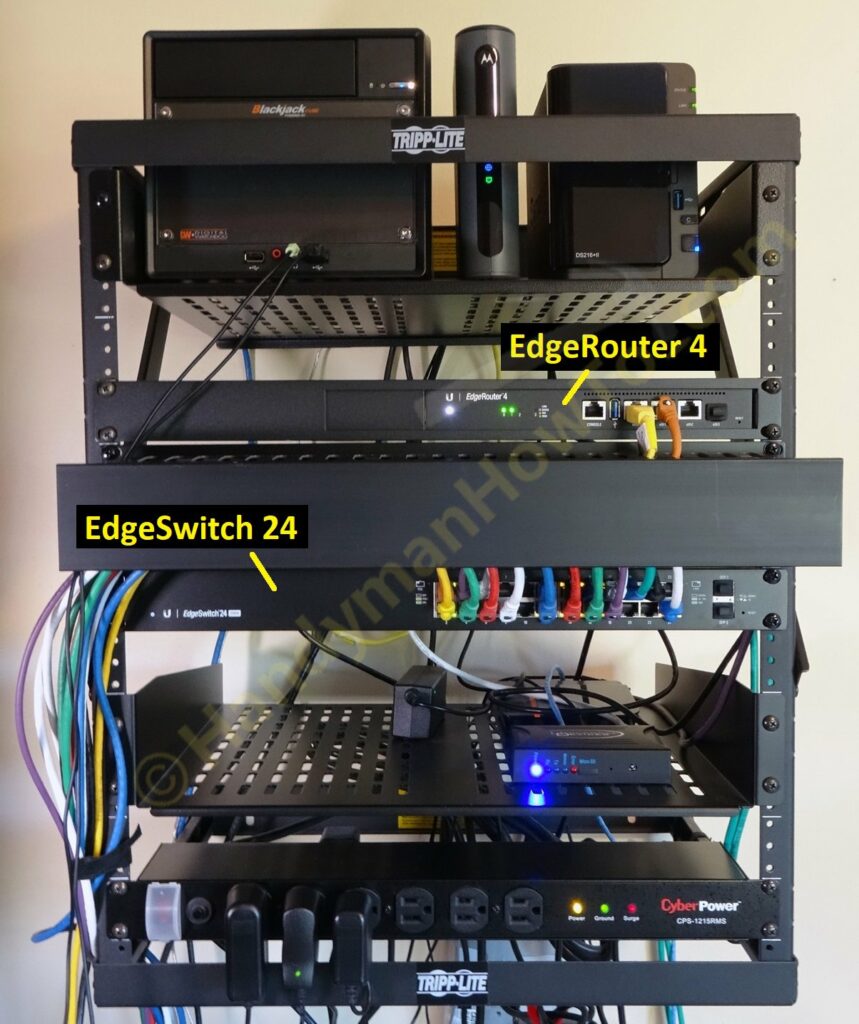
The EdgeRouter 4 runs cool – just slightly warm to the touch – so I didn’t bother with the cooling fan used with the ER3.
This project is continued in Ubiquiti EdgeRouter Lite SOHO Network Configuration.
Best,
Bob Jackson
This is an excellent breakdown on a SOHO network designand implementation. I have based my home network design on your splendid work and reccomendations.
Hello Bob
I used your site to config and understand the configuration of my network with an ER3 back in ~ 2010 (and understand ~ Vyatta). I’m old and can’t remember the exact date. It died due to a faulty power supply. I replaced it with a ER4 and kept my same config – with some cleanup. I had said it before on your site and I will repeat it again. Your explanation of your Ubiquiti config was the best I had found. It has served me well for so many years. Once again – THANKS!!
It is unfortunate that Ubiquiti has silently abandoned the Edgerouter line. I was their best fan. I’m moving on to pfSense now. I wouldn’t have been able to understand the core concepts of it without your original post on your web site.
I hope life is treating you well.
Regards