This project shows how to paint a room in Italian Tuscan style with stencils. I painted the master bedroom and bath of a Mediterranean style home in Florida like an Tuscan Country Villa after seeing photos in a book titled Country Houses of Tuscany
The Tuscan style painted room was impressive!
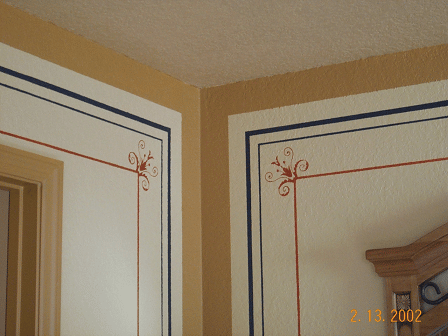
The Tuscan theme continued into the master bath.

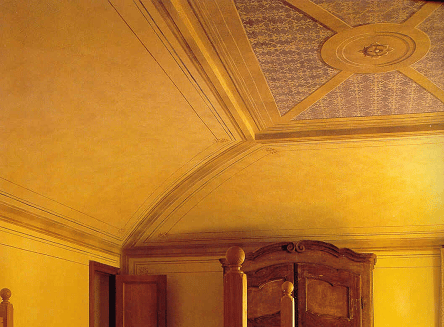
Notice the oak leaf ceiling patter and central blossom was modeled after the vaulted ceiling of the Italian Villa below.
Stencil Design and Layout
The bedroom tray ceiling begged for a decorative and inspiring design. For ideas, I browsed several books on Italian interiors and classical ornamental design, choosing and blending things I liked. Stencils were created using a computer-aided design (CAD) program.
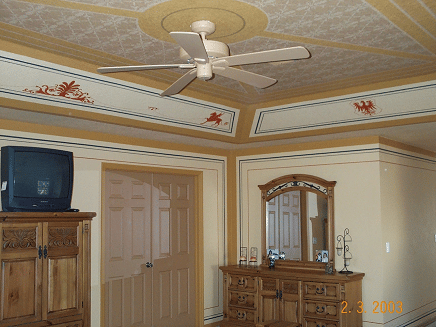
For example, the master bedroom (above) was modeled after the photo on page 79 of Country Houses of Tuscany painted in the Trompe l’oeil (French meaning “trick the eye”) technique. The image below was scanned from the book to study the details more closely.
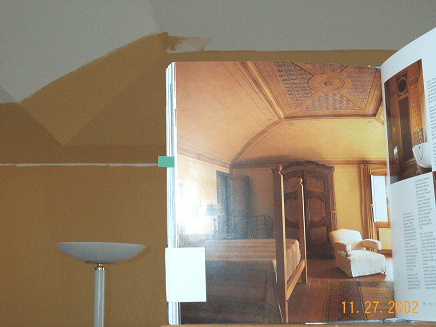
In the photo below, the book is compared to the colors chosen to match the bedroom as the base coat is applied to the walls and ceiling. The challenge to matching colors from a photo is interpreting hue and saturation – that is, the same color appears much darker or lighter depending on the intensity of the ambient light.
How to Create Decorative Stencils for Painting
The steps to create a stencil are:
- Scan the ornamental designs or photos from a book into the computer.
- Load the scanned imaged into a computer aided design (CAD) program.
- Trace the photo or image to create a vector drawing.
- Customize the drawing to suit your tastes.
- Print the final drawing on inkjet transparency film.
- Cut out the stencil using a razor knife.
Depending on the complexity of your design and number of colors, several stencils may be necessary to create the final layout.
Computer Aided Design (CAD) for Stencils
I used TurboCad to layout the stencils in this project because of it’s affordable and very capable. TurboCad is available from Amazon. It takes time and technical skill to learn how to use CAD program. If this is outside your comfort zone, it’s easy enough to outsource the drafting job to a reputable business. Search for “drafting services” in your area at Kudzu.com or Angie’s List.
Scanning and Tracing a Stencil Design
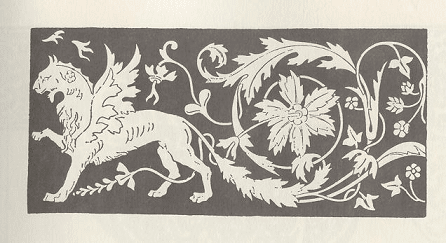
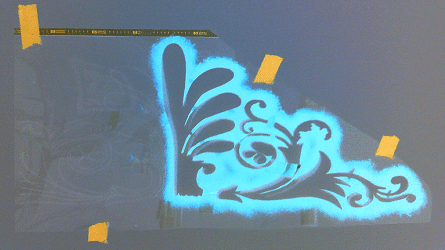
This overview shows how the stencils for the Griffin and floral arrangement were created.
First, a Griffin was scanned from page 71 of “Decorative Ornaments and Alphabets of the Renaissance” and saved to a bitmap file on the computer.
Next, the bitmap file is loaded opened in TurboCad and the Griffin is traced over to create a line drawing. The line drawing is essential for the CAD program to resize, rotate and modify the graphic.
The TurboCad screen grab below depicts how the drawing of the Griffin looks after tracing the bitmap. Notice the Griffin has been flipped 180 degrees, resized to fit the dimensions of the tray ceiling panel and is now holding a rope.
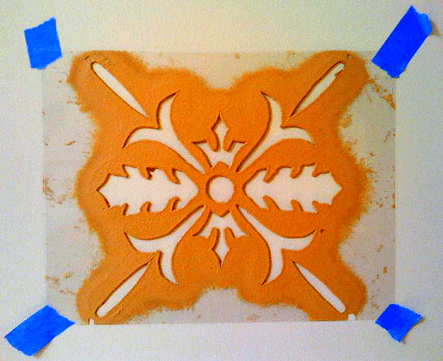
The central floral drawing is also made by tracing a scanned image from a book.
Hint: Because this is a symmetrical drawing, only the right half is traced. A “mirror copy” is made to complete the left half.
The following screen shows how a standard 8.5″ by 11″ printer page compares to the actual size of the drawing. Adjustments to the print layout are made in the CAD program to print the drawing as panels on inkjet transparency film. The printed panels are taped together to make the complete stencil.
The stencil is printed on transparency film and the cut out with a razor knife. The finished stencil (below) is shown as a “negative” image to better highlight the transparency film. Notice that only 1/2 of the stencil is cut out since the left and right parts are mirror images. Just flip the stencil over (after the paint dries) to paint the 2nd half.
The oak leaf stencil for the field pattern on the ceiling is shown below. The oak leaf design was drawn by hand after a close study of the vaulted ceiling photo on page 79 of “Country Houses of Tuscany” (see beginning of this article). The stencil was sized such that the rows and columns would evenly tile across the width and length of the ceiling. A CAD program is invaluable for this type of work.
How to Paint Stencil Accent Lines
The steps to painting the long accent lines bordering the room are:
- Productivity is the key to making long accent lines. Marking off each line with a tape measure is slow work. Instead, make a pre-measured stick by making tick marks for the location of each accent line. Shade in the lines so you don’t mistake which mark belongs to which line. Make a big mark on one end so you know which end is “up” or “start” to keep the stick correctly oriented. The pre-measured stick can be wooden foot ruler or I like to use a 3/4″x1/4″x12″ length of oak or popular.
- Mark off each accent line every 2- or 3 feet with the pre-measured stick. Here you’re just making light 1/4″ pencil marks.
- Draw straight lines between the tick marks using an aluminum yard stick. Aluminum is very stiff and smooth for nice even lines.
- Mask off the lines using easy release painters masking tape. I prefer Scotch-Blue Painter’s Masking Tape. It’s available at most home improvement stores.
- Paint the lines, wait for the paint to tack up and carefully remove the masking tape. Remove the tape before the paint is completely drie or it may lift off the finish coat. Depending on the colors, line spacing and width, it can take several iterations of masking and painting.
How to Paint Perfect Stencils
Stenciling patterns and accent lines requires a round flat brush and applying the paint using an up and down dabbing motion with a somewhat dry brush. If you brush the paint on in the normal way with back and forth strokes, it will bleed under the stencil or masking tape and look horrible.

To get the right amount of paint on the brush, I like to pour a bit of paint on the paint can lid and dab the brush. This wets only the tip of the brush and if you get too much, just dab the brush on a dry spot of the lid.
Take care to keep the paint from building up on the stencil or it will bleed onto the wall. Every so often, place the wet side of the stencil on some newspaper and pat it down to remove the excess paint.
For intricate stencils like the floral design above, it will be necessary to fill in the “bridges” – areas of the stencil not cut out so it won’t be too flimsy – with an artist’s brush.
Painting with Stencils – Time and Effort
The CAD work to trace the stencils took me about 16 hours over several weekends. Before committing to the final design, I printed it out full size on plain paper and taped it to the ceiling to verify it looked right and was what the boss (my wife) wanted.
The actual painting required the equivalent of ten (10) 8-hour days for the bedroom, hallway and bath for a total of 80 hours to do the job.
Labor intensive, definitely! Did I save many thousands of dollars doing it myself, absolutely!
A few years later I sold the house to take a new job out of state. The reaction from numerous prospective buyers was “Wow! Can you do this at my house?”. Only one prospect said “This isn’t to my taste.” – and that’s OK, some folks prefer bland pastels. I sold the house in less than 1 month for 55% more than I paid for it! And that was well before the real estate bubble began.
Bob Jackson