Rhino Gutter Guard installation, performance and maintenance issues are discussed in this project. Also see the Rhino Gutter Guard and MasterShield Comparison.
Rhino Gutter Guards
A couple years ago I had the original 5 inch gutters on my home replaced with 6 inch gutters and MasterShield gutter guards installed. More recently I hired a builder to build a roof and screened porch on my wood deck. The builder is a Rhino Gutter Guard authorized dealer so I purchased the Rhino product with the porch gutters. My backyard has many tall trees including Tulip Poplar, Hickory, Oak and Sweetgum that drop catkins, pollen, blossoms, leaves, twigs and nuts and seeds throughout the year. Here’s the new screened porch addition and gutters.
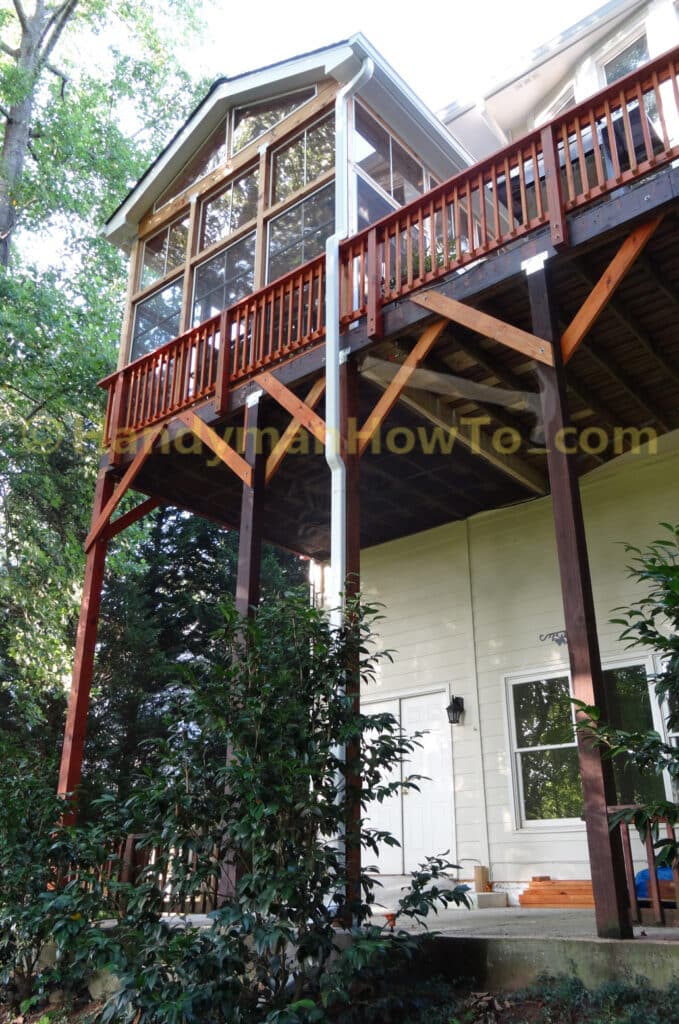
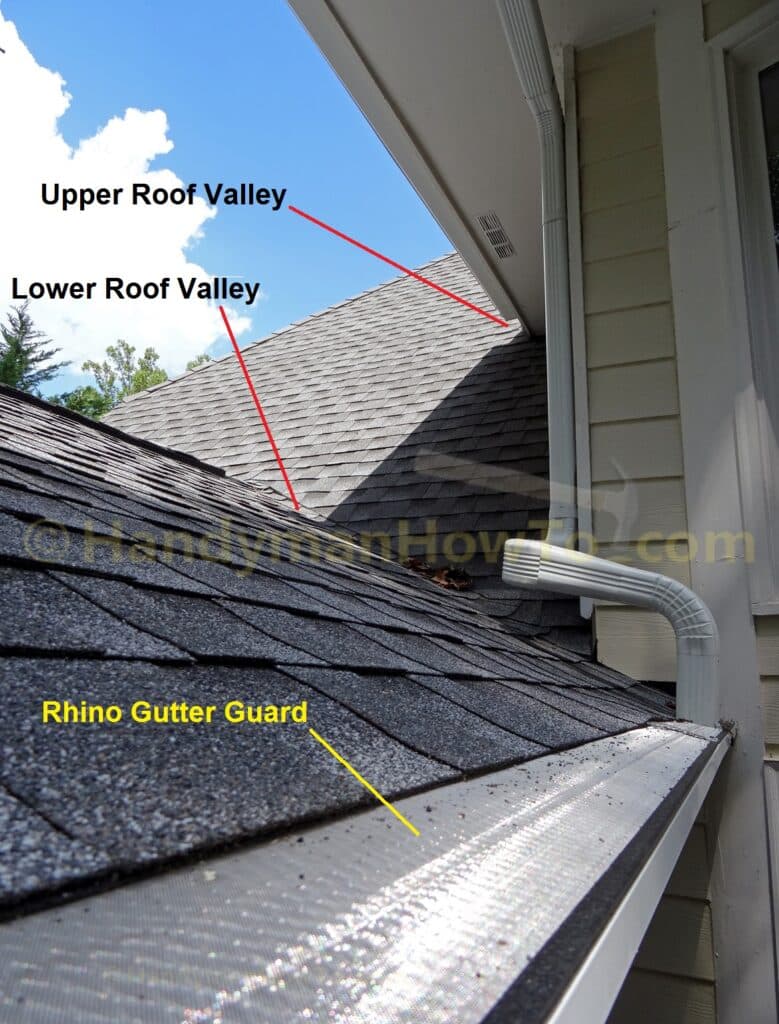
The new porch roof is tied into the main roof. Two roof valleys feed into the gutter and Rhino Gutter Guards:
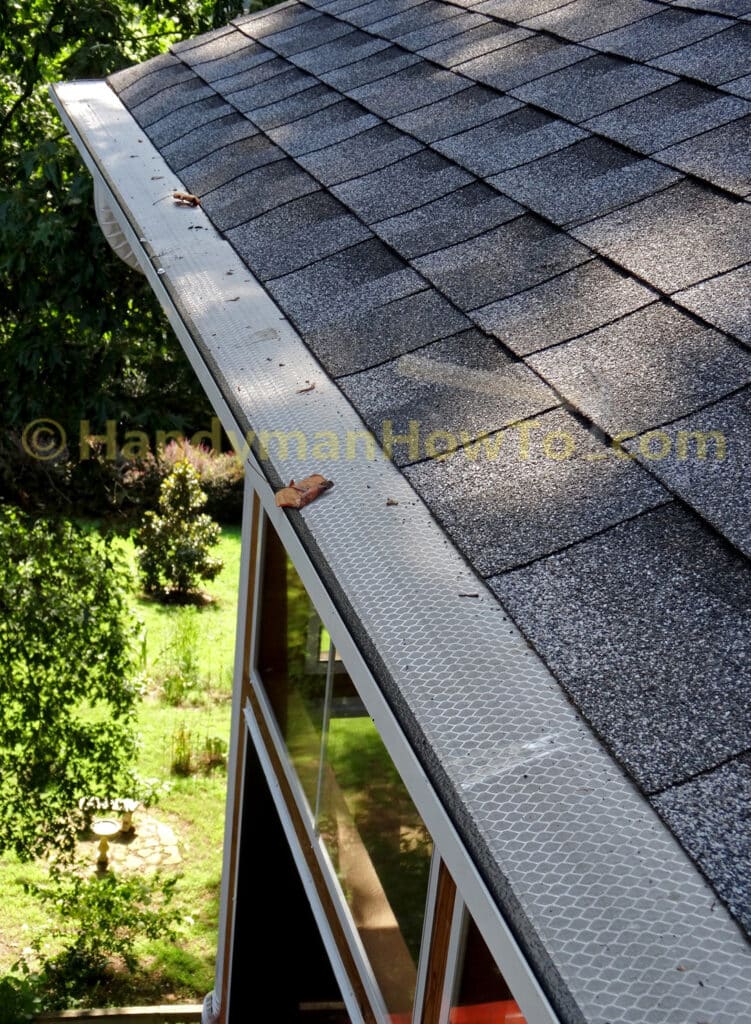
View of the Rhino Gutter Guards looking towards the roof gable:
Rhino Gutter Guard Installation Errors
The Rhino Gutter Guards were purchased from and installed by an authorized Rhino Gutter Guard dealer in my area. The order process was X feet of gutters and Rhino Gutter Guards for Y price. On the day of install I met with the two workmen who were very polite and worked hard. However they didn’t speak English so it was difficult to have a conversation about the installation procedure.
Contrast the above with the MasterShield order process where I met with the owner of the local dealership, discussed the particulars of my roof layout and we redesigned many aspects of the original gutter system. The MasterShield installation crew spoke English, the owner was frequently on-site meeting with me and inspecting the work.
During my research for this article I studied the Rhino Gutter Guard Installation Manual (document dated June 18, 2014) and inspected my Rhino Gutter Guard, finding many installation errors that invalidate the Rhino Gutter Guard 20 Year Limited Warranty, which states in part:
“EXCLUSIONS/LIMITATIONS
This warranty does not cover –…
Damage or performance failures due to improper installation” (red emphasis added)
Rhino Guard Improper Installation – Missing Screws – Voids Factory Warranty
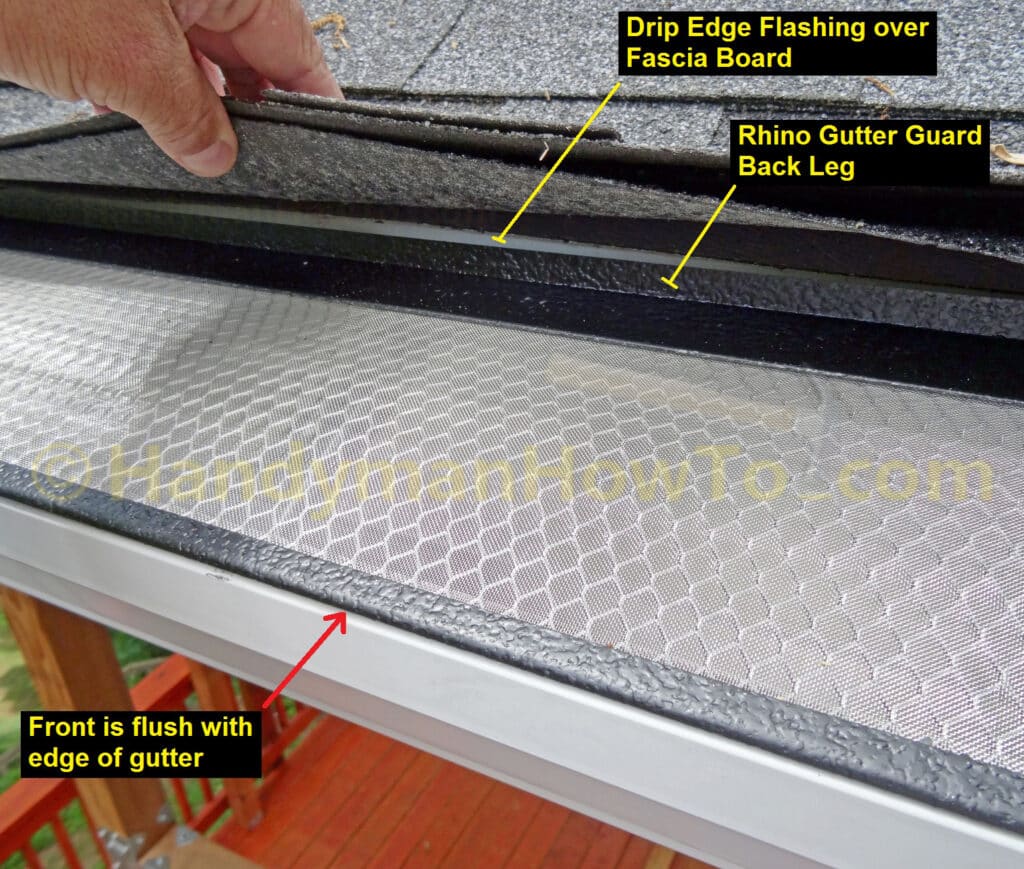
The Rhino Gutter Guard installs on top of the gutter and is supposed to strengthen the gutters by virtue of the screws and box system. Per page 9 of the Rhino Gutter Guard Installation Manual, the front lip is first fastened to the gutter with four (4) 1/2 inch zip screws – two at the panel ends then “even spacing on the remaining”. Next the back leg is raised to make a 10 to 15 degree slope and fastened with four (4) 1 1/2 inch zip screws. This makes a total of 8 zip screws per panel. Where are the other four “evenly spaced” zip screws (two front and two back) on the interior section of this panel? Good question. Many of my panels have only 3 screws – two front and one rear.
Rhino Gutter Guard – Manufacturer Butt Joint Instructions
The Rhino Gutter Guard Installation Manual is very specific about the proper way to make butt joints to overlap panels stating:
Page 10 states: “…This overlap is mandatory for warranty to be executed.“
In case the above link to installation manual is removed for public access, the following steps illustrate how the make the Rhino guard butt joint per the manufacturer’s instructions.
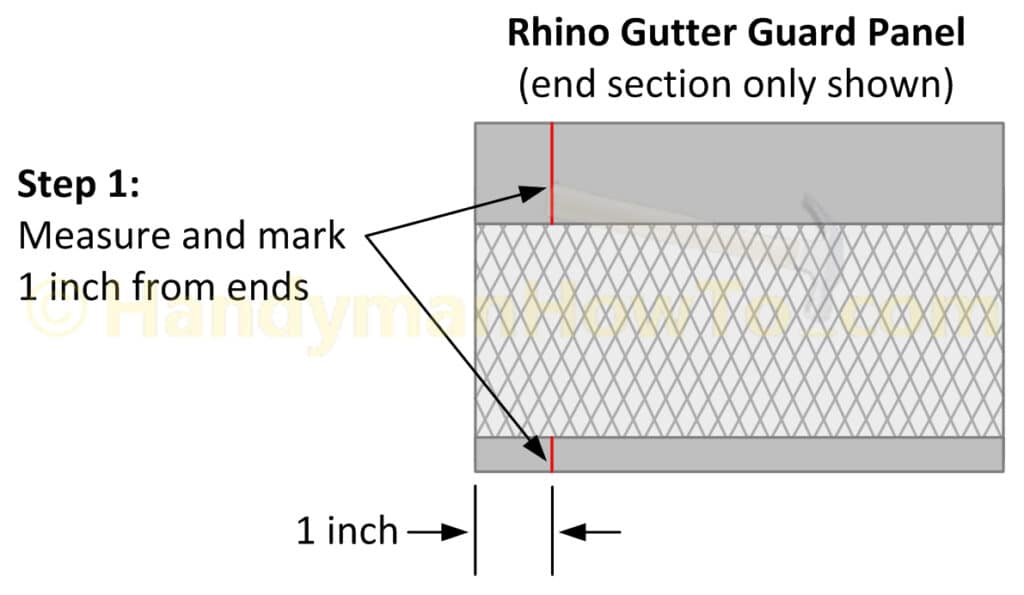
- Step 1 – Measure and mark 1 inch from the end of the gutter guard on the aluminum frame.
Note: The back of the panel that fits against the fascia is at the top of the diagram:
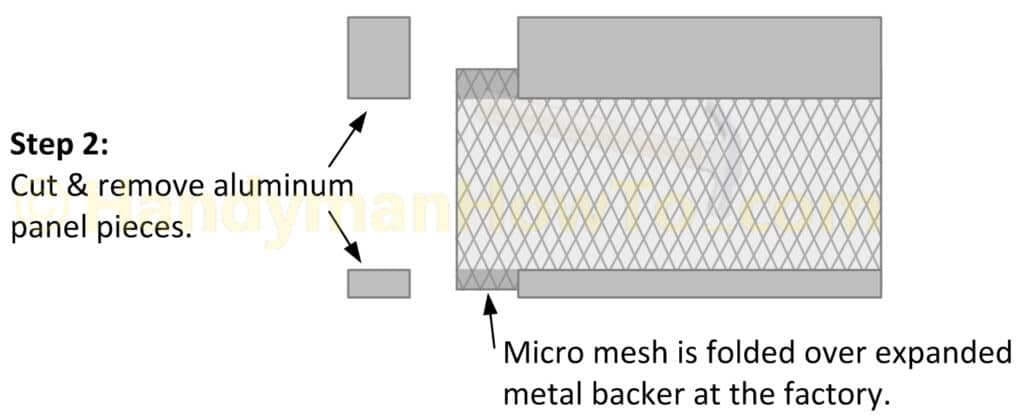
- Step 2 – Cut the aluminum frame with tin snips and remove the pieces:
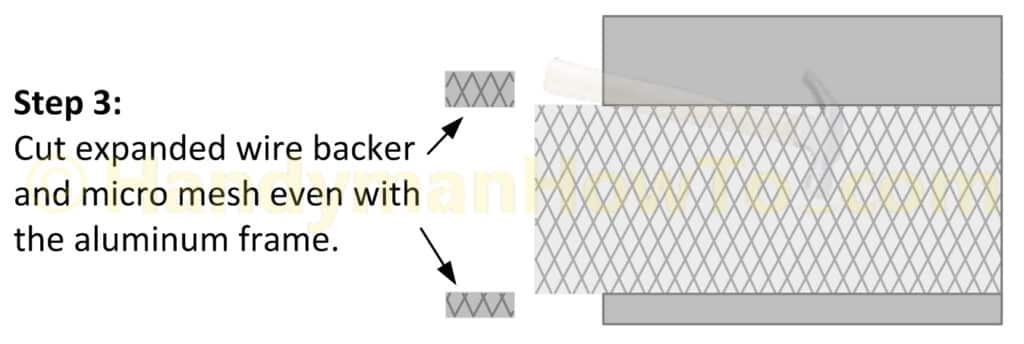
- Step 3 – Cut the expanded metal backer and micro mesh even with the aluminum frame. The micro mesh is folded over the backer wire grid at the factory before it’s crimped into the frame.
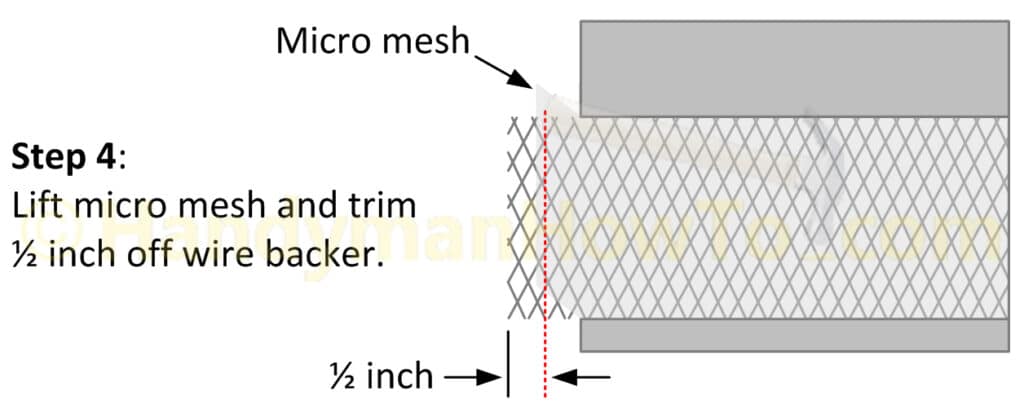
- Step 4 – Lift the micro mesh and trim 1/2 inch off the expanded wire backer. After trimming, the micro mesh will be 1/2 inch longer than the expanded wire backer:
- Step 5 – Fold the micro mesh over the wire backer and pinch closed with your fingers.
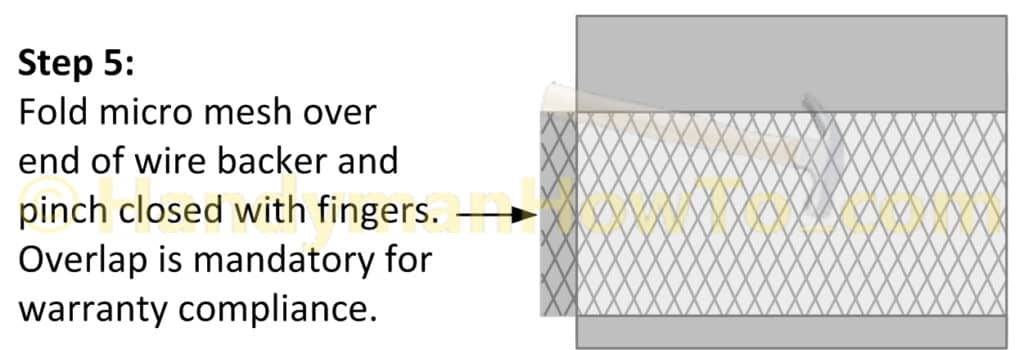
The butt joint is complete and the panel is ready for installation. The butt joint tail (or tongue) will overlap the next panel by 1/2 inch as illustrated in this diagram:
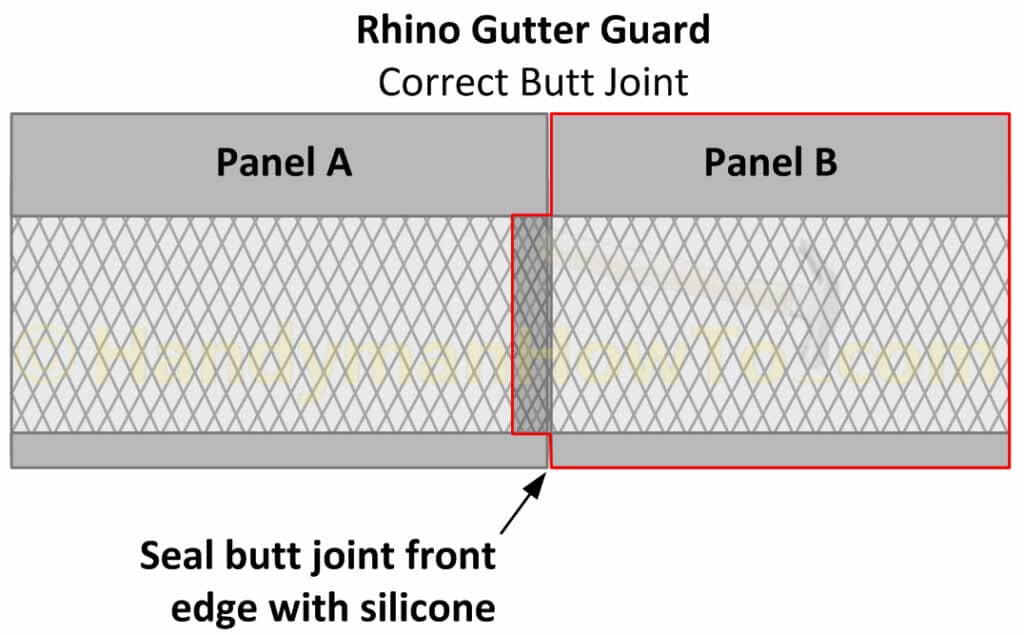
Butt joints made per the factory instructions will not lift and fray.
Rhino Guard Guard Butt Joint Installation Error – Voids Factory Warranty
The Rhino Gutter Guard installers incorrectly made the panel butt joints because they:
- only cut back the front edge of the aluminum frame
- didn’t fold the micro mesh over the expanded wire backer
- laid the aluminum frame of Panel B on top of Panel A
- failed to seal the front edge of the with silicone
The following diagram illustrates how the Rhino guard installers made the butt joints on my home. Compare this to the factory required butt joint above.
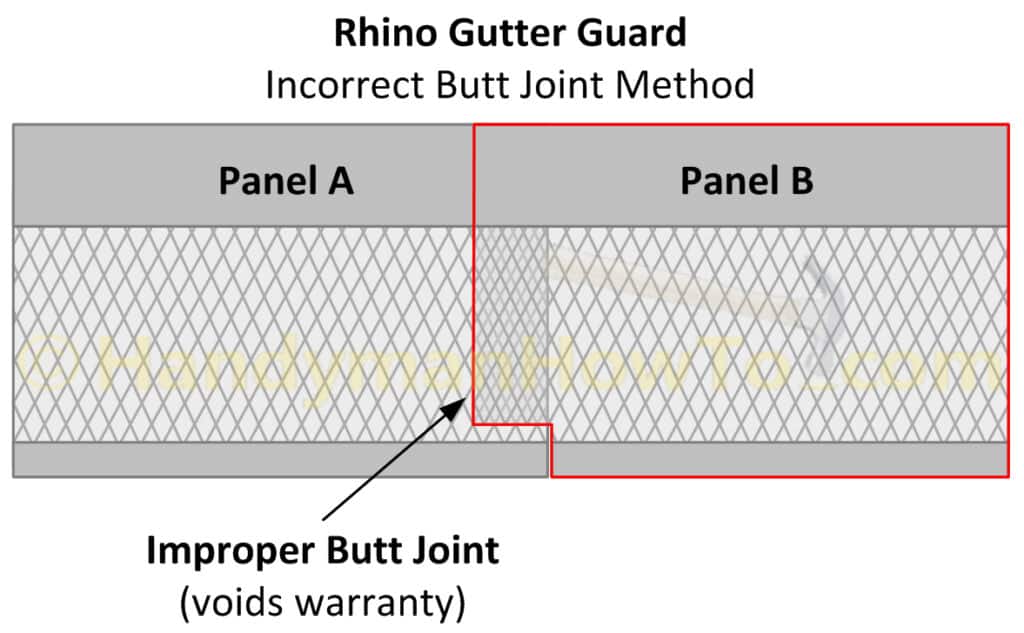
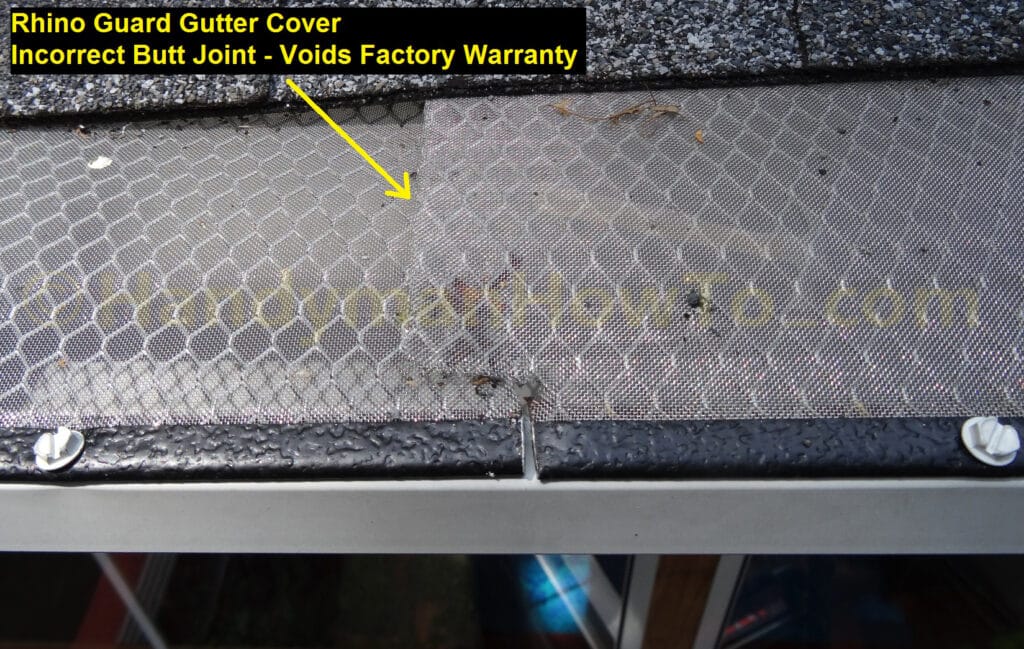
If debris were to be brushed off the gutters guards it will catch and bend up the micro mesh creating a fraying snag and unprotected opening in the gutter guard. The improperly made butt joint on my home:
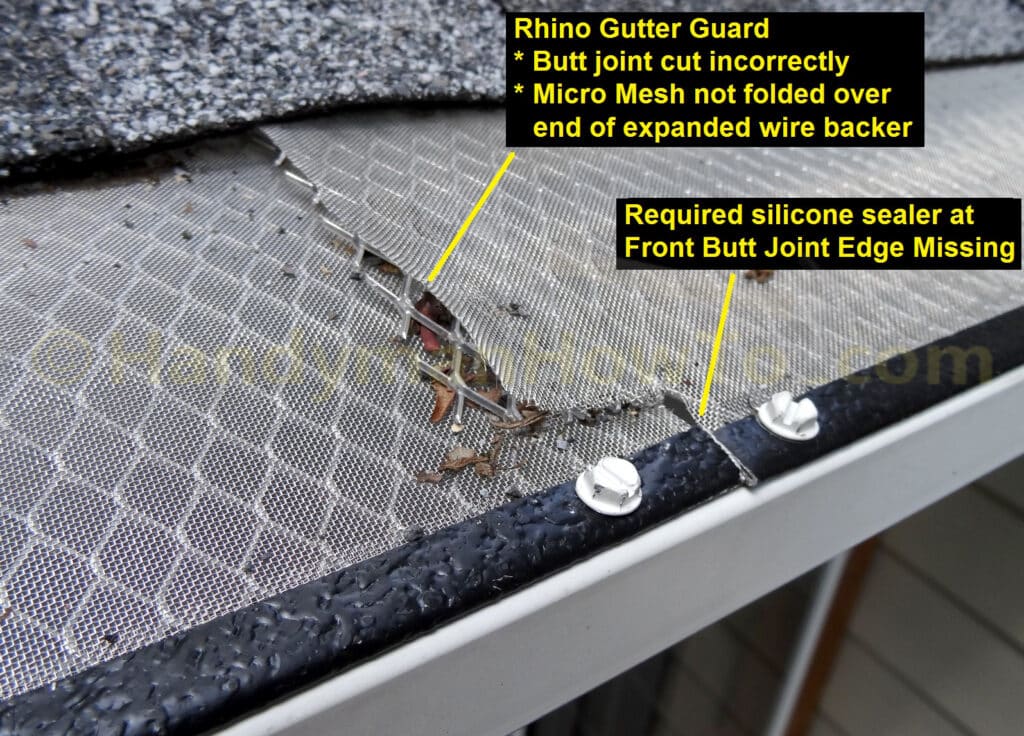
Page 10 of the Rhino guard installation manual also states:
“Before installing any additional panels, it is REQUIRED to seal each front butt joint edge with silicone or any other equivalent sealer. This will prevent water from dripping between panels.”
The front butt joint edge in the previous and next photos was not sealed by the installers.
Let’s see what else is wrong with this installation:
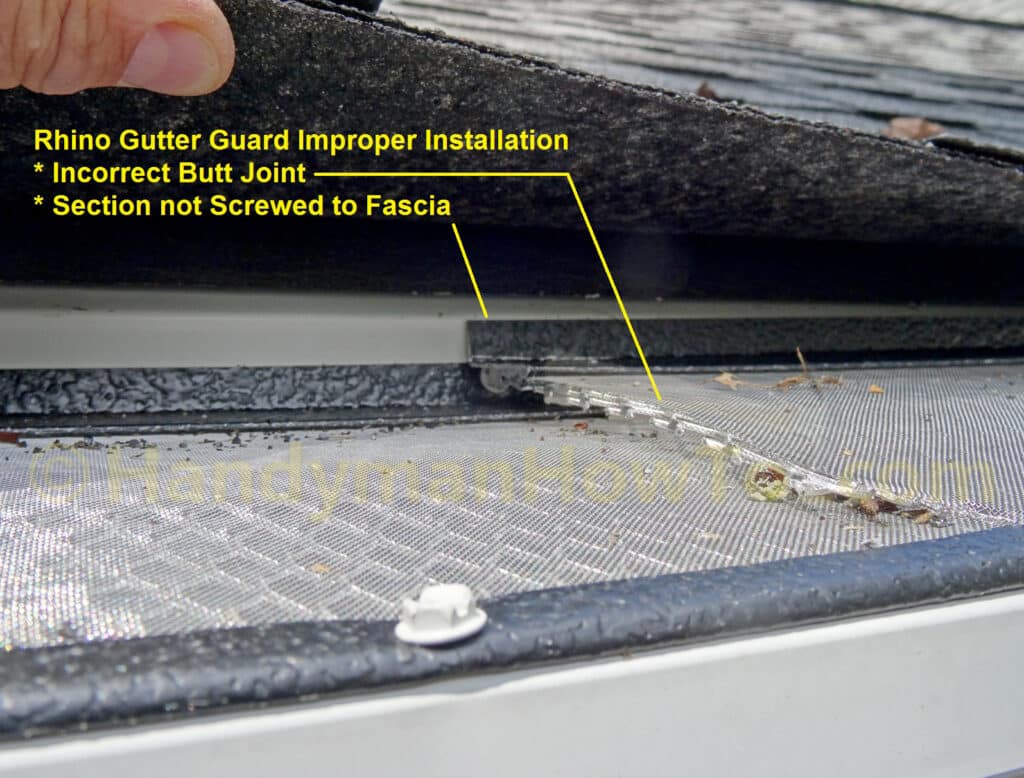
- The right panel back frame wasn’t trimmed back and is lying on top of the left panel.
- The right panel end isn’t screwed to the fascia per the manufacturer’s instructions:
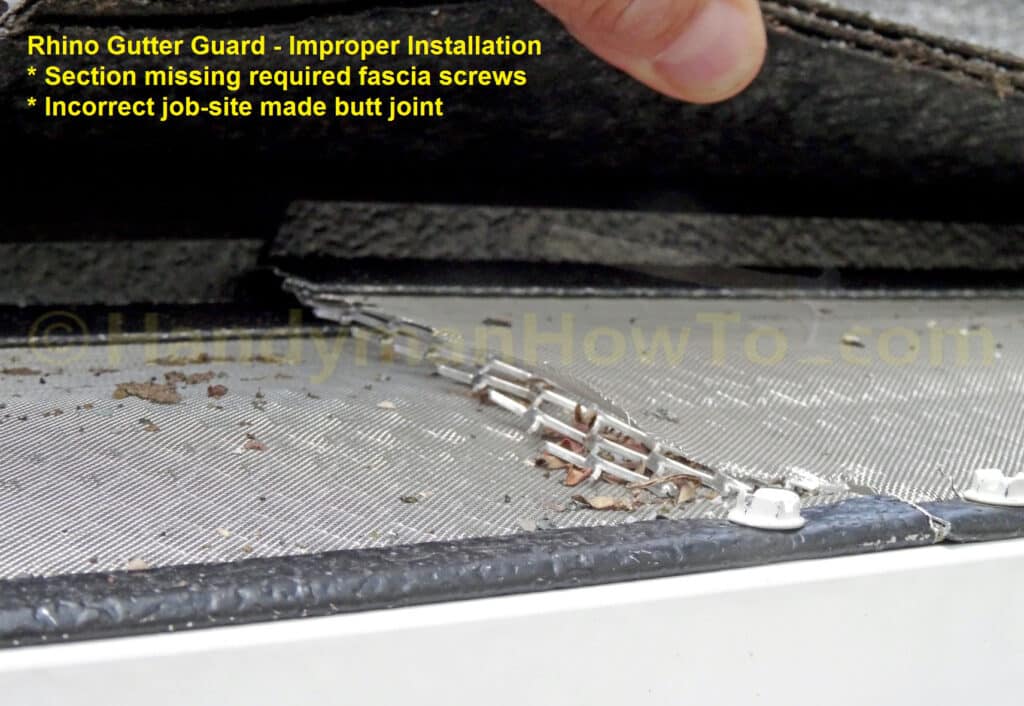
Checking the next butt joint shows more of the same installation errors:
The installers only used 3 zip screws (two on the front lip at the ends and one at the fascia) instead of the required 8 total screws per panel:
Resolving the Improper Rhino Gutter Guard Installation
I’ll call Rhino Gutter Guard tomorrow and see what they say about these installation problems. The fault is not with the product rather the local authorized Rhino dealer who isn’t adequately training their installers. The dealer certainly didn’t perform an on-site inspection for quality assurance and conformance to the factory required installation methods, so blaming a “rogue” gutter crew as an isolated incidence isn’t a viable excuse. More to come on the resolution…
Widespread Problem?
It’s possible these installation errors have occurred on numerous homes and the fix will require replacing the Rhino guard. A widespread problem could get very expensive at a cost of $15 to $20 per foot and force an authorized dealer out of business. The homeowner’s only recourse is with the local Rhino dealer because the Rhino Gutter Guard Warranty (2014) states:
“EXCLUSIONS/LIMITATIONS
This warranty does not cover –…
Damage or performance failures due to improper installation” (red emphasis added)
Grab a ladder and inspect how your Rhino Gutter Guards were installed to be first in line for an improper workmanship claim.
Aside: MasterShield Gutter Guards have a factory made interlocking tab that avoids this particular type of installer error and are fastened only to the front edge of the gutter where the required screws can be readily seen.
Rhino Gutter Guard Performance and Maintenance
Installation errors aside, the Rhino Gutter Guard handles heavy downpours with ease. I’ve watched how the Rhino guard performs during thunderstorms that dropped 2 to 3 inches of water per hour and it works great without overflowing!
The Rhino field sections along the main roof are basically self cleaning and haven’t required maintenance. The problem I’ve had with both MasterShield and Rhino gutter guards are at high-flow roof valleys where so much tree debris and tar/oil leaching from the roof shingles is funneled onto a narrow section. The tar clogs the micro mesh while the matted wet leaves and twigs forms a dam that overflows as in this photo taken a night:
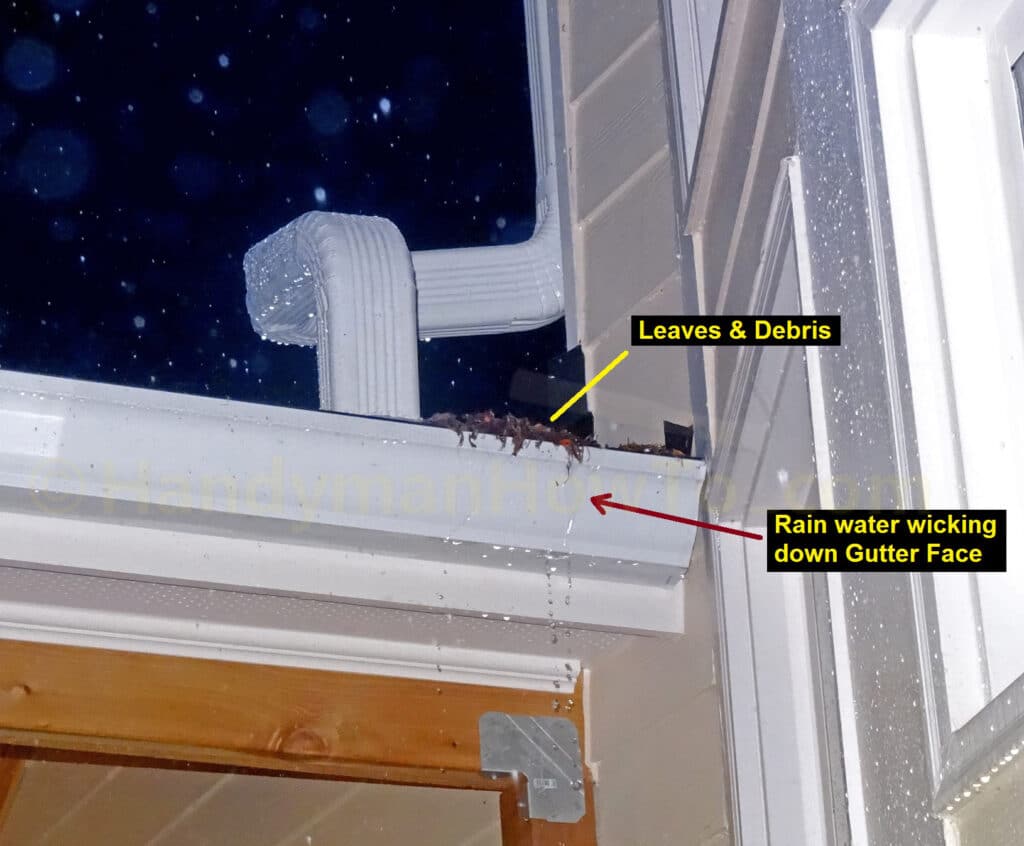
The Rhino guard doesn’t overflow at the roof valley when it’s clean.
Cleaning the Rhino Gutter Guard
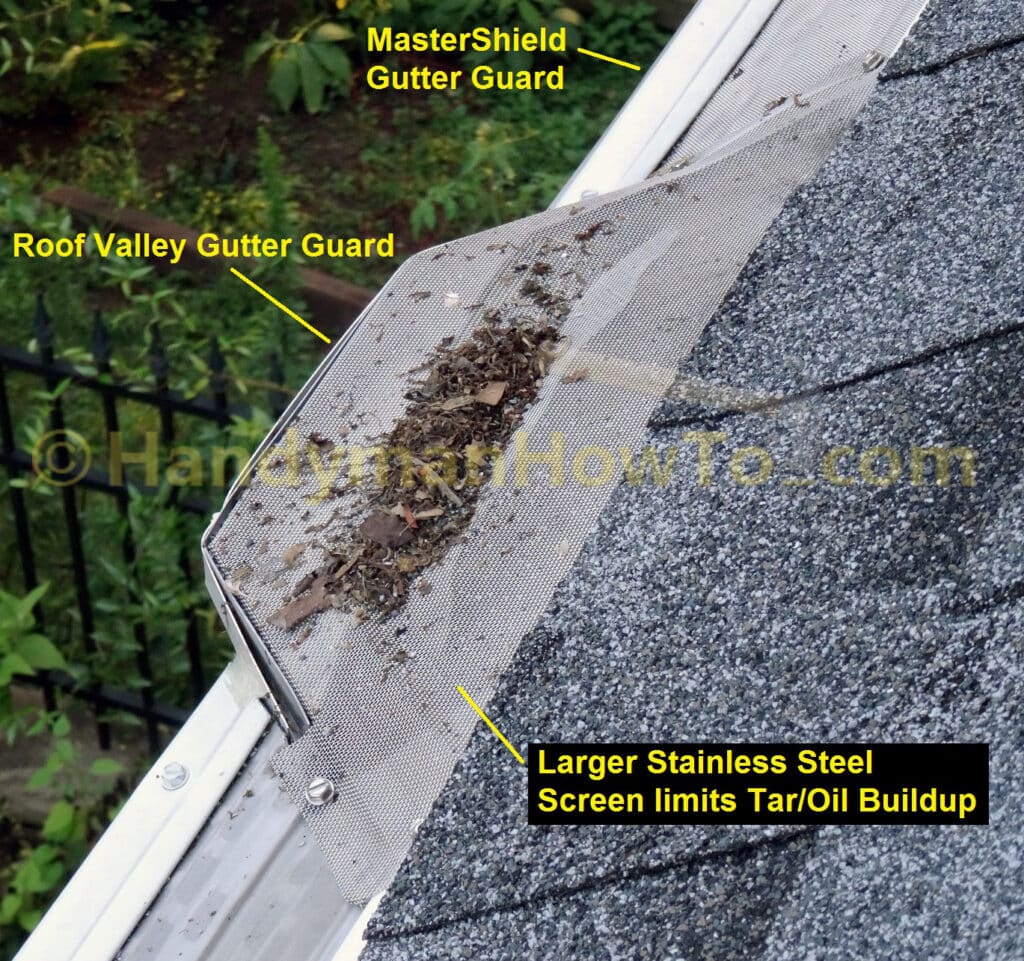
A normal gutter guard really shouldn’t be used below a roof valley because so much debris washes down and clogs the system. A better solution is a Rhino Miter or similar product such as this installed one by my MasterShield dealer which has never clogged. This valley gutter guard uses a coarser screen and large catch basin which keeps out the shingle granules and the tar buildup is minimal:
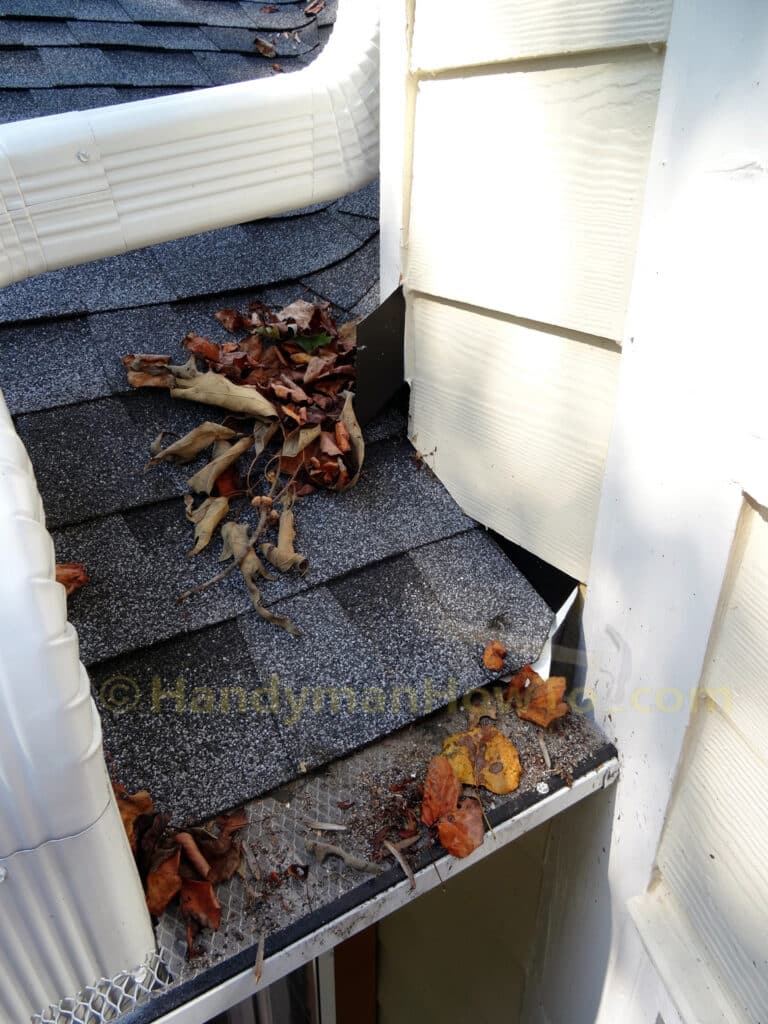
The overflow at this roof valley splashes against the house wall & windows and the Rhino guard requires frequent cleaning. I plan to have a valley guard or miter installed here:
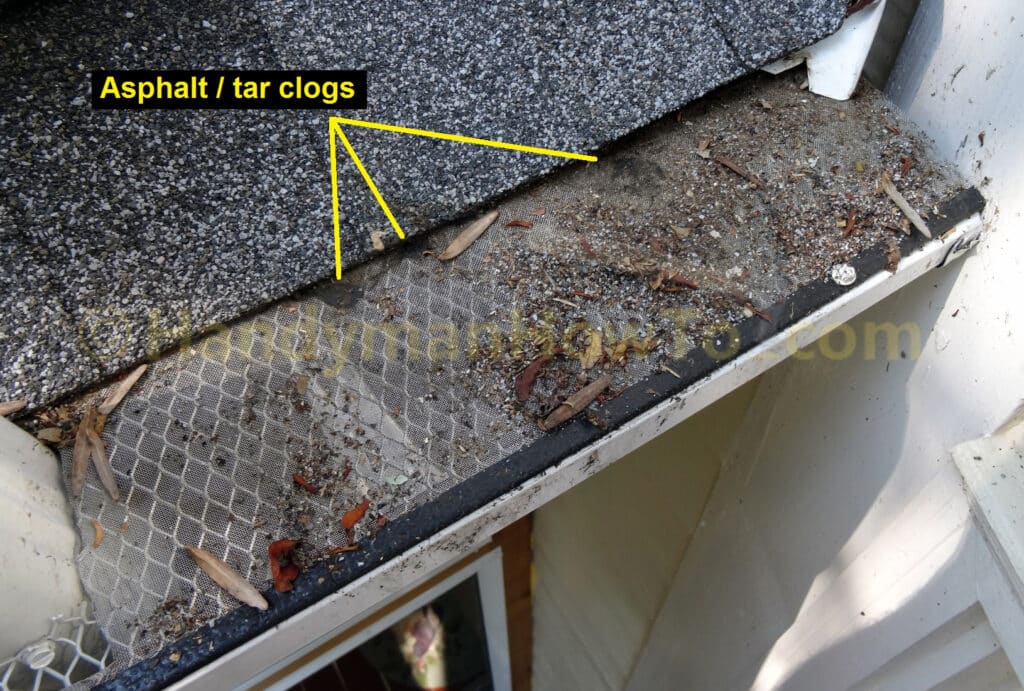
My roof was replaced in 2012 and the shingles leach tar and oil all year round. The tar builds up on the micro mesh and clogs the screen. Both MasterShield and Rhino know about this issue and it’s explicitly excluded from the no-clog warranties. See the Rhino “Customer Obligations for Proper Care/Maintenance” in the warranty for cleaning advice.
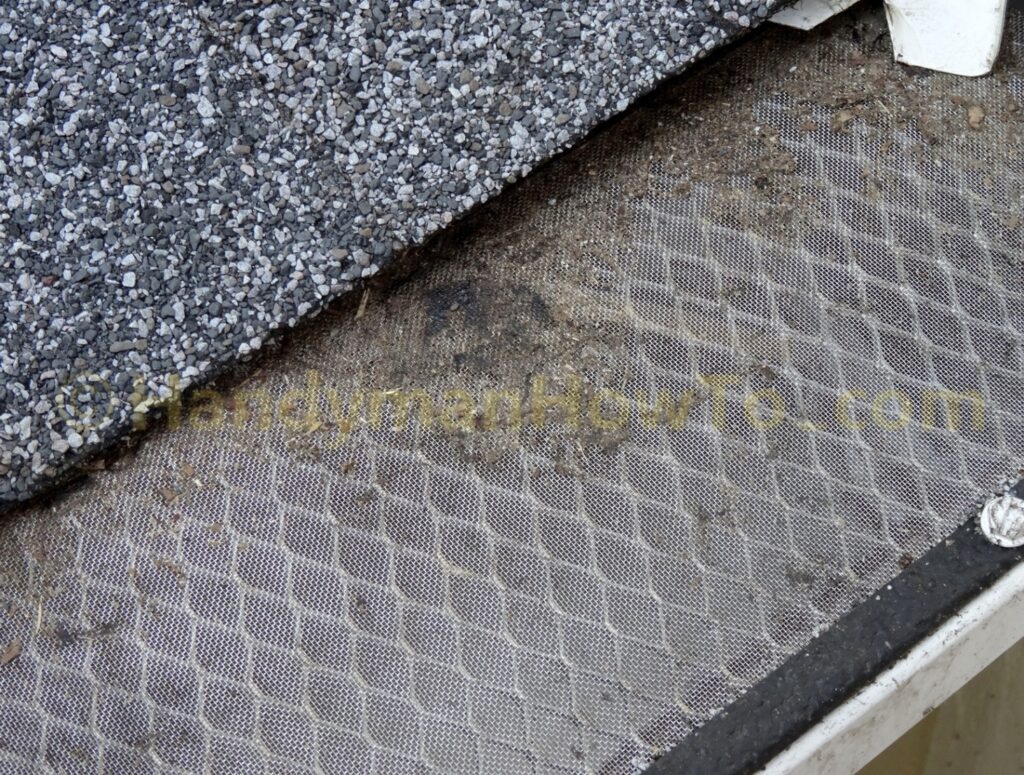
Closeup view of the tar and fine debris:
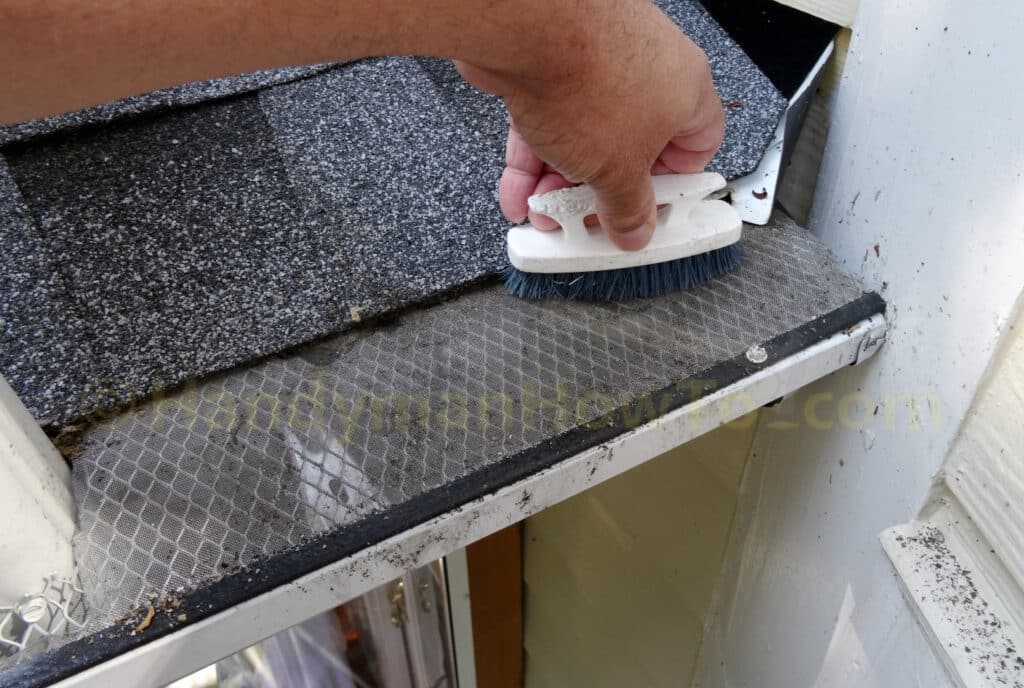
Use a brush to remove the fine debris:
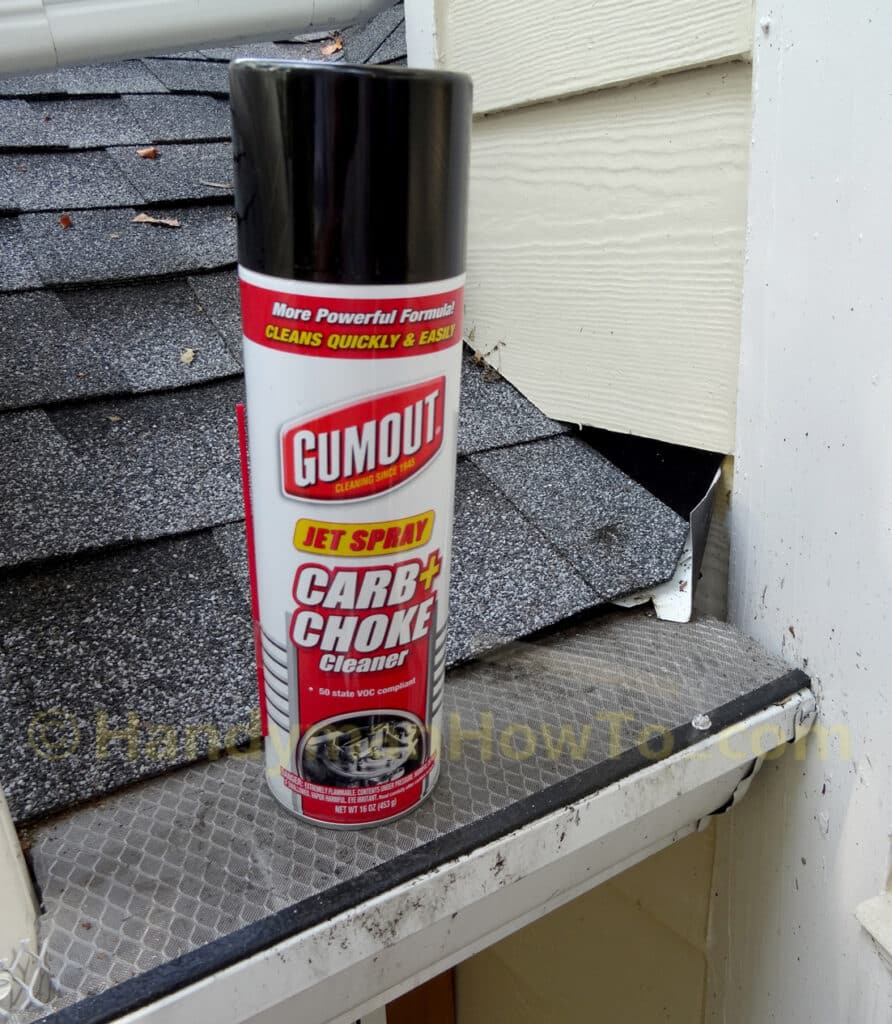
I prefer carburetor cleaner instead of mineral spirits to remove the tar and oil:
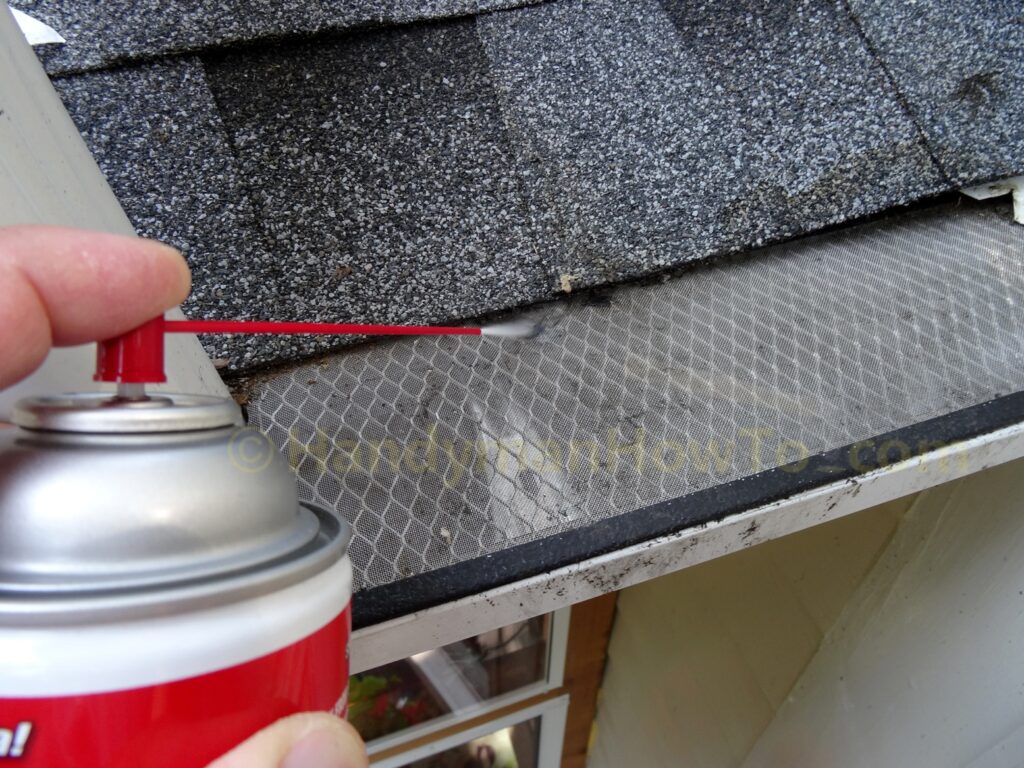
Remember – No Smoking because the carburetor cleaner is extremely flammable. Just spray on the carburetor cleaner and wipe off the tar with paper towels. The tar comes off right away and the carburetor cleaner dries in seconds:
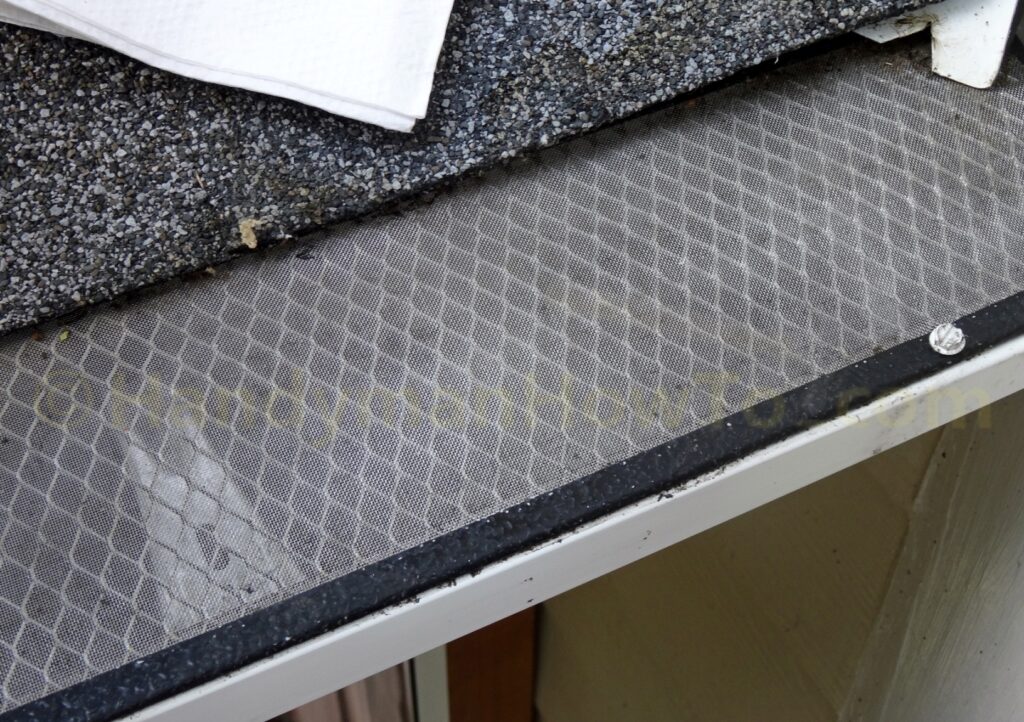
The Rhino guard is clean and good as new:
Take care,
Bob Jackson
I recently had Rhino gutter guards installed and they installed them incorrectly as well. Would you be able to email me a copy of the gutter guard install manual? Thank you.
Hi Michael, here is one instructions manual that is available online. There may be others, as well, depending on what products you have exactly. I would contact the support team at Rhino here to get what you need.
Mr. Elder, thank you for your reply. The link you provided is for a car mount though. But I’ve reached out to the Rhino company and am awaiting a response.
Thank you.