This series continued from How to Install a Panasonic Network Camera – Part 2.
Now I’m ready to connect the camera to the network and configure the camera.
Panasonic Network Camera Customer Support
The Panasonic Global Support web site has the complete documentation and firmware for all Panasonic network cameras.
Panasonic’s Toll Free Phone Support at 1-800-211-7262 was a pleasure. My call was answered by a USA-based technical support rep. in only a few minutes who was very knowledgeable, knew the answer to my question and was patient with me on the phone. I was given a case number in case I needed to call back with a follow-up question.
Panasonic Network Camera Hookup
A printed copy of the Camera Hardware Installation Guide is well written and includes detailed illustrations showing how to connect the camera to the network.
My network has several indoor (model #BB-HCM511A) and outdoor (model #BB-HCM531A) cameras with Power over Ethernet (PoE) connections. I chose the PoE capable cameras to simplify the wiring because Cat5e cable provides both power and data. The indoor cameras are connected PC speakers for 2-way audio as shown here. (Click on the image for a full size view.)
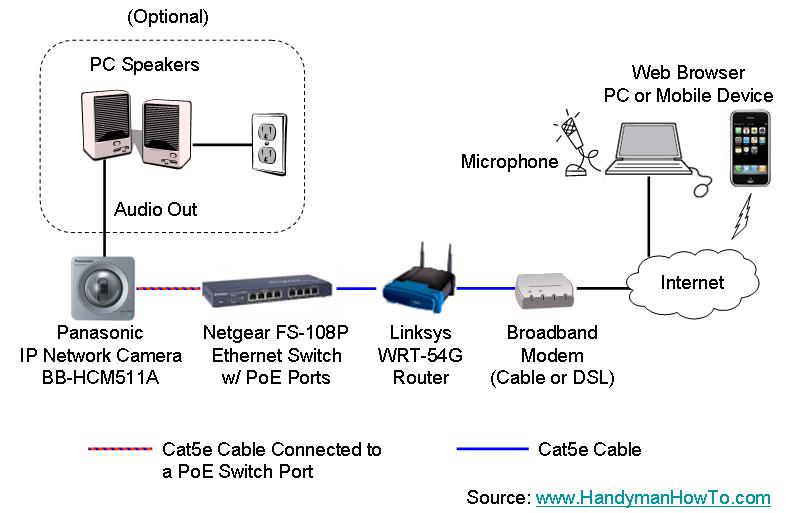
Proceed to the next step after the cameras are plugged into the network.
Tip: Bench Configuration
It’s a network camera so it doesn’t matter where the camera is plugged into the network. Don’t bother with installing new Ethernet jacks or climbing ladders to mount the camera. Just put the camera on the table next to you and plug it into the PoE ethernet switch with a 6 foot Cat5e cable. This way you can push the camera buttons, check the status LED and make cable connections with ease.
After you’ve bench configured the camera, it will retain it’s operating configuration when you unplug it and move it to its permanent location.
Camera Network Discovery & Basic Configuration
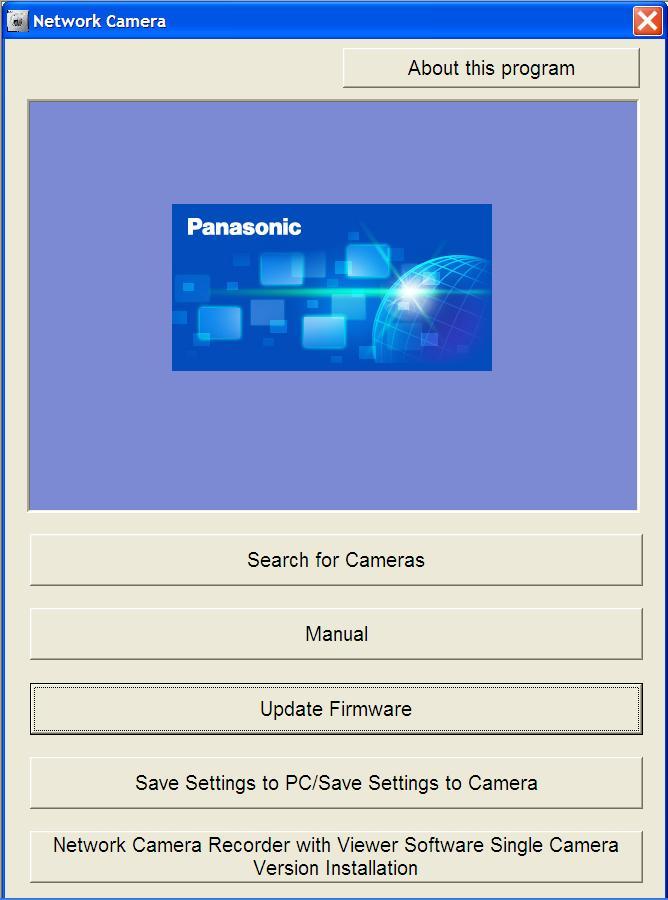
Follow the instructions in the camera Setup Guide to find the camera on the network, configure a login password and enable Internet access. The Setup Guide is easy to follow and I won’t repeat those instructions here. The Setup.exe program will run automatically when the Panasonic Network Camera CD is inserted in the disk drive.
Camera Audio: Web Browser Compatibility and Active-X Audio Control
The Camera Audio Notes, FAQ and Troubleshooting page at Panasonic Support is an excellent reference for using the camera’s audio features.
Microsoft Internet Explorer: Audio Controls
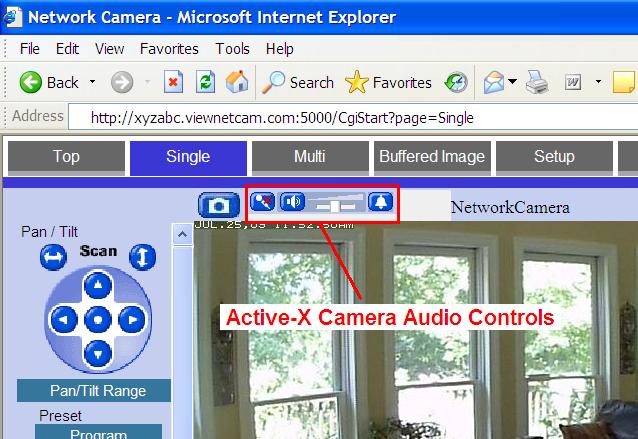
When you first access the camera with Internet Explorer, it should automatically download the Panasonic Active-X audio control.
Advanced Network Camera Configuration
At this point your network camera should be viewable over the local LAN and Internet. Next I will cover advanced camera setup topics like setting the time server, recording images to the SD memory card, port forwarding and configuring a static IP address. These topics are and much more are covered in the Operating Instructions on the CD ROM.
Panasonic Camera Dynamic DNS Configuration
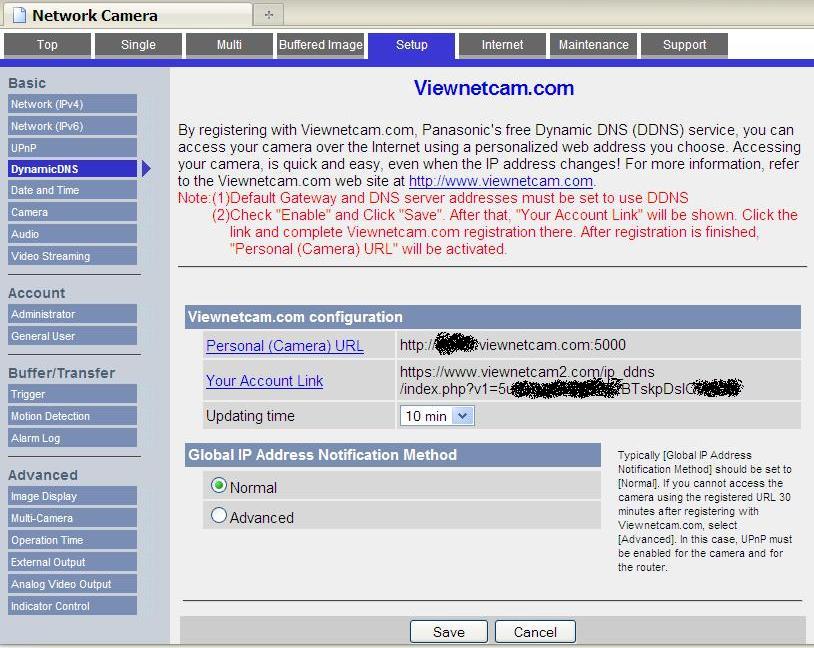
Page 2 of the camera Setup Guide guides you through the free Viewnetcam.com Dynamic DNS configuration. I use Viewnetcam.com and it’s worked well for me. You cannot register for a Viewnetcam.com account directly, it can only be initiated by the Camera Setup menu; this ensures the service is used only by Panasonic IP Network Cameras.
If you haven’t already registered for a Viewnetcam.com account or want to use your own DDNS service, such as DynDNS.com or TZO.com, you can set it by clicking Setup → DynamicDNS.
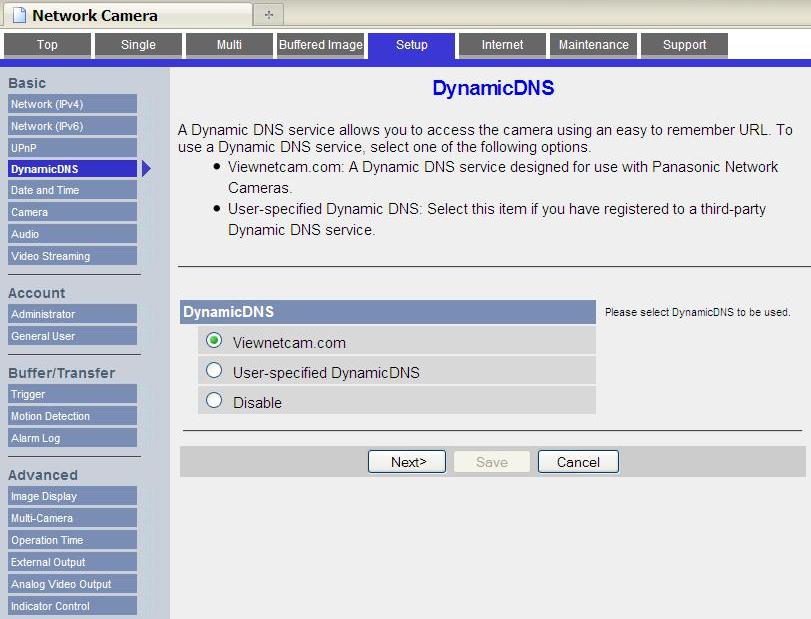
Checking the Viewnetcam.com radio button and clicking Next will take you through the setup wizard and forward you to the Viewnetcam.com web site to complete your account setup. When your Viewnetcam.com account registration is complete, your personal camera URL and Account Link is displayed in the camera menu.
Configure a Custom Dynamic DNS Service
If you already have a DDNS account with DynDNS.org or another service provider, life can be simpler if you reuse that account. Note: The camera will reject web access attempts from a DDNS host name if it’s not configured in the camera as security measure with this error message:
Failed to access.
Try and access again with registered camera Host Name.
To configure a custom, or user-specified Dynamic DNS service, click Setup → DynamicDNS Setup → User-specified DynamicDNS and enter your DDNS account information.
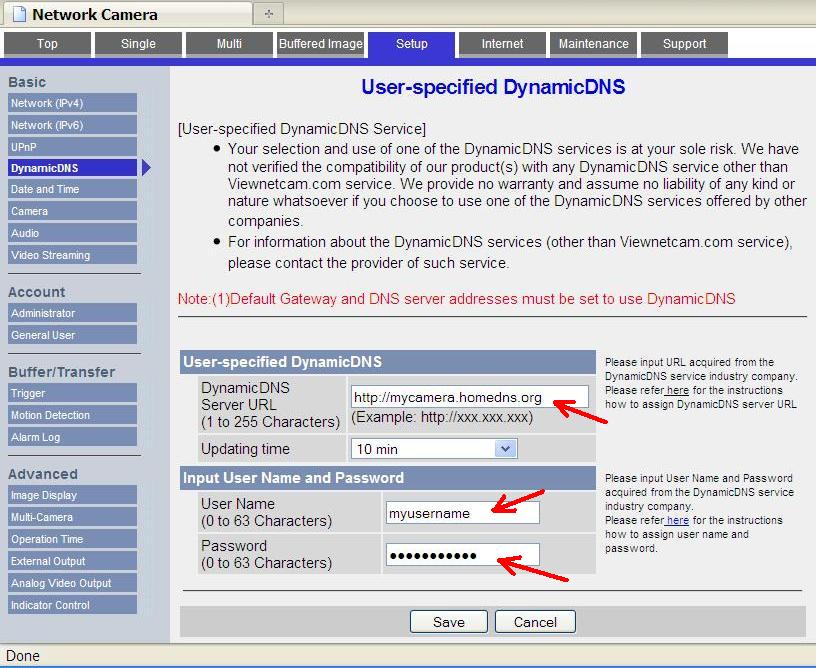
If you need to create a Dynamic DNS account, see the DDNS instructions in this tutorial.
Static IP Address and Port Forwarding Configuration
If you’re having problems with the automatic network configuration and/or Universal Plug and Play (UPnP), configuring a static IP address usually solves the problem.
Choosing a Static IP Address
To configure a static IP address, first take a look at your router to select an unused IP address and port number. I have a Linksys WRT-54G WiFi router.
Login to the Linksys administrator web page. The default Admin page URL is http://192.168.1.1, however I’ve change my router IP address to 192.168.2.1.
Go to the Setup → Basic Setup web page to check your DHCP address range. Click on the image for a full size view.
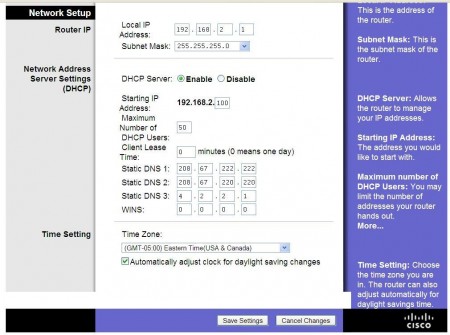
The DHCP dynamic IP address pool here is the range 192.168.2.100 to 192.168.2.149.
Aside: The ending DHCP IP address is calculated by 149 = 100 (starting IP) + 50 (max # of users) – 1.
The static IP must be chosen outside of the DHCP range. I choose to assign the camera 192.168.2.253 as it’s well above the last .149 DHCP address.
Note: You cannot use the first (x.x.x.0) and last (x.x.x.255) IP addresses in an IP address range because these are the default host and broadcast addresses, respectively, for the subnet.
Go to the Applications & Gaming → Port Forward Range page. Enter the following values:
- Name for the Application so you’ll know what this is for; e.g. NetCam1
- Start and End Ports: 5000 and 5000
- Protocol: Both
- IP Address: 253 for the 192.168.2.253 static IP address we chose for the camera.
The static IP addresses and port numbers for the other cameras are shown here, too.
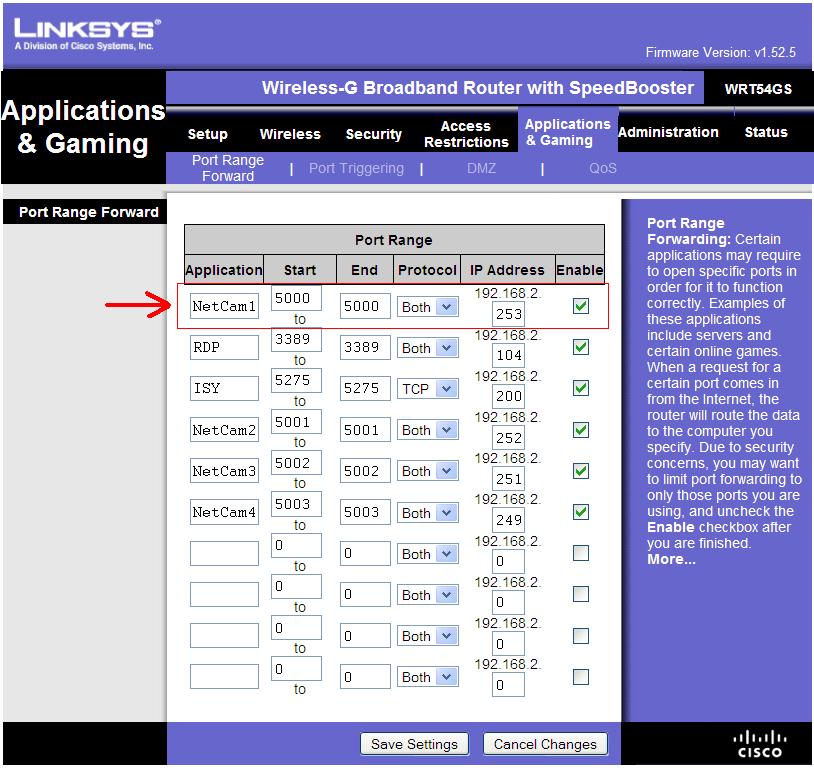
Write down the static IP address (192.168.2.253) and port number (5000) for the camera – or print the web page.
Click Save Settings and exit the web browser.
Camera Static IP Address Configuration
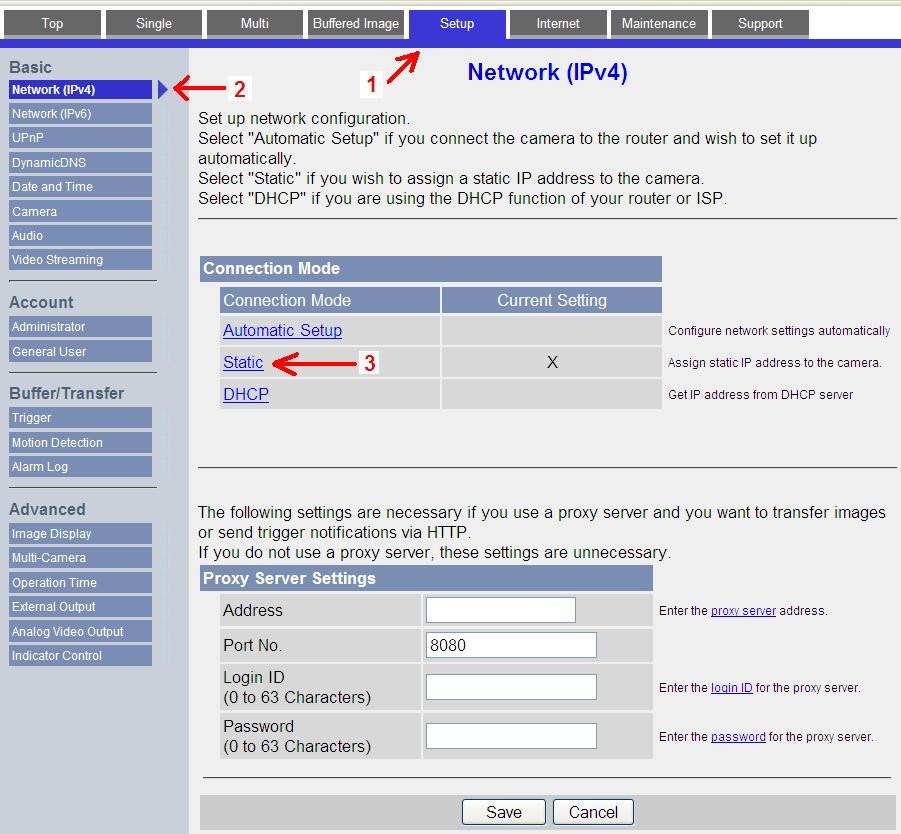
Next, open the network camera web page. Click Setup → Network (IPv4) → Static menus as shown here:
The Static IP Address Configuration web page is displayed. Enter the static IP address and Port Number that were configured in the Linksys router.
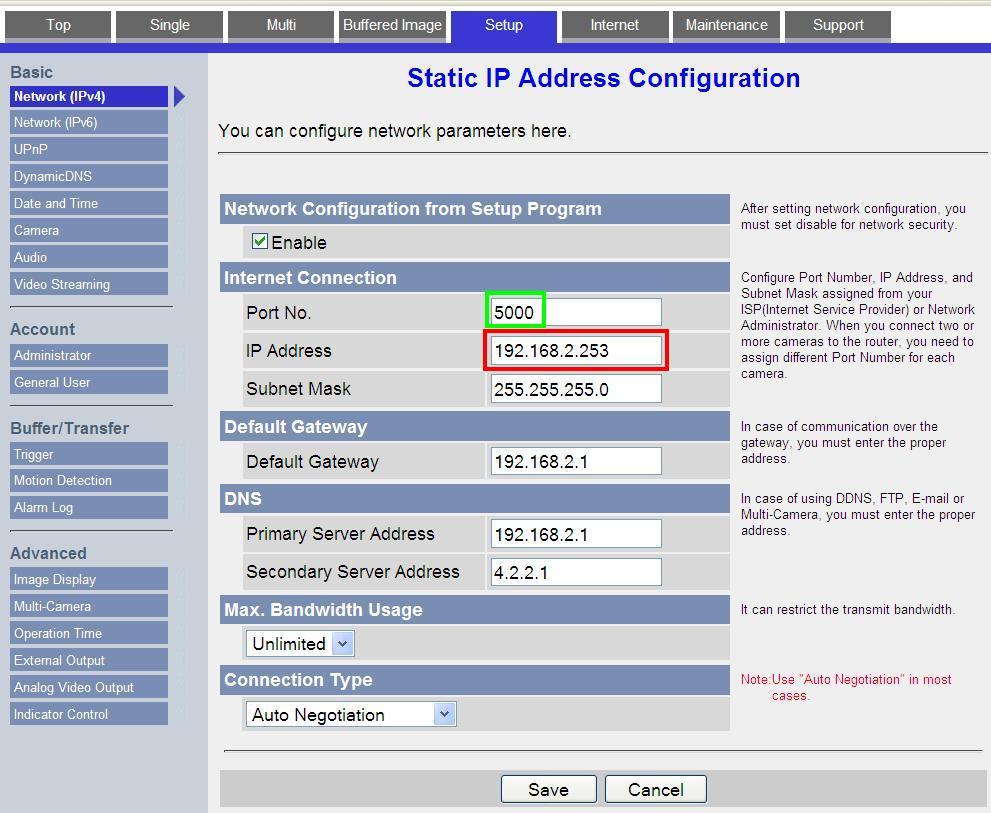
The Default Gateway and Primary DNS Server should already be set to the IP address of the Linksys router. I set the Secondary DNS Server IP address to Level 3 Communications at 4.2.2.1.
Click Save.
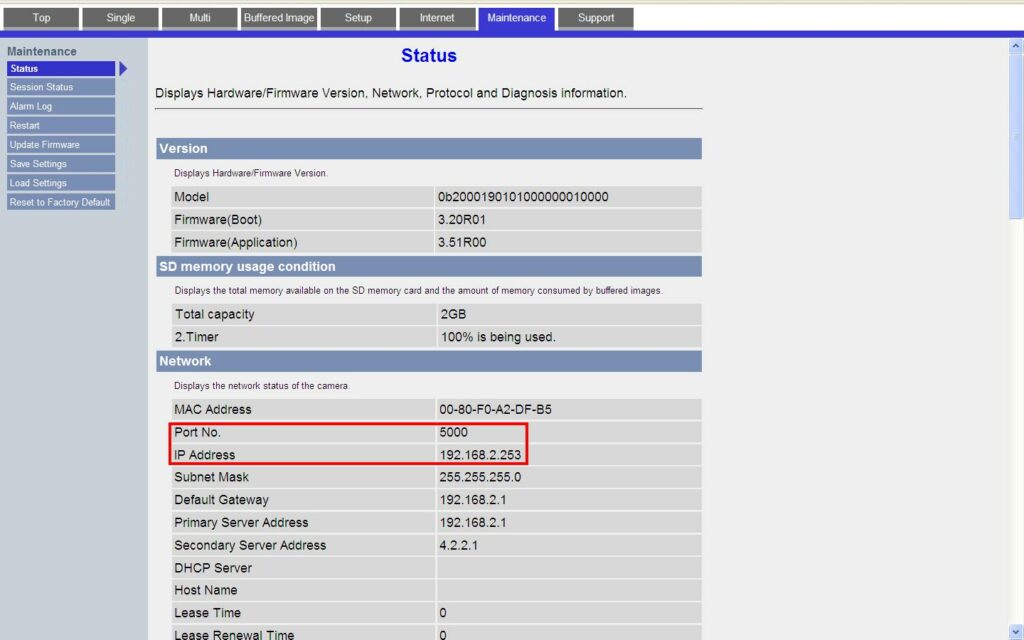
Confirm the camera’s static IP address by clicking on Maintenance → Status and confirming the Port No. and IP Address as shown.
Scroll down on the Status page to see the Camera IP Address and Viewnetcam.com Dynamic DNS URLs.
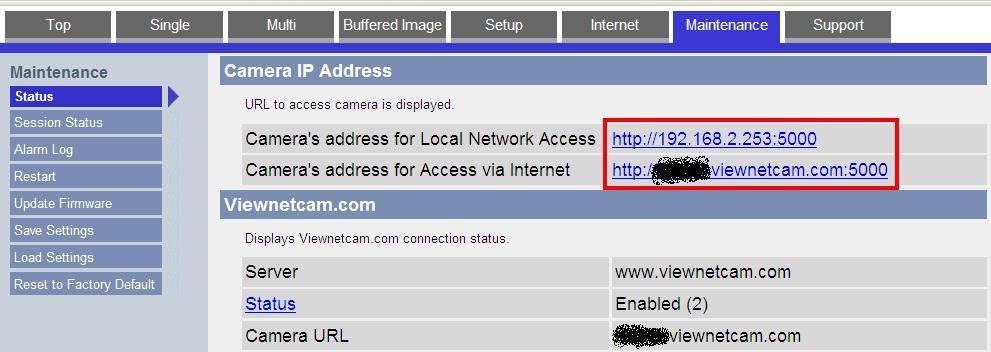
Test the Local Network Access URL and Viewnetcam.com URL to make sure both are working. The static IP address configuration is now complete. Be sure to bookmark each and write down the URLs, Static IP Address and Port Number.
This series is continued in How to Install a Panasonic Network Camera – Part 4.
Hope this helps,
Bob Jackson