The wood deck ledger board flashing is replaced by tearing off the lap siding and installing new flashing to complete the deck rebuild. This project is continued from How to Replace Wood Deck Boards.
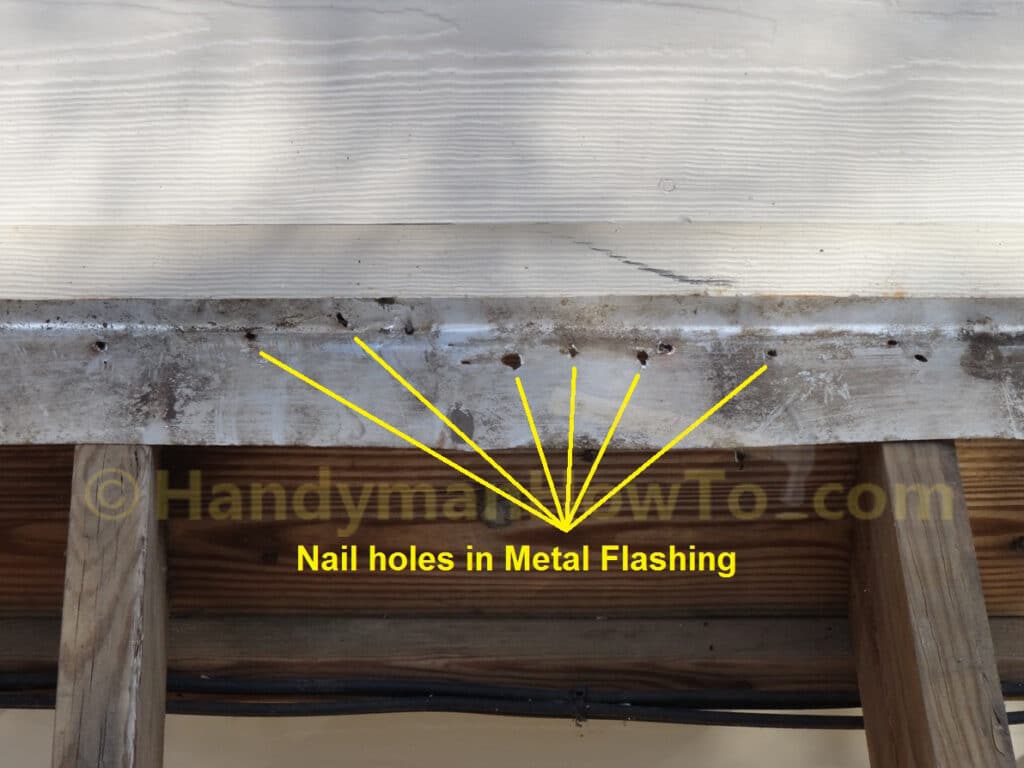
Nail Holes in Deck Ledger Flashing
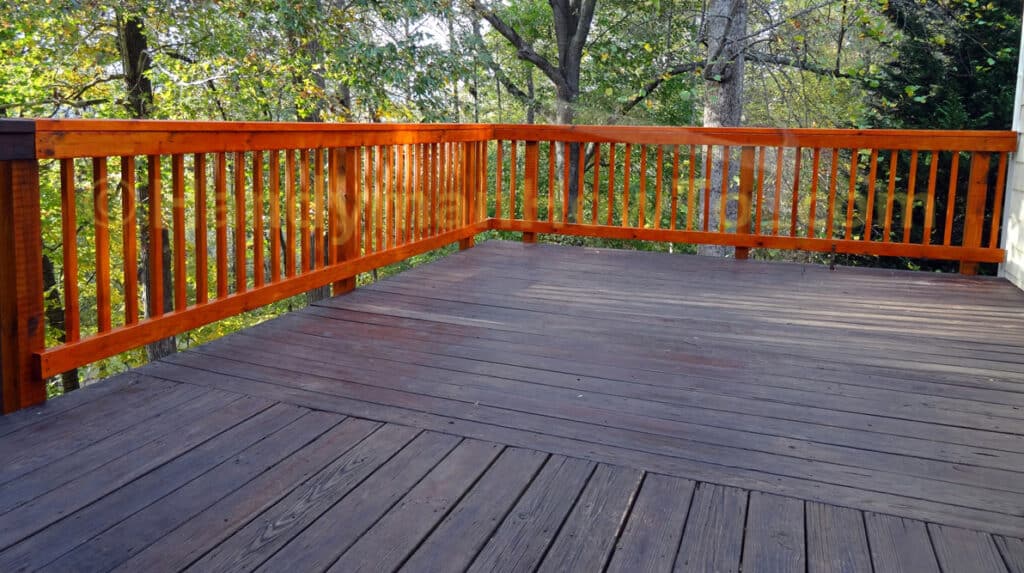
The home builder incorrectly installed the deck boards parallel to- instead of 90 degrees across the joists at the deck addition:
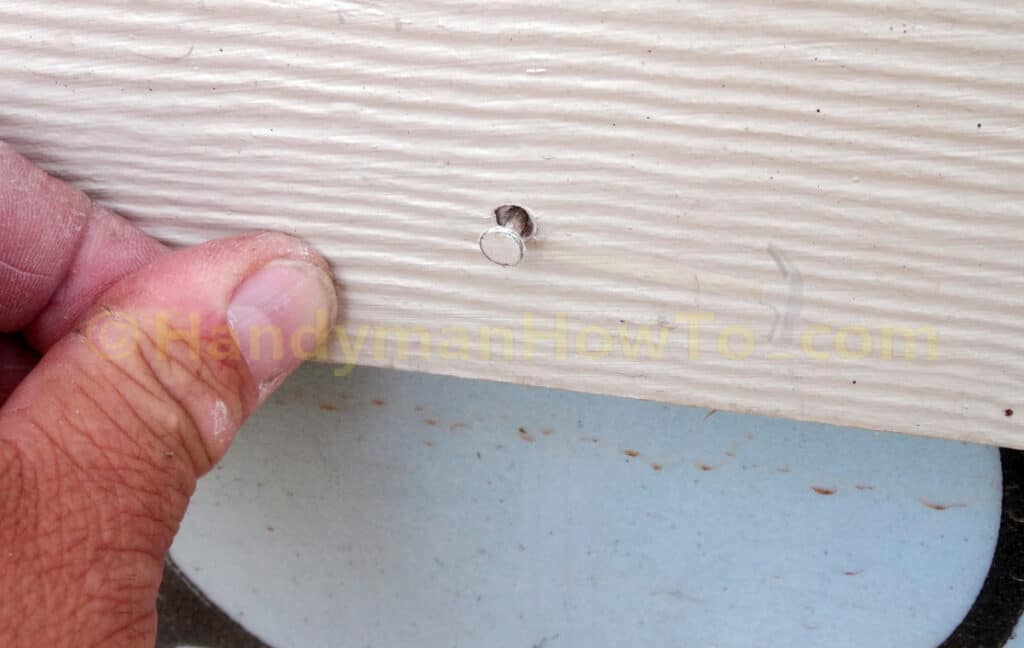
The deck boards were nailed through the ledger flashing making holes that leak and rot the ledger board. This defeats the purpose of the ledger flashing. The ledger board is critical structural element that connects the deck to the house and collapsed decks are often caused by ledger board failure.
How to Replace Deck Ledger Flashing
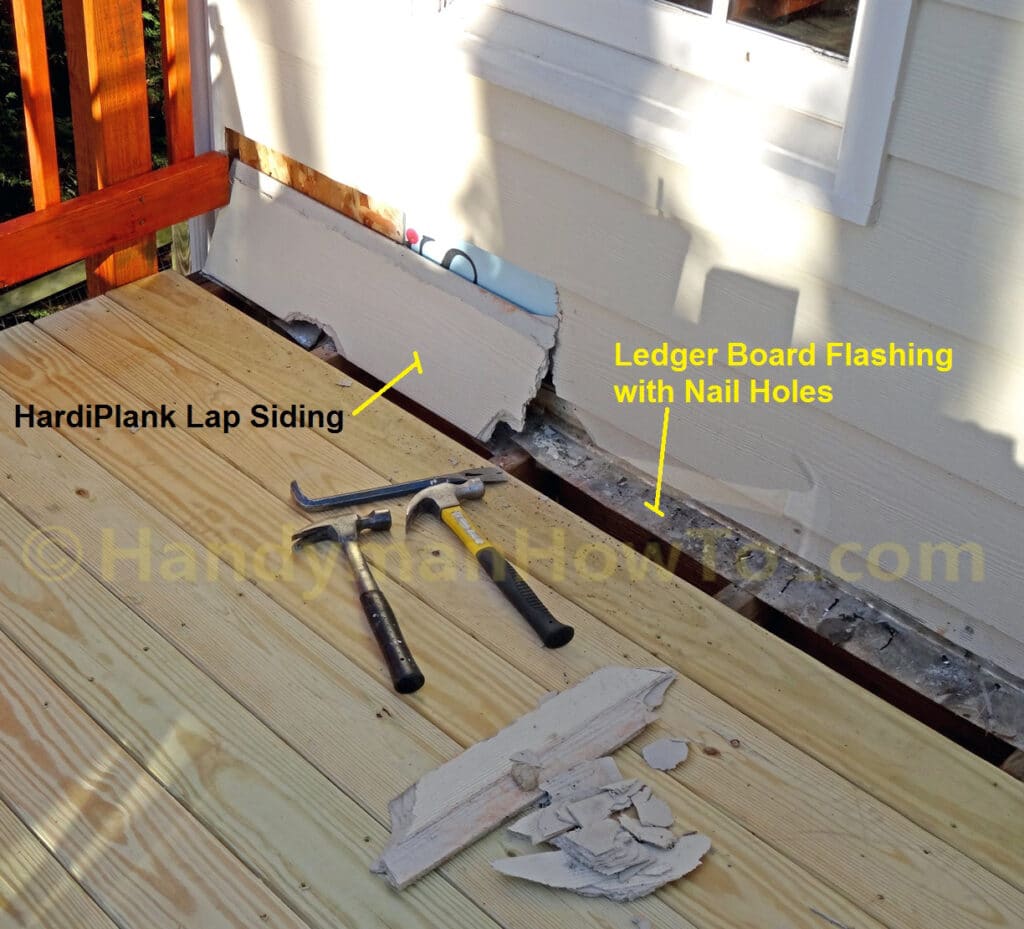
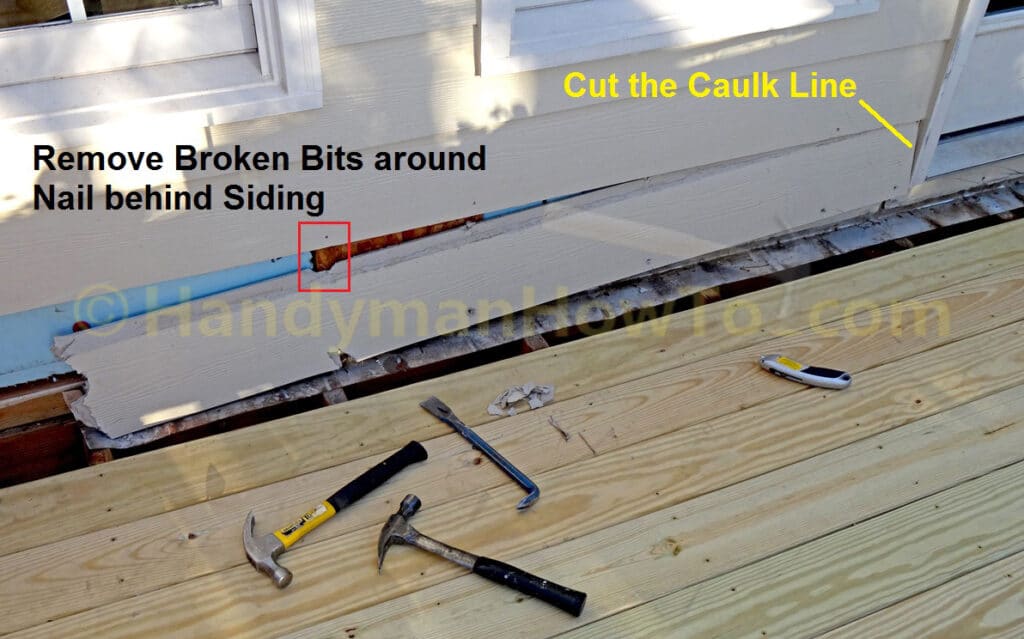
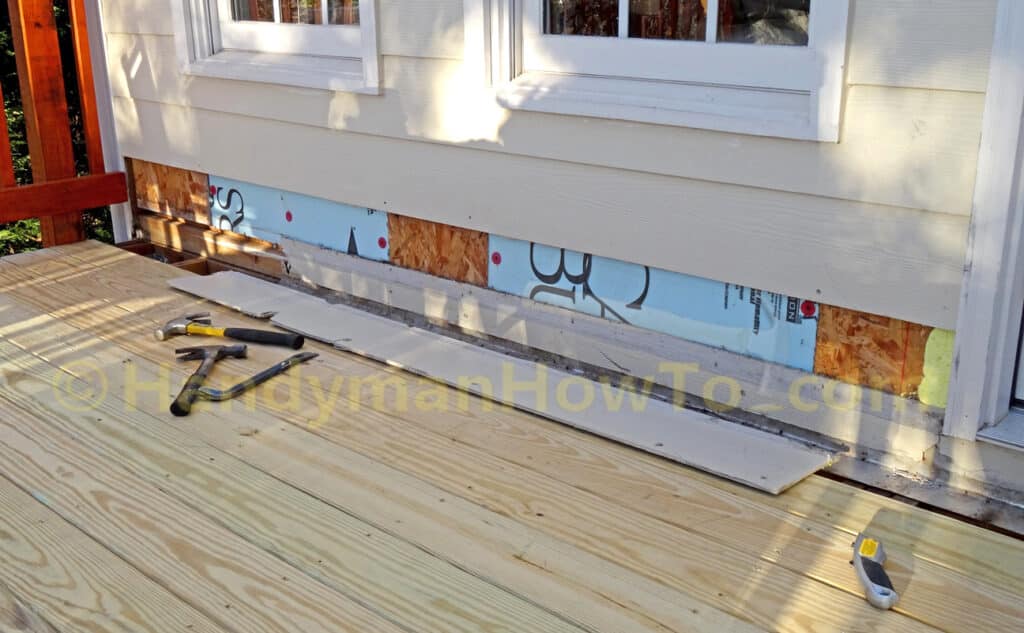
Remove the HardiPlank Lap Siding
The Georgia Amendments Prescriptive Deck Details based on the 2012 International Residential Code on page 9 “continuous flashing with drip edge”; also see Figure 14 on page 10 for the flashing diagram. Because the ledger flashing is nailed to the wall behind the HardiPlank lap siding, I had to tear off the siding to replace the flashing. There’s no elegant way to remove the HardiPlank without destroying it:
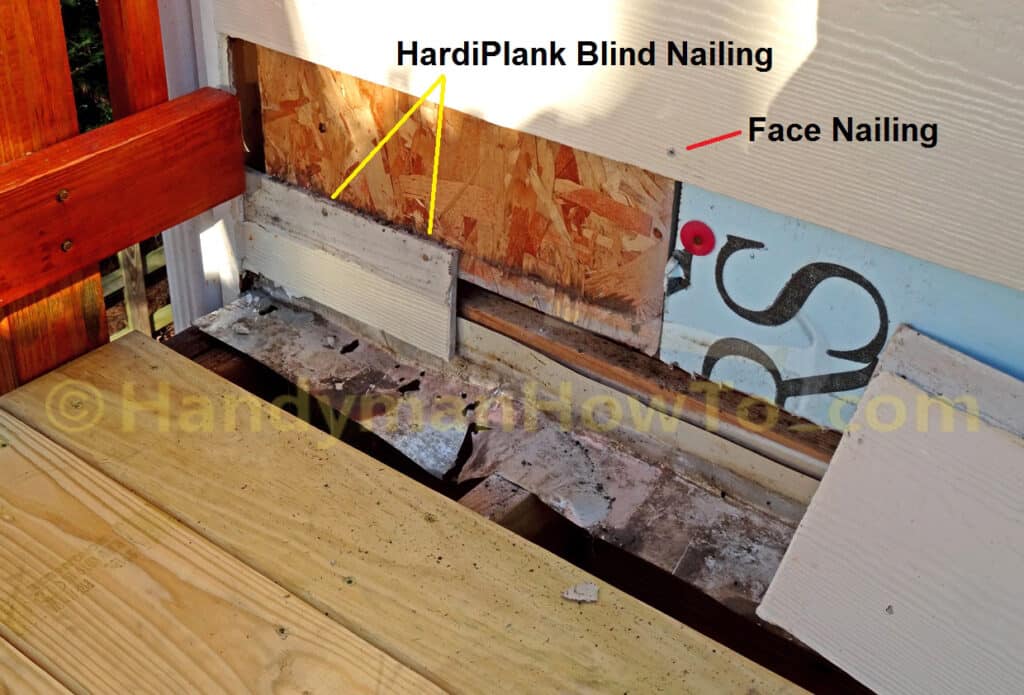
The HardiPlank is blind-nailed except the for the 3rd course which is face-nailed. This is good because I can remove the face nails without damaging the siding:
The HardiPlank siding is wiggled and pulled to break it off at the nails. It’s slow grunt work to avoid damaging the upper row of siding. Slip your fingers under the siding to remove the pieces on the nail shank:
Then press the HardiPlank inward to expose the face nail to pull it out with the claw hammer:
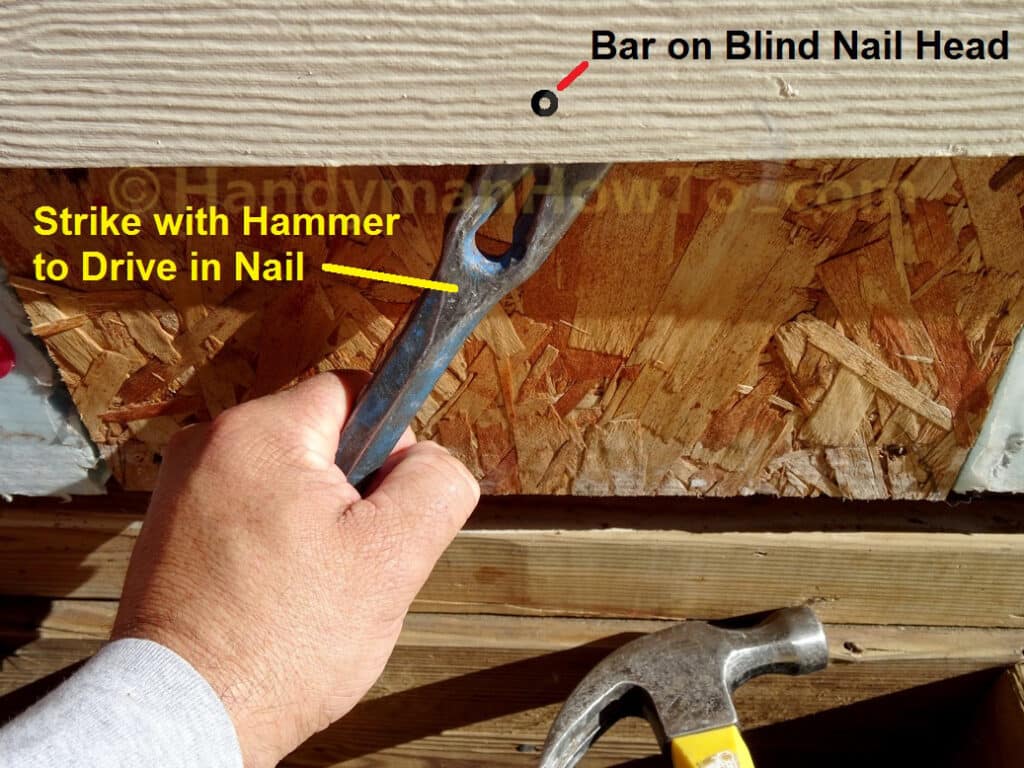
The siding was blind nailed in places and there’s no way to pull out a hidden nail. If left alone, the blind nail protrudes and will block installation of the new siding. The solution is to drive the nail all the way in so it’s flush against the wall. Place the flat end of the pry bar on the hidden nail head, then strike the bar with the hammer to set the nail:
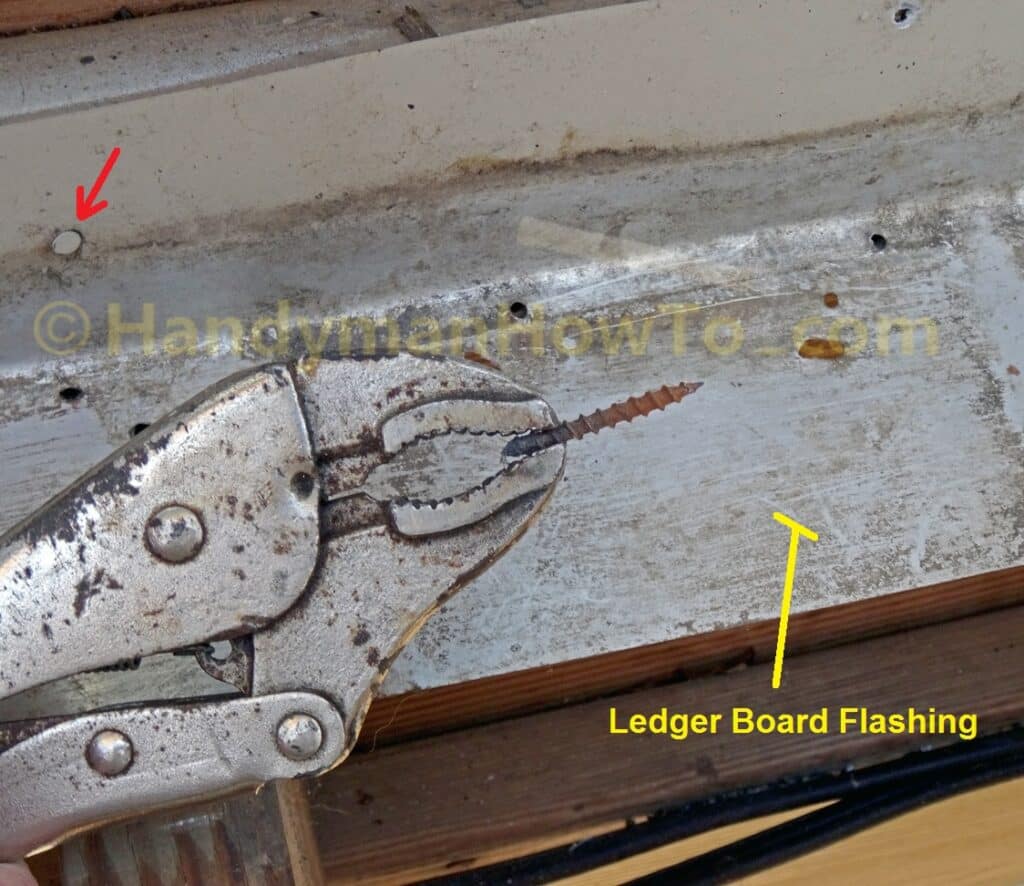
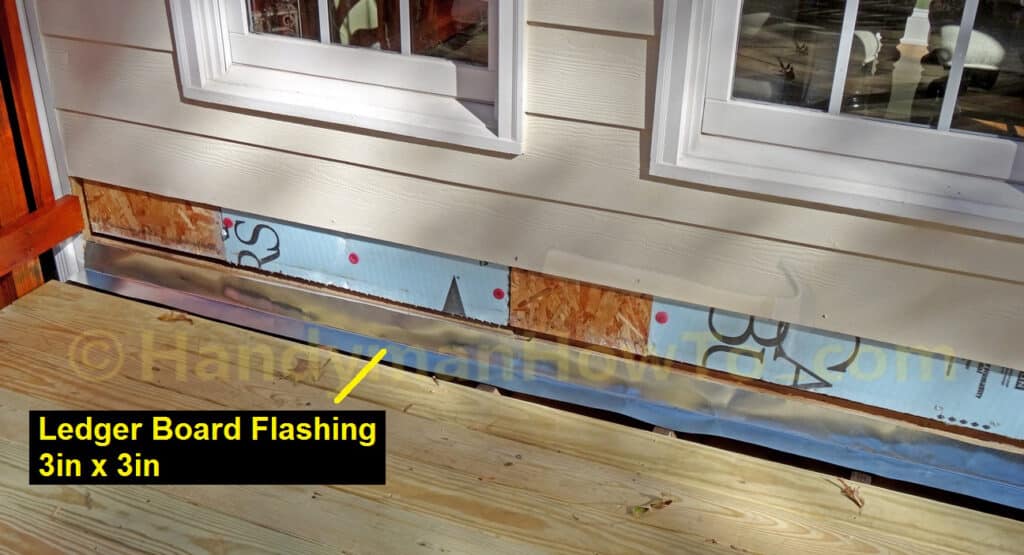
I removed the occasional rusted and broken screw or nail with vice grips. This worked well to clamp down on the shank and turn it out. Note the red arrow pointing to a nail used to tack the ledger board flashing to the house. The flashing also lacks a drip edge as required by the current deck building code:
Finished pulling off that upper course of siding:
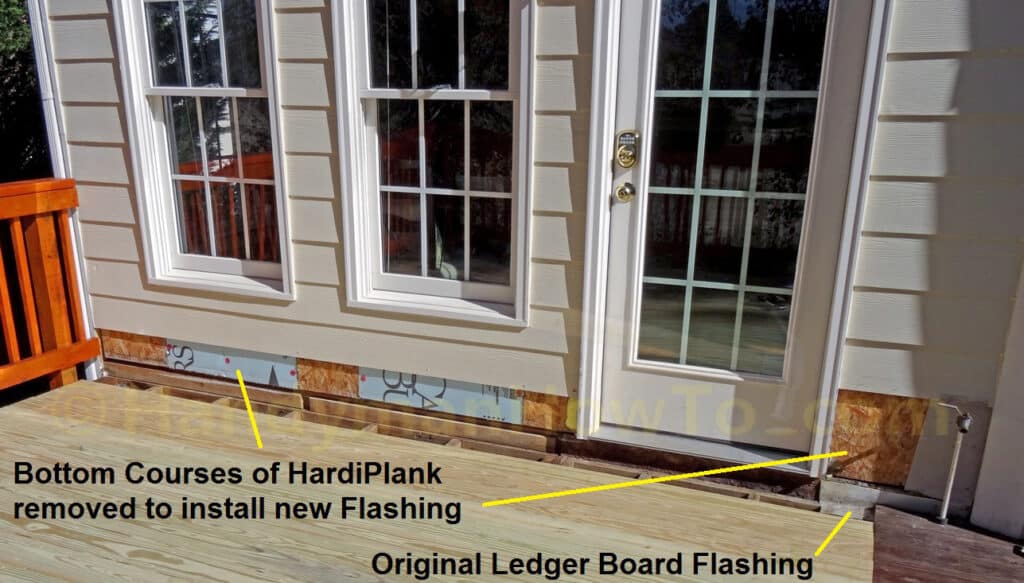
Closeup of the ledger board, old flashing and HardiPlank siding in the following photo. I’ve torn off the section of old flashing to the left. Fortunately the ledger board was in very good condition with no signs of rot. The eaves and gutters overhang the deck by about 16 inches which protected the ledger board from the most of the rain.
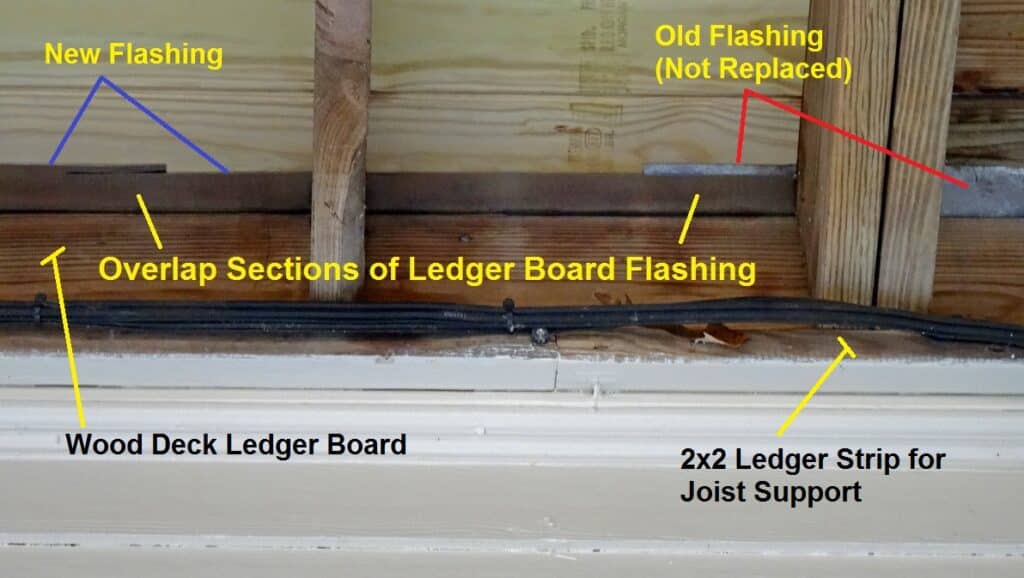
The siding removal is complete. It’s necessary to leave a section of the original ledger flashing in place to overlap with the new flashing (right side of photo):
How to Make Custom Deck Ledger Flashing
Because my ledger board extends only slightly beyond the wall sheathing, factory made deck ledger Z flashing won’t fit as illustrated in the ledger diagram by Building Science Corp.
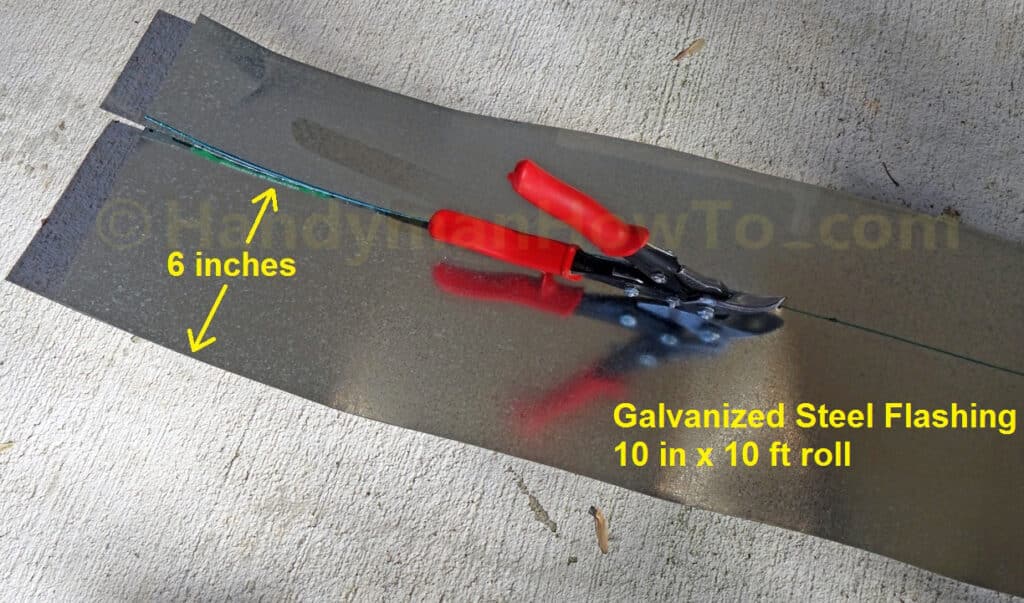
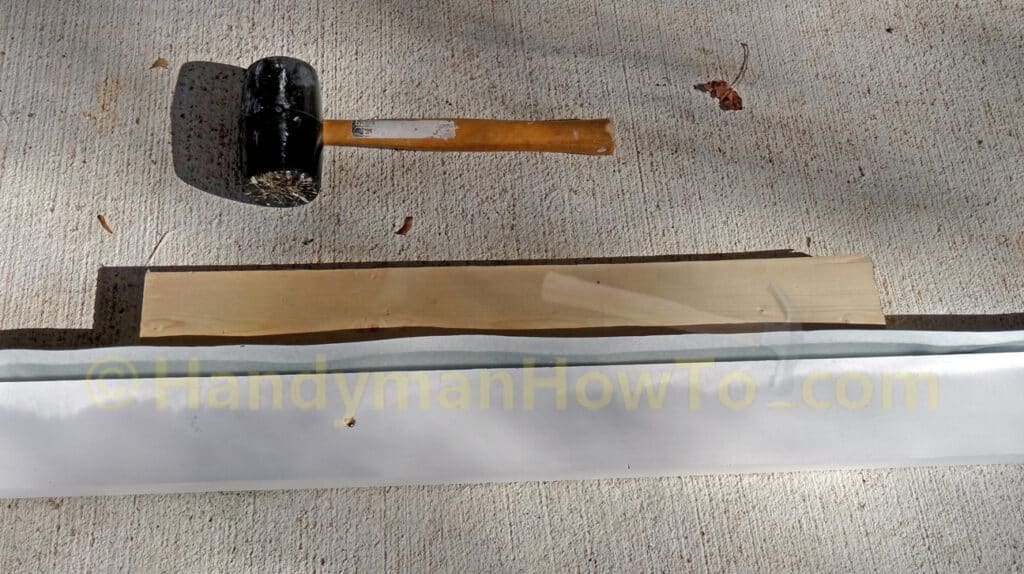
I custom made deck ledger flashing by purchasing two rolls of 10 in x 10 ft galvanized steel valley flashing and cut it with tin snips to make a strip 6 inches wide:
The 6 inch wide by 10 feet long section of roll flashing is bent at 90 degrees in the middle with a rubber mallet, 2×4 board and 8 foot composite (i.e. white plastic) 2×4 for a simple sheet metal brake. The composite 2×4 has sharp corners for a crisp bend, however a kiln dried wood 2×4 will also do. I worked my way along the roll flashing hitting the 2×4 with mallet to make the bend:
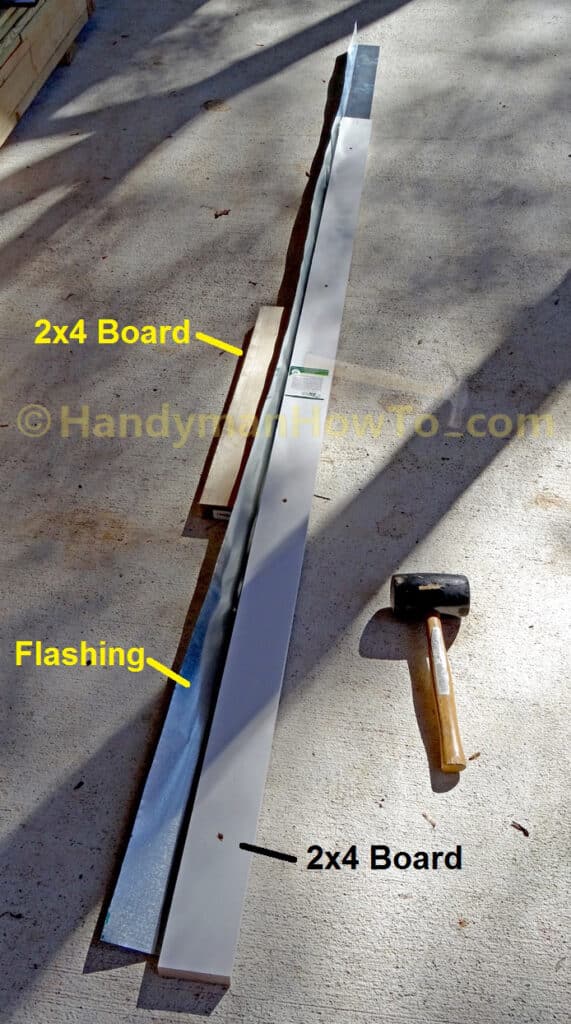
The mallet and 2×4 sheet metal brake worked well:
The custom ledger board flashing fits nicely. I’ll saw the new HardiPlank siding boards, then tack the flashing to the wall:
Saw New HardiPlank Lap Siding
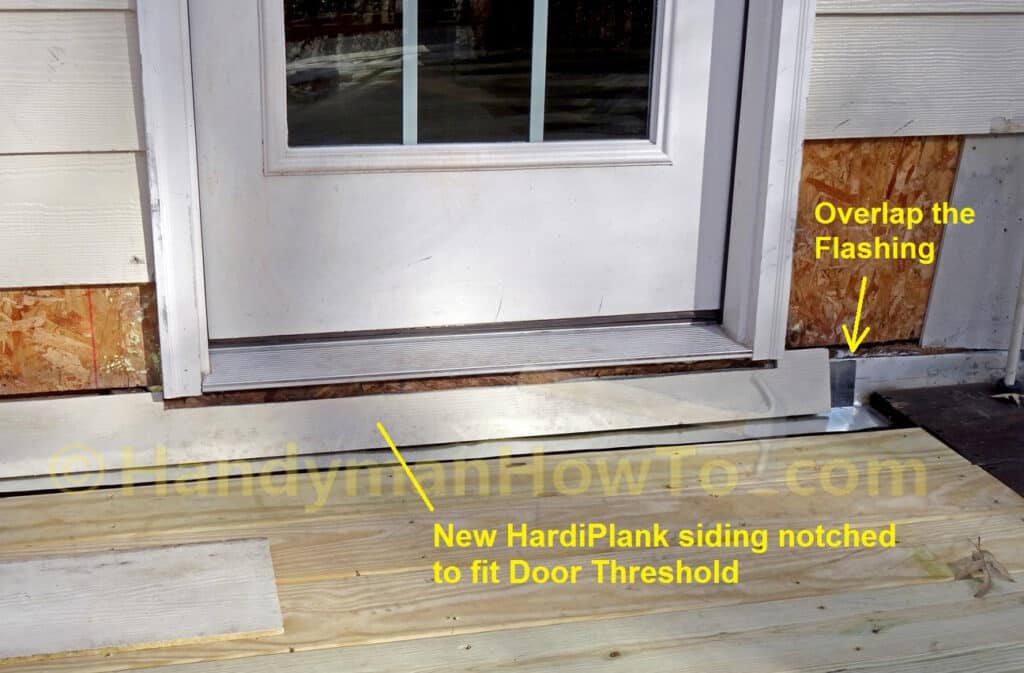
I had several HardiPlank siding boards left over from the re-roofing job and use those to replace the siding. The only tricky part was notching the HardiPlank fit under the door threshold. Notice how the new ledger flashing will overlap the old flashing:
Before installing the new flashing and siding:
- I brushed three coats of Copper-Green Brown Wood Preservative on the ledger board and deck joists to treat the nail holes and wood to prevent rot. Notice the darker areas on the wood in the following photo.
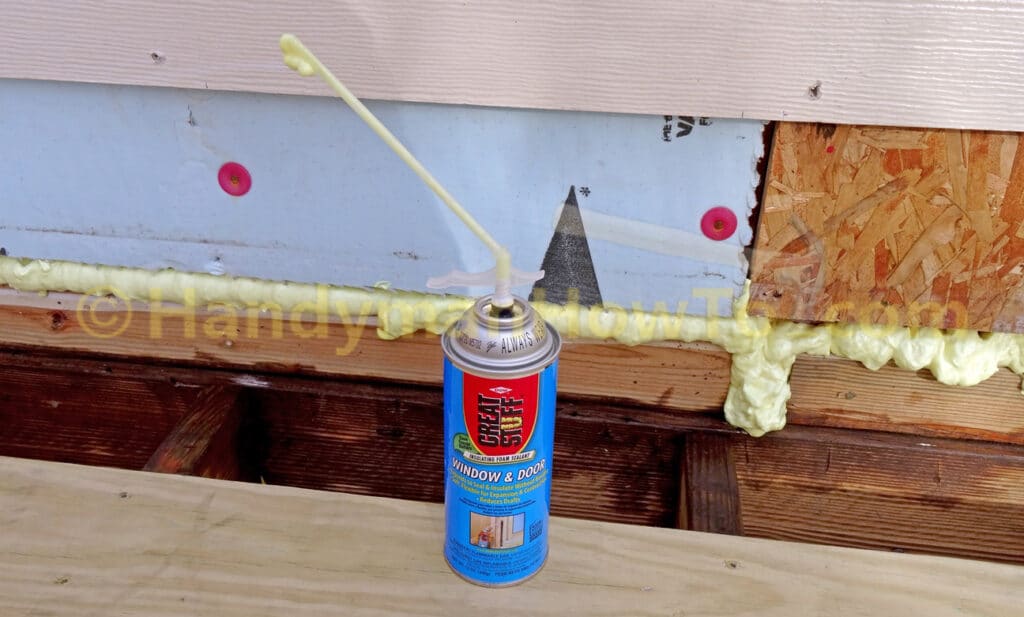
- Filled the large framing gaps in the house wall with GREAT STUFF Window & Door foam sealant.
Window and Door sealant is a minimal-expanding foam that won’t push out the flashing and bulge the siding. Wait a couple of minutes for the foam to fully expand – but not harden – before proceeding.
Install the New Ledger Flashing
The ledger board flashing installation steps are:
- Tack the flashing with galvanized roofing or 6 penny nails to the wall set near the top edge.
Space the nails about 4 feet apart. The nails are just to prevent the flashing from moving during installation. - My house doesn’t have housewrap or felt paper behind the siding. I cut a length of roofing felt and slipped it behind the lap siding so it drapes over the ledger flashing to create a continuous drainage plain. In other words, so that any splashing rain that got behind the siding would dribble down over the flashing. Tack the felt paper in place with roofing nails.
- Smooth the felt paper so the GREAT STUFF foam sealant is flush with the wall sheathing.
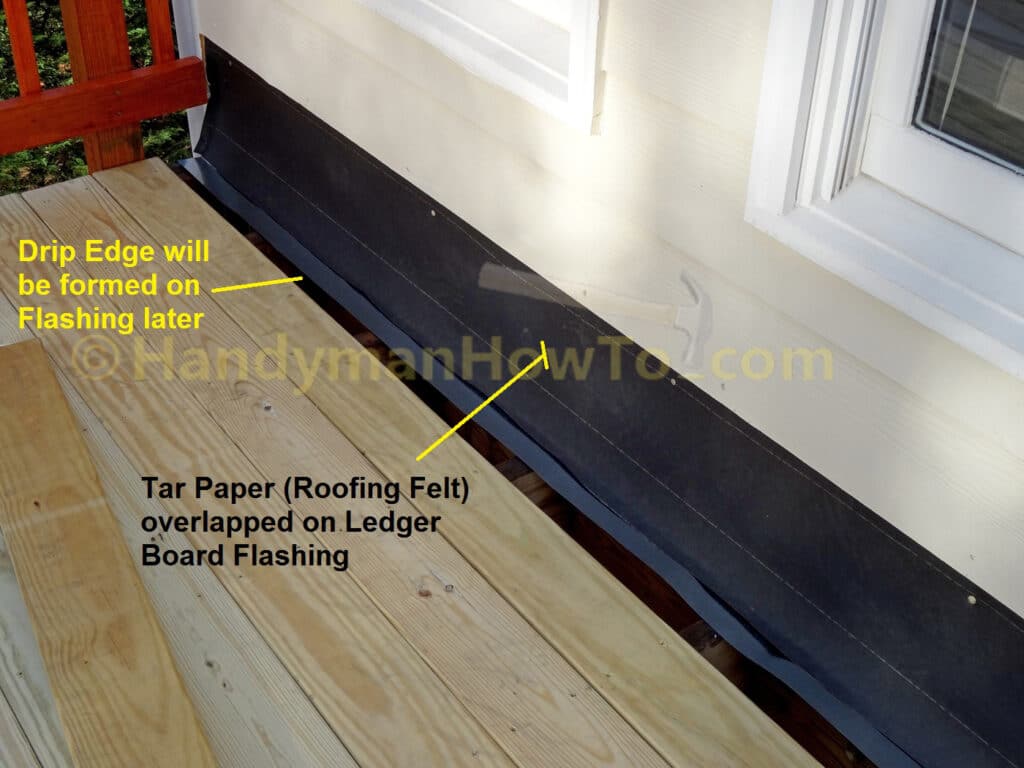
The 10 feet roll of flashing was too short to span the entire distance, therefore two pieces of ledger flashing were needed with a generous overlap. This photo is looking up from under the deck:
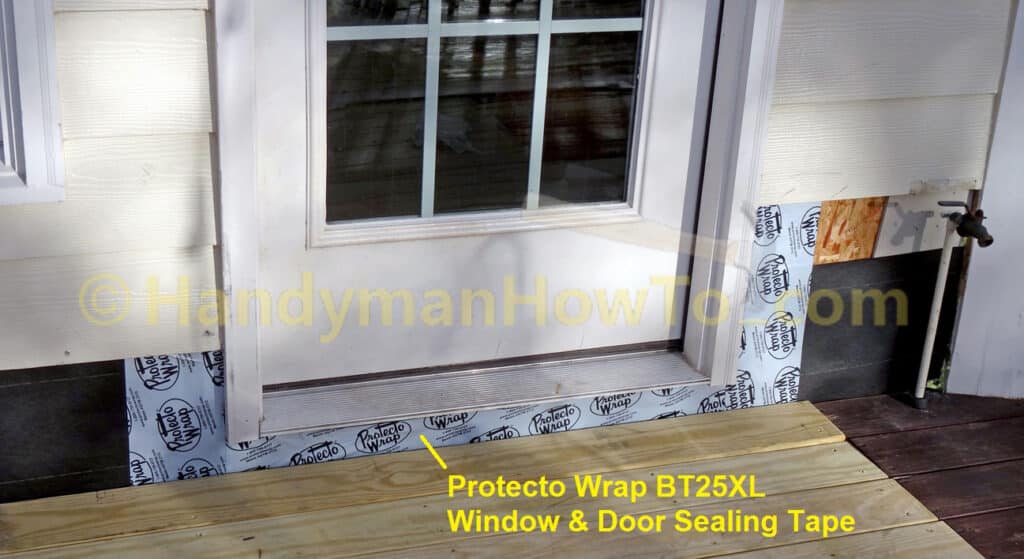
Window and Door Flashing Tape
The exterior door needs special attention. I installed three pieces of Protecto Wrap BT25XL Window and Door Flashing Tape. The Protecto Wrap is installation order is important:
- Stick the horizontal piece along the bottom of the door threshold first. Make sure it extends 6 inches beyond the door frame on both the left and right sides.
- Install the left and right vertical pieces behind the brick moulding and up behind the siding as far as possible.
The vertical pieces overlap the horizontal flashing tape below the door threshold.
Smooth the tape to remove bubbles.
The deck board next to the wall is just sitting there and not fastened with screws. The flashing tape was installed without the deck board in place, but I was wrapping up for the night and almost forgot to take a photo:
The HardiPlank is installed and the drip edge formed with a hand seamer in How to Replace Deck Ledger Flashing – Part 2.
Thanks for reading,
Bob Jackson