How to Finish a Basement Bathroom – build the tile shower pan by installing the shower curb, mortar bed, shower pan liner and cement backer board. This project is continued from How to Finish a Basement Bathroom – Part 2. See the series introduction for the project index.
How to Build a Tile Shower Pan
Oately, Inc. has an excellent overview of shower pan construction here and my installation will be identical. The Oatey shower pan video is the best I’ve seen:
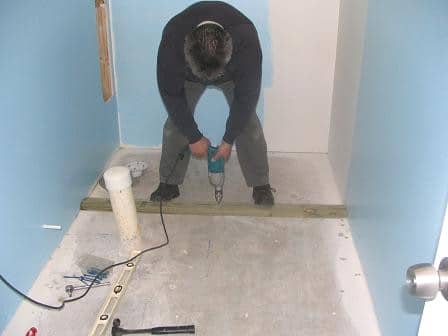
The shower curb for the shower pan is built using pressure treated 2×4’s and Tapcon concrete anchors.
If I were to do this over again, I would use pre-formed shower curb and pan products like the Schluter-KERDI-SHOWER-KIT for faster installation and less work. Ask the people at your local tile specialty store for recommendations because the big box home improvement stores often don’t carry these products.
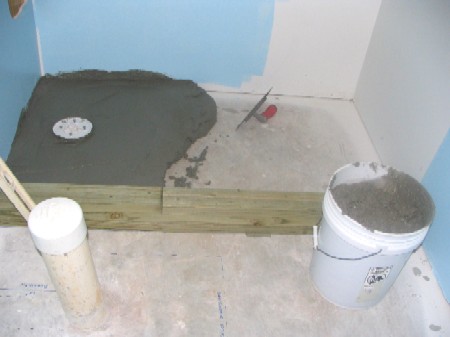
Bags of dry mortar for a tile shower pan bed is mixed in a 5 gallon bucket, then the primary mortar bed is being laid with a trowel and gently sloped for drainage toward the shower drain:
Pre-Pitch Shower Pan Guide Tool
I highly recommend using one of the pre-pitch tools for sloping the shower pan mortar base for a perfect result every time. Also see the Schluter-KERDI-SHOWER-KIT toward the end of this page.
I spoke with several plumbing contractors and most said they skip the pre-slope mortar bed. Rather they install the PVC shower pan liner first and make the mortar bed all at once. Doing so will cause problems with mold and ponding in the permeable mortar because the mortar bed is not waterproof and soaks up water. Something to note if hiring a plumber to build the shower pan.
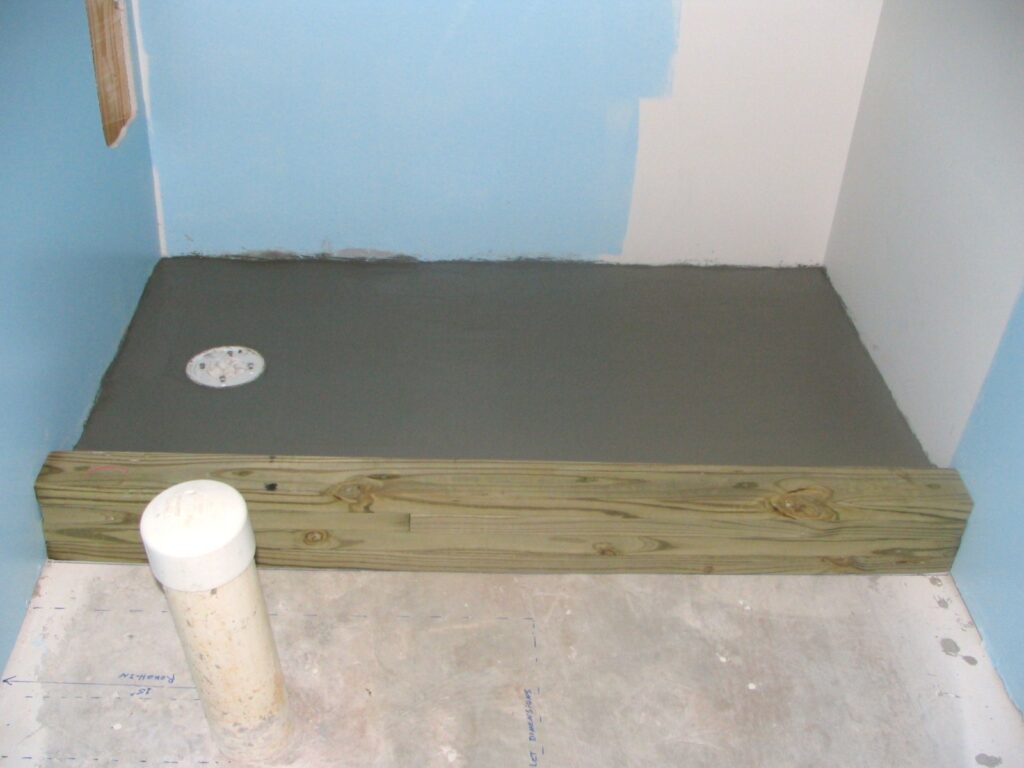
The pre-sloped primary mortar bed is completed in the following photo:
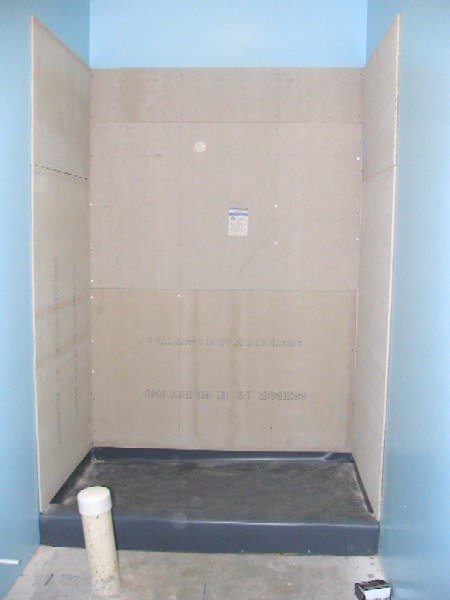
The PVC shower pan liner is installed over the pre-slope mortar bed and about 8 inches up the shower walls (see the following photo). Take care to nail only the top edges of the liner to the walls to keep the shower pan waterproof. I’ve also installed 1/2 inch James Hardie HardiBacker cement board on the shower walls in preparation for laying tile using corrosion resistant screws. A hole will be cut through the PVC liner for the shower drain. For details see the Oatley shower pan liner instructions.
Note: I should’ve installed the cement wall board about 3 inches further down so the bottom edge is about 1/4 inch above the shower pan to cover nearly all of the shower pan liner on the walls (an oversight in retrospect). Doing so would’ve allowed finish layer of mortar to cover the bottom portion of the cement wall board so there’s a continuous solid base for the tile. My job turned out OK because the finish layer of mortar over the pan liner narrowed the gap at the bottom of the cement board and I applied mortar against the walls over the liner. The 6″ x 6″ wall tile was large enough span that bottom gap while mostly supported by the cement wall board.
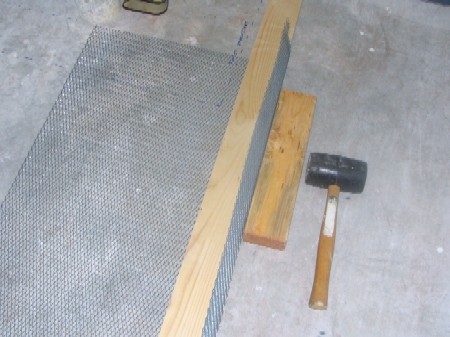
Metal lath is laid over the PVC liner and tacked to the outside of the curb only so the mortar has something to grip. To make the 90 degree bends for the shower curb, I used a 2×4 and block to make a brake (a “brake” in this sense is device for bending metal). This worked very well with crisp perfect bends.
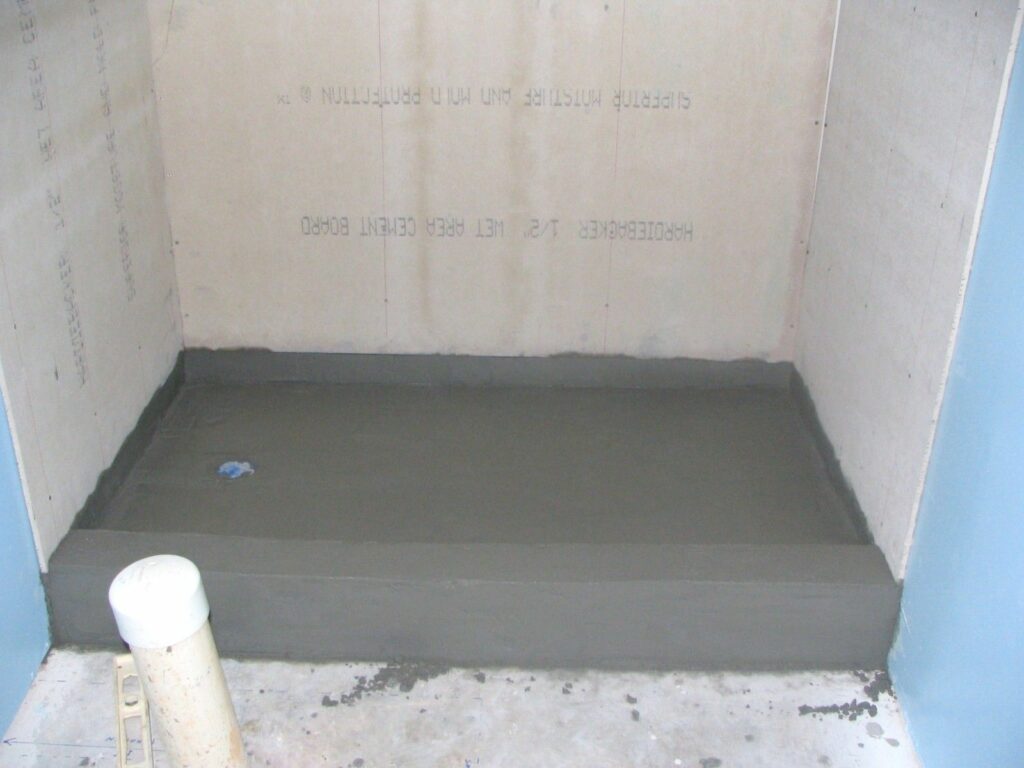
Another 1-1/2 to 2 inches of bedding mortar were troweled onto the shower pan floor with about 3/4 inch thick layer of mortar over the shower curb. The shower pan strainer is covered with blue masking tape to keep out dirt. The final result is in the photo below. Click on the image for a larger view.
Schluter-KERDI-SHOWER-KIT
I’ve since found a much better and faster way to build a tiled shower base. If I were to build a tiled shower in the future, I’d try the Schluter-KERDI-SHOWER-KIT which features:
- prefabricated, sloped shower tray
- prefabricated shower curb
- thin and lightweight Schluter-KERDI waterproofing membrane that installs beneath the tile and over the shower tray.
This eliminates the possibility of water soaking into the mortar bed as used with traditional shower bases as I’m building here. - prefabricated waterproofing membrane corner pieces
- prefabricated fittings with rubber grommets for the shower head and valve.
- easy to install and big time saver
The porcelain tile shower plans and materials list are figured in How to Finish a Basement Bathroom – Part 4.
Thanks for reading.
Bob Jackson
Copyright © 2019 HandymanHowTo.com Reproduction strictly prohibited.
How many 2 x 4’s did you use for the shower lip?
The shower curb was built up with a total of four (4) pressure treated 2x4s. I chose this height for two reasons: It was a little more than the height of a floor tile for appearances and the shower drain is about 1″ inch or so above the cement subfloor.
Your shower curb could be as low as a single 2×4, it just depends on the drain level and appearances. Some showers are built without curbs.
I recently saw a demo of the Beno J. Gunlach Company “No. 455 Quick Curb(tm)” – a stay in place 4″ high shower curb form that you fill with mortar. Looks really nice and a labor saver!
Hi Bob- I appreciate the attention to detail that you took in describing and photographing the work you’ve done. It has been a valuable resource for me. I did have a question regarding your comment about skipping the pre-slope mortar bed next time you finish a shower pan. It seems to me that if you skipped this step, then condensation that filters through to the pan liner/membrane wouldn’t be encouraged to flow downhill towards the shower drain weepholes. I’m working on my first tile shower now and would love to skip the pre-slope mortar bed step, but I want to make sure that everything will still be water proof and drain well. Is there something I’m missing? Or perhaps you could explain more about why this step could be skipped. Thanks again!
I really wonder how much water gets past the tile, grout and mortar bed to make a difference. Not that the shower pan liner isn’t necessary or an excellent safeguard.
When I remodeled this bathroom, the mud bed under the tile was dry and there wasn’t a shower pan liner running up the walls.
What I would do differently is use a pre-slope system and shower curb form. Visit your local tile supply store to see demos of various vendor systems.
Do take care that your shower pan liner lays perfectly flat and snug against the pre-slope bed, corners and walls – trim, glue and use pre-formed corner tabs as needed.
Thanks for the help….one question…does the mortar bed rest up against the cement board? Or, would you say that the cement board sits on top of the mortar bed?
I mudded the pre-slope mortar bed first as shown in the projects photos. The purpose of the pre-slope is to establish the drainage grade.
The PVC shower pan liner is installed over the pre-slope mortar bed and run about 8 inches up the drywall for waterproofing. The cement board goes on the drywall, over the PVC liner (no nails here!) and down to the pre-slope bed.
The finish mortar bed is next and goes to the wall. Due to the slope of the mortar bed, you will have a small gap in sections between the level bottom of the cement board and the sloping mortar bed. I troweled mortar into these gaps to have a solid vertical surface for setting tile.
Post back if I haven’t fully answered your question.
Great demo. Learned alot. Working on my basement shower and I’m caught between the ease of an acrylic shower pan and the thrift of a concrete shower pan. What materials are you using for your mortar bed?
Thanks
I used Quikrete Floor Mud for the basement bathroom shower pan. Other pre-mix brands are available.
> I’m caught between the ease of an acrylic shower pan and the thrift of a concrete shower pan
It really depends on what you want, the style of shower and purpose. If I were installing a shower pan for a rental property, then I’d probably go with a pre-manufactured acrylic or fiberglass pan for economy and ease of installation. For my own home, I wanted a nicer looking tiled shower pan and installed the mortar bed from scratch. If I were starting the basement bathroom project today then I’d go with the Schluter-KERDI-SHOWER kit system. I’m getting the itch to remodel my master bath and studying the Schluter-KERDI-SHOWER system for a no-curb shower with aquarium style glass.
I built a bathroom in the basement, I did not use the liner in the shower pan, I used Portland cement with sand for the pitch and then tiled, over a concrete floor. What kind of trouble can I expect and should I tear it apart and redo or is there a way of preventing any future problem??
My former home in Florida was built on a concrete slab. When I remodeled the master bathroom I discovered the tile shower pan was built without a liner. The home builder also didn’t use cement backer board on the walls and the bottom of the drywall next to the pan was damp and crumbling but only along a 10 inch long section near the back corner. I too didn’t bother tearing out the mortar bed and install a liner.
The proper recommendation is to chisel out the mortar bed and do it over. It’s a necessity if the shower pan were built over a wood subfloor to prevent rot.
I think you’ll be OK leaving it as-is since it’s over a concrete slab if you regularly seal the walls and floor grout with a quality grout sealer like Aqua Mix. Grout sealer isn’t a waterproofing agent and the product label states “Allows moisture vapor transmission” although water should mostly bead up instead of soaking into the grout lines and mortar bed. Pay extra attention to the area around the shower drain and fill all cracks and gaps with grout. When the water stops beading, let the shower dry completely (at least 24 hours) and reseal.
Thanks so much for your time, I feel more confident on my job. I did use hardy backer board on the sides and durock on the back wall because on the size of the board [the hardy backer I was able to use one board on each side 4x8x1/2].
Did you install the Durock (cement board) over your drywall? If so, how did you attach it, have you seen any issues? Did you put a barrier in between the drywall and the durock?
I used Hardibacker cement board, which is a competitor to Durock. After locating and marking the 2×4 wall studs, the cement board was installed over the drywall with corrosion resistant screws set into the studs. The chalk lines marking the stud locations and screws are more apparent in this photo.
Corrosion resistant cement board screws are usually found near the cement board in the home improvement store. Backer-on or Durock screws are good.
I’m making plans to redo a basement workshop bathroom. It’s on slab recessed 3 1/2 inches into the basement floor. It’s about 8 1/2 x 6. Waterproofed CMU half walls are on two sides, with stud wall faced with T&G pine above. The third wall is CMU to about 6′ and exposed copper plumbing makes a shower and a spigot below. There is also a toilet. The last wall is a stud wall sheathed in T&G with the door. It was built as a outdoor, yard work extra bathroom and dog wash area. There is not enclosure for the shower area and it slopes to a drain in the concrete floor. It get occasional use and is well ventilated so works fine just how it is. However the area outside is getting converted to a guest room and I’d like to update the bathroom a bit. Nearest the plumbing, I’d like to build a 2 to 3′ wall that would be tiled, with a glass panel above to separate the toilet from the shower. The CMU would get covered in tile up to the wood. Another 2×4 wall, tiled would be built to form the far end of the shower. A low curb would be built across the step-in opening.
So, a bunch of questions. Any ideas on making a low curb to frame in the whole shower and be the base for the two walls and the curbing over the opening? While the new walls would be cement board to back the tile, what would I use on the existing CMU walls? Mesh? Cement board? Nothing? And lastly, is there any reason I can’t tile directly over the existing slab on the already sloping floor?
Please keep in mind this is a DIY for occasional home use.
> While the new walls would be cement board to
> back the tile, what would I use on the existing CMU walls?
I would fasten cement board (HardieBacker) to the concrete block walls with glue and screws. See the video: https://youtu.be/4vRzT-52C_s
> And lastly, is there any reason I can’t tile directly
> over the existing slab on the already sloping floor?
A waterproof crack isolation membrane is needed between the slab floor and shower tile, otherwise water will soak into the slab and more importantly cracks in the slab will fracture the tile. There are many crack isolation membrane products on the market, for example:
* Laticrete HYDRO BAN® Sheet Membrane
* HydraFlex™ Waterproofing Crack Isolation Membrane
Visit your local tile supply warehouse (where the pro’s buy their tools & materials) and ask what they recommend. They often have cutaway installation displays and can provide hands-on advice.
You really shouldn’t use pressure treated lumber inside the home nor under tile. It has a high probability of shrinking and deforming due to the treatment process and the moisture introduced when it acclimates to a house the moisture wants to evaporate and can lead to warping. Leading to tile, grout cracking or moving.
That is a risk but I’ve had no problems. The pressure treated 2x4s were some I had on hand felt dry, but new lumber can be soaking wet. As I said in the project: