I replaced a 10 year old noisy chain drive garage door opener with a Chamberlain® Whisper Drive garage door opener featuring MyQ™ Technology with Battery Backup and am pleased to write this product review. The Chamberlain® Whisper Drive with was true to the company claims “Quiet, Fast, Smooth”.

Why Choose a Belt Drive Garage Door Opener?
I’ve had several homes with chain drive garage door openers – all were noisy and sent grinding vibrations through the wood framing that was heard all through the house. At a former home in Florida, I replaced a chain drive opener with a Genie screw drive model and it was a nice improvement. The issue with the chain- and screw drive door openers is the T-rail or screw drive must be well lubricated and problems can arise in cold weather when the grease thickens, causing the motor force sensor to think something is blocking the door and the door stays open.
Belt drive garage door openers have a reputation for being the quiet and I settled on the Chamberlain® 3/4 HP Whisper Drive unit for the following reasons:
- Quiet – a bedroom is over the garage and I wanted as little noise as possible.
- Lifetime motor warranty
-
Lifetime belt warranty
The box states “15 years”, however the Installation Guide warranty page says “10 years” and the Chamberlain web site specifies “Lifetime” warranty. I e-mailed Chamberlain customer support who replied the next day and confirmed the belt has a Lifetime warranty.
- Battery backup – to operate the door in case of a power outage
- Security+ anti-burglary rolling code security technology.
- Motion-Detecting Smart Control Panel – a modern wall switch with an illuminated blue LCD that displays the time, temperature and command menus for programming remotes and an automatic “time to close” feature. The motion sensor turns on the opener lights when you pass by or the door safety sensor beam is broken; my wife really likes this feature. Saves hunting around for the light switch and turns off automatically after a few minutes.
- Time-to-Close – programmable timer to close the door after 1, 5 or 10 minutes. Never worry about leaving the door open all day or night again! This can be overridden by pressing the “Hold” menu button the Smart Control Panel if you’re outside and want to keep the door open.
- 3/4 horsepower – My old unit was 1/2 HP. I didn’t spending a little more for a stronger motor that would less stressed.
- Wireless outdoor keypad – great for opening the door when working in the yard.
- Accepts 100 watt light bulbs – either compact florescent or incandescent for 200 watts total. I like a lot of light in the garage.
- MyQ™ Garage Door Monitor – table top unit that displays the garage door open/closed status, chimes when the door opens or closes and remotely closes the door with the push of a button. Note: LiftMaster® is a Chamberlain company.
Chamberlain® Battery Backup with MyQ Technology Garage Door Opener Packages
The Chamberlain 3/4 HP belt drive garage door opener with battery backup is sold with different MyQ™ accessories in the three different packages:
- Model #: 349544 with the table top MyQ Garage Door Monitor.
- Model #: HD920EV with MyQ Remote Light Switch.
- Model #: WD962KEV with myQ Remote Lamp Control.
All MyQ enabled Chamberlain Whisper Drive door openers include the:
- Smart Control Panel®
- Wireless Keypad
- Two remote controls with visor clips for the cars
- Door safety sensors
Additional MyQ accessories can be purchased separately to expand your system.
How Quiet is the Chamberlain Whisper Drive?
This next video is a demonstration of the 10 year old 1/2 HP chain drive garage door opener that will be replaced with the Chamberlain Whisper Drive. Couple of pointers:
- The door itself makes a lot of noise. A good cleaning and oiling of the hinges and tracks is needed.
- The door stops hard and shakes back and forth at the top of its travel. You’ll see this at the 19 second mark in the video.
- The grinding motor hum and vibrations transmitted through the house framing isn’t very apparent in the audio.
- A slight shimmering in the video is due to the camera auto-focus getting confused by the door movement.
Chamberlain Whisper Drive Demonstration
The operation of the new Chamberlain belt drive model 349544 garage door opener is demonstrated in the next video. Notice the following:
- The door tracks and hinges have been thoroughly cleaned and lubricated, greatly reducing the door noise.
- The Chamberlain belt drive motor makes a higher pitched whirring noise compared to the low grinding noise of the belt drive. The vibration transmitted through the wood framing to the bedroom over the garage is greatly reduced, but not totally gone. The “Whisper Drive” name shouldn’t be taken literally, however it’s a big improvement and the door isn’t heard throughout the house.
- The door stops gently at the top of its travel and doesn’t shake!
Chamberlain Belt Drive Installation Highlights
The Chamberlain installation guide for the 3/4 HP belt drive models with battery backup and MyQ technology is well written with numerous illustrations and available here. Best to read the entire manual and familiarize yourself with all the parts before installing the garage door opener. I’ll show highlights of what I thought were the more interesting parts of the installation.
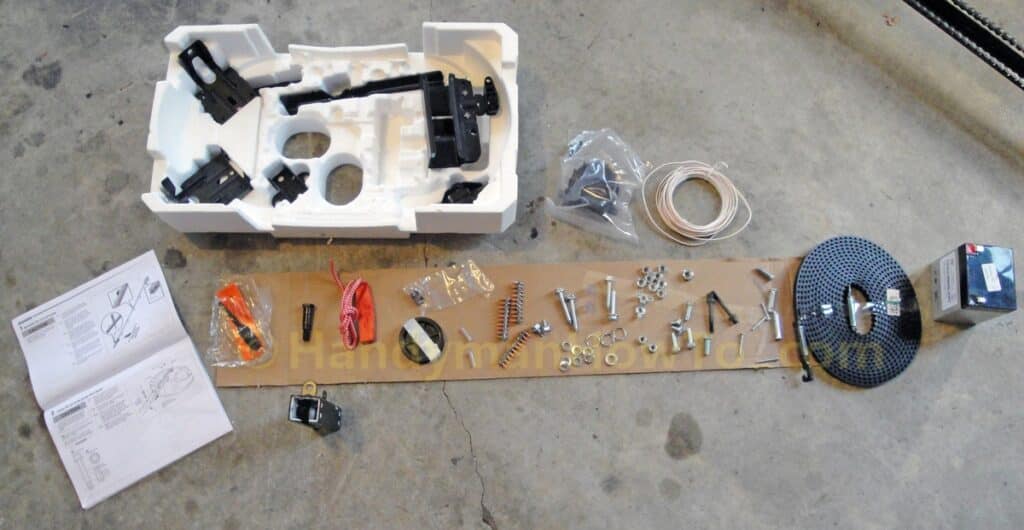
The kit contents as I unpacked the box:
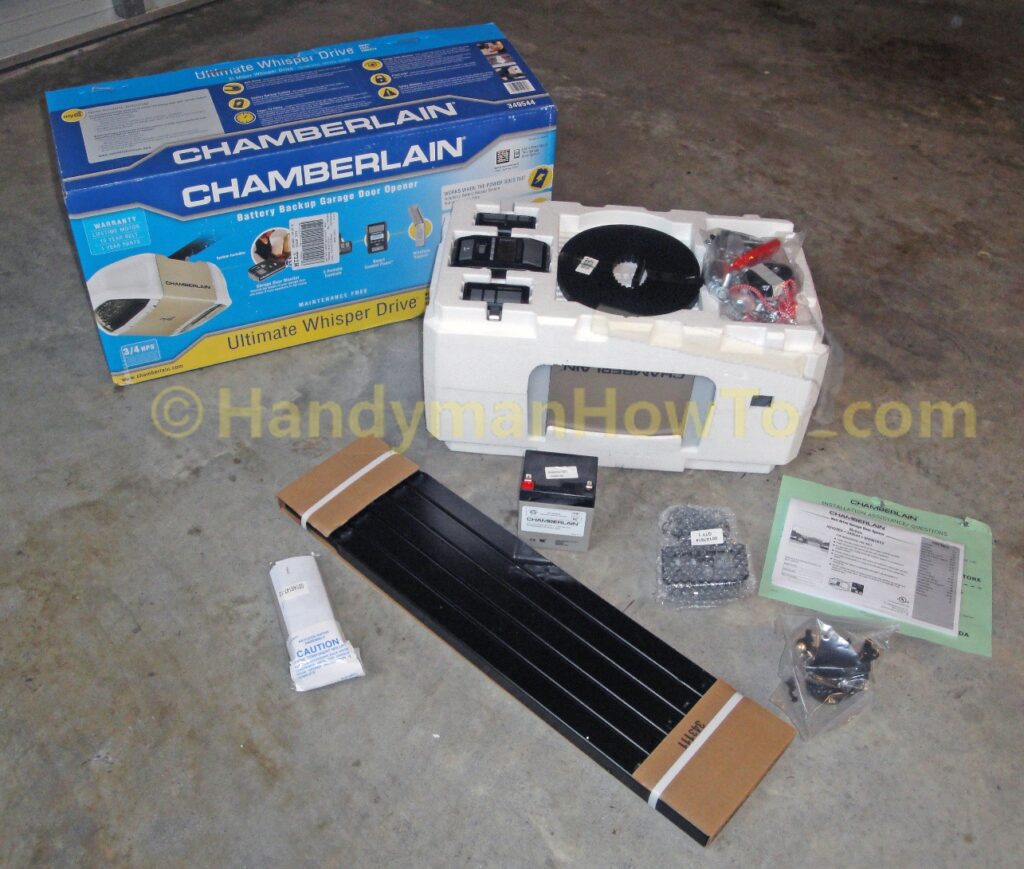
Give yourself plenty of room to arrange everything on the floor to identify the parts and installation hardware. I used a tape measure to ensure I had the correct length bolt or pin as called for at different steps in the instructions.
Remove the Old Garage Door Opener
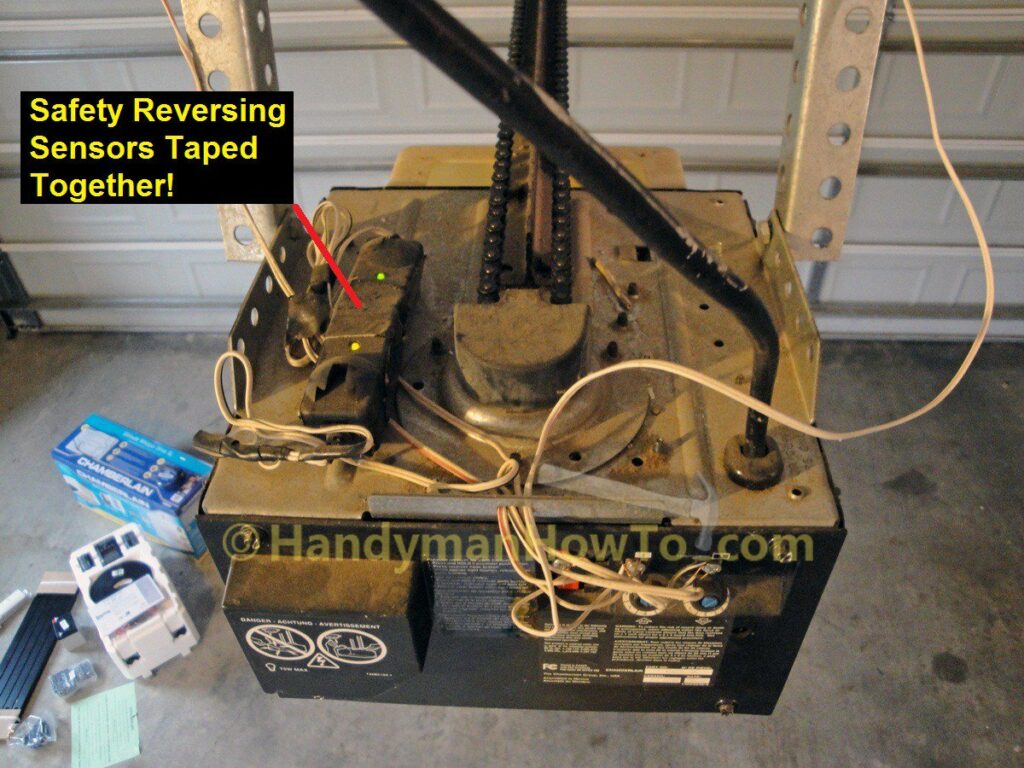
The old garage door opener was apparently installed by my old friend, the original homeowner, who as I found time and time again, usually botched or goobered the job. This was no different – the safety reversing sensors are taped together to override their purpose!
The old garage door opener is removed by:
- Unplug the power cord.
- Disconnect all the bell wires.
- Remove the two bolts from the ceiling mounting bracket.
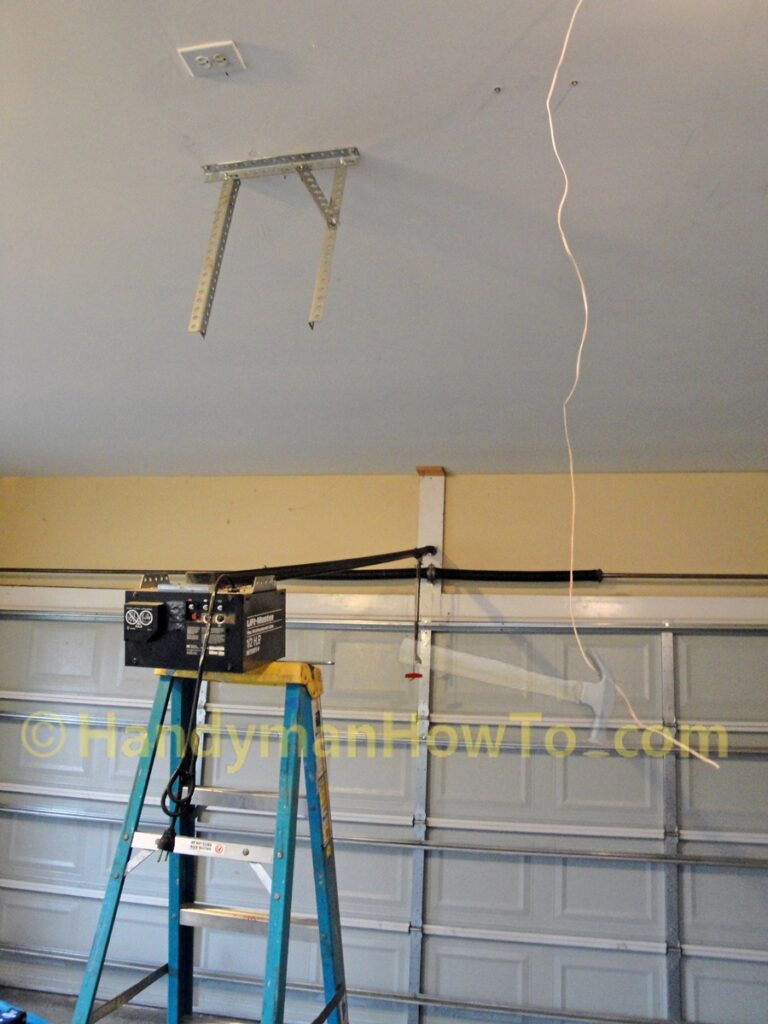
- Support the motor head on top of a step ladder.
I couldn’t just set the motor head on the floor because the T-rail would hit the cross strut on the garage door. - Disconnect the lift arm from the garage door bracket by removing the clevis pin and retaining ring.
- Disconnect the T-rail from the wall bracket by removing that clevis pin and retaining ring.
The old motor still worked OK, so I donated it to Goodwill.
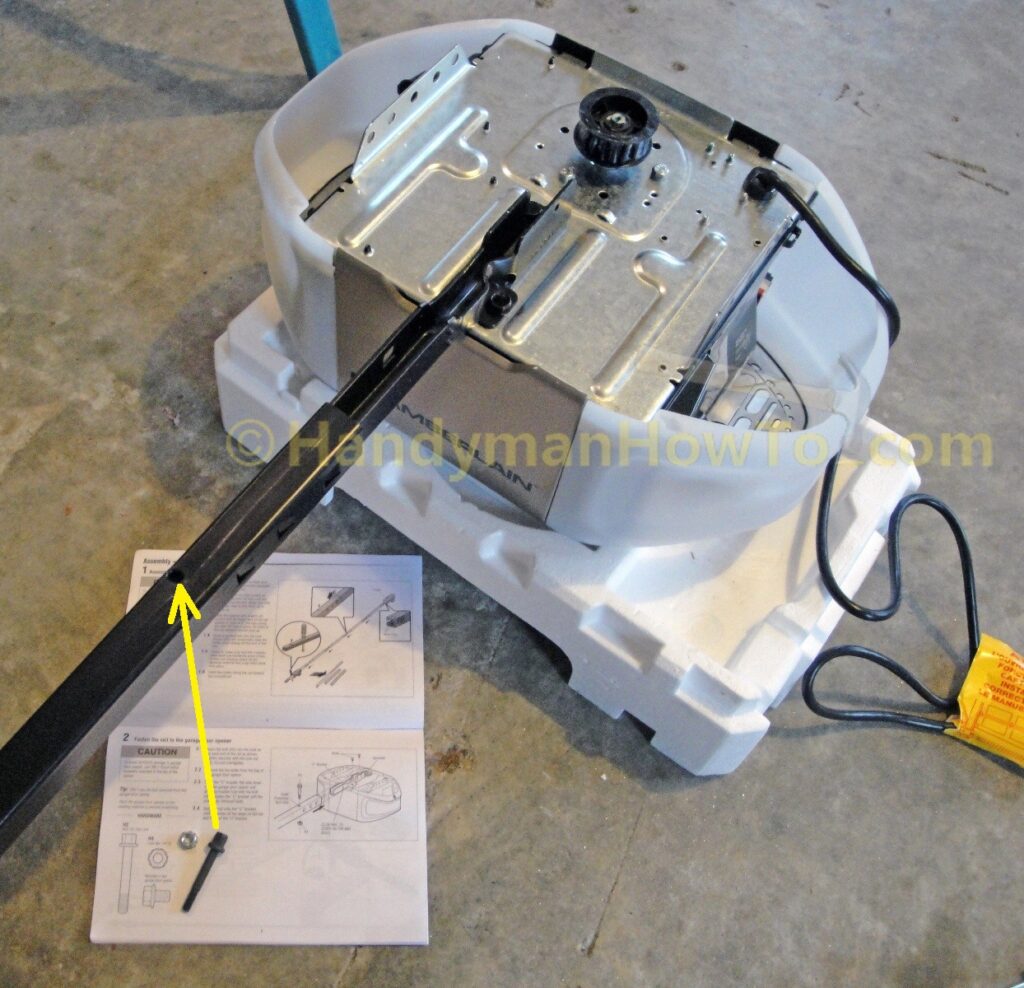
The rail sections snapped together without any problems. The inner & outer trolley is slipped onto the rail (not shown), then the rail is slipped onto the U-bracket on the motor head. Tip: The U-bracket bolts are already installed on the motor head; remove these to attach the U-bracket. The long bolt in the photo has a square head and installed in the hole indicated by the yellow arrow.
Drive Belt Installation
After assembling the rail and trolley, I propped the rail on the garage door strut which was more or less even with the motor head. The drive belt is threaded through the rail and the belt pulley fastened with a bolt. A screw driver is inserted in a hole through the rail to prevent the trolley from moving as the drive belt is attached and tensioned. Note that I have released the outer trolley and moved it to the right out of view.
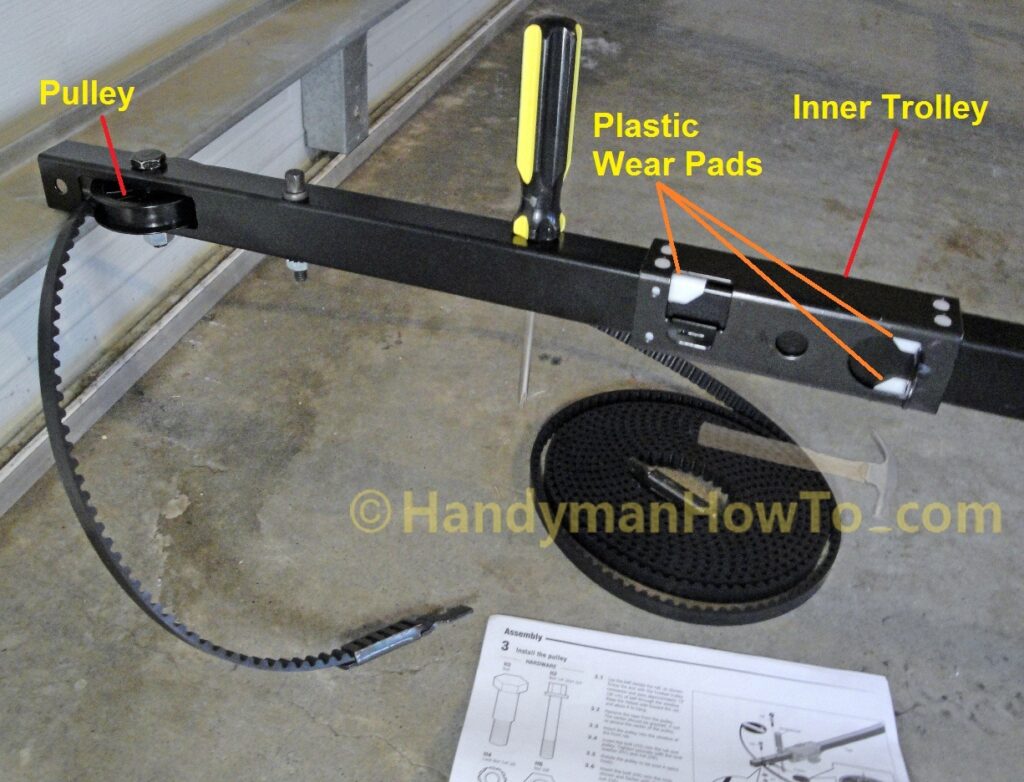
A nice feature of the Chamberlain belt drive garage door opener are the slick white plastic wear pads inside the trolley – meaning you never have to lubricate the rail. No oil or grease means there’s nothing to collect dust/dirt and interfere with the trolley movement.
Tighten the Drive Belt
The next steps are:
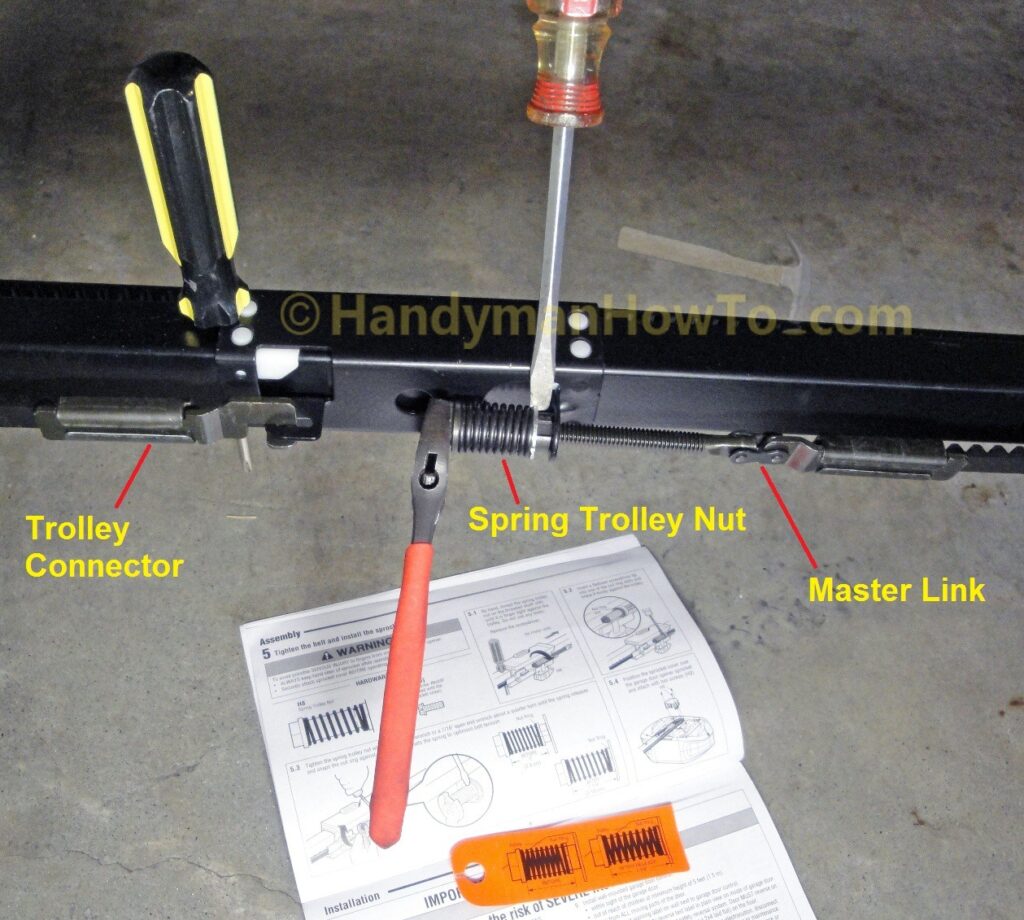
- The trolley connector is hooked to the trolley.
Note that I’ve disengaged the outer trolley and moved it off to the right out of view in the next image. - The drive belt is run along the rail and looped around the motor sprocket, then back to the trolley.
- The threaded rod is attached to the belt connector with a snap-on master link.
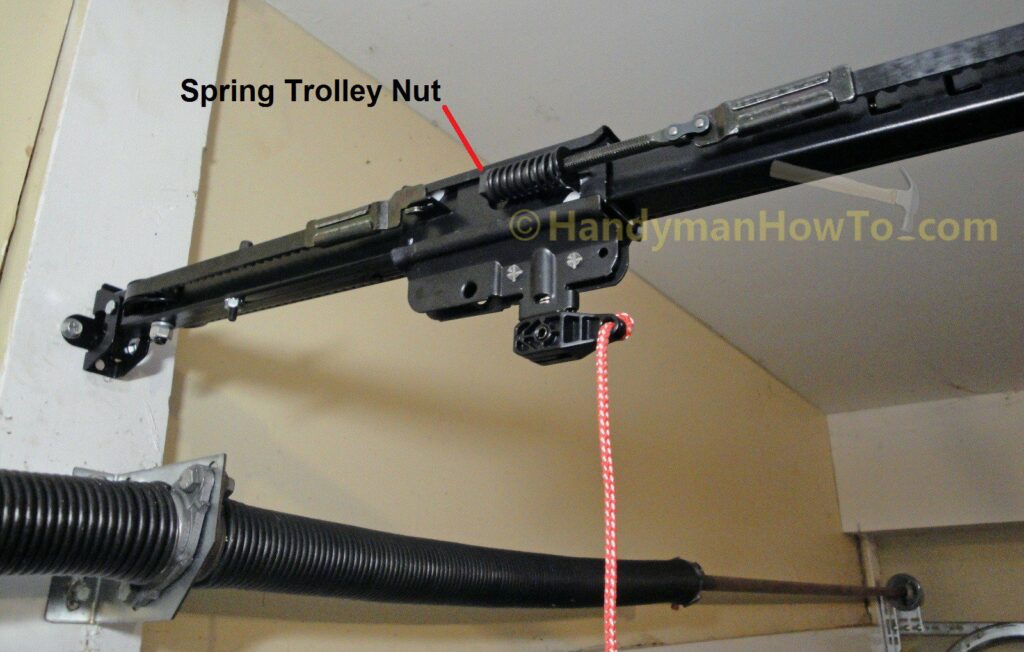
- The spring trolley nut is threaded onto the rod by hand until it is finger tight.
Please refer to the factory installation manual for details.
The only “trick” is to release the spring and snap the nut against the trolley to set the proper belt tension. This is done by holding the nut ring in place with a flat head screw driver and tightening the trolley spring nut about 1/4 turn with a wrench. The spring will release and force the nut ring to the right against the trolley, setting the proper the drive belt tension.
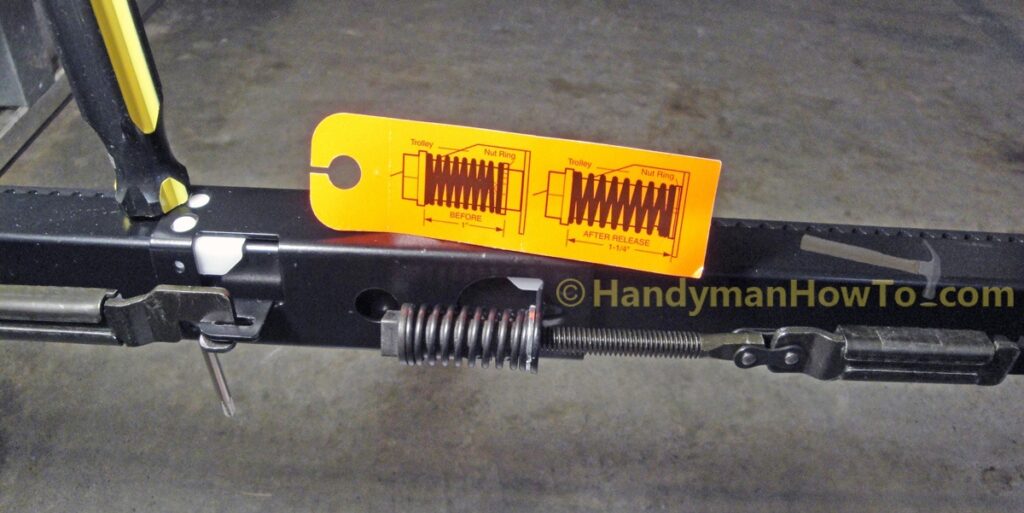
Closeup of the trolley spring nut after the spring is released. Chamberlain provides an orange tag illustrating the before and after configurations:
Garage Door Header Bracket
I could have reused the old wall bracket to anchor the rail, but it was a bit off center and higher than necessary, so I removed it and filled in the screw holes with caulk. I centered the Chamberlain bracket a few inches lower on the 2×6 head board while maintain a minimum of 2″ clearance (my actual clearance is about 4″) above the maximum height of the door as it’s raised, drilled 3/16″ pilot holes for the lag screws and fastened the new header bracket to the wall.
Hanging the Garage Door Opener
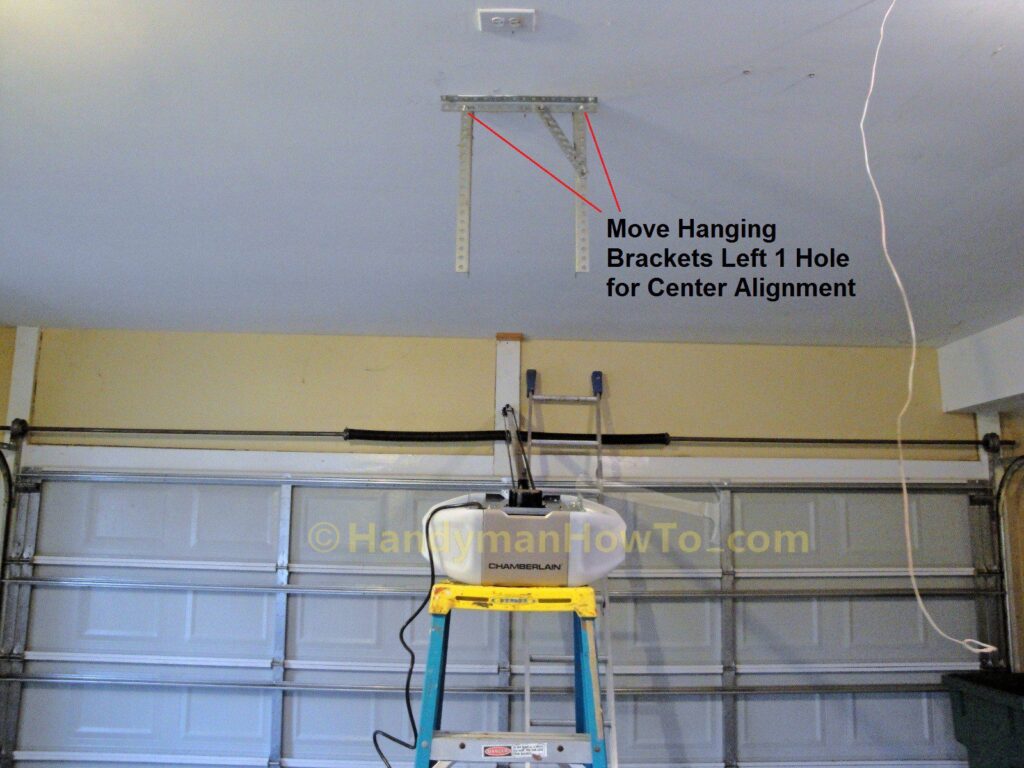
My helper held the motor head while I attached the rail to the header bracket with the included clevis pin. Then I sat the motor head on top of the step ladder. I climbed the step ladder and held the motor head against the ceiling bracket to check center alignment and clearances as the door is manually raised. The ceiling hanging bracket was the correct length, however the motor was about 1″ off center to the right. I moved the bracket arms one hole to the left to center the motor head with the door.
The hanging bracket is now centered and the garage door opener attached with included hex bolts. The ceiling bracket only carries the weight of the motor head and rail.
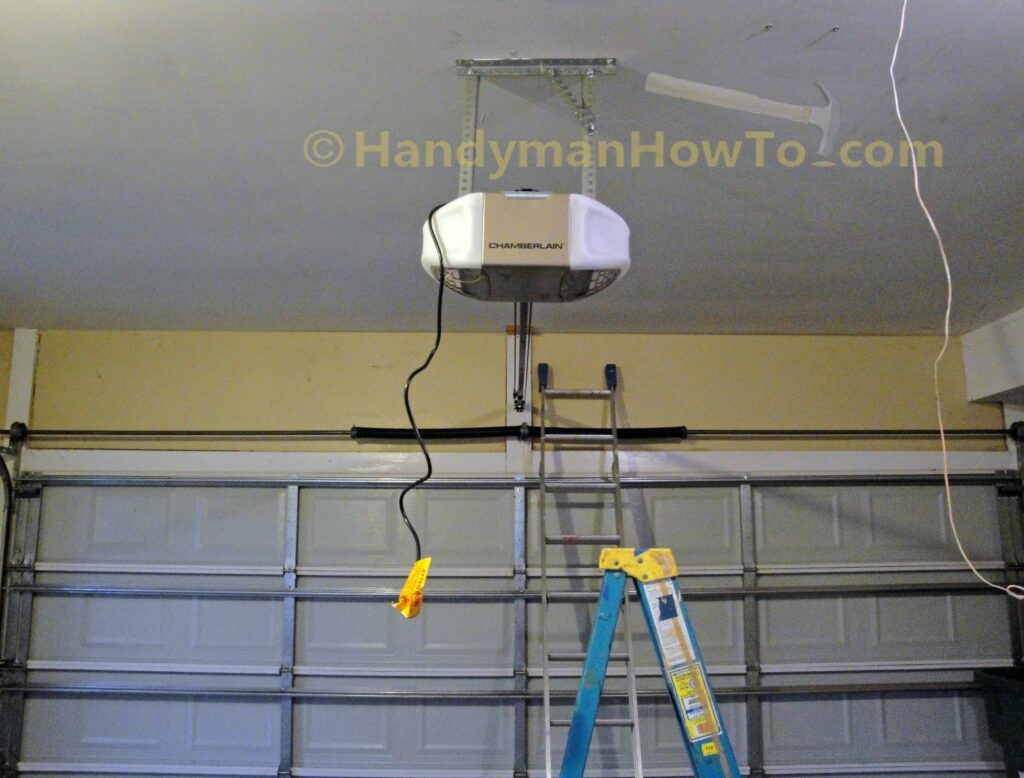
Closeup of the trolley, header bracket and emergency release rope:
Sectional Garage Door Reinforcement Bracket
Section garage doors require a reinforcement bracket distribute the load of the door bracket.
The prior homeowner (a goober) failed to grasp this necessity and botched the job by fastening the old door bracket directly to the door with two hex screws, a pan head sheet metal screw, and of all things – a drywall screw! He apparently never wondered why the door bracket was wider than the door rib.
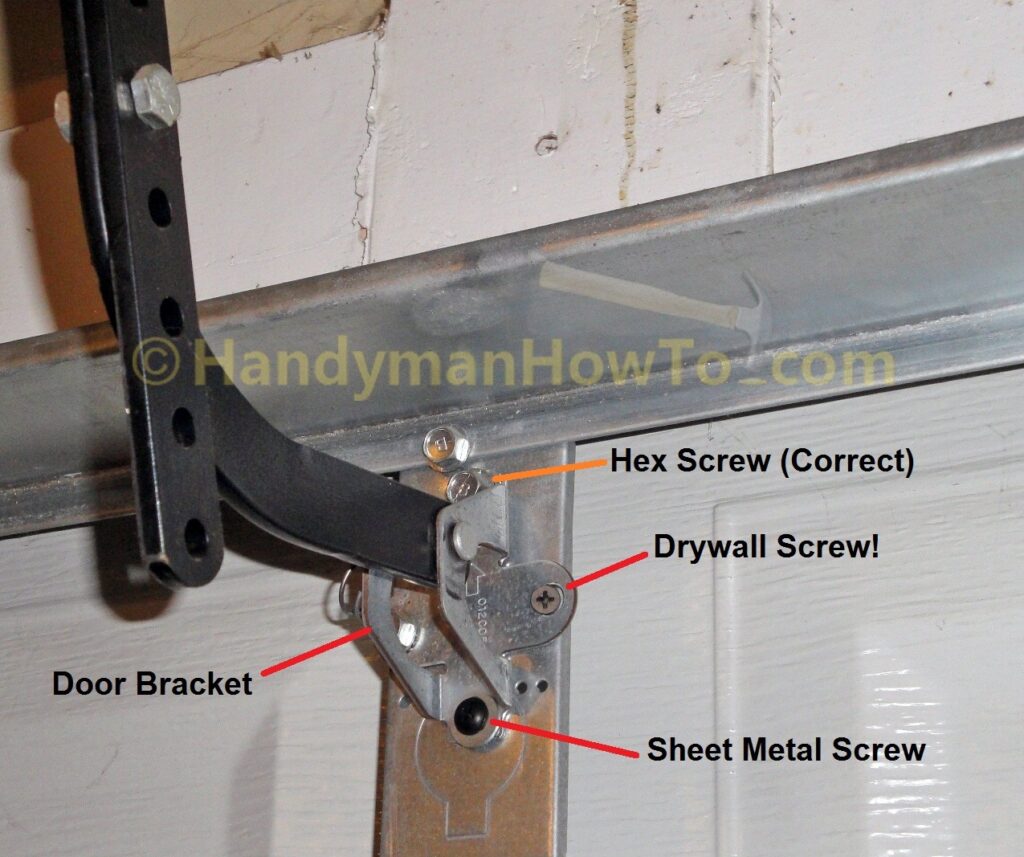
The absence of a door reinforcement bracket caused the door rib to bulge outward somewhat because it was not designed to take the door opener load in a concentrated spot. The top hex screw was carrying most of the stress and raised a 3/16″ nub in the door rib as it tried to pull out.
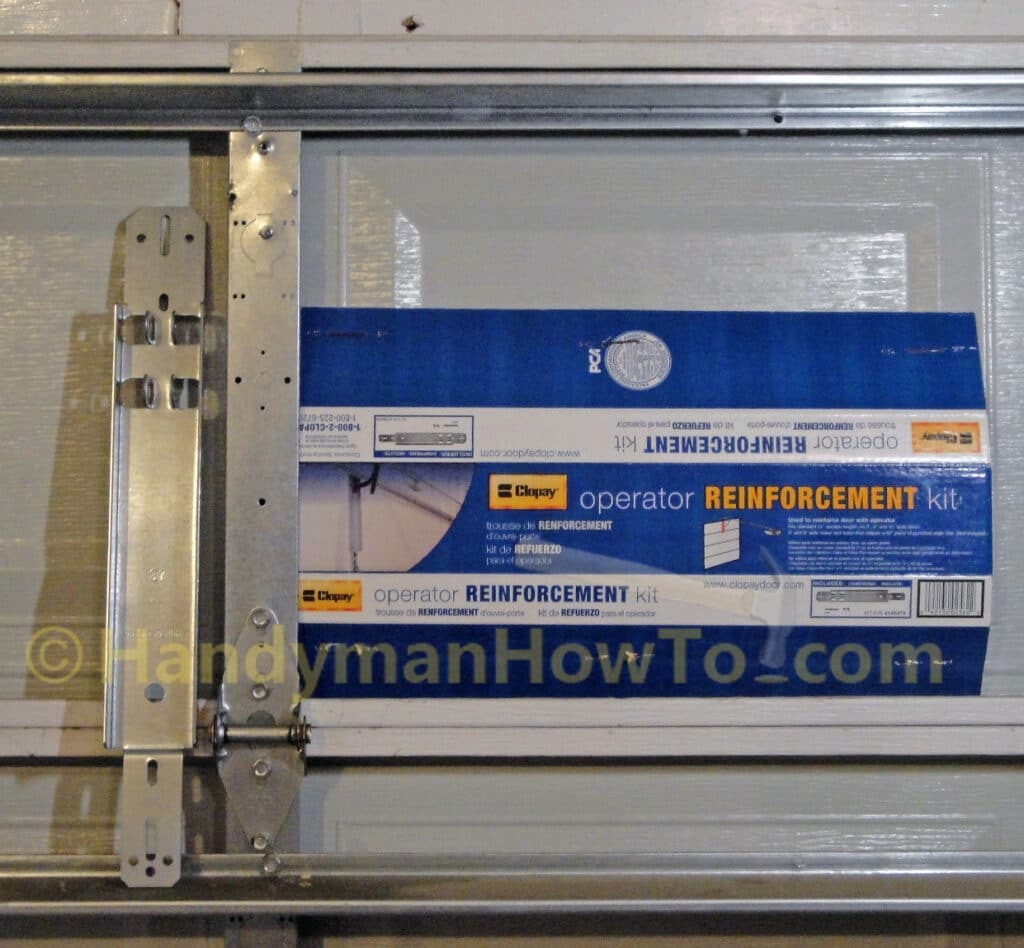
Clopay® Garage Door Opener Reinforcement Bracket
Chamberlain recommends checking with your garage door manufacturer for a door reinforcement kit. I purchased a Clopay® 21 inch Operator Reinforcement Kit (a.k.a. “Opener Reinforcement Bracket”) that fit my sectional garage door perfectly. The top section of my door is 21″ high which matches the length of the 21″ Clopay Reinforcement Bracket.
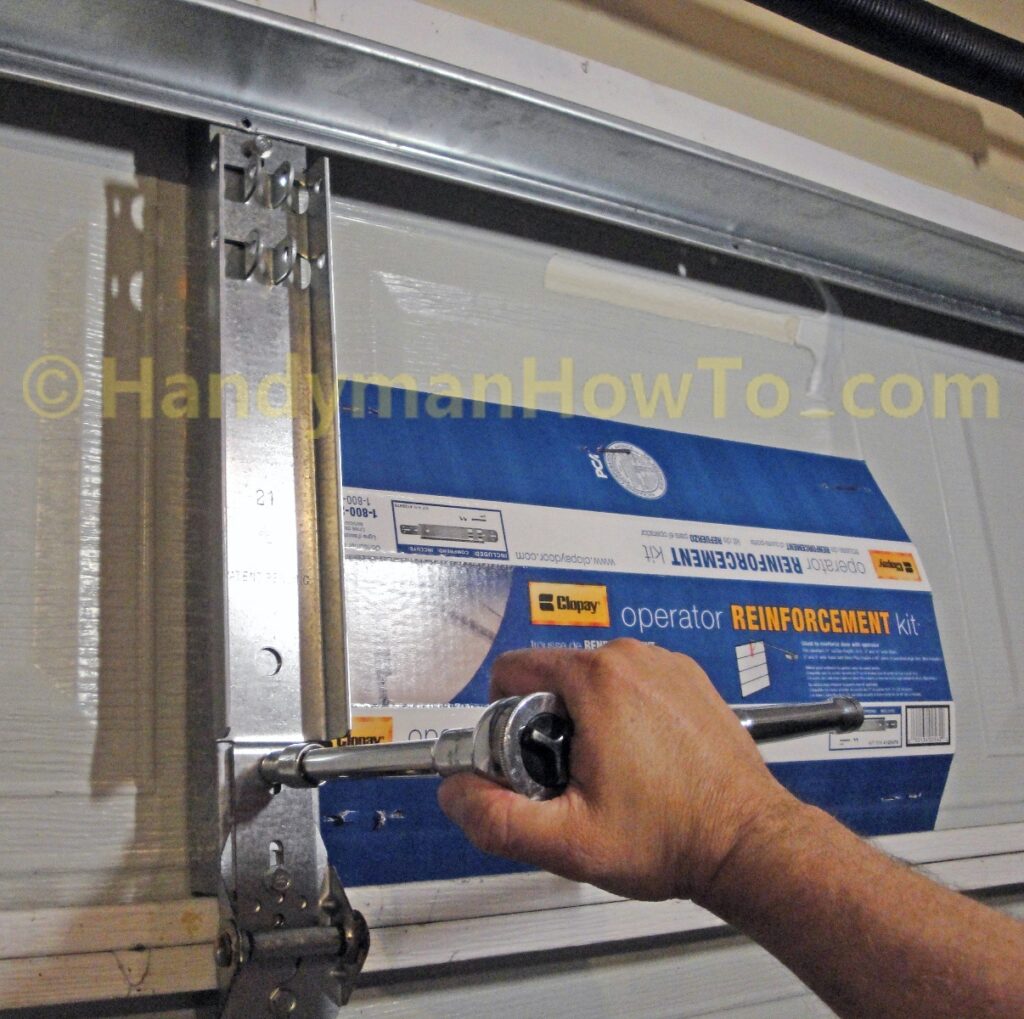
I removed the old garage door bracket and am ready to install the new Clopay 21″ reinforcement bracket. The Clopay bracket is well made, very rigid and provides for direct attachment of the door arm. The Clopay bracket includes a matching clevis and cotter pin.
The Clopay reinforcement bracket slides under the top door strut and fits over the the hinge leaf. I removed the four hex screws from the strut and hinge leaf to fit the bracket on the door:
The Clopay bracket has generous pre-formed holes to remount the hex screws in the existing holes. The exception was the off center hole in the horizontal strut for which I drilled a 3/16″ in pilot hole through the Clopay door bracket to match.
Here’s the installed Clopay bracket. What an improvement!
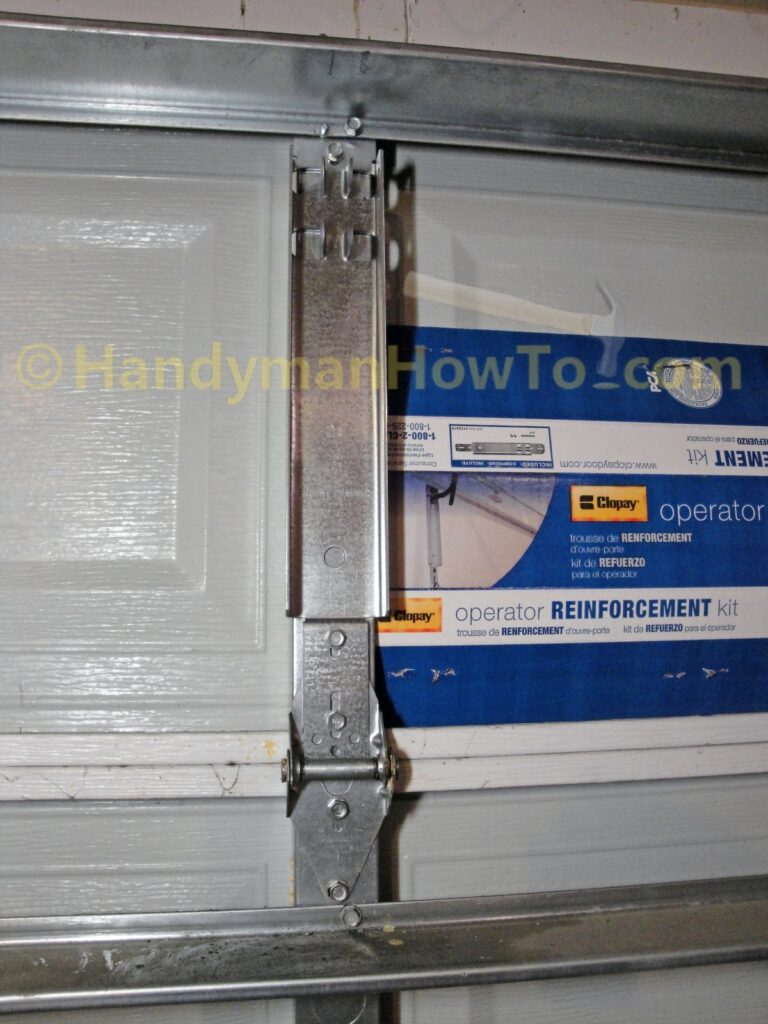
Minor item: I broke the head off the 1/4″ hex screw in the top strut, so I drilled a new 3/16″ pilot hole in the door strut and Clopay bracket to set a new screw.
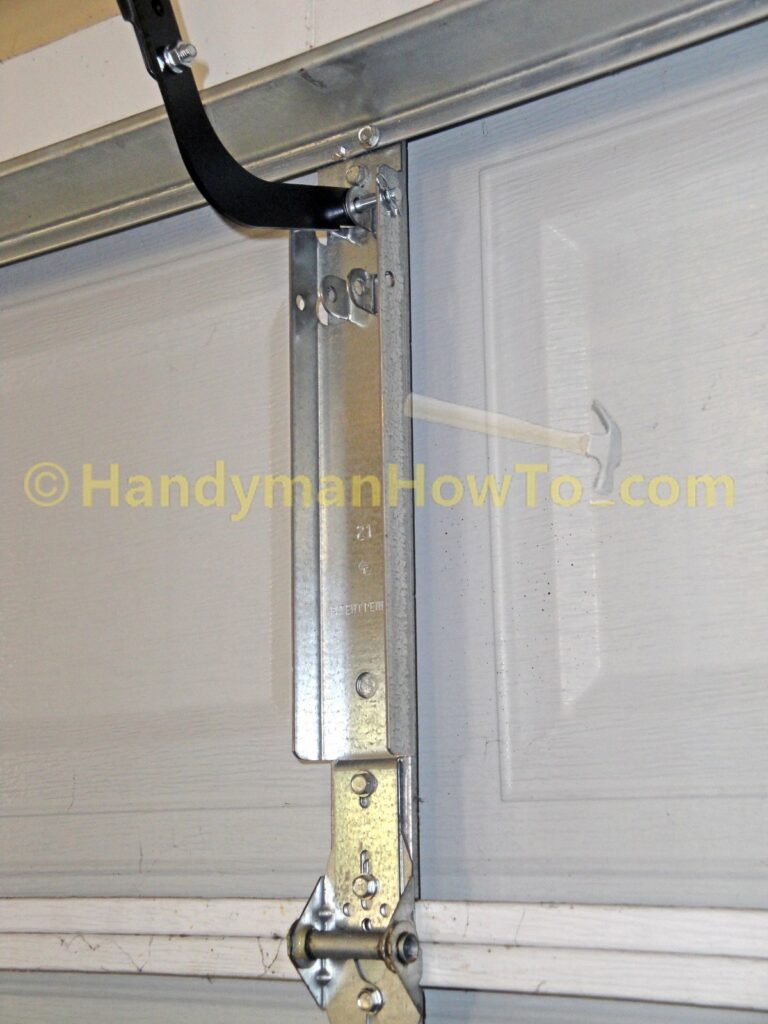
The Chamberlain belt drive door arm is attached to the built-in Clopay door bracket using the provided clevis pin and cotter pin:
The Chamberlain® belt drive garage door opener is fully assembled and I’m ready to wire the door safety sensors, Smart Control Panel and MyQ™ Garage Door Monitor.
Detail of the door arm and trolley assembly:
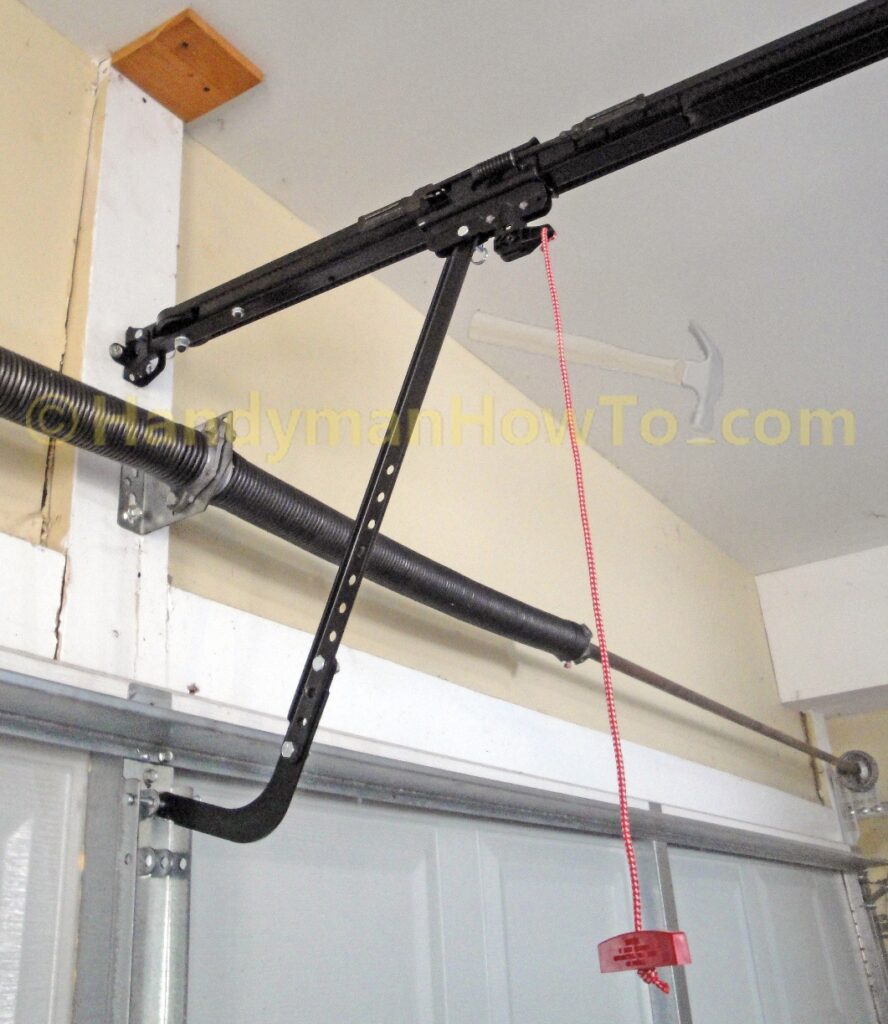
Another closeup of the belt drive attachment to the trolley and the trolley spring nut. If the belt sags noticeably when the door is raised, tighten the trolley spring nut a full turn to tension the belt, operate the door and tighten the nut a bit more if needed.

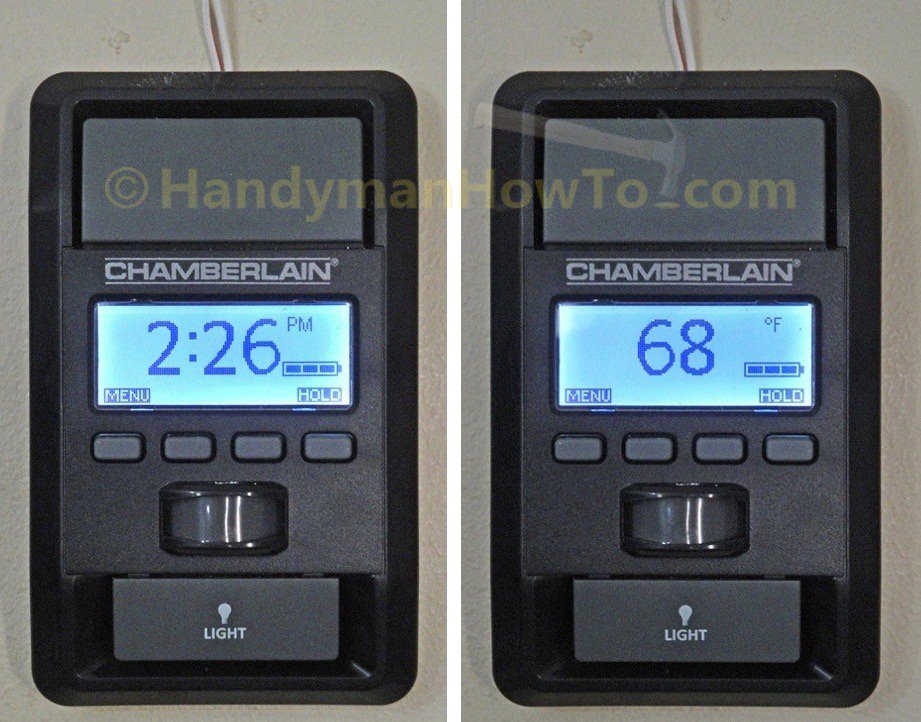
Chamberlain® Smart Control Panel
The Chamberlain Smart Control Panel was the other reason I purchased the MyQ™ technology belt drive garage door opener – because it’s ultra modern and packed with features:
- Easy menu driven operation.
- Illuminated blue LCD display.
- Displays the time and temperature.
-
Motion detector that turns on the opener lights.
My wife really likes this feature – never walk into a dark garage again and no fumbling for the light switch.
The motion detector is excellent and works from the far side of the garage. - Displays the backup battery charge status.
-
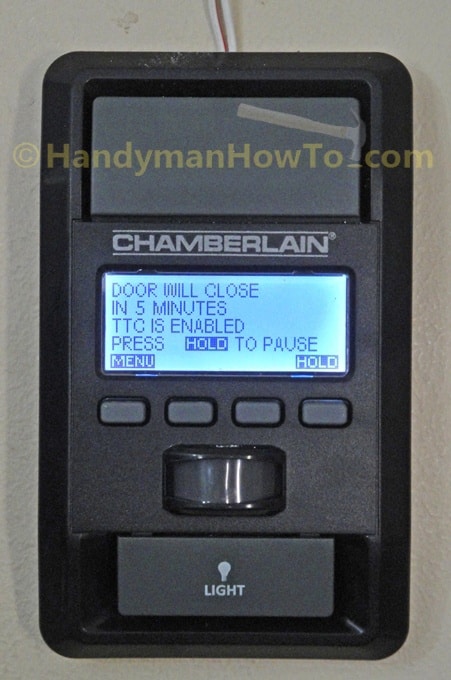
Automatic Time-To-Close – menu programmable for 1, 5 or 10 minutes and customized up to 99 minutes.
No worrying if the garage door was left open all day or night. - Hold feature – to override the Time-To-Close and keep the door open indefinitely until you decide to close the door.
-
Learn a Device (door remote control or MyQ accessory) directly from the menu.
No more climbing a ladder to press the Learn button on the motor head. -
Lock feature to completely disable all garage door remotes.
Helpful if you’re going away on vacation. For instance, if someone broke into your car while parked in the driveway, the door would not open if the visor remote or HomeLink was pressed. -
Turns on the opener lights if the door safety sensor beam is broken.
Nice if the door is left open at night (via the HOLD menu command) and someone walks in the garage. The lights would turn on before a person was close enough to trigger the motion sensor. -
Displays helpful error messages.
For example, I received a “Sensor wiring intermittent connection Error Code 14 See User Manual” when blowing leaves obstructed the door safety reversing sensor beam. The computer couldn’t tell if the bad signal were due to a broken wire or blowing leaves breaking the beam, but it pointed me in the right direction and the problem was obvious. Clearing the away the leaves and cycling the door cleared the error message.
Wiring the Smart Control Panel is simple – just strip and connect the two wires to screws on the panel. The panel draws power from the garage door opener and runs on the backup battery power if the house power is out.
The large button at the top of the control panel operates the door, while the bottom button labeled “Light” simply turns ON and OFF the opener lights.
The Time To Close (TTC) can be set for 1, 5 or 10 minutes to automatically close the door – assuming nothing is blocking the door safety sensors. The TTC can optionally be customized for up to 99 minutes. The TTC is helpful if you forget to press the remote control button to close the door.
Take care that the TTC function is disabled if the garage door opener is operating on backup battery power.
Pressing the HOLD navigation button (forth button to the right) will disable the TTC function. This is helpful if you’re working in the garage or yard and want to keep the door open.
Chamberlain® Smart Control Panel – Programming Remote Controls
Programming Remote Controls and MyQ™ accessories is easy with the Smart Control Panel. Simply navigate the on-screen menus to PROGRAM → REMOTE:
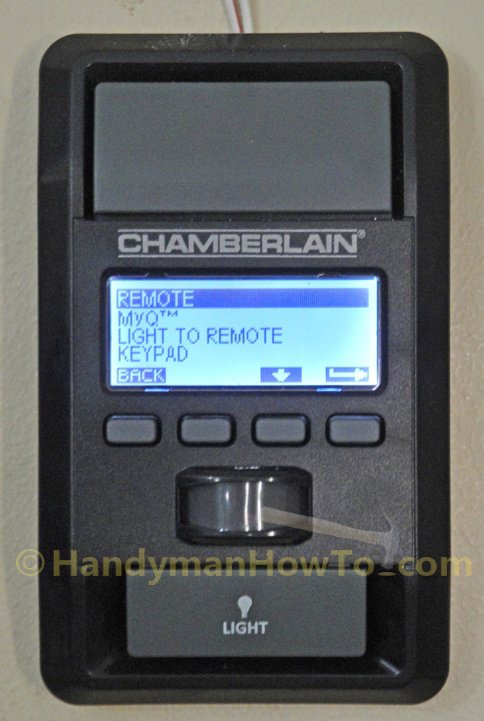
Press the key on the remote control you want to program and then press the [Enter] key on the Smart Control Panel. I’ve already programmed the large remote control button to operate the door. In this example, I’ve navigated to PROGRAM → LIGHT TO REMOTE to program the 3rd remote control button to turn ON/OFF the garage door opener lights. Cool!
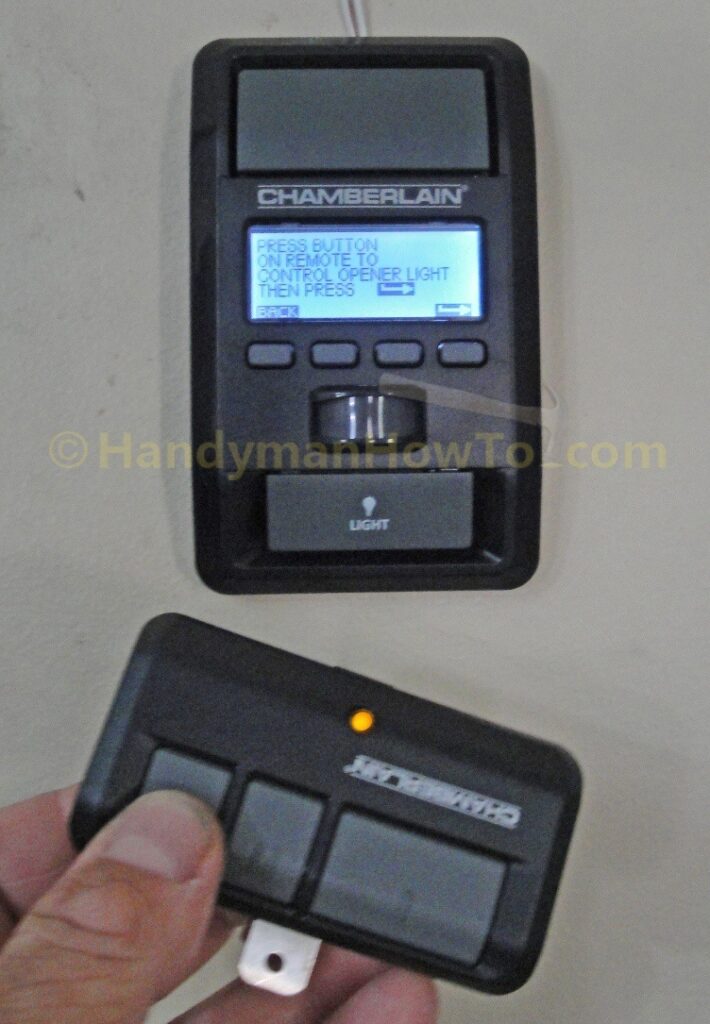
I really liked the Smart Control Panel programming because it sure beats the old way of climbing a ladder to press the “Learn” button on the motor head.
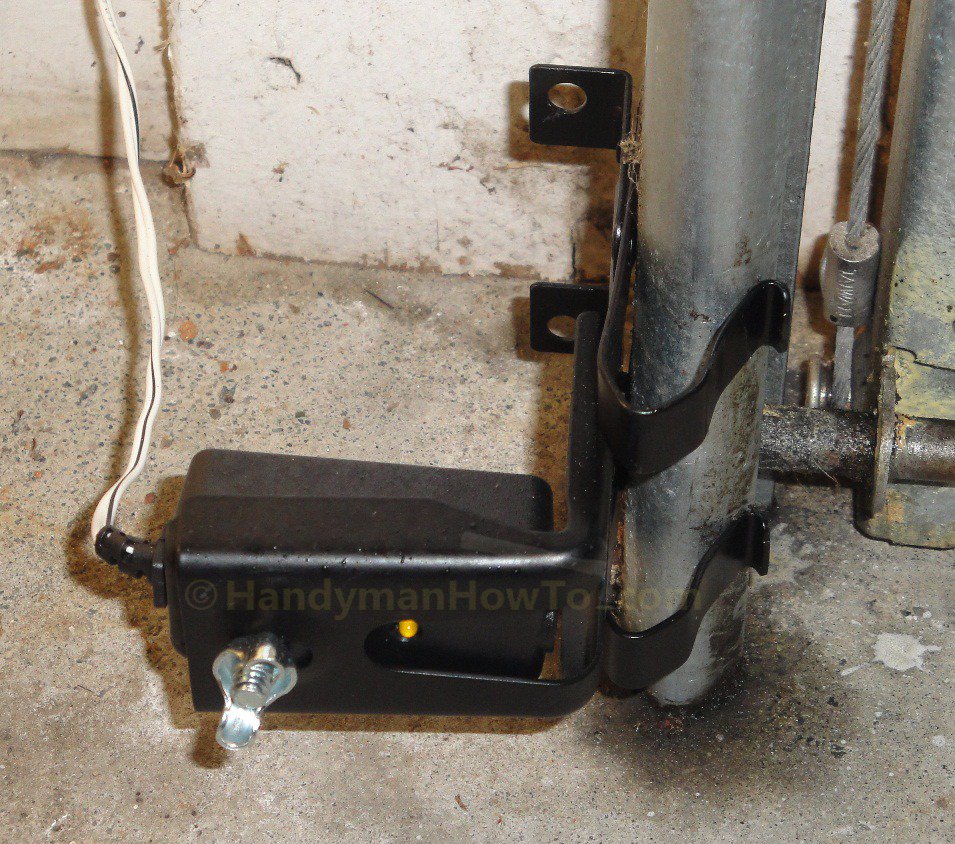
Garage Door Safety Reversing Sensors
The Chamberlain garage door opener kit includes two prewired safety reversing sensors with a 25 or 30 foot spool of wire. The sensor bracket securely snaps onto the garage door track. The sensor body attaches to the door bracket with a carriage bolt and wing nut – no tools required. The sensor at the other side of the door (not shown) has a green LED that illuminates when the invisible light beam received. The green LED turns off if the beam is broken or the sensors are misaligned.
Chamberlain® Garage Door Opener Wiring and Battery Backup
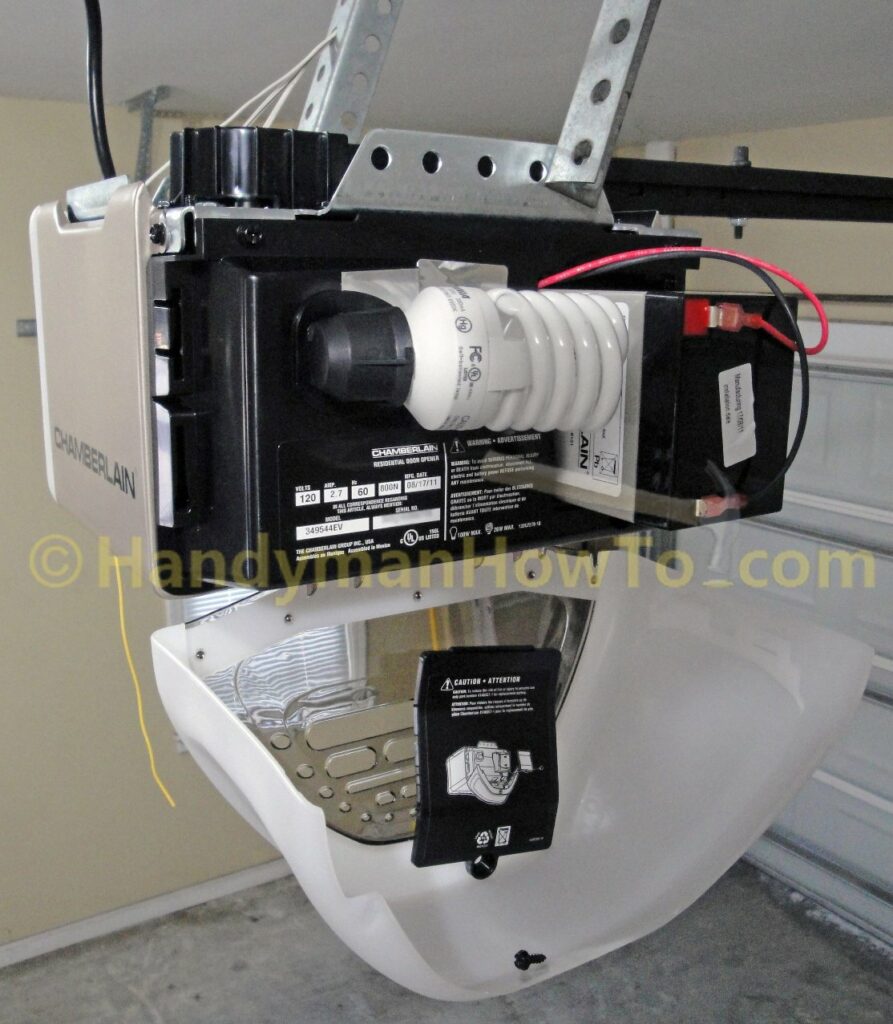
The Chamberlain Whisper Drive garage door opener accepts 100 watt incandescent or compact fluorescent light bulbs. The control and sensor wiring hookups are easy with the convenient spring tabs to hold the wires in place. Two sets of wires serve the door safety sensors, the other two wires are for the Smart Control Panel.
The opener setup controls are user-friendly with instructions printed on the side of the opener. The battery status LED in the next image display green (fully charged), flashing green (charging), orange (power lost, running on battery) and red (replace battery). The triangular buttons adjust the up/down door travel limits with automatic force adjustment. The “Learn” button is the large yellow button which illuminates the small yellow LED indicating the opener is in Learn mode.
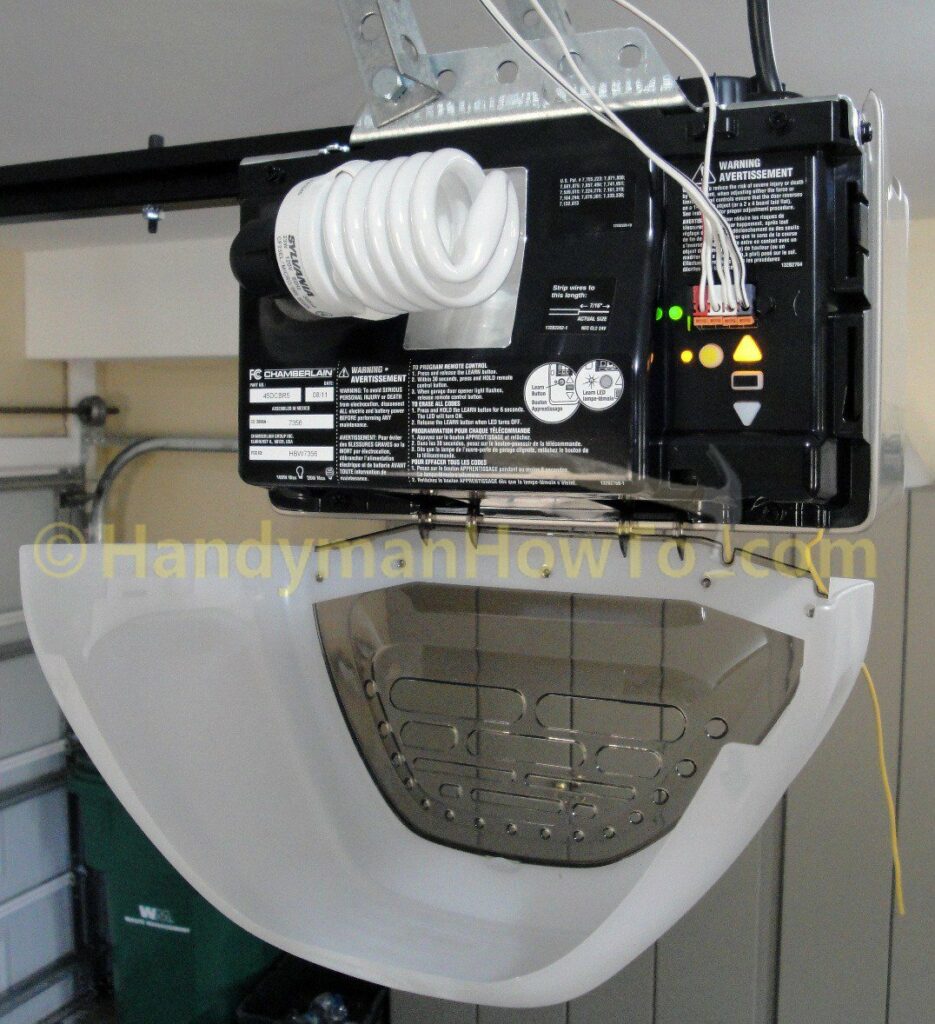
The included sealed battery slides into the side of the motor housing and attaches with two wiring clips. A battery typically lasts 3 years. Battery lifetime is mainly affected by heat, which causes a battery to age faster, so your mileage may vary.
Chamberlain MyQ™ Garage Door Monitor
MyQ™ Technology is a two-way 900 Mhz wireless home automation system developed by Chamberlain to integrate lighting and monitoring controls with your garage door. The Chamberlain Whisper Drive 3/4 HP Belt Drive garage door opener, Model # 349544, is MyQ enabled and includes the table top Garage Door Monitor.
The MyQ™ Garage Door Monitor (Model #AGDMEV) is linked to the garage door opener via the Smart Control Panel menu commands PROGRAM → MyQ™. The door monitor is AC powered and does not have internal battery. I found that it retains the programmed link to the garage door after being unplugged for over an hour, so no need to reprogram after temporary power outages.
The Garage Door Monitor emits a chime when the door opens and closes. Four volumes levels can be selected low, medium high and off – I prefer the low volume setting.
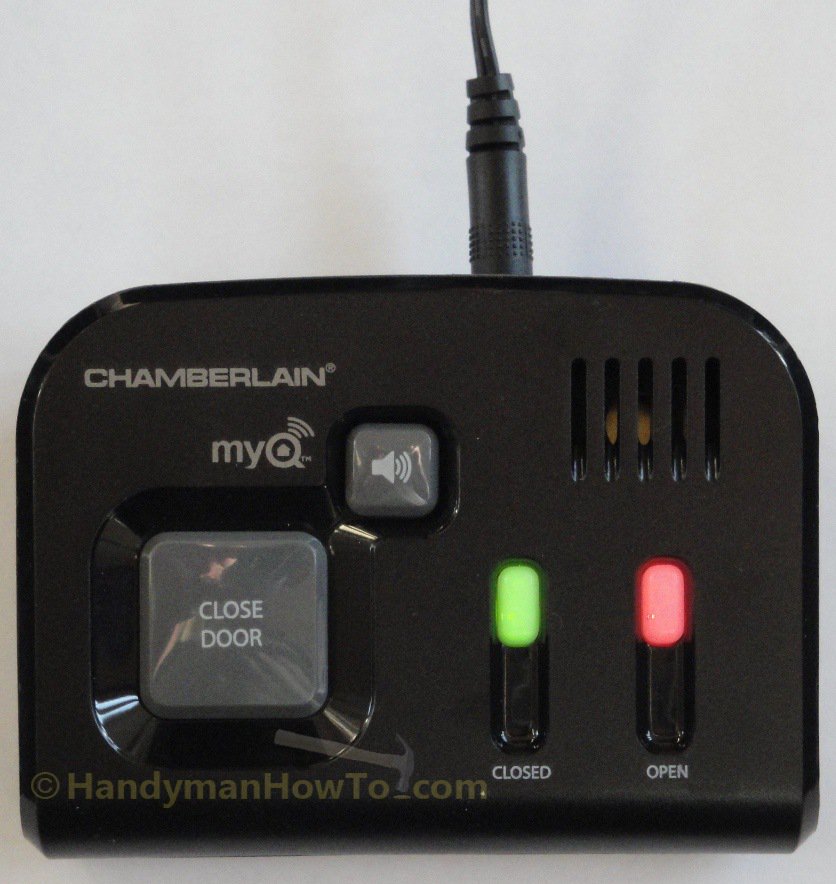
A steady green status LED indicated the door is closed:
The monitor beeps three times when the door is opened and the red LED status illuminates:
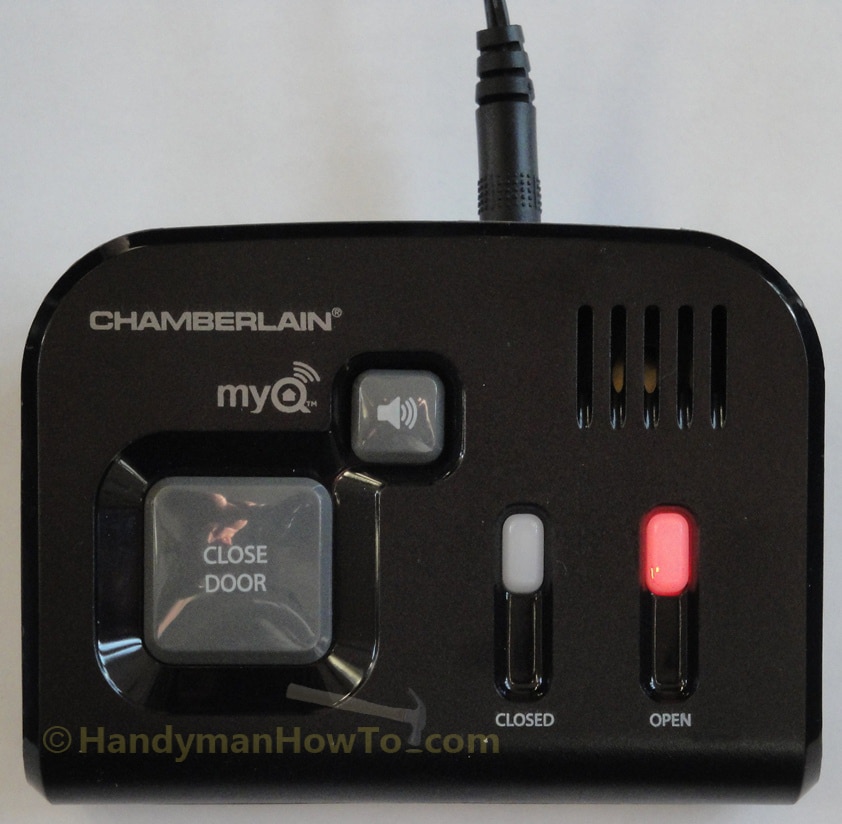
Pressing the “Close Door” button will close the door, assuming nothing is blocking the safety reversing sensors beam. The red and green LEDs will flash and the monitor will emit a long beep when the door is closed.
I like the Garage Door Monitor because:
- It beeps to let me know someone is arriving home.
- I can see at a glance if the door is open or closed, and remotely close the door if needed.
Clean the Garage Door Tracks
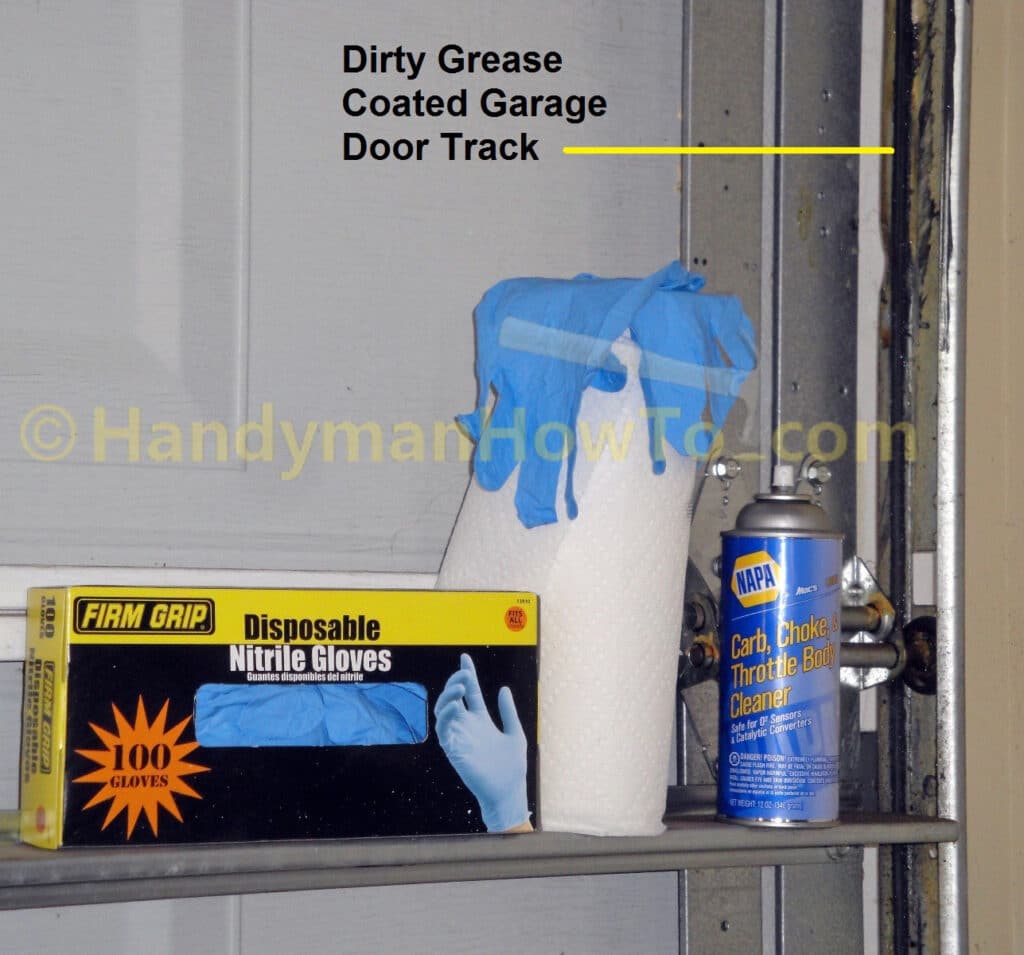
I now have a quiet garage door opener but a squeaky garage door. A well oiled garage door on clean door tracks goes a long way towards reducing noise. The garage door tracks are caked with layers of old grease that has picked up dust/dirt that adds resistance to the door movement.
There’s nothing like carburetor cleaner for cutting through grease. Carburetor cleaner is really hard on your skin, so I donned a pair of nitrile disposal gloves that are resistant to chemicals. To clean the garage door tracks, I sprayed the track with the carburetor cleaner and wiped the grease off with paper towels. I used a whole can of carburetor cleaner, two rolls of towels and four sets of gloves. Take care to open some windows or the door to air out the toxic carburetor cleaner fumes.
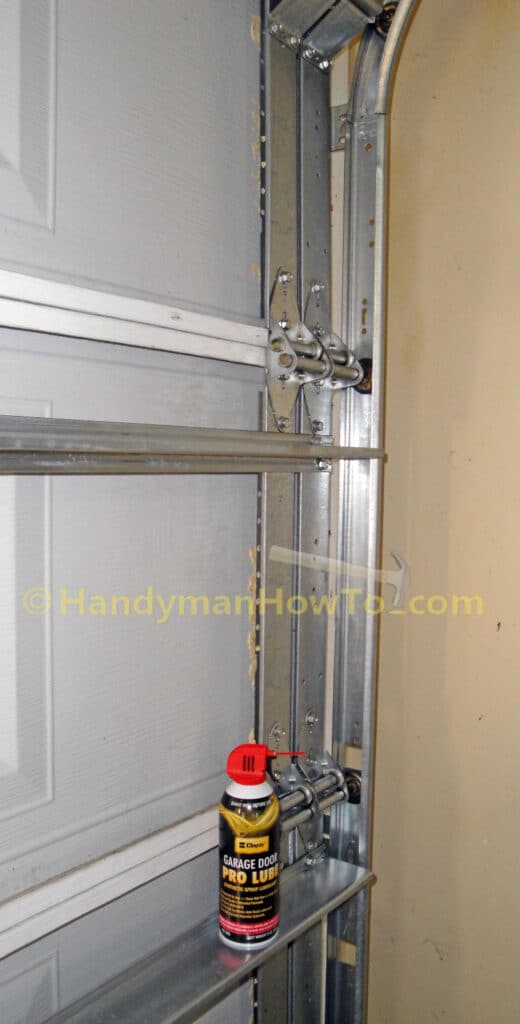
After cleaning the old grease from the door tracks and door hinges, I used garage door spray-on lubricate to oil the tracks and hinges.
The garage door lube dries fast, prevents rust and doesn’t attract dust. This made a huge difference in the door noise.
Squirrel Damages the Safety Sensor Wires
A squirrel was trapped in the garage overnight and chewed through the safety sensor wires. I repaired the sensor wires with telephone butt splice connectors.
Hope this helps,
Bob Jackson